Sony Walkman NW-HD3 Operating Instructions Manual
Portable hard disk audio player
Hide thumbs
Also See for Walkman NW-HD3:
- Operating instructions manual (458 pages) ,
- Service manual (54 pages) ,
- Specifications (2 pages)
Table of Contents
Advertisement
Quick Links
Advertisement
Table of Contents

Related Manuals for Sony Walkman NW-HD3


Summary of Contents for Sony Walkman NW-HD3
- Page 1 To go to the section you want to read, click the title in the PDF Bookmarks, the title in the “Table of Contents” of the Operating Instructions, or the page in the sentences. © 2004 Sony Corporation NW-HD3 Operating Instructions...
-
Page 2: Declaration Of Conformity
The model and serial numbers are located at the rear of the player. Record the serial number in the space provided below. Refer to these numbers whenever you call upon your Sony dealer regarding this product. Model No. NW-HD3 Serial No. ___________________________ WARNING To prevent fi... -
Page 3: Table Of Contents
Table of Contents Notice for Users Precautions On safety On installation On heat build-up On the headphones On cleaning Getting Started Checking the Supplied Accessories Guide to Parts and Controls About the serial number Preparing a Power Source Charging the battery using a USB connection Checking the remaining power of the battery... -
Page 4: Notice For Users
• In no event will SONY be liable for any fi nancial damage, or loss of profi ts, including claims made by third parties, arising out of the use of the software supplied with this player. -
Page 5: Precautions
• The recorded music is limited to private use only. Use of the music beyond this limit requires permission of the copyright holders. • Sony is not responsible for incomplete recording/downloading or damaged data due to problems of the player or computer. -
Page 6: Getting Started
AC power adaptor cease to function in its intended manner during the warranty period, the adaptor should be returned to your nearest Sony Service Center or Sony Authorized Repair Center for replacement, or if a problem occurs after the warranty period has expired, the adaptor should be discarded. -
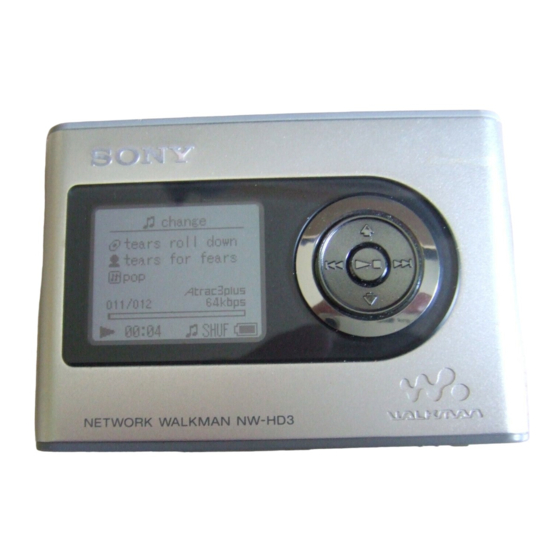
Page 7: Guide To Parts And Controls
Guide to Parts and Controls Player (headphones)/LINE OUT jack ( page 18) buttons ( page 20, 21) MENU button ( page 25, 29) ... -
Page 8: Preparing A Power Source
Preparing a Power Source Charge the built-in lithium-ion rechargeable battery before using it for the fi rst time or when it is depleted. Slide the BUILT-IN BATTERY switch to ON. The protection for the built-in rechargeable battery is released and power is supplied to the player. -
Page 9: Charging The Battery Using A Usb Connection
To remove the USB adaptor from the player While pressing the gray buttons on both sides, push the USB adaptor inward, and then pull it outward. Charging the battery using a USB connection Turn on your computer and connect the USB cable to your computer ( ... -
Page 10: Installing Sonicstage On Your Computer
Installing SonicStage on Your Computer Using the supplied CD-ROM, install the SonicStage on your computer. Preparing the required system The following system environment is required. IBM PC/AT or Compatible Computer • CPU: Pentium II 400 MHz or higher (Pentium III 450 MHz or higher is •... -
Page 11: Installing Sonicstage
Installing SonicStage Check the following before installing the SonicStage software. • Make sure to close all other software, including any virus-check software, as such software usually demands a large amount of system resources. • Make sure to use the supplied CD-ROM for installing SonicStage. -
Page 12: Importing Audio Data To Your Computer
Importing Audio Data to Your Computer Record and store tracks (audio data) from an audio CD to the SonicStage “ My Library” on the hard disk drive of your computer. You can record or import tracks from other sources such as the Internet and your computer’s hard disk. - Page 13 Click “Music Source” on the SonicStage window. The contents of the audio CD appear in the music source list. If CD information such as album title, artist name, and track names could not be obtained automatically, connect your computer to the Internet and click “CD Info”...
-
Page 14: Transferring Audio Data To The Player
Transferring Audio Data to the Player Transfer the tracks (audio data) stored in SonicStage “ My Library” on your computer to the player in ATRAC3plus/MP3 format. The audio data to be transferred includes the information, such as an artist name and an album name (original album name) in the CD information. - Page 15 Connect the USB adaptor to the player. Insert the USB adaptor as shown below until it clicks into place. “PC Connect” appears in the display. The setup display for automatic transfer appears in the SonicStage window. Follow the instructions in the window. For details, see the SonicStage Help ( ...
-
Page 16: Using Sonicstage Help
Notes • Do not disconnect the USB cable or the USB connector while the data is being transferred. If you do, the data being transferred may be destroyed. • Use of the player with a USB hub or a USB extension cable is not guaranteed. - Page 17 To understand SonicStage Help The left side The right side frame frame 1 Double click “ Overview” in the left- side frame of SonicStage Help. 2 Click “ About This Help File.” The explanation will appear in the right- side frame. Scroll the display if necessary.
-
Page 18: Playback
Playback Playing Back Transfer audio data from your computer to the player beforehand ( page 14). You can change the language to your own for the menu and the messages in the display ( page 31). After setting the BUILT-IN BATTERY switch to ON ( ... -
Page 19: Locking The Controls (Hold)
Playable audio data This player can play audio data compressed in the ATRAC3plus/ MP3 formats. ATRAC3plus (Adaptive Transform Acoustic Coding3plus) is an audio compression technology that satisfi es the demand for high sound quality and high compression rates. ATRAC3plus can compress audio fi les to about 1/20 of their original size at 64 kbps. -
Page 20: Basic Playback Operations
Basic playback operations Play from a point where you stopped the player previously Stop playback Find the beginning of the current track Find the beginning of previous tracks* Find the beginning of the next track* Find the beginning of succeeding tracks* Go backwards quickly Go forward quickly * When shuffl... -
Page 21: Playing Back Tracks Selected By Mode (Artist, Album, Genre, Group, Etc.)
Playing Back Tracks Selected by MODE (Artist, Album, Genre, Group, etc.) By grouping the tracks in the player into a “ MODE,” such as by “Artist” or “Album,” you can select tracks you want to listen to. There are fi ve MODEs, and the steps here use the displays of the “Artist”... - Page 22 To search tracks more, press Artist selected in step 2. Albums of the selected artist appear. Press to select an item, and then press Playback starts from the track you selected or the fi rst track of the item (artist, album, etc.) you selected.
-
Page 23: Mode Displays
M ODE displays The display differs depending on the MODE. You can start playback by pressing Artist List of artists Albums of the artist selected Album: displaying an album name (original album name) in the CD information of SonicStage ... -
Page 24: Adding A Bookmark (Bookmark Track Play)
Adding a bookmark ( Bookmark track play) You can play your favorite tracks by adding a Bookmark to them. To play bookmarked tracks, select “Others” MODE ( page 21). During playback of the track where you want to add a Bookmark, press ... -
Page 25: Changing Playback Options (Play Mode)
Changing Playback Options (Play Mode) You can use various playback options, such as selecting songs you want to listen to and playing songs in random order. For details about playback options (Play Mode), see page 26, 27. You can also play songs repeatedly using the playback options you choose (repeat play, ... -
Page 26: Playback Options (Play Mode)
Playback options A range of tracks to be played (“Play unit” page 27) differs depending on the MODE ( page 21) where you start playback. In the MENU display/icon Normal/No icon ( Normal play) 1 Track/ 1 ( Single play) Play Unit/ ( Play unit play) Track SHUF/... - Page 27 What is a “ play unit” ? All the items (an artist, an album, a track, etc.) on the list when you start playback is called a “play unit.” When you change the Play Mode, the play unit changes to all the tracks recorded in the player. On playback of a play unit Example: When you select Artist MODE Artists...
-
Page 28: Playing Tracks Repeatedly (Repeat Play)
Playing tracks repeatedly ( Repeat play) Playback of tracks repeats in the playback options selected in page 25. Select the playback option you want to repeat ( page 25). Press MENU. The MENU display appears. Press to select “Repeat,”... -
Page 29: Changing Sound Quality And Settings
Changing Sound Quality and Settings For details about various setting items, see page 30. Press MENU. The MENU display appears. Press to select the item, and then press The display to set the selected item appears. ... -
Page 30: Setup Items
Setup items Item Options ( Sound (Sound setting) AVLS (Limiting volume) Beep (Sound of operation) Audio Out (External audio output) Contrast (Adjustment of the display) 1) The settings work only when playing ATRAC3plus audio tracks. When playing an MP3 audio track, the settings do not work. - Page 31 Items Options ( Backlight Auto (LCD backlight of the display) 10 seconds 30 seconds Reverse Display Positive (Turning over the display) Negative Language (Display language) English Français Deutsch Italiano Español * These languages are not displayed depending on the country where you use the player. : Default settings) The display lights up for about 10 seconds when you press a button and keeps lighting up while you scroll the...
-
Page 32: Customizing Sound Quality (Sound Eq - Custom)
Customizing sound quality (Sound EQ - Custom) You can adjust the sound quality for each frequency range individually, checking the settings on the display. After selecting “Sound” in step 2 in “Changing Sound Quality and Settings” ( page 29), select “Custom1”... -
Page 33: Adjusting Treble And Bass Emphasis (Digital Sound Preset)
Adjusting treble and bass emphasis ( Digital Sound Preset) You can preset the treble and bass levels to your preference. While checking the display, adjust the emphasis settings. After selecting “Sound” in step 2 in “Changing Sound Quality and Settings” ( page 29), select “Custom3”... -
Page 34: Other Functions
Other Functions Transferring Audio Data Back to Your Computer Audio data can be transferred back to SonicStage “ My Library” on your computer. “ATRAC Audio Device” “Transfer” My Library list Connect the player to your computer (see steps 1 and 2 in “Transferring audio data to the ... -
Page 35: Connecting Other Devices
Connecting Other Devices You can listen to tracks through a stereo system and record tracks in the player onto a MiniDisc or a cassette tape. See the instruction manual that comes with the device you want to connect. Be sure to turn off all devices before making the connections and changing the settings and explained below. -
Page 36: Storing Data Other Than Audio Files
Storing Data Other Than Audio Files You can transfer data from the hard disk of a computer to the built-in hard disk of this player using Windows Explorer. The built-in hard disk of the player is displayed in Windows Explorer as an external drive (as a removable storage). -
Page 37: Initializing Hard Disk
Press to select “Yes,” and then press The message appears, and then the Format display appears. To cancel set up In step 4, select “No,” and then press The Format display appears. Press MENU to return to the MENU display. Press and hold MODE or press MENU in the MENU display to return to the display before step 1. - Page 38 Press to select “Initialize Hard Disk,” and then press The Initialize Hard Disk display appears. Press to select “Yes,” and then press Press to select “Yes,” and then press The message appears, and then the Format display appears.
-
Page 39: Additional Information
Additional Information Notes on Disposing of the Unit This player has a built-in lithium-ion rechargeable battery. When you dispose of the player, be sure to dispose of it properly. Certain countries may regulate disposal of the battery used to power this product. Please consult with your local authority. - Page 40 7 Remove the built-in battery. 8 Pull the connecting cord between the battery and the player to separate the connector.
-
Page 41: Troubleshooting
You have not used the player for a prolonged period. Effi ciency of the battery will be improved by repeatedly charging and discharging. The battery needs to be replaced. Consult your nearest Sony dealer. Battery charging time is not enough. The player requires 15 minutes to check the battery condition to protect it before a quick recharge starts. - Page 42 Sound Symptom There is no sound. Noise is heard. The volume does not increase. There is no sound from the right channel of the headphones. The volume cannot be adjusted. When using the player with a stereo system connected, the sound is distorted or noisy.
- Page 43 The display turns off. Connection with the computer/SonicStage Symptom The SonicStage software cannot be installed. The installation appears to have stopped before it has fi nished. The progress bar on the display of your computer is not moving. The access lamp of your computer has not lit for a few minutes.
- Page 44 Symptom The player is not recognized by the computer when it is connected to the computer. Audio data cannot be transferred to the player from your computer. The number of tracks that can be transferred to the player is not much.
- Page 45 Symptom Audio data is transferred back to your computer and remaining transferable count increases without operations occasionally when the player is connected to the computer. The operation of the player becomes unstable while it is connected to the computer. “Failed to authenticate Device/ Media.”...
-
Page 46: Error Messages
Error Messages Follow the instructions below if an error message appears in the display. Message Meaning The volume exceeds the maximum AVLS volume of AVLS. NO VOLUME OPERATION The number of bookmarks exceeds BOOKMARK the limit. FULL CANNOT “Format” in the MENU display is OPERATE selected during playback. - Page 47 Transfer audio data to the player ( page 14). Go to a track list with tracks. Transfer audio data to the player ( page 14). Write down the number and consult your nearest Sony dealer.
-
Page 48: Specifi Cations
Specifi cations Maximum recordable number of track (Approx.)* ATRAC3 ATRAC3plus 5,000 2,500 (132 kbps) (256 kbps) 6,000 10,000 (105 kbps) (64 kbps) 10,000 13,000 (66 kbps) (48 kbps) * When transferring four-minute tracks Sampling frequency 44.1 kHz (ATRAC3plus), 32/44.1/48 kHz (MP3) Audio compression technology Adaptive Transform Acoustic Coding3plus (ATRAC3plus), MPEG-1 Audio Layer-3 (MP3) - Page 49 Deutsch 31 Digital Sound Preset 30, 33 English 31 Español 31 Find the beginning of a track 20 Français 31 Genre 23 Group 23 Grouping tracks 21 Headphone 30, 35 Headphones 6 Heavy 30 HOLD function 19 Italiano 31 Japanese 31 Jazz 30 Korean 31 Language 31...
- Page 50 Sony Corporation...