Miele CM 7750 Operating Instructions Manual
Hide thumbs
Also See for CM 7750:
- Operating instructions manual (112 pages) ,
- Quick start manual (2 pages) ,
- Operating instructions manual (112 pages)

Related Manuals for Miele CM 7750


Summary of Contents for Miele CM 7750
-
Page 1: Operating Instructions
Operating instructions Coffee maker To avoid the risk of accidents or damage to the appliance, it is essential to read these instructions before it is installed and used for the first time. en – AU, NZ M.-Nr. 11 059 380... -
Page 2: Caring For The Environment
Disposal of the Miele descaling centre for electrical and electronic cartridge appliances. You are also responsible for Dispose of the used Miele descaling deleting any personal data that may be stored on the appliance prior to cartridge in your household waste. -
Page 3: Table Of Contents
Contents Caring for the environment .................. 2 Warning and Safety instructions................ 7 Guide to the appliance .................. 17 Rear of machine ....................18 Unpacking and installing .................. 20 Unpacking the coffee machine ................20 Accessories supplied .................... 20 Installing and connecting the coffee machine............20 Operating principles.................... - Page 4 Contents Cancelling preparation ..................43 Tea......................... 44 TeaTimer........................ 44 Making tea......................45 Cancelling tea preparation ..................45 Teapot: making several cups of tea one after the other ........45 Preparing hot water .................... 47 Parameters...................... 48 Amount of coffee....................48 Brewing temperature .....................
- Page 5 Demo mode...................... 64 Factory default settings ..................64 Appliance settings.................... 65 Network configuration .................. 65 Network ........................ 66 Setting up the network (Miele@home)..............66 Setting up the network again ................67 Remote control...................... 67 MobileStart ......................68 RemoteUpdate ...................... 69 Cleaning and care ....................
- Page 6 Contents The Miele descaling cartridge ................90 Fitting and removing a descaling cartridge ............ 91 Set the start time for automatic descaling (Descaling timer)........ 92 Cancelling automatic descaling ................92 Switching off automatic descaling ................ 93 Problem solving guide .................. 94 Messages in the display..................
-
Page 7: Warning And Safety Instructions
They contain important notes on the installation, safety, operation and care of the appliance. Miele cannot be held liable for damage caused by non-compliance with these Warning and Safety instructions. Keep the instructions in a safe place and pass them along to any... - Page 8 Warning and Safety instructions Correct application The machine is intended only for the preparation of drinks such as espresso, cappuccino, latte macchiato, tea etc. Any other usage is at the owner's risk. The coffee machine is not suitable for outdoor use. ...
- Page 9 Warning and Safety instructions Safety with children Danger of burning and scalding on the dispensing spouts. Children's skin is far more sensitive to high temperatures than that of adults. Ensure children do not touch hot surfaces of the coffee machine or place parts of their body under the dispensing spouts.
-
Page 10: Technical Safety
Warning and Safety instructions Technical safety A damaged coffee machine is dangerous. Check it for any visible damage before setting it up. Never attempt to use a damaged coffee machine. Before connecting the appliance to the mains supply, make sure that the rating on the data plate corresponds to the voltage and frequency of the household supply. - Page 11 The manufacturer's warranty will be invalidated if the appliance is not repaired by a Miele approved service technician. Miele can only guarantee the safety of the appliance when genuine Miele replacement parts are used. Faulty components must only be replaced by Miele original spare parts.
- Page 12 Disconnect the coffee machine from the power supply if it is not going to be used for a while, e. g. while on holiday. Use only Miele original spare parts. If spare parts or accessories from other manufacturers are used, the warranty will be invalidated, and Miele cannot accept liability.
-
Page 13: Correct Use
Warning and Safety instructions Correct use Danger of burning and scalding on the dispensing spouts. The liquids and steam dispensed are very hot. Heating surfaces have residual heat after use. Keep well away from the area underneath the spouts when hot liquids and steam are being dispensed. - Page 14 Warning and Safety instructions Do not use coffee beans which have been treated with caramel, sugar or other substances. Sugar will damage the coffee machine. Only fill the coffee chute with ground coffee beans. Do not use any caramelised ready ground coffee. The sugar in the coffee will stick to and block the brew unit of the coffee machine.
- Page 15 If you do not utilise automatic descaling, you will need to descale the coffee machine manually on a regular basis. Miele cannot be held liable for damage resulting from not descaling the machine, using the wrong descaling agent or an unsuitable descaling solution concentration.
- Page 16 Warning and Safety instructions The following applies to appliances with stainless steel surfaces: Do not adhere stickers, adhesive tape or any other adhesive materials to the stainless steel surfaces. Stainless steel scratches very easily and even magnets can cause damage to the surface.
-
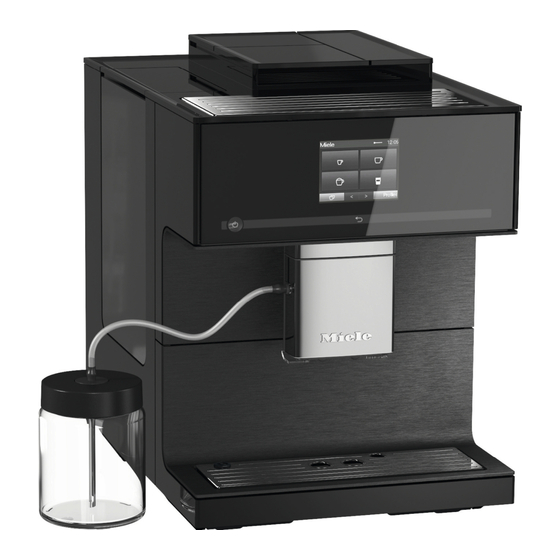
Page 17: Guide To The Appliance
Guide to the appliance a On/Off sensor b “Back” sensor c Touch display d Cup heating e Water container f Bean system with 3 bean containers g Park position for milk tube h Grinder setting i Ground coffee drawer with integrated coffee scoop j Brew unit k Height-adjustable central spout with lighting l Drip tray with lid and waste container... -
Page 18: Rear Of Machine
Guide to the appliance Rear of machine a Cover b Descaling cartridge holder c Plug d Miele descaling cartridge... - Page 19 Guide to the appliance Central spout in detail a Dispensing spouts for coffee and milk b Cup sensor c Hot water spout d Stainless steel cover...
-
Page 20: Unpacking And Installing
– Cleaning tablets for degreasing the – Do not place the coffee machine near brew unit a window in direct sunshine or right – Miele descaling tablets next to an appliance that gives off heat. These would subject the – Miele descaling cartridge machine to ambient temperatures –... - Page 21 Unpacking and installing – The coffee machine must be set up on a level surface. The surface must be water-resistant. – The appliance door must be opened completely to remove the brew unit. Place the coffee machine in the location in which you intend to use it.
-
Page 22: Operating Principles
Operating principles Touch display Operating actions You can only select options which are The touch display can be scratched highlighted in light grey. by pointed or sharp objects, e.g. pens. Each time you touch a possible option Only touch the display with your the relevant field lights up partially or fingertips. - Page 23 Operating principles Entering numbers Use the numerical keypad to enter numbers, e.g. if you want to set a timer duration. The numerical keypad will appear automatically in the relevant menus. Space Save Select the letters or characters you want. ...
-
Page 24: Symbols In The Display
Operating principles Symbols in the display The following symbols may also appear in the display in addition to the text and drinks symbols: Symbol Explanation This symbol indicates the “Settings” menu and the “Language” menu option. Some settings, e.g. display brightness and buzzer/keypad volume, are selected using a bar chart. - Page 25 This symbol and a fault code will appear if a fault occurs. The strength of the Wi-Fi connection is shown under Settings | Miele@home | Connection status Symbols represent the connection strength in increments from strong to not connected.
-
Page 26: Before Using For The First Time
When you connect the machine to the – : The display is dark when the mains power, the following message appliance is switched off. will appear in the display: Miele - – Night dimming : The time and date are Willkommen displayed from 5:00 to 23:00. -
Page 27: Setting The Water Hardness Level
The setting is now saved. The next time the coffee machine is switched off, the descaling cartridge Miele@home communication-enabled will fill with water. You will hear water appears in the display. You appliance being pumped into the cartridge at can connect your coffee machine to frequent intervals. -
Page 28: Setting Up The Bean System
Before using for the first time Setting up the bean system After setting up the coffee machine, you will be prompted to set up the bean system. The coffee machine will assist you when first filling and naming the bean containers. ... - Page 29 Before using for the first time Any remaining drinks which have not been selected will be allocated to the third bean type. You have set up the bean system and you can now prepare drinks. To ensure that any coffee residues from the factory testing process are removed from the brewing system, please throw away the first two cups...
-
Page 30: Bean System
Miele profiles. residues from the caffeinated beans Alternatively, you can make coffee in the grinder or brew chamber. -
Page 31: Changing Bean System Settings (Type Of Beans)
(see “Parameters - Bean parameters If you have created additional Profiles type”). with coffee drinks to the Miele standard profile, the bean types can Renaming type of beans be individually allocated to individual The 3 bean containers are shown in the drinks in each Profile. - Page 32 Bean system If you do not allocate a type of bean, you will be asked what type of bean you want to use for the coffee as you make it.
-
Page 33: Filling The Water Container
Filling the water container If the water container is not inserted Risk to health due to correctly (e.g. sits too high or at an contaminated water. angle), water can leak from the outlet Bacteria can develop in water which valve. -
Page 34: Switching On And Off
Switching on and off Switching the coffee machine Switching the coffee machine Touch the On/Off sensor . Touch the On/Off sensor . The appliance will begin rinsing after If coffee has been dispensed, the coffee the heating-up phase. Hot water will run machine will rinse the coffee pipework out of the central spout. -
Page 35: Spout Adjustment
Spout adjustment Switching the spout The height of the central spout cannot adjustment on and off be manually adjusted. Drinks menu is shown in the display. Before making the drink, the central spout moves down and the cup sensor Touch . stops it at the optimum height for the ... -
Page 36: Cup Heating
Cup heating Pre-heating cups Danger of overheating due to insufficient ventilation. If the coffee machine is not sufficiently ventilated, the appliance can overheat. Ensure that there is sufficient ventilation around the coffee machine, e.g. do not cover cups on the cup heating surface with a tea towel. -
Page 37: Making Coffee
Making coffee The following drinks without milk can be Danger of burning and scalding made: on the dispensing spouts. – Ristretto is a strong, concentrated The liquids and steam dispensed are espresso. It is prepared with the very hot and can cause scalding. same amount of coffee as for an Keep well away from the area espresso but with much less water. -
Page 38: Doubleshot
Making coffee DoubleShot Select the DoubleShot function if you would like a particularly strong and aromatic coffee. In this case, more coffee beans will be ground and brewed halfway through brewing. DoubleShot will appear while drinks are being made. This function is available for all drinks except “Ristretto”... - Page 39 Making coffee Follow the instructions in the display. Making drinks with ready ground coffee Each cup of coffee will be brewed and dispensed individually. The display will You can make coffee using ready inform you about the progress. ground coffee. This allows you to prepare a decaffeinated coffee, for Cancelling Coffee pot example, even if the bean container is...
- Page 40 Making coffee If you select , the ground coffee will be disposed of in the waste container without being brewed. The appliance rinses. Fill the coffee scoop with ready ground coffee. Push the ground coffee drawer horizontally into the ground coffee chute.
-
Page 41: Making Coffee With Milk
Making coffee with milk The following drinks with milk can be Danger of burning and scalding made: on the dispensing spouts. – Cappuccino consists of approx. The liquids and steam dispensed are 2/3 milk froth and 1/3 espresso. very hot and can cause scalding. Keep well away from the area –... -
Page 42: Using The Milk Flask
Making coffee with milk Using the milk flask The stainless steel flask keeps milk cool for longer. Good milk froth can only be made with cold milk (< 10 °C). Place the milk flask next to the coffee machine. Connect the milk tube to the aperture in the central spout. -
Page 43: Using Milk Cartons Or Bottles
Making coffee with milk Select a drink. Using milk cartons or bottles The drink will be dispensed from the central spout into the cup. Cancelling preparation You can finish dispensing individual drink components early, e.g. if the cup is not big enough. Cancelling individual drink components The milk tube for cartons and other... -
Page 44: Tea
An audible tone will sound temperature. after the brewing time has elapsed. The respective dispensing temperatures are recommended by Miele for making If you have switched off audible tones, black tea, green tea, herbal or fruit tea. you will not be reminded when the brewing time has finished. -
Page 45: Making Tea
– : the TeaTimer is displayed while You can now start the minute minder for the hot water is being prepared. The brewing time if the TeaTimer is switched can be started after TeaTimer preparation. Starting the TeaTimer – : the TeaTimer is not displayed. TeaTimer appears in the bottom left of ... - Page 46 Select the number of cups you want (3 to 8). Follow the instructions in the display. The teapot will be filled. The display will inform you about the progress. You can interrupt preparation at any time: Touch Cancel...
-
Page 47: Preparing Hot Water
Preparing hot water Danger of burning and scalding on the hot water spout! The liquids and steam dispensed are very hot and can cause scalding. Keep well away from the area underneath the spouts when hot liquids and steam are being dispensed. -
Page 48: Parameters
Parameters You can individually adjust the following Amount of coffee parameters for each drink: The coffee machine can grind and brew – Amount of coffee 7.5–12.5 g of coffee beans per cup. The greater the quantity, the stronger the – Brewing temperature coffee. -
Page 49: Pre-Brewing Ground Coffee
Parameters The coffee has been too finely ground Pre-brewing ground coffee When the pre-brewing function is – espresso or coffee flows into the cup switched on, the freshly ground coffee very slowly, is first moistened with a little hot water. Then the remaining water is forced –... -
Page 50: Portion Size
Portion size When the cup is filled up to the level The flavour of the coffee produced depends not only on the type of coffee, you want, touch Save but also on the amount of water used. If the maximum amount is reached, You can programme the amount of preparation stops and the maximum water for all coffee drinks and hot water... -
Page 51: Resetting Drink Settings
Resetting drink settings You can reset portion sizes and Resetting all drinks parameters individually or for all drinks Touch Reset all drinks back to their factory default setting. Reset all drinks to default settings? will Drinks menu is shown in the display. appear in the display. -
Page 52: Profiles
Profiles In addition to the Miele drinks menu – Delete profile if you want to delete a (Miele profile), you can enter up to 10 profile. individual profiles to cater for different – Change profile to set whether the tastes and preferences. - Page 53 Profiles – When switched on: Each time the machine is switched on it will automatically select the Miele drinks menu regardless of which profile was set before the machine was last switched off. Select the required option and touch...
-
Page 54: Profiles: Creating And Processing Drinks
Profiles: creating and processing drinks Touch You can save frequently made drinks in Change drink a profile with your own individual Select a drink. settings (see “Profiles”). You can now change the portion size(s), You can also change the names of your drink parameters or the names as drinks and delete any unwanted drinks described. -
Page 55: User Profiles: Making Drinks
User profiles: making drinks Drinks menu is visible in the display. Touch Profiles Select the User profile you want. The name of the profile selected will be shown in the top left of the display. Now you can make the drink you want. ... -
Page 56: Expert Mode
Expert mode In Expert mode you can change the portion size while the drink is being made. The setting will not be saved and will only apply for the current drink. Dispensing If you select DoubleShot or two portions , Expert mode is not available. -
Page 57: Settings
Settings You can use the Settings menu to Changing and saving settings customise the coffee machine to suit Settings menu is shown in the your individual requirements. display. Some settings which can be found in Select the option you want to Settings menu are described in change. -
Page 58: Overview Of Available Settings
Settings Overview of available settings The factory default for each option is indicated by *. Menu option Available settings Language deutsch and other languages Country Time Show – Night dimming Clock format – 24 h 12 h (am/pm) Date Timer Timer 1 –... - Page 59 Settings Menu option Available settings Lighting Machine switched on – Set the brightness Machine switched off – Brightness Switch off after Type of beans Type A – Change name – Change allocation Type B – Change name – Change allocation Type C –...
- Page 60 Settings Menu option Available settings Miele@home Set up If Miele@home is set up: – Deactivate Activate – Set up again – Connection status If Miele@home is set Remote control If Miele@home is set RemoteUpdate Service Evaporate Demo mode Factory default Appliance settings –...
-
Page 61: Language
If you have connected the coffee machine to a Wi-Fi network and have You can select a language and country signed in to the Miele@mobile app, the for all display texts. time will be synchronised based on Useful tip: If you select the wrong... -
Page 62: Switch On At
Settings Select the required day of the week. Switch on at When all required days of the week The coffee machine will not switch on are marked, touch OK. at the required time if you have activated the system lock. Activating and deactivating the timer The timer settings are deactivated. -
Page 63: Lighting
Settings Useful tip: If your water hardness is Lighting >21 °dH (3.7 mmol/l), we recommend The following options are available: instead to use bottled drinking water – The machine is switched on: set the (< 150 mg/l Ca ). This will mean your brightness. coffee machine will need to be descaled less often and there will be –... -
Page 64: Locking The Coffee Machine (System Lock )
Miele@home: The appliance can be presented in – : This option only appears if the Set up Miele Experience Centres or retail coffee machine has not previously stores with the Demo mode function. The been connected to a Wi-Fi network... -
Page 65: Appliance Settings
Settings Please refer to the “Overview of available settings” chart for the factory settings. Appliance settings The following will not be reset: – The number of drinks and the appliance status (No. of portions until appliance needs descaling, ... brew unit needs degreasing) –... -
Page 66: Network
Setting up the network (Miele@home) Networking is deactivated ex-works. To connect the coffee machine to a Wi- Fi network, the Miele@mobile app must be installed on a mobile device (e.g. smartphone). You sign in to the app with a user account. -
Page 67: Setting Up The Network Again
Follow the prompts in the app. Setting up the network again If your Wi-Fi network has changed, you can set up Miele@home for your coffee machine again. Settings menu is shown in the display. -
Page 68: Mobilestart
– If milk was used before the machine drink, for example, via the was last switched off, the milk Miele@mobile app. pipework needs to be rinsed before Danger of burning and scalding switching off. -
Page 69: Remoteupdate
Miele’s RemoteUpdate function can only be used if the coffee machine is connected to a Wi-Fi network and you have an account in the Miele@mobile app. The coffee machine must be registered in the app. See the Miele@mobile app for terms and conditions of use. -
Page 70: Cleaning And Care
Cleaning and care Risk to health due to inadequate cleaning. Heat and moisture inside the coffee machine can cause coffee residues to become mouldy and/or milk residues to go off and pose a risk to health. Carefully clean the coffee machine regularly. Cleaning intervals - Quick guide Recommended frequency What do I have to clean / maintain? -
Page 71: Cleaning By Hand Or In The Dishwasher
Cleaning and care Cleaning by hand or in the The maximum temperature of the dishwasher dishwashing programme selected must not exceed 55 °C. Please note that the brew unit is not dishwasher-safe. Contact with natural dyes such as Clean the brew unit by hand only those found in carrots, tomatoes and under warm running water. -
Page 72: Unsuitable Cleaning Agents
Cleaning and care Unsuitable cleaning agents Danger of burning and scalding on hot components or by hot liquids. Contact with unsuitable cleaning Components can become very hot agents can alter or discolour all during operation. Touching hot surfaces. All surfaces of this components can cause burning. - Page 73 Cleaning and care – sharp metal scrapers – steel wool or stainless steel wire scourers...
-
Page 74: Cleaning The Drip Tray And Waste Container
Cleaning and care Empty the drip tray and the waste Cleaning the drip tray and container. waste container Danger of burning and scalding on hot components or by hot liquids. Components can become very hot during operation. Touching hot components can cause burning. -
Page 75: Cleaning The Drip Tray Cover
Cleaning and care Clean the inside of the machine Cleaning the drip tray cover underneath the drip tray. Remove the drip tray cover. Replace the waste container, the lid The drip tray cover can be cleaned in and the lower panel before pushing the dishwasher, or by hand using the drip tray back into the coffee... -
Page 76: Cleaning The Water Container
Cleaning and care Cleaning the water container Clean the water container every day. You can clean the water container in the dishwasher once a week. Make sure that the valve, the underside of the water container and the surface the water container sits on are clean. -
Page 77: Cleaning The Central Spout With Integrated Cappuccinatore
Cleaning and care Cleaning the central spout with integrated cappuccinatore With the exception of the stainless steel cover, all parts of the central spout should be cleaned in the dishwasher at least once a week. This will remove coffee deposits and milk residues effectively. -
Page 78: Removing And Cleaning The Cup Sensor
Cleaning and care Removing and cleaning the cup sensor The cup sensor is located underneath the central spout. Clean the cup sensor daily by hand with warm water and a little washing-up liquid. Clean the surfaces of the central spout with a damp cloth. -
Page 79: Cleaning The Stainless Steel Milk Flask
Clean the milk pipework maintenance programme together Dry all parts afterwards. with the Miele Cleaning agent for milk Reassemble the stainless steel milk pipework (see “Cleaning the milk flask. pipework”). -
Page 80: Cleaning The Bean System
Cleaning and care Useful tip: Open one lid at a time to Cleaning the bean system prevent mixing of bean types when Danger of injury on the moving filling the bean system. grinder! Cleaning the ground coffee If you reach into the grinder or drawer objects such as a spoon are left in the grinder and a grinding process is... -
Page 81: Vacuuming Out The Ground Coffee Chute
Dry all parts with a soft cloth. Useful tip: You can also clean the appliance front with the Miele all purpose microfibre cloth. Insert the attachment and use the suction tube of your vacuum cleaner to vacuum out the ground coffee chute. -
Page 82: Maintenance Programmes
Cleaning and care Maintenance programmes Rinsing the appliance The coffee machine has the following After a coffee has been dispensed, the maintenance programmes: machine is rinsed before it switches off. This removes any residual coffee – Rinsing the appliance grounds. –... -
Page 83: Rinsing The Milk Pipework
You can also rinse the milk pipework It is available to order from the Miele manually. online shop or directly from Miele (see the end of this booklet for contact Drinks menu is shown in the display. -
Page 84: Degreasing The Brew Unit And Cleaning The Interior
Miele Cleaning Tablets can be ordered the solution. Make sure it is placed via the Miele webshop or directly from sufficiently far into the cleaning Miele (see the end of this booklet for solution. contact details). Touch OK. The maintenance programme for degreasing the brew unit lasts for ... - Page 85 Cleaning and care The maintenance programme cannot When you have removed the brew be cancelled. It must be completed unit, do not change the position of through to the end. the handle on the brew unit. Otherwise the brew unit cannot be ...
-
Page 86: Descaling The Appliance
Cleaning and care Clean the interior of the coffee Press the button under the handle of machine. Make sure that the areas the brew unit and, whilst doing so, highlighted (in white) in the illustration turn the handle to the right . are cleaned especially well. - Page 87 Descale the machine will appear in the order via the Miele webshop or directly display. from Miele (see the end of this booklet You can switch the coffee machine off if for contact details). you do not want to carry out the descaling programme at this point.
- Page 88 Cleaning and care The descaling process is complete at the end of the rinsing process. You can now prepare drinks again. Fill the water container to the descaling symbol with lukewarm water. Place 1 descaling tablet in the water. Follow the instructions for the mixing ratio carefully.
-
Page 89: Automatic Descaling
Please note before and during maintenance programme for descaling the machine. For automatic descaling, a automatic descaling: Miele descaling cartridge is fitted at the The coffee machine must be ready to back of the coffee machine. The coffee use and the following conditions must... -
Page 90: The Miele Descaling Cartridge
Automatic descaling – The coffee machine is switched off. The descaling cartridge is available to order from the Miele online shop or The Miele descaling cartridge directly from Miele (see back cover for contact details). Only use the Miele descaling... -
Page 91: Fitting And Removing A Descaling Cartridge
Automatic descaling Fitting and removing a descaling cartridge Risk of damage from spilt descaling solution. Sensitive surfaces and/or natural floors can suffer damage. When handling a cartridge which has already been filled with water, ensure that the descaling solution does not come into contact with sensitive surfaces. -
Page 92: Set The Start Time For Automatic Descaling (Descaling Timer)
Automatic descaling Set the start time for automatic The cap is located on the cartridge. descaling (Descaling timer). Release it by snapping it off. You can set the daily start time for Dispose of the empty cartridge with automatic descaling as you wish. The your household waste. -
Page 93: Switching Off Automatic Descaling
Automatic descaling The descaling solution is rinsed out of Switching off automatic the pipework. Rinsing can take up to descaling 5 minutes. You can make drinks If you remove the descaling cartridge, afterwards. automatic descaling is deactivated. You will then need to descale manually using the Descale the machine maintenance programme. -
Page 94: Problem Solving Guide
With the help of the following guide, minor faults in the performance of the appliance, some of which may result from incorrect operation, can be remedied without contacting Miele. This will save you time and money because you won't need a service call. - Page 95 Problem solving guide Problem Possible cause and remedy F73 or The brew unit cannot be positioned correctly. Check the brew unit Switch the machine off with the On/Off sensor. Remove the brew unit and clean it by hand. ...
- Page 96 Problem solving guide Problem Possible cause and remedy F233 The cup sensor is not inserted or is incorrectly inserted. The stainless steel cover of the central spout was not fitted properly, e.g. is tilting forwards slightly. If the central spout is moving upwards and the cup sensor is bumped, e.g.
-
Page 97: Unusual Performance Of The Coffee Machine
Switch off at the wall socket and remove the plug. Contact a qualified electrician or Miele. The coffee machine The switch-off time programmed using the timer has switches off suddenly. - Page 98 Problem solving guide Problem Possible cause and remedy The coffee machine The system lock has been activated. does not switch itself Deactivate the system lock. on, although the Switch A day of the week has not been selected and/or the on at setting has been timer has not been activated.
- Page 99 Problem solving guide Problem Possible cause and remedy Fill and refit the water The descaling cartridge is not fitted. The coffee appears after machine needs descaling. container switching on even Switch the machine off with the On/Off sensor. though the container is Wait approx.
- Page 100 Problem solving guide Problem Possible cause and remedy The waste container is This is not a fault. full, although the drip The drip tray has probably been removed without the tray and waste waste container being emptied. container have been Removing the drip tray resets the internal counter for emptied following each emptying the waste container.
- Page 101 30 minutes after switching switched off. off the appliance. The display lights up The Demo mode of the coffee machine for Miele but the coffee machine Experience Centres and Chartered Agents has been does not heat up and no activated.
-
Page 102: Faults With Automatic Descaling
For this you will need to use Miele descaling tablets. fitted. Drinks cannot be Descale the coffee machine using the made. maintenance programme (see “Cleaning and care - Descaling the appliance”). -
Page 103: Unsatisfactory Results
Fill the coffee bean container with fresh beans. There may be foreign objects such as plastic or stones in amongst the coffee beans. Switch the coffee machine off immediately. Call Miele. - Page 104 Problem solving guide Problem Possible cause and remedy The crema on the The grinder setting is not correct. coffee or espresso is Set the grinder to a finer or coarser setting. not as it should be. The brew temperature is too high for the type of coffee being used.
-
Page 105: Service
2 years. Miele. For further information, please refer to your warranty booklet. Contact information for Miele can be found at the end of this booklet. Please quote the model and serial number of your appliance when contacting Miele. This information can... -
Page 106: Transporting The Machine
Transporting the machine Touch . If you are not going to use the coffee machine for an extended period of time Select Settings and then Service and you intend to transport it, e.g. when moving house, a number of procedures ... -
Page 107: Vacuuming Out The Ground Coffee Chute Using The Attachment And Cleaning The Interior
Transporting the machine When the display goes out, the Packing machine has finished evaporating. The coffee machine should only be Clean the drip tray and waste packed when it is clean and dry. container. Residues of coffee grounds can cause scratches on surfaces. -
Page 108: Accessories
Accessories These products and other useful accessories can be ordered via the Miele webshop or directly from Miele (see back cover for contact details). – Original Miele all purpose microfibre cloth For removing finger marks and light soiling – Cleaning agent for milk pipework For cleaning the milk system –... -
Page 109: Saving Energy
Saving energy The following tips can help you save energy and money as well as care for the environment: – Operate the coffee machine in “Eco mode” (default setting). – Select dimmer lighting or abstain from using lighting when the appliance is switched on. -
Page 110: Electrical Connection
Electrical connection Before connecting the appliance, make The machine must not be used with so- sure that the connection data on the called energy saving plugs. These data plate (voltage and frequency) reduce the amount of energy supplied match the mains electricity supply. to the machine, causing it to overheat. -
Page 111: Appliance Dimensions
Appliance dimensions a = 311 mm b = 420 mm c = 445 mm... -
Page 112: Technical Data
Technical data Current draw in standby mode < 0.5 Watt (default setting): Pump pressure: max. 15 bar Through-flow heater: 1 stainless steel thermo block Appliance dimensions (W x H x D): 311 x 420 x 445 mm Net weight: 14.2 kg Connection cable length: 120 cm Water container 2.2 l capacity: Total capacity of bean containers: Approx. - Page 115 Miele Experience Centre South Melbourne: Freemans Bay, Auckland 1011 206-210 Coventry Street South Melbourne, VIC 3205 Miele Experience Centre Auckland: Miele Experience Centre and Office Sydney: 8 College Hill 3 Skyline Place Freemans Bay, Auckland 1011 Frenchs Forest, NSW 2086 Telephone:...
- Page 116 CM 7750 en – AU, NZ M.-Nr. 11 059 380 / 00...