Miele PM 1210 Operating Instructions Manual
Commercial rotary iron
Hide thumbs
Also See for PM 1210:
- Operating instructions manual (42 pages) ,
- Operating instructions manual (30 pages) ,
- Quick manual (2 pages)

Related Manuals for Miele PM 1210


Summary of Contents for Miele PM 1210
- Page 1 Operating Instructions Commercial Rotary Iron PM 1210 PM 1214 PM 1217 To prevent accidents and machine damage, read en-US these instructions before installation or use. M.-Nr. 09 980 931...
-
Page 2: Table Of Contents
Contents Caring for the environment .................... 4 IMPORTANT SAFETY INSTRUCTIONS ................ 5 Appropriate use ........................5 Technical and electrical safety ..................... 5 Use of the appliance ......................6 Using accessories ........................ 6 Notes on the use of this machine ..................6 Appliance overview ...................... 8 Touch display ........................ - Page 3 Contents Miele Technical Service ....................... 27...
-
Page 4: Caring For The Environment
Consult with local authorities, dealers or Miele in order to dispose of and recycle electrical and electronic appliances. Miele assumes no responsibility for deleting any personal data left on the appliance being disposed. -
Page 5: Important Safety Instructions
Do not damage, remove or bypass the safety components or control elements of the ro- tary iron. Do not make any alterations to the machine, unless authorized to do so by Miele. If the controls or the electrical cabling insulation has been damaged, the rotary iron must not be used until it has been repaired. -
Page 6: Use Of The Appliance
Using accessories Accessory parts may only be fitted when expressly approved by Miele. If other parts are used, any claims from the warranty will be void. Notes on the use of this machine ... - Page 7 IMPORTANT SAFETY INSTRUCTIONS Before switching to reverse, make sure that no one is endangered. If other persons are being shown how to operate the rotary iron, they must be given or informed of these IMPORTANT SAFETY INSTRUCTIONS. Keep these instructions and pass them on to any future users / owners of the appliance.
-
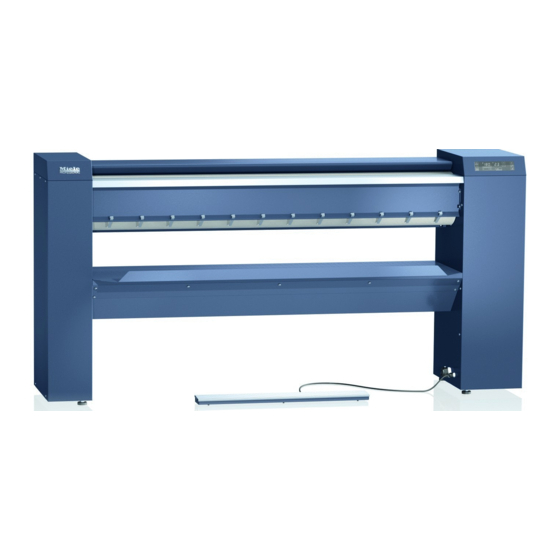
Page 8: Appliance Overview
Appliance overview Control panel (touch display) FlexControl footswitch Laundry infeed table Pick-off bands (PM 1214 & PM 1217 only) Finger guard Height-adjustable screw feet Roller Toe kick (optional) Heater plate with cover Lint filter box (optional for PM 1210) Laundry outfeed table Option PM 1210 PM 1214 PM 1217... -
Page 9: Touch Display
Appliance overview Touch display The buttons on the touch display can be selected by pressing lightly. The button that is currently selected will then be highlighted with a bar underneath. ... - Page 10 Appliance overview Display in the roller speed selection mode button Speed selection button Switches the iron on and off. High speed range button button Pauses the ironing process. Increases the roller speed button button...
-
Page 11: Display Symbols
Appliance overview Display symbols Pre-selection and display of temperature Activate the finger guard in °C/°F Iron heater element on / heater plate tem- perature is rising Pre-selection and display of roller speed // Service display for cleaning and waxing Roller speed range ... -
Page 12: Finger Guard
Appliance overview Finger guard The finger guard is a safety device that must be checked daily for proper functioning be- fore startup. Every time the rotary iron is switched on, check the function of the finger guard. Activate the finger guard once while the symbol is flashing. If fingertips become trapped between the roller and the finger guard, the iron will be stopped immediately and the heater plate disengaged. -
Page 13: Preparing The Laundry
Preparing the laundry Residual moisture For an excellent finish and optimum ironing performance, the laundry that is to be ironed should have the following levels of residual mois- ture, depending on the type of ironing being carried out: PM 1214, PM 1217: 15–25 % residual moisture PM 1210: 15 % residual moisture The ideal level of residual moisture depends on the textile's proper- ties. -
Page 14: Starting Up For The First Time
Starting up for the first time Cleaning and waxing before starting up for the first time It is essential to clean and wax the heater plate before starting it up for the first time (see “Cleaning and maintenance”). Clean the heater plate by passing the cleaning cloth across the en- ... -
Page 15: Use
Preparing for use Turn on the on-site power switch for the power supply. Press the button to switch on the iron. The red display symbol flashes. Now activate the finger guard by lifting it. The finger guard is a safety feature which must be checked every time the iron is started up. -
Page 16: Ironing Temperature
Ironing tempera- The ironing temperature should be selected according to the type of ture fabric being ironed. Type of fabric Symbol Temperature Preset value Nylon / artificial silk 212-230°F (100– 230°F (110°C) 110°C) Woolens / silk 232-302°F (111– 257°F (125°C) ... -
Page 17: Speed Of Iron
The new temperature value is now saved for that temperature selec- tion button. Tip: Before starting to iron, allow the roller to rotate for about five minutes while unloaded so that the temperatures of the heater plate and roller can equalize. Speed of iron PM 1210 / PM 1214: Symbol... -
Page 18: Changing The Value Of A Spin Speed Selection Button
Changing the Press the spin speed selection button you want to change the value value of a spin for. speed selection The bar will light up underneath it and the current spin speed value button will appear in the display. Press the ... -
Page 19: Pauses In Ironing
Standby mode Standby mode is switched off in the factory settings. Standby mode can be activated at the service level by Miele Technical Service. The value representing the time after which the rotary iron switches to Standby mode can be set between 1 and 30 minutes of non-use. -
Page 20: After Ironing
After ironing After ironing, let the roller run for about 5 minutes at the minimum heating temperature and without feeding in any laundry to dry out the padding completely. Switch off the rotary iron by pressing the button. The heater plate disengages, and the fan coasts down for cooling for 10 minutes. -
Page 21: Notes
Notes Changing the temperature unit Miele Service can switch the temperature display from °C to °F. Favorites setting Using the button, the most frequently used combination of tem- perature and roller speed can be saved so that it can be accessed quickly and easily. -
Page 22: Fault Messages
Drive fault F 53 F 57 Fan fault F 61 12 V (24V) voltage missing F 99 Machine locked F 104 Drive voltage too low F 108 General compressor fault F 120 Low voltage F 4500-4512 Control system fault In the event of a malfunction, contact Miele Technical Service. -
Page 23: Cleaning And Maintenance
Coarse-grained scouring agents or abrasive cleaning cloths must not be used for cleaning aluminum heater plates. Only use the Miele cleaning set for cleaning. It contains a cleaning cloth, a waxing cloth, and ironing wax. This set is available as an optional accessory. -
Page 24: Cleaning With The Cleaning Cloth
Cleaning and maintenance Cleaning with the Use the cleaning cloth for cleaning the heater plate. cleaning cloth Since the cleaning cloth is smaller than the heater plate, you cannot clean the entire heater plate width by feeding the cloth through once. -
Page 25: Waxing The Heater Plate
Cleaning and maintenance Now lay the cleaning cloth back on the infeed table, but this time move it slightly to the right. The cleaning strip must again face the heater plate. Feed the cleaning cloth through the iron again. ... -
Page 26: Padding Instructions
Cleaning and maintenance Feed the wax cloth into the iron from the left or right side at the necessary intervals across the entire working width of the iron. Press and hold the button for at least 3 seconds once waxing is ... - Page 27 Miele Technical Service In the event of a malfunction, contact Miele Technical Service. The Miele Technical Service department requires the model and serial number (SN) of the rotary iron.
- Page 28 Please have the model and serial number of your machine available when contacting Technical Service. U.S.A. Miele, Inc. National Headquarters 9 Independence Way Princeton, NJ 08540 Phone: 800-991-9380 609-419-4241 Fax: www.miele-pro.com proinfo@mieleusa.com Technical Service & Support Phone: 800-991-9380 Fax: 800-220-1348 proservice@mieleusa.com...