
Related Manuals for Miele HM 16-83


Summary of Contents for Miele HM 16-83
- Page 1 Operating instructions Rotary ironer HM 16-83 It is essential to read these operating instructions before installing or using the machine, to avoid the risk of accident, or damage to the machine. M.-Nr. 05 460 232...
-
Page 2: Table Of Contents
Contents Description of the appliance ........3 Warning and safety instructions . -
Page 3: Description Of The Appliance
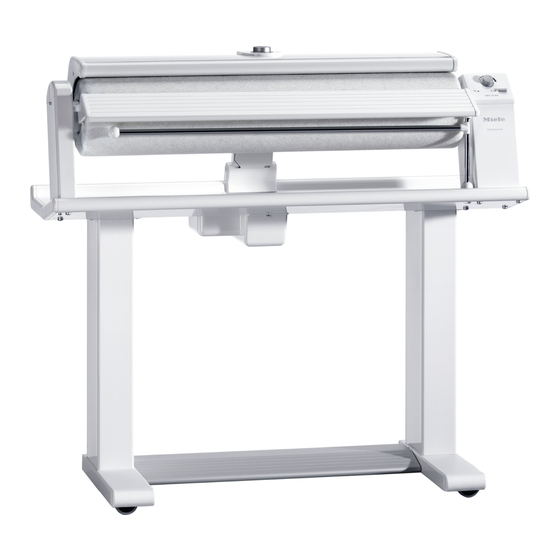
Description of the appliance Temperature selector Emergency release Finger guard plate Heater plate Roller Feed board Bar for hanging ironed laundry Ironing table Mains connection cable Foot pedal switch Control panel Indicator light " C Temperature" Roller speed selector "I On - 0 Off" button for switching the ironer on and off... -
Page 4: Warning And Safety Instructions
Repairs should only Appropriate use be undertaken by a Miele approved en- gineer. This rotary ironer is intended exclu- Ensure current is not supplied to the sively for ironing textiles which are... - Page 5 Accessory parts may only be fitted between the raised roller and the when expressly approved by Miele. If heater plate to smooth an article. other parts are used, guarantee, perfor- Never drape items over the heater mance and product liability claims may plate when it is heated up.
-
Page 6: Caring For The Environment
Caring for the environment Disposal of the packing Disposal of your old appliance material Old appliances contain materials which can be recycled. Please contact your The transport and protective packing dealer, your local waste collection cen- has been selected from materials which tre or scrap merchant about potential are environmentally friendly for disposal recycling schemes before disposing of... -
Page 7: Moving The Appliance
Moving the appliance Moving the appliance Preparation of the working area The rotary ironer is fitted with four roll- ers. A height-adjustable chair is useful and also a flat surface, e.g. a table, to lay ^ Hold the ironer by the ironing table the ironed laundry on. -
Page 8: Before Using For The First Time
Before using for the first time Dust cover The dust cover which protects the roller during transit has to be removed. Then plug the appliance in and switch it on. The heater plate will then rise automatically. Connection cable The mains connection cable is wound round a hook underneath the ironing ta- ble. -
Page 9: Before Ironing
Before ironing Preparing the laundry Pulling into shape and smoothing Correct preparation of the laundry is es- sential for successful ironing. Pull the dampened laundry into shape as usual. Before ironing, the laundry should be: Smooth out ribbons, straps, seams and –... -
Page 10: Checking The Effectiveness Of The Finger Guard
Before ironing Checking the effectiveness of the finger guard The finger guard is a safety feature and should be checked each time before the ironer is used. ^ With the ironer switched on, press the foot pedal right down. – the heater plate comes down onto the rotating roller. -
Page 11: Ironing
Ironing Material Dot symbol Temperature range Polyester / cool iron (low artificial silk temperature) Silk / medium hot iron Wool (medium temperature) Cotton / hot iron (high Linen temperature) Switching on and off The rotary ironer is switched on and off with the "I On / 0 Off"... -
Page 12: Selecting The Roller Speed
Ironing Selecting the roller speed Ironing There are 5 roller speed settings, from The ironing process is controlled by the low (approx. 2 metres per minute) to foot pedal which has three operating high (approx. 4.5 metres per minute). positions: A lower roller speed makes it easier to iron complicated articles such as shirts and blouses. -
Page 13: Positioning The Laundry
Ironing Positioning the laundry Laundry bar ^ Arrange the items of laundry on the The ironed laundry can be hung over feed board so that they are straight the swing out bar to avoid creasing. and then smooth out. Take care not to press down on the bar when it is swung out, as this could cause the rotary ironer to tip over. -
Page 14: After Ironing
Ironing After ironing Power cut ^ Switch the appliance off. In the event of a power cut, pull up ^ Turn the temperature to g "cold". the emergency release lever. ^ Switch off at the mains and then re- If there is a power cut when the rotary move the plug from the socket. -
Page 15: Points On Ironing
Points on ironing The following notes are intended as helpful suggestions. You will probably find several alternative routines which suit your own method of working. Tea towels, hand towels, handker- chiefs and serviettes etc. Lay the item with the straight grain of the fabric to the feed board. - Page 16 Points on ironing Duvet covers If folds are acceptable: ^ First do up the poppers/buttons. Start ^ Fold the duvet cover lengthwise and the first run by carefully feeding this iron both sides. end in first on left side of the roller, taking care not to damage any but- Pillow cases tons.
-
Page 17: Maintenance And Care
Ironing covers are available from your Miele dealer or the Miele Spare parts department. The ironing cover should only be ^ Undo the ironing cover cords at each changed when the appliance is end of the roller. - Page 18 Maintenance and care ^ Unwind the cover. ^ Take hold of the cloth by each side edge, pull taut and keeping taut lay over the heater plate. The slot which holds the cotton undercloth is now at the top. ^ Completely unwind the cotton undercloth attached to the roller and let it hang down smoothly.
- Page 19 Maintenance and care After the roller has gone through three or four revolutions and the end of the ironing cover is under the heater plate: ^ switch off the appliance while keep- ing the foot pedal pressed down. The ironing cover is held firmly in place by the heater plate which is still low- ered.
-
Page 20: After Sales Service
After sales service In the event of a fault, please contact: – your Miele dealer or – the nearest Miele Service Depart- ment, (see address on the back page). When contacting the Service Depart- ment, please quote the Model and Se-... -
Page 21: Electrical Connection
Electrical connection Electrical connection U.K. Important The appliance is supplied with a mains The wires in the mains lead are col- cable and moulded plug ready for con- oured in accordance with the following nection to an a.c. single phase code: 220 –... - Page 22 (as applicable to the design of the plug fitted). The correct fuse rating of the replace- ment fuses that are ASTA approved to BS 1362 should be fitted. Replacement fuse covers may be purchased from your local electrical supplier, or Miele Service agent.
-
Page 23: Electrical Connection Aus / Nz
Electrical connection Electrical connection AUS / NZ Important The appliance is supplied with a mains The wires in the mains lead are col- cable and moulded plug ready for con- oured in accordance with the following nection to an a.c. single phase code: 220 –... -
Page 24: Technical Data
Technical data Height 96 cm Width 105 cm Depth 38 cm Weight ca. 38 kg max. load 372 Newton Voltage see data plate Rated load see data plate Fuse rating see data plate Test certificates awarded Radio/TV suppressed, VDE Australia C-Tick Mark, acc. - Page 27 Technical data...
- Page 28 Alteration rights reserved /003 - 1202 M.-Nr. 05 460 232 This paper consists of cellulose which has been bleached without the use of chlorine.