Table of Contents
Advertisement
Available languages
Available languages
Quick Links
Advertisement
Chapters
Table of Contents

Related Manuals for Yamaha isx-b820


Summary of Contents for Yamaha isx-b820
- Page 1 ABLV INTEGRATED AUDIO SYSTEM ISX-B820 OWNER’S MANUAL MANUAL DE INSTRUCCIONES...
- Page 2 TO REDUCE THE RISK OF FIRE OR ELECTRIC SHOCK, and may cause fire, damage to this unit, and/or personal DO NOT EXPOSE THIS UNIT TO RAIN OR MOISTURE. injury. Yamaha will not be held responsible for any damage resulting from use of this unit with a voltage CAUTION other than specified.
-
Page 3: Table Of Contents
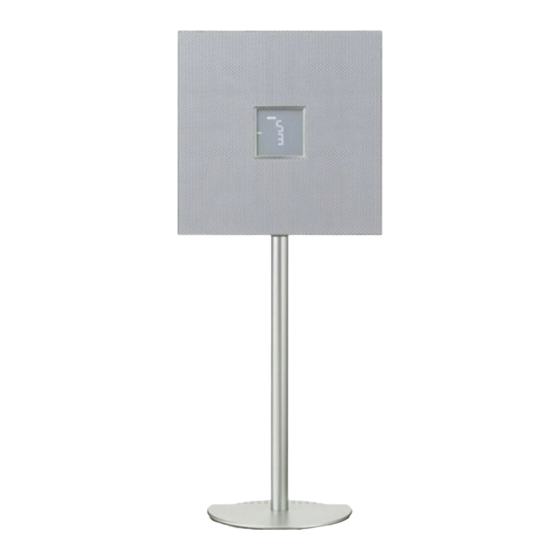
Keep the USB cap out of stand. Read the separate Base reach of children so as to Assembly Guide for information Support ISX-B820 ensure that it is not on how to assemble the stand. Cable clamp mistakenly swallowed. Screw set... -
Page 4: Names Of Parts And Their Functions
NAMES OF PARTS AND THEIR FUNCTIONS Top panel AUTO BEEP SOURCE + BEEP SOURCE DIMMER CLOCK ALARM TYPE LABEL SIDE VOLUME SOURCE ALARM SNOOZE SLEEP PRESET SNOOZE/SLEEP (Power) Set the sleep timer or switch the alarm to snooze mode Press to turn the system on/off. Time is displayed on the front (P. -
Page 5: Front Panel Display
NAMES OF PARTS AND THEIR FUNCTIONS Front panel display Play/shuffle/repeat indicator Displays the playback mode (P. 6, 9). Remote control signal receiver Clock indicator Shows the clock hour hand (P. 5). Source indicator Shows selected source. Bluetooth indicator Turns on if this unit is connecting via Bluetooth (P. 10, 11). Sleep indicator Turns on if the sleep timer has been set (P. - Page 6 NAMES OF PARTS AND THEIR FUNCTIONS Remote control Remote control signal transmitter (Power) Press to turn the system on/off. ALARM Switches the alarm on/off. SNOOZE/SLEEP Bluetooth Set the sleep timer or switch the alarm to snooze mode (P. 16, 17). Source button Switch the source to be played.
-
Page 7: Adjusting The Clock
ADJUSTING THE CLOCK Setting the time Move the CLOCK switch on the rear panel to SET. Top panel Rear panel SOURCE + BEEP AUTO BEEP SOURCE DIMMER CLOCK ALARM TYPE LABEL SIDE VOLUME SOURCE ALARM SNOOZE SLEEP PRESET Set the time with Set time (flashing) Move the CLOCK switch on the rear panel to CLOCK1 or CLOCK2. -
Page 8: Listening To Ipod
LISTENING TO iPod Playing the iPod For details on compatible iPod models, refer to “SPECIFICATIONS” (P. 22). Connect an iPod to the iPod dock. Top panel Press SOURCE and set iPod as the playback AUTO BEEP SOURCE + BEEP SOURCE DIMMER CLOCK ALARM TYPE... -
Page 9: Listening To Cd And Usb Devices
LISTENING TO CD AND USB DEVICES The unit will operate as follows when playing back tracks/files on CD/USB devices. • If the CD/USB device being played back is stopped, the track that was being played back will start playing from the beginning of the track the next time playback begins. - Page 10 LISTENING TO CD AND USB DEVICES Listening to a data CD Press SOURCE to set CD as the playback source. Top panel Insert the data CD into the Disc slot with the AUTO BEEP SOURCE + BEEP label side facing toward the front of the unit. SOURCE CLOCK DIMMER...
-
Page 11: Listening To A Usb Device
LISTENING TO CD AND USB DEVICES Listening to a USB device Press SOURCE and set USB as the playback Top panel source. SOURCE + BEEP AUTO BEEP SOURCE CLOCK ALARM TYPE Connect a USB device to the USB port. DIMMER Playback starts automatically. -
Page 12: Listening To Music From Your Bluetooth Component
SNOOZE SLEEP PRESET From the Bluetooth connection list of the other component, choose this unit (ISX-B820 Yamaha). When pairing has been completed, your iPod touch/iPhone/ iPad will indicate “Connected”. The Bluetooth indicator on the front panel display of this unit will light. -
Page 13: Listening To A Bluetooth Component
In the Bluetooth settings of the other component, turn Bluetooth on. From the Bluetooth connection list of the other component, choose this unit (ISX-B820 Yamaha). The Bluetooth connection will be established, and the Bluetooth indicator on the front panel display of this unit will light. -
Page 14: Listening To Fm Stations
LISTENING TO FM STATIONS Selecting the FM station Press SOURCE and set FM as the playback source. Top panel AUTO BEEP SOURCE + BEEP SOURCE DIMMER CLOCK ALARM TYPE Reception frequency LABEL SIDE VOLUME SOURCE ALARM SNOOZE SLEEP PRESET Press to tune the FM station. -
Page 15: Listening To External Sources
LISTENING TO EXTERNAL SOURCES Selecting a preset FM station Press SOURCE and set FM as the playback source. Top panel Press PRESET repeatedly to select the preset FM AUTO BEEP SOURCE + BEEP SOURCE DIMMER CLOCK ALARM TYPE station. Using the remote control LABEL SIDE Press PRESET VOLUME... -
Page 16: Using The Alarm Function
Source Playback method Function The unit resumes play from the last track you played. If you’ve created a playlist* with the name “ALARM Yamaha DTA” in advance, the playlist stored on the iPod can be played back iPod Resume repeatedly. - Page 17 Press PRESET • When iPod is set as the source, the unit plays back the “ALARM Yamaha DTA” playlist at the set alarm time. If this playlist cannot be Note found within the iPod, the unit resumes play from the last track you The alarm setting will be erased if the system is turned off without properly played (resume).
- Page 18 USING THE ALARM FUNCTION Turning the alarm on/off Press ALARM. Top panel When the alarm is on, the alarm indicator ( ) is shown, AUTO BEEP SOUR and the alarm time is shown for a while. If you press ALARM DIMMER CLOCK ALARM...
-
Page 19: Using The Sleep Timer
USING THE SLEEP TIMER You can set the time to turn off the system automatically. Press SNOOZE/SLEEP a number of times to set Top panel the time until the system turns off. AUTO BEEP SOURC DIMMER CLOCK ALARM T The sleep timer can be set to 30, 60, 90 and 120 minutes. When the time is set, the sleep indicator ( ) is shown on the front panel display. -
Page 20: Troubleshooting
If there is a problem with the unit, check the following list first. If you cannot resolve the problem with the suggested solutions or if the problem is not listed below, turn off and unplug the system, and consult the nearest authorized Yamaha dealer or service center. -
Page 21: Usb Device Playback
TROUBLESHOOTING CD playback Problem Cause Solution Disc cannot be inserted. The system is set to power save mode. Press to cancel the power save mode (☞ P. 2). Some button operations do not work. The disc loaded into the unit may not be Use a disc supported by the unit (☞... - Page 22 TROUBLESHOOTING Bluetooth Problem Cause Solution Cannot make this unit paired with the The other component does not support A2DP. Perform pairing operations with a component other component. which supports A2DP. A Bluetooth adaptor, etc. that you want to pair with Use a Bluetooth adaptor, etc.
-
Page 23: Notes On Discs And Usb Devices
• Do not connect devices other than USB mass storage class devices (such as USB chargers or USB hubs), PCs, card readers, an external HDD, etc. • Yamaha will not be held responsible for any damage to or data loss on the USB device occurring while the device is connected to this unit. -
Page 24: Specifications
• Yamaha does not guarantee all wireless connections between this unit and devices compatible with Bluetooth function. - Page 25 Directive for the chemical involved. shall immediately discontinue using the software. We, Yamaha Music Europe GmbH hereby declare that this unit is in compliance with the essential requirements and other relevant provisions of Directive 1999/5/EC.
- Page 26 PRECAUCIÓN aparato y/o lesiones a las personas. Yamaha no se hará Peligro de explosión si la pila se sustituye incorrectamente. responsable de ningún daño debido al uso de este aparato Sustitúyala por otra del mismo tipo o de un tipo equivalente.
-
Page 27: Acerca De Este Manual
Base Lea la Guía de montaje Mantenga el tapón para Soporte aparte para aprender a USB fuera del alcance de ISX-B820 Abrazadera de cable montar la peana. los niños, para evitar que Conjunto de tornillos se lo traguen por accidente. -
Page 28: Nombres De Las Partes Y Sus Funciones
NOMBRES DE LAS PARTES Y SUS FUNCIONES Panel superior AUTO BEEP SOURCE + BEEP SOURCE DIMMER CLOCK ALARM TYPE LABEL SIDE VOLUME SOURCE ALARM SNOOZE SLEEP PRESET ALARM (Alimentación) Activa o desactiva la alarma y permite ajustar varias Pulse este botón para encender o apagar el sistema. Cuando el configuraciones de alarmas (P. -
Page 29: Panel Posterior
NOMBRES DE LAS PARTES Y SUS FUNCIONES Pantalla del panel frontal Indicador de reproducción/reproducción aleatoria/repetición Muestra el modo de reproducción (P. 6, 9). Receptor de señales del mando a distancia Indicador de reloj Muestra la manecilla de hora del reloj (P. 5). Indicador de fuente Muestra la fuente seleccionada. - Page 30 NOMBRES DE LAS PARTES Y SUS FUNCIONES Mando a distancia Transmisor de señales del mando a distancia (Alimentación) Pulse este botón para encender o apagar el sistema. ALARM Activa o desactiva la alarma. SNOOZE/SLEEP Bluetooth Configure el temporizador para dormir o cambie la alarma al modo de repetición (P.
-
Page 31: Ajuste Del Reloj
AJUSTE DEL RELOJ Configuración de la hora Mueva el conmutador CLOCK del panel posterior Panel superior a SET. SOURCE + BEEP AUTO BEEP SOURCE DIMMER CLOCK ALARM TYPE Panel posterior LABEL SIDE VOLUME SOURCE ALARM SNOOZE SLEEP PRESET Programe la hora con Programar la hora (parpadeando) Mueva el conmutador CLOCK del panel posterior... -
Page 32: Escuchar El Ipod
ESCUCHAR EL iPod Reproducir el iPod Para obtener información sobre los modelos de iPod compatibles, consulte “ESPECIFICACIONES” (P. 22). Conecte un iPod a la base para iPod. Panel superior Pulse SOURCE y configure iPod como la fuente de AUTO BEEP SOURCE + BEEP SOURCE DIMMER... -
Page 33: Escuchar Un Cd Y Un Dispositivo Usb
ESCUCHAR UN CD Y UN DISPOSITIVO USB La unidad funcionará del siguiente modo al reproducir pistas o archivos de CD/dispositivos de USB. • Si se detiene el CD/dispositivo de USB que se está reproduciendo, la pista que se estaba reproduciendo empezará a reproducirse desde el principio de la pista la próxima vez que empiece la reproducción. - Page 34 ESCUCHAR UN CD Y UN DISPOSITIVO USB Cómo escuchar un CD de datos Pulse SOURCE y configure CD como la fuente de Panel superior reproducción. AUTO BEEP SOURCE + BEEP Introduzca el CD de datos en la ranura del SOURCE CLOCK DIMMER ALARM TYPE...
- Page 35 ESCUCHAR UN CD Y UN DISPOSITIVO USB Escuchar un dispositivo USB Pulse SOURCE y configure USB como la fuente de Panel superior reproducción. SOURCE + BEEP AUTO BEEP SOURCE CLOCK ALARM TYPE Conecte un dispositivo USB al puerto USB. DIMMER La reproducción empezará...
-
Page 36: Escuchar Música Desde El Componente Bluetooth
ALARM SNOOZE SLEEP PRESET En la lista de conexiones a Bluetooth del otro componente, elija esta unidad (ISX-B820 Yamaha). Una vez finalizada la vinculación, el iPod touch/iPhone/iPad indicará “Conectado”. El indicador Bluetooth en la pantalla del panel frontal de esta unidad se iluminará. - Page 37 En los ajustes de Bluetooth del otro componente, active Bluetooth. En la lista de conexiones a Bluetooth del otro componente, elija esta unidad (ISX-B820 Yamaha). La conexión a Bluetooth se establecerá y el indicador Bluetooth en la pantalla del panel frontal de esta unidad se iluminará.
-
Page 38: Para Escuchar Emisoras De Radio
PARA ESCUCHAR EMISORAS DE RADIO Selección de la emisora FM Pulse SOURCE y configure FM como la fuente de Panel superior reproducción. AUTO BEEP SOURCE + BEEP SOURCE DIMMER CLOCK ALARM TYPE Frecuencia de LABEL SIDE recepción VOLUME SOURCE ALARM SNOOZE SLEEP PRESET Pulse... -
Page 39: Escuchar Una Fuente Externa
ESCUCHAR UNA FUENTE EXTERNA Selección de una emisora de FM presintonizada Pulse SOURCE y configure FM como la fuente de Panel superior reproducción. AUTO BEEP SOURCE + BEEP SOURCE DIMMER CLOCK ALARM TYPE Pulse PRESET varias veces para seleccionar la emisora FM presintonizada. -
Page 40: Usar La Función De Alarma
La unidad reanudará la reproducción desde la última pista que reprodujo. Si ha creado de antemano una lista de reproducción* con el nombre “ALARM Yamaha DTA”, se puede reproducir repetidamente la lista iPod Reanudar de reproducción guardada en el iPod. - Page 41 • Si elige el iPod como fuente, la unidad reproduce la lista de Pulse para ajustar la hora de la alarma. reproducción “ALARM Yamaha DTA” a la hora de alarma programada. Si esta lista de reproducción no puede encontrarse en el Uso del mando a distancia iPod, la unidad reanudará...
- Page 42 USAR LA FUNCIÓN DE ALARMA Activación/desactivación de la alarma Pulse ALARM. Panel superior Cuando la alarma está activada, el indicador de alarma ( AUTO BEEP SOUR se ilumina y la hora de alarma se muestra por un instante. Si DIMMER CLOCK ALARM pulsa ALARM de nuevo, se desactivarán el indicador de...
-
Page 43: Uso Del Temporizador Para Dormir
USO DEL TEMPORIZADOR PARA DORMIR Puede establecer la hora a la que desea apagar el sistema automáticamente. Pulse SNOOZE/SLEEP varias veces para Panel superior programar el tiempo de desactivación del sistema. AUTO BEEP SOURC DIMMER CLOCK ALARM T Usted puede programar el temporizador para dormir en 30, 60, 90 ó... -
Page 44: Solución De Problemas
Si tiene algún problema con la unidad, compruebe primero la siguiente lista. Si no puede solucionar su problema con las siguientes soluciones o si el problema no está en la lista, apague y desenchufe la unidad y a continuación, consulte al concesionario o centro de servicio Yamaha autorizado más cercano. General... - Page 45 SOLUCIÓN DE PROBLEMAS Reproducción de CD Problema Causa Solución No se puede introducir el disco. El sistema se encuentra en el modo de ahorro de Pulse para cancelar el modo de ahorro de energía. energía (☞ P. 2). Algunas operaciones que se realizan con Es posible que el disco cargado en la unidad no sea Utilice un disco compatible con la unidad los botones no funcionan.
- Page 46 SOLUCIÓN DE PROBLEMAS Bluetooth Problema Causa Solución Esta unidad no puede vincularse con el El otro componente no es compatible con A2DP. Realice las operaciones de vinculación con un otro componente. componente compatible con A2DP. El adaptador de Bluetooth, etc. que desea vincular Utilice un adaptador de Bluetooth, etc.
-
Page 47: Notas Sobre Los Discos Y Los Dispositivos Usb
* CD-R/RW formato ISO 9660 • Yamaha no se responsabilizará de los daños causados o las pérdidas de datos en el dispositivo USB que tengan lugar cuando el dispositivo esté conectado a esta unidad. -
Page 48: Especificaciones
• Yamaha no garantiza todas las conexiones inalámbricas entre esta unidad y dispositivos compatibles con la función Bluetooth. - Page 49 Si las estipulaciones de esta cláusula y de este contrato no se pueden cumplir, el usuario deberá suspender inmediatamente la utilización del software. Nosotros, Yamaha Music Europe GmbH, declaramos por la presente que esta unidad cumple con los requisitos esenciales y otras disposiciones pertinentes de la Directiva 1999/5/CE.
- Page 50 ◆ For U.K. customers VAROITUS Muiden kuin tässä esitettyjen toimintojen säädön tai asetusten muutto If the socket outlets in the home are not suitable for the plug supplied saattaa altistaa vaaralliselle säteilylle tai muille vaarallisille with this appliance, it should be cut off and an appropriate 3 pin plug toiminnoille.
- Page 51 Printed in China ZF20180 © 2012 Yamaha Corporation...