Sign In
Upload
Manuals
Brands
JVC Manuals
Projector
DLA-G150CLE
JVC DLA-G150CLE Manuals
Manuals and User Guides for JVC DLA-G150CLE. We have
4
JVC DLA-G150CLE manuals available for free PDF download: Instructions Manual, Operating Instructions Manual
JVC DLA-G150CLE Instructions Manual (394 pages)
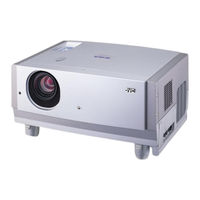
D-ILA PROJECTOR
Brand:
JVC
| Category:
Projector
| Size: 14.66 MB
Table of Contents
English
6
Safety Precautions
3
Power Connection
5
Table of Contents
6
Contents
7
Accessories
7
Controls and Features
8
Front Side / Top Surface / Right Side
8
Left-Hand Side / Rear Side
9
Bottom Surface
10
Control Panel on the Projector
11
Temp Indicator
12
Connector Panel
13
Remote Control Unit
14
Installing Batteries
16
Precautions for Using Batteries
16
Installing the Projector
17
Precautions for Installation
17
Adjusting the Inclination of the Projector
18
Installing the Projector against the Screen
19
Projection Distance and Screen Size
20
Setting the Amount of Lens Shifting
21
Effective Range and Distance of the Remote Control Unit
22
Setting the Position Selecting Screw for Ceiling Mounting
23
When Installing (Adjusting/Setting) the Unit
23
Connecting to Various Devices
24
Signals that Can be Input to the Projector
24
Connecting to Video Devices
26
Connecting to Hi-Vision Devices/DVD Players
27
Connecting to Other Devices
28
Connecting to Devices Which Control the Projector
29
Connecting to Computer Devices
30
Connecting to DVI
31
How to Attach the Ferrite Core
31
Connecting the Power Cord
32
Removing the Lens Cap
32
Basic Operations
33
Turning on the Power
34
Select the Input Source to be Projected
35
Adjust the Screen Size (Zooming)
36
Adjust Focus
36
Setting the Screen Aspect Ratio
36
Turning off Image (HIDE)
37
Removing the Trapezoidal Distortion of the
37
Quick Alignment Function (QUICK ALIGN.)
38
Displaying a Still Picture (FREEZE)
39
Zooming a Part of the Image (DIGITAL ZOOM T/W)
39
Menu Operations
40
Basic Menu Operation
45
Changing the Color System (Video Menu Mode Only)
47
Changing the Language Display
48
Changing the Screen Aspect Ratio/Hdtv Format (Video Menu Mode Only)
48
Adjusting Tracking/Phase
49
(Video Menu Mode Only)
51
Adjusting Picture Quality
51
Adjusting Color Temperature
52
Adjusting the Video Screen/Menu Position
53
Changing the Image Gamma/Aspect Ratio (Video Menu Mode Only)
54
Changing the Image Size - Resize Function (PC Menu Mode Only)
55
Changing the Clamp Pulse Position (PC Menu Mode Only)
55
Setting and Adjusting Other Functions (OPTIONS)
56
Getting Information
58
Replacing the Fuse
59
Replacing the Light-Source Lamp
60
Resetting the Lamp Use Time
64
Cleaning and Replacing the Filter Cover
65
Troubleshooting
66
Warning Indication
68
Warning Messages
69
Specifications
72
Outside Dimensions
74
Pin Assignment (Specifications for Terminals)
75
RS-232C External Control
76
Appendix
78
Wichtige Informationen
81
Deutsch
84
Inhalt
85
Sicherheitsmassnahmen
85
Zubehörteile
85
Bedienungselemente und Merkmale
86
Vorderseite / Oberseite / Rechte Seite
86
Linke Seite / Rückseite
87
Unterseite
88
Bedienfeld am Projektor
89
Anschlußfeld
91
Fernbedienungsteil
92
Einsetzen der Batterien
94
Vorsichtsmaßnahmen für die Verwendung von Batterien
94
Installieren des Projektors
95
Vorsichtsmaßnahmen für die Installation
95
Einstellung der Neigung des Projektors
96
Installieren des Projektors gegen die Projektionswand
97
Projektionsabstand und Projektionswandgröße
98
Einstellung des Grades der Objektivverschiebung
99
Wirkungswinkel und Bereich der Fernbedienung
100
Einstellung der Positionswahlschraube für Deckenanbringung
101
Bei Installation (Justierung / Einstellung) des Geräts
101
Verbindung mit Verschiedenen Geräten
102
Mögliche Eingabesignale für den Projektor
102
Anschluß an Videogeräte
104
Verbindung mit Hi-Vision-Geräten/DVD-Spielern
105
Verbindung mit Verschiedenen Geräten
106
Anschluß an Geräte, die den Projektor Steuern
107
Verbindung mit Computergeräten
108
Verbindung mit DVI
109
Anbringen des Ferritkerns
109
Anschluß des Netzkabels
110
Objektivdeckel Abnehmen
110
Grundfunktionen
111
Strom Einschalten
112
Eingabequelle für die Projektion Wählen
113
Einstellung der Bildgröße (Zoomen)
114
Anpassen der Bildschärfe (Scharfstellring)
114
Einstellen des Bildseitenverhältnisses
114
Abschalten des Bildsignals (HIDE)
115
Bereinigen einer Trapezverzerrung des Bildes
115
Schnellanpassung (QUICK ALIGN.)
116
Anzeige eines Standbildes (FREEZE)
117
Zoomen eines Teils des Bildes (DIGITAL ZOOM T/W)
117
Menüfunktionen
118
Grundfunktionen des Menüs
123
Wechsel des Farbsystems (nur IM Video-Menü-Modus)
125
Ändern der Sprache für die Anzeige
126
Einstellung des Bildseitenverhältnisses/Hdtv-Formats (nur Video-Menü-Modus)
126
Anpassung der Spurlage / Phase
127
Einstellung für die Betrachtung von Filmmaterial (nur IM Video-Menümodus)
128
Anpassen der Bildqualität
129
Einstellung der Farbtemperatur
130
Anpassung der Videoprojektion/ Menüposition
131
Wechsel des Bildfarbtons/Seitenverhältnisses (nur IM Video-Menü-Modus)
132
Wechsel der Bildgröße - Größenanpassungsfunktion (nur IM PC-Menü-Modus)
133
Ändern der Tastimpulsposition (nur PC-Menü-Modus)
133
Einstellung und Anpassung Sonstiger Funktionen (OPTIONEN)
134
Abfrage von Informationen
136
Austausch der Sicherung
137
Ersetzen der Projektionslampe
138
Reinigung und Austausch des Filterdeckels
143
Fehlersuche
144
Warnanzeige
146
Warnmeldungen
147
Spezifikationen
150
Äußere Abmessungen
152
RS-232C Externe Steuerung
154
Anhang
156
Informations Importantes
159
Français
162
Sécurité
163
Table des Matières
163
Accessoires
163
Commandes Et Fonctions
164
Face Avant / Dessus / Côté Droit
164
Face Arrière / Côté Gauche
165
Dessous
166
Panneau de Commande du Projecteur
167
Panneau du Connecteur
169
Télécommande
170
Mise en Place des Piles
172
Précautions Pour L'utilisation des Piles
172
Installation du Projecteur
173
Précautions Pour L'inclinaison
173
Réglage de L'inclination du Projecteur
174
Installation du Projecteur Par Rapport À L'écran
175
Distance de Projection Et Taille de L'écran
176
Objectifs en Option
176
Réglage du Décalage de L'objectif
177
Distance de Fonctionnement Effectif de la Télécomande
178
Réglage de la Vis de Sélection de Position Pour un Montage Au Plafond
179
Lors de L'installation (Ajustements/Réglages) de L'appareil
179
Raccordement Avec Différents Appareils
180
Signaux Pouvant Être Entrés Dans Le Projecteur
180
Raccordement À des Appareils VIDéo
182
Raccordement À des Appareils Hi-Vision/Lecteurs DVD
183
Raccordement À D'autres Appareils
184
Raccordement À des Appareils Qui Contrôlent Le Projecteur
185
Raccordement Aux Ordinateurs
186
Raccordement Au DVI (DV-I)
187
Procédure de Fixation du Noyau en Ferrite
187
Branchement du Cordon D'alimentation
188
Dépose du Capuchon D'objectif
188
Fonctionnement de Base
189
Mise Sous Tension
190
Mise Hors Tension
190
Sélection de la Source D'entrée À Projeter
191
Réglage du Format D'écran (Zoom)
192
Ajustement de la Mise Au Point
192
Réglage du Format de L'écran
192
Coupure de L'image (HIDE)
193
Suppression de la Distorsion Trapézoïdale de L'image
193
Fonction D'alignement Rapide (QUICK ALIGN.)
194
Affichage D'une Image Fixe (FREEZE)
195
Zoom Sur Une Partie de L'image (DIGITAL ZOOM T/W)
195
Fonctionnement du Menu
196
Fonctionnement du Menu de Base
201
Changement du Système de Couleur (Mode Menu VIDéo Uniquement)
203
Changement de L'affichage de la Langue
204
Changement du Format D'écran /HDTV (Mode Menu VIDéo Uniquement)
204
Ajustement de L'alignement/Phase
205
Réglage Pour la Visualisation de Logiciel VIDéo (Mode de Menu VIDéo Uniquement)
206
Ajustement de la Qualité de L'image
207
Réglage de la Température de Couleur
208
Ajustement de la Position du Menu/Écran VIDéo
209
Changement de la Tonalité de L'image/Format D'image (Mode Menu VIDéo Uniquement)
210
Changement du Format D'image - Fonction de Redimension (Mode Menu PC Uniquement)
211
Changement de la Position de L'attache D'impulsion (Mode Menu PC Uniquement)
211
Réglage Et Ajustement D'autres Fonctions (OPTIONS)
212
Pour Obtenir des Informations
214
Remplacement du Fusible
215
Remplacement de la Lampe de Projection
216
Nettoyage Et Remplacement du Filtre du Couvercle
221
Dépannage
222
Indication D'avertissement
224
Messages D'avertissement
225
Spécifications
228
Dimensions Extérieures
230
Affectation des Broches (Spécifications Pour Les Prises)
231
Commande Externe RS-232C
232
Format de Commande
232
Annexe
234
Precauzioni DI Sicurezza
237
Italiano
240
Accessori
241
Comandi E Funzioni
242
Lato Anteriore / Superficie Superiore / Lato Destro
242
Lato Sinistro / Lato Posteriore
243
Superficie Inferiore
244
Pannello Comandi del Proiettore
245
Pannello Connettori
247
Telecomando
248
Inserimento Delle Pile
250
Precauzioni Per L'uso Delle Pile
250
Installazione del Proiettore
251
Precauzioni Per L'installazione
251
Regolazione Dell'inclinazione del Proiettore
252
Installazione del Proiettore Rispetto Allo Schermo
253
Distanza DI Proiezione E Dimensioni Dello Schermo
254
Impostazione Dell'entità DI Spostamento Lente
255
Raggio E Distanza Effettivi del Telecomando
256
Regolazione Della Vite DI Selezione Posizione Per Il Montaggio a Soffitto
257
Durante L' Installazione (Regolazione / Impostazione) Dell'apparecchio
257
Collegamento a Vari Dispositivi
258
Segnali Che Possono Essere Immessi al Proiettore
258
Collegamento a Dispositivi Video
260
Collegamento a Dispositivi Hi-Vision/Lettori DVD
261
Collegamento Ad Altri Dispositivi
262
Collegamento a Dispositivi Che Controllano Il Proiettore
263
Collegamento a Dispositivi Computer
264
Collegamento al DVI
265
Collegamento del Nucleo DI Ferrite
265
Collegametno del Cavo DI Alimentazione
266
Rimozione del Coprilente
266
Operazioni Basilari
267
Appendice
268
Accensione
268
Selezionare la Fonte in Ingresso da Proiettare
269
Impostazione del Rapporto DI Aspetto (Formato) Dello Schermo
270
Regolazione Della Messa a Fuoco (Anello DI Fuoco)
270
Regolazioni Delle Dimensioni Della Schermata (Zoom)
270
Disattivazione Dell'immagine (HIDE)
271
Eliminazione Della Distorsione Trapezoidale Dell'immagine
271
Funzione DI Allineamento Rapido (QUICK ALIGN.)
272
Visualizzazione DI un Fermo Immagine (FREEZE)
273
Zoomare Su Parte Dell'immagine (DIGITAL ZOOM T/W)
273
Operazioni DI Menu
274
Operazioni DI Menu Basilari
279
Cambiamento del Sistema DI Colore (solo Modo Menu Video)
281
Cambiamento Della Lingua DI Visualizzazione
282
Cambiamento del Rapporto DI Aspetto Dello Schermo/Formato HDTV (solo Modo Menu Video)
282
Regolazione DI Track / Fase
283
Impostazione Per la Visione DI Software DI Immagini (solo Modo Menu Video)
284
Regolazione Della Qualità DI Immagine
285
Regolazione Della Temperatura del Colore
286
Regolazione Della Schermata Video/Posizione DI Menu
287
Cambiamento del Tono Dell'immagine/Rapporto DI Aspetto (solo Modo Menu Video)
288
Cambiamento Delle Dimensioni Dell'immagine-Funzione Resize (solo Modo Menu PC)
289
Cambiamento Della Posizione DI Impulso Clamp (solo Modo DI Menu PC)
289
Impostazione E Regolazione DI Altre Funzioni (OPZIONI)
290
Visione Delle Informazioni
292
Sostituzione del Fusibile
293
Sostituzione Della Lampada DI Proiezione
294
Pulizia E Sostituzione del Coperchio Filtro
299
Soluzione DI Problemi
300
Indicazione DI Avvertimento
302
Messaggi DI Avvertimento
303
Dati Tecnici
306
Dimensioni Esterne
308
Assegnazione Piedini (Specifiche Per I Terminali)
309
Controllo Esterno RS-232C
310
Precauciones de Seguridad
315
Español
318
Accesorios
319
Índice
319
Precauciones de Seguridad . 1
319
Controles y Características
320
Lado Delantero / Superficie Superior / Lado Derecho
320
Lado Izquierdo / Lado Trasero
321
Lado Inferior
322
Panel de Control del Proyector
323
Panel de Conexiones
325
Mando a Distancia
326
Instalación de las Pilas
328
Precauciones sobre el Uso de las Pilas
328
Instalación del Proyector
329
Precauciones de Instalación
329
Ajuste de la Inclinación del Proyector
330
Instalación del Proyector Frente a la Pantalla
331
Distancia de Proyección y Tamaño de la Pantalla
332
Lentes Opcionales
332
Ajuste del Grado de Movimiento de la Lente
333
Margen y Distancia de Funcionamiento Efectivos del Mando a Distancia
334
Ajuste del Tornillo de Selección de Posición para Montaje en Techo
335
Cuando Instale (Ajuste/Reglaje) la Unidad
335
Conexión a Los Diversos Dispositivos
336
Señales que Pueden Introducirse al Proyector
336
Conexión a Los Dispositivos de Vídeo
338
Conexión a Los Dispositivos Hi-Vision/Lector de DVD
339
Conexión a Otros Dispositivos
340
Conexión a Los Dispositivos de Control del Proyector
341
Conexión a Ordenadores
342
Conexión al DVI
343
Cómo Se Coloca el Núcleo de Ferrita
343
Conexión del Cable de Alimentación
344
Para Quitar la Tapa de la Lente
344
Operaciones Básicas
345
Conexión de la Alimentación
346
Selección de la Fuente de Entrada a Proyectar
347
Ajuste del Tamaño de Pantalla (Zoom)
348
Ajuste del Enfoque
348
Selección del Formato de Imagen
348
Ocultar la Imagen (HIDE)
349
Para Quitar la Distorsión Trapezoidal de la Imagen
349
Función de Alineación Rápida (QUICK ALIGN.)
350
Visualización de una Imagen Fija (FREEZE)
351
Acercamiento O Alejamiento de una Parte de la Imagen (DIGITAL ZOOM T/W)
351
Empleo de Los Menús
352
Uso Básico de Los Menús
357
Cambio del Sistema de Color (sólo en el Modo Menú de Vídeo)
359
Cambio del Idioma Visualizado
360
Cambio de la Relación de Aspecto de Pantalla/Formato HDTV (Modo de Menú de Vídeo Solamente)
360
Ajuste del Seguimiento/Fase
361
Configuración del Equipo para Ver Películas (sólo en el Modo de Menú de Vídeo)
362
Ajuste de la Calidad de la Imagen
363
Ajuste de la Temperatura de Color
364
Ajuste de la Posición de la Pantalla de Vídeo/Menú
365
Cambio del Tono de Imagen/Relación de Aspecto (sólo en el Modo Menú de Vídeo)
366
Cambio del Tamaño de la Imagen - Función de Redimensión (sólo en el Modo Menú de PC)
367
Cambio de la Posición de Abrazadera (Modo Menú PC Solamente)
367
Establecimiento y Ajuste de Otras Funciones (OPCIONES)
368
Obtención de Información
370
Sustitución del Fusible
371
Sustitución de la Lámpara de la Fuente de Luz
372
Limpieza y Sustitución de la Cubierta de Filtro
377
Solución de Problemas
378
Indicación de Aviso
380
Mensajes de Aviso
381
Especificaciones
384
Dimensiones Exteriores
386
Vista Lateral
386
Asignación de Clavijas (Especificaciones para Los Terminales)
387
Control Externo RS-232C
388
Appéndice
390
Advertisement
JVC DLA-G150CLE Instructions Manual (160 pages)
D-ILA Projector
Brand:
JVC
| Category:
Projector
| Size: 5.92 MB
Table of Contents
English
6
About the Installation Place
4
Important Information
4
Important Safeguards
4
Table of Contents
6
Contents
7
Safety Precautions
7
Accessories
7
Controls and Features
8
Front Side / Top Surface / Right Side
8
Left-Hand Side / Rear Side
9
Bottom Surface
10
Control Panel on the Projector
11
Temp Indicator
12
Connector Panel
13
Remote Control Unit
14
Installing Batteries
16
Precautions for Using Batteries
16
Installing the Projector
17
Precautions for Installation
17
Adjusting the Inclination of the Projector
18
Installing the Projector against the Screen
19
Projection Distance and Screen Size
20
Setting the Amount of Lens Shifting
21
Effective Range and Distance of the Remote Control Unit
22
Setting the Position Selecting Screw for Ceiling Mounting
23
When Installing (Adjusting/Setting) the Unit
23
Connecting to Various Devices
24
Signals that Can be Input to the Projector
24
Connecting to Video Devices
26
Connecting to Hi-Vision Devices/DVD Players
27
Connecting to Other Devices
28
Connecting to Devices Which Control the Projector
29
Connecting to Computer Devices
30
Connecting to DVI
31
How to Attach the Ferrite Core
31
Connecting the Power Cord
32
Removing the Lens Cap
32
Basic Operations
33
Turning on the Power
34
Select the Input Source to be Projected
35
Adjust the Screen Size (Zooming)
36
Adjust Focus
36
Setting the Screen Aspect Ratio
36
Turning off Image (HIDE)
37
Removing the Trapezoidal Distortion of the
37
Quick Alignment Function (QUICK ALIGN.)
38
Displaying a Still Picture (FREEZE)
39
Zooming a Part of the Image (DIGITAL ZOOM T/W)
39
Menu Operations
40
Basic Menu Operation
45
Changing the Color System (Video Menu Mode Only)
47
Changing the Language Display
48
Changing the Screen Aspect Ratio/Hdtv Format (Video Menu Mode Only)
48
Adjusting Tracking/Phase
49
(Video Menu Mode Only)
51
Adjusting Picture Quality
51
Adjusting Color Temperature
52
Adjusting the Video Screen/Menu Position
53
Changing the Image Gamma/Aspect Ratio (Video Menu Mode Only)
54
Changing the Image Size - Resize Function (PC Menu Mode Only)
55
Changing the Clamp Pulse Position (PC Menu Mode Only)
55
Setting and Adjusting Other Functions (OPTIONS)
56
Getting Information
58
Replacing the Fuse
59
Replacing the Light-Source Lamp
60
Resetting the Lamp Use Time
64
Cleaning and Replacing the Filter Cover
65
Troubleshooting
66
Warning Indication
68
Warning Messages
69
Specifications
72
Outside Dimensions
74
Pin Assignment (Specifications for Terminals)
75
RS-232C External Control
76
Appendix
78
Informations Importantes
82
Français
84
Table des Matières
85
Accessoires
85
Sécurité
85
Commandes Et Fonctions
86
Face Avant / Dessus / Côté Droit
86
Face Arrière / Côté Gauche
87
Dessous
88
Panneau de Commande du Projecteur
89
Panneau du Connecteur
91
Télécommande
92
Mise en Place des Piles
94
Précautions Pour L'utilisation des Piles
94
Installation du Projecteur
95
Précautions Pour L'inclinaison
95
Réglage de L'inclination du Projecteur
96
Installation du Projecteur Par Rapport À L'écran
97
Objectifs en Option
98
Distance de Projection Et Taille de L'écran
98
Réglage du Décalage de L'objectif
99
Distance de Fonctionnement Effectif de la Télécomande
100
Réglage de la Vis de Sélection de Position Pour un Montage Au Plafond
101
Lors de L'installation (Ajustements/Réglages) de L'appareil
101
Raccordement Avec Différents Appareils
102
Signaux Pouvant Être Entrés Dans Le Projecteur
102
Raccordement À des Appareils VIDéo
104
Raccordement À des Appareils Hi-Vision/Lecteurs DVD
105
Raccordement À D'autres Appareils
106
Raccordement À des Appareils Qui Contrôlent Le Projecteur
107
Raccordement Aux Ordinateurs
108
Raccordement Au DVI (DV-I)
109
Procédure de Fixation du Noyau en Ferrite
109
Branchement du Cordon D'alimentation
110
Dépose du Capuchon D'objectif
110
Fonctionnement de Base
111
Mise Sous Tension
112
Mise Hors Tension
112
Sélection de la Source D'entrée À Projeter
113
Réglage du Format D'écran (Zoom)
114
Ajustement de la Mise Au Point
114
Réglage du Format de L'écran
114
Coupure de L'image (HIDE)
115
Suppression de la Distorsion Trapézoïdale de L'image
115
Fonction D'alignement Rapide (QUICK ALIGN.)
116
Affichage D'une Image Fixe (FREEZE)
117
Zoom Sur Une Partie de L'image (DIGITAL ZOOM T/W)
117
Fonctionnement du Menu
118
Fonctionnement du Menu de Base
123
Changement du Système de Couleur (Mode Menu VIDéo Uniquement)
125
Changement de L'affichage de la Langue
126
Changement du Format D'écran /HDTV (Mode Menu VIDéo Uniquement)
126
Ajustement de L'alignement/Phase
127
Réglage Pour la Visualisation de Logiciel VIDéo (Mode de Menu VIDéo Uniquement)
128
Ajustement de la Qualité de L'image
129
Réglage de la Température de Couleur
130
Ajustement de la Position du Menu/Écran VIDéo
131
Changement de la Tonalité de L'image/Format D'image (Mode Menu VIDéo Uniquement)
132
Changement du Format D'image - Fonction de Redimension (Mode Menu PC Uniquement)
133
Changement de la Position de L'attache D'impulsion (Mode Menu PC Uniquement)
133
Réglage Et Ajustement D'autres Fonctions (OPTIONS)
134
Pour Obtenir des Informations
136
Remplacement du Fusible
137
Remplacement de la Lampe de Projection
138
Nettoyage Et Remplacement du Filtre du Couvercle
143
Dépannage
144
Indication D'avertissement
146
Messages D'avertissement
147
Spécifications
150
Dimensions Extérieures
152
Affectation des Broches (Spécifications Pour Les Prises)
153
Format de Commande
154
Commande Externe RS-232C
154
Annexe
156
JVC DLA-G150CLE Operating Instructions Manual (80 pages)
Brand:
JVC
| Category:
Projector
| Size: 3.16 MB
Table of Contents
Section 1
3
Safety Precautions
2
Table of Contents
3
Accessories
3
Controls and Features
4
Front Side / Top Surface / Right Side
4
Left-Hand Side / Rear Side
4
Bottom Surface
5
Control Panel on the Projector
5
Connector Panel
6
Remote Control Unit
7
Precautions for Using Batteries
8
Installing the Projector
8
Precautions for Installation
8
Installing Batteries
8
Adjusting the Inclination of the Projector
9
Installing the Projector against the Screen
9
Projection Distance and Screen Size
10
Setting the Amount of Lens Shifting
10
When Installing (Adjusting/Setting) the Unit
11
Setting the Position Selecting Screw for Ceiling Mounting
11
Remote Control Unit
11
Signals that Can be Input to the Projector
12
Connecting to Various Devices
12
Connecting to Video Devices
13
Connecting to Hi-Vision Devices/DVD Players
13
Connecting to Other Devices
14
Connecting to Devices Which Control the Projector
14
Connecting to DVI
15
Connecting to Computer Devices
15
How to Attach the Ferrite Core
15
Connecting the Power Cord
16
Removing the Lens Cap
16
Basic Operations
16
Turning on the Power
17
Select the Input Source to be Projected
17
Turning off Image (HIDE)
18
Removing the Trapezoidal Distortion of the Image
18
Adjust the Screen Size (Zooming)
18
Setting the Screen Aspect Ratio
18
Adjust Focus
18
Quick Alignment Function (QUICK ALIGN.)
19
Displaying a Still Picture (FREEZE)
19
Zooming a Part of the Image (DIGITAL ZOOM T/W)
19
Menu Operations
20
Basic Menu Operation
22
Changing the Color System (Video Menu Mode Only)
23
Changing the Language Display
24
Changing the Screen Aspect Ratio/Hdtv Format (Video Menu Mode Only)
24
Adjusting Tracking/Phase
24
(Video Menu Mode Only)
25
Adjusting Picture Quality
25
Adjusting Color Temperature
26
Adjusting the Video Screen/Menu Position
26
Changing the Clamp Pulse Position
27
Changing the Image Gamma/Aspect Ratio (Video Menu Mode Only)
27
(PC Menu Mode Only)
27
Changing the Image Size - Resize Function
27
Setting and Adjusting Other Functions (OPTIONS)
28
Getting Information
29
Replacing the Fuse
29
Replacing the Light-Source Lamp
30
Cleaning and Replacing the Filter Cover
32
Troubleshooting
33
Warning Indication
34
Warning Messages
34
Specifications
36
Outside Dimensions
38
Pin Assignment (Specifications for Terminals)
38
RS-232C External Control
39
Appendix
40
Section 2
43
Accessories
44
Controls and Features
44
Front Side / Top Surface / Right Side
44
Bottom Surface
45
Left-Hand Side / Rear Side
45
Control Panel on the Projector
46
Connector Panel
47
Remote Control Unit
47
Installing Batteries
48
Precautions for Using Batteries
48
Adjusting the Inclination of the Projector
49
Installing the Projector
49
Precautions for Installation
49
Installing the Projector against the Screen
50
Projection Distance and Screen Size
50
Effective Range and Distance of the Remote Control Unit
51
Setting the Amount of Lens Shifting
51
Connecting to Various Devices
52
Setting the Position Selecting Screw for Ceiling Mounting
52
Signals that Can be Input to the Projector
52
When Installing (Adjusting/Setting) the Unit
52
Connecting to Video Devices
53
Connecting to Hi-Vision Devices/DVD Players
54
Connecting to Other Devices
54
Connecting to Computer Devices
55
Connecting to Devices Which Control the Projector
55
Connecting the Power Cord
56
Connecting to DVI
56
How to Attach the Ferrite Core
56
Removing the Lens Cap
56
Basic Operations
57
Turning on the Power
57
Adjust Focus
58
Adjust the Screen Size (Zooming)
58
Select the Input Source to be Projected
58
Setting the Screen Aspect Ratio
58
Quick Alignment Function (QUICK ALIGN.)
59
Removing the Trapezoidal Distortion of the Image
59
Turning off Image (HIDE)
59
Displaying a Still Picture (FREEZE)
60
Zooming a Part of the Image (DIGITAL ZOOM T/W)
60
Menu Operations
61
Basic Menu Operation
63
Changing the Color System (Video Menu Mode Only)
64
Changing the Language Display
64
Changing the Screen Aspect Ratio/Hdtv Format
64
Adjusting Tracking/Phase
65
(Video Menu Mode Only)
66
Adjusting Color Temperature
66
Adjusting Picture Quality
66
Adjusting the Video Screen/Menu Position
67
Changing the Image Gamma/Aspect Ratio
67
Changing the Clamp Pulse Position (PC Menu Mode Only)
68
Changing the Image Size - Resize Function (PC Menu Mode Only)
68
Options
68
Setting and Adjusting Other Functions
68
Getting Information
69
Replacing the Fuse
70
Replacing the Light-Source Lamp
70
Cleaning and Replacing the Filter Cover
73
Troubleshooting
74
Warning Indication
74
Warning Messages
75
Specifications
76
Outside Dimensions
77
Pin Assignment (Specifications for Terminals)
78
RS-232C External Control
78
Appendix
79
Advertisement
JVC DLA-G150CLE Operating Instructions Manual (80 pages)
D-ILA Projector
Brand:
JVC
| Category:
Projector
| Size: 2.93 MB
Advertisement
Related Products
JVC DLA-G150HT - Cineline Projector
JVC DLA-G15U - D-ila Projector, 1500 Ansi Lumens
JVC DLA-G150CL - D-ILA Projector - 100 ANSI Lumens
JVC DLA-G150HTE
JVC DLA-G150CLU
JVC DLA-G150
JVC DLA-G150HTU
JVC DLA-G15U-V - D-ila Cineline Projector
Jvc Professional DLA-G15
JVC DLA-G10U
JVC Categories
Car Receiver
Camcorder
TV
VCR
Stereo System
More JVC Manuals
Login
Sign In
OR
Sign in with Facebook
Sign in with Google
Upload manual
Upload from disk
Upload from URL