
Related Manuals for Swann SportsCam SW-DVR460


Summary of Contents for Swann SportsCam SW-DVR460
- Page 1 SportsCam™ Advanced security made easy Personal Video Recorder Operating Instructions www.swannsecurity.com MSAC140910E...
-
Page 2: (Important) Legal Mumbo Jumbo
(Important) Legal Mumbo Jumbo FCC Verification: NOTE: This equipment has been tested and found to comply with the limits for Class B digital device, pursuant to part 15 of the FCC Rules. These limits are designed to provide reasonable protection against harmful interference in a residential installation. -
Page 3: Table Of Contents
Contents (stuff you’ll read after this) (Important) Legal Mumbo Jumbo Contents (stuff you’ll read after this) Stuff you Already Know About Bits (what’s in the pack) Where Stuff is At (the layout of the thing) The Waterproof Case Preparing the SportsCam Charging the SportsCam Pushing Buttons (an “Operating Guide”) LEDs and what they mean... -
Page 4: Stuff You Already Know About
You’ve gone and done it now. Really taken the cake. You’ve bought a SportsCam - the miniature, waterproof, easy to use, personal action video recorder from Swann. Kudos to you! Can’t say we’re not envious. You’ve nabbed yourself a camera that’s perfect for capturing your insane antics and displays of immense skill*. -
Page 5: Bits (What's In The Pack)
Bits (what’s in the pack) Waterproof Case Accessories (Adhesive fabric pads for #15 & lanyard) SportsCam USB Adapter Arm Strap Standard Clip USB Cable Standard Clip for Case Elastic Strap Head/Arm Strap for Case Silicon Sleeve Adjustable Sports Clip Adhesive Fabric Straps Magnetic Bracket Double-pin Clip Fabric Pouch... -
Page 6: Where Stuff Is At (The Layout Of The Thing)
Where Stuff is At (the layout of the thing) Microphone and Indicator LEDs Lens VOX Switch MicroSD card slot USB Port (Bottom) Power ON/OFF Switch Record VIDEO Button Take PHOTO Button 6 6 6 6... -
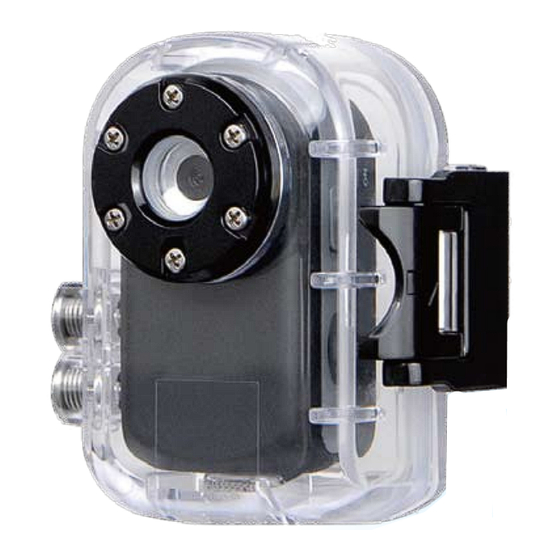
Page 7: The Waterproof Case
The Waterproof Case Lens Cover Locking Clasp Record Video Button Take Photo Button The waterproof case will protect the SportsCam from bumps, knocks and high winds in addition to providing waterproofing at depths up to 65ft/20m. Before using the waterproof case in a wet environment, ensure that it is completely sealed. -
Page 8: Preparing The Sportscam
Preparing the SportsCam The SportsCam is almost good to go right out of the box. You won’t need to configure anything or fiddle with confusing settings - that’s all automatic. All you’ll need to do before the SportsCam can start recording is: •... -
Page 9: Charging The Sportscam
Charging the SportsCam Charging the built-in battery: You can charge the battery via the USB slot on the base of the camera using the supplied power adapter, or using a computer’s USB port and the supplied USB adapter or cable. Charging the battery will take approximately 60 ~ 80 minutes. -
Page 10: Pushing Buttons (An "Operating Guide")
Pushing Buttons (an “Operating Guide”) So, how do you make the SportsCam do things (like record video) and how do you know what it’s doing? It all comes down to two switches, two buttons and two LEDs. Switches Power ON/OFF VOX Switch Switch The power switch turns the camera on and off. -
Page 11: Leds And What They Mean
LEDs and what they mean The two LEDs, one red and one green, are the primary way that the SportsCam lets you know what it’s doing. RED LED Constantly On Power On Goes Out Power Saving Standby Mode Flashing Slowly Recharging Flashing Quickly Read/Write to USB Port... -
Page 12: Making It Do Things With A Computer
Making it do things with a computer To access and playback the videos and pictures you grab with the SportsCam, you’ll need to connect it to a computer. Connecting the SportsCam to a computer is easy. All you’ll need is a computer with USB ports and a relatively recent operating system, and either the USB cable or USB adapter which came with the SportsCam. -
Page 13: Seeing How Cool You Are (Playback)
Seeing how cool you are (Playback) • Install the drivers and software on the mini CD. See page 15. Run MDPlayer. • Connect the SportsCam to your computer (page 14). Open button. Locate the drive associated with the • Click the SportsCam. -
Page 14: Time Travel (Setting The Date)
Time Travel (Setting the Date) So, the date stamp on the video you took this morning indicates that you were skating along sometime in 1987. What’s gone wrong here, other than the over-the-top hair styles and oversized ear-rings? The time and date setting on the SportsCam is probably wrong! This can happen from time to time, particularly if you’ve swapped out the microSD card recently. -
Page 15: Installing The Drivers For A Pc
Installing the Drivers for a PC Let’s start at the start. You’ll need a computer running Microsoft Windows XP, Microsoft Windows Vista or Microsoft Windows 7. If you don’t use one of these operating systems (90-odd-percent of folks do, but if you’re one of the die-hard 10%) then you’ve got two options. -
Page 16: Wearing The Camera
Wearing the Camera You’ve almost certainly already noticed that there are about a billion (long-scale) accessories in the pack for mounting the SportsCam. Okay, maybe not quite a billion, but there’s more than our humble manual writer can count on one hand. So, how many ways can you actually mount this camera? As many as you can think of. -
Page 17: Helmetcam
HelmetCam You know where’s a great place to mimic what your eyes can see? Right near your eyes. If you’re doing anything die-hard cool, chances are you’ll be wearing a helmet (heads are fragile things, after all, and are worth protecting). There are a couple of ways that you can mount the SportsCam onto a helmet. -
Page 18: Mounting The Waterproof Case
Mounting in the Waterproof Case When you’re using the waterproof case, you’ll need a different approach to mounting the camera. Sometimes it’ll be pretty similar to the methods covered over the last couple of pages, sometimes it’s pretty different. The most common way you’ll mount the waterproof case is using the two case clips provided. -
Page 19: Headcase
Headcase Mounting the Waterproof Case on your Head or Helmet • Put the SportsCam into the waterproof case. • Connect the clip on the head strap to the slots in the rear of the waterproof case. • Wrap the head strap around your head, helmet, arm, leg... wherever you want the camera. -
Page 20: Strappin' It To Something Else Altogether
Strappin’ it to Something Else Altogether So, you want to strap your SportsCam to something completely different? You’ve got a [insert crazy item/sport/vehicle here] and none of the mounting options provided in the pack will do? Well, the odds are like a million to one, but if you’re one of the few folk who find that unique circumstances prompt you to have to think outside the box (literally) then we have a couple of tips that’ll help. -
Page 21: Sticking It To Your Surfboard
Sticking it to your Surfboard So, you want to mount the SportsCam onto your surfboard? No problems - you can jump onto our website (addresses below) and grab yourself a surfboard mount. Or three, if you happen to have three surfboards. We sell these separately for a couple of reasons. -
Page 22: Troubleshooting
(for example you’re using a platform other than a 32- bit Microsoft Windows-based PC) try using a different program, such as VLC Media Player (a favorite around the Swann office). It’s available free from www.videolan.org/vlc, and works with a huge range of operating systems. -
Page 23: Technical Specifications
Technical Specifications Video Video Format Resolution 640 x 480 Frame Rate 30fps Video Bit Rate Variable (500 ~ 800KB/s) Amount of video per GB 15 ~ 20 minutes Overlays Time & Date Stamp (always present) Photography Photo Format JPEG Photo Resolution 1280 x 960 (interpolated) File Size Variable (approx 350KB) - Page 24 Swann. The end user is responsible for all freight charges incurred to send the product to Swann’s repair centres. The end user is responsible for all shipping costs incurred when shipping from and to any country other than the country of origin.
Need help?
Do you have a question about the SportsCam SW-DVR460 and is the answer not in the manual?
Questions and answers