Universal Audio Apollo Twin Hardware Manual
Hide thumbs
Also See for Apollo Twin:
- Hardware manual (33 pages) ,
- Customer support information (8 pages) ,
- User manual

Related Manuals for Universal Audio Apollo Twin


Summary of Contents for Universal Audio Apollo Twin
- Page 1 Apollo Twin USB Hardware Manual Manual Version 150923 Customer Service & Technical Support: USA Toll-Free: +1-877-698-2834 International: +1-831-440-1176 www.uaudio.com...
-
Page 2: A Letter From Bill Putnam Jr
Apollo Twin into your creative process, we hope that the excitement and pride that we’ve built into it comes through. We believe Apollo Twin will earn its way into your creative workflow by providing stunning fidelity, great ease-of-use, and rock-solid reliabil- ity for years to come. -
Page 3: Table Of Contents
A Letter from Bill Putnam Jr................2 Chapter 1: Introduction ................. 4 Welcome to Apollo Twin USB ................4 Apollo Twin USB Features .................. 5 Operational Overview ..................7 About Apollo Twin USB Documentation ..............9 Web Documentation .................. -
Page 4: Chapter 1: Introduction
Apollo Twin USB has all the right tools, all in the right place. *Apollo Twin USB includes the “Realtime Analog Classics” UAD plug-in bundle. All other plug-ins are sold separately at www.uaudio.com. All trademarks are property of their respective owners. -
Page 5: Apollo Twin Usb Features
• Front panel and software control of all preamp parameters • Low cut filter, 48V phantom power, 20 dB pad, polarity inversion, and stereo linking *96 kHz maximum on S/PDIF digital inputs Apollo Twin USB Hardware Manual Chapter 1: Introduction... - Page 6 Console Recall plug-in: • Saves Apollo Twin USB configurations inside DAW sessions for easy recall • Facilitates control of Apollo Twin USB monitoring features from within the DAW • VST, RTAS, and AAX 64 plug-in formats UAD Meter & Control Panel application: •...
-
Page 7: Operational Overview
Operational Overview Audio Interface First and foremost, Apollo Twin USB is a premium 2x6 USB 3 audio interface with world-class 24-bit/192 kHz audio conversion. Apollo Twin USB connects to the outputs and inputs of other audio gear, and performs analog-to-digital (A/D) and digital-to-analog (D/A) audio conversions on the gear’s signals. - Page 8 UAD Powered Plug-Ins in a DAW Apollo Twin USB and UAD plug-ins can also be used within a DAW without the use of Console. UAD plug-ins loaded within the DAW operate like other (non-UAD) plug-ins, except the processing occurs on the Apollo Twin USB DSP instead of the host computer’s processor.
-
Page 9: About Apollo Twin Usb Documentation
About Apollo Twin USB Documentation Documentation for all Apollo Twin USB components is extensive, so instructions are separated by areas of functionality. Each functional area has a separate manual file. An overview of each file, and how they are accessed, is provided in this section. -
Page 10: Web Documentation
Online Manuals Manuals are also available online at: www.uaudio.com/support/manuals.html Web Documentation UA Support Videos Many informational videos are available online to help you get started with Apollo Twin USB: • http://www.uaudio.com/blog/cat/videos Apollo Twin USB Support Page The latest technical information for Apollo Twin USB is posted on the Universal Audio website. -
Page 11: Technical Support
Technical Support Universal Audio provides free customer support to all registered Apollo users. Support specialists are available to assist you via email and telephone during normal business hours, which are from 9 AM to 5 PM, Monday through Friday, Pacific Standard Time. -
Page 12: Chapter 2: Quick Start
Chapter 2: Quick Start Quick Start Overview Apollo Twin USB hardware and software installation and setup consists of these main steps, which are detailed in this chapter: Hardware Setup: Connect and power the Apollo Twin USB hardware Software Setup: Download and install the Apollo Twin USB software... -
Page 13: Hardware Setup
Hardware Setup Select a Suitable Location • Locate Apollo Twin USB on a flat surface so its feet will maintain airflow beneath the unit. • The location should be sturdy enough to securely hold its weight and withstand the pressure of operating the top panel controls. -
Page 14: Software Setup
Apollo Twin USB Documentation for related information. System Requirements All system requirements must be met for Apollo Twin USB to operate properly. Before proceeding with installation, see the system requirements in the Apollo Software Manual. Software Installation The software must be installed to use the hardware and UAD plug-ins. The UAD Powered Plug-Ins software installer contains the Apollo Twin USB software and drivers. -
Page 15: Connect To Input Sources And Monitor System
Connect to Input Sources and Monitor System One typical Apollo Twin USB setup is illustrated below. For complete details about all of Apollo Twin USB's connectors and controls, see Chapter 3: Controls & Connectors. Typical Apollo Twin USB setup connections... -
Page 16: Setting Hardware I/O Levels
• Line outputs 3 & 4 are accessed and controlled via software only (Console or DAW). What Next? Refer to the Apollo Software Manual to learn how to configure the audio interface set- tings, use the Console application and Realtime UAD Processing, and more. Apollo Twin USB Hardware Manual Chapter 2: Quick Start... -
Page 17: Chapter 3: Controls & Connectors
PREAMP Mode When Apollo Twin USB is in Preamp mode, all top panel controls are related to input functions only. To adjust any input function, press the PREAMP button to enter Preamp mode and activate the input channel controls. -
Page 18: Monitor Mode
Controls section later in this chapter. MONITOR Mode When Apollo Twin USB is in Monitor mode, all top panel controls are related to output functions only. To adjust any output function, press the MONITOR button to enter Monitor mode and activate the monitor controls. -
Page 19: Top Panel
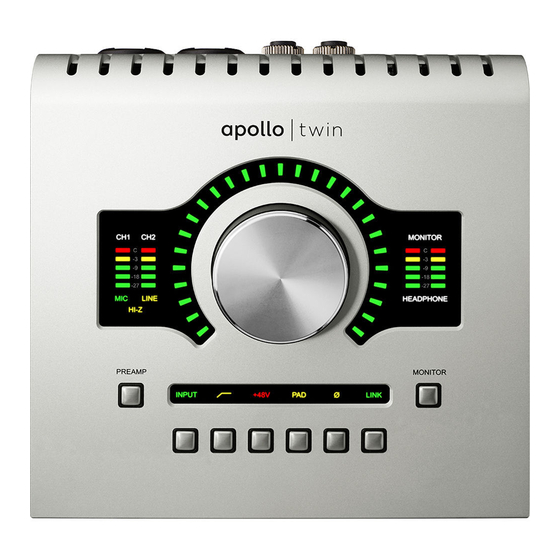
Top Panel Refer to the illustration below for control descriptions in this section. Apollo Twin USB’s top panel elements (1) Level Knob & Switch The Level knob & switch controls multiple functions. The knob’s current function is se- lected with the Preamp (9) and Monitor (10) buttons. - Page 20 Reduce levels feeding the output(s) if a red “C” (clip) LED at the top of the Output Meters illuminates. *Exception: If HEADPHONES is currently selected on Apollo Twin USB and the Headphone Source in Console is set to HP, these output meters indicate the level being sent to the headphone bus via Console’s headphone sends and/or the DAW.
- Page 21 Unison details. Refer to the illustration below for control descriptions in this section. Apollo Twin USB’s preamp option buttons (a) Input Select Selects the active input jack for the channel. Press to alternate between the mic & line inputs.
-
Page 22: Front Panel
Front Panel Refer to the illustration below for control descriptions in this section. Apollo Twin USB’s front panel elements (12) Hi-Z Instrument Input Connect any guitar, bass, or other high impedance instrument here. This jack automati- cally overrides the channel 1 mic and line inputs. -
Page 23: Rear Panel
These ¼” phone outputs are accessed via software (Console or DAW). Line outputs 3 & 4 are used to send audio to other equipment. (17) Power Supply Input The included power supply must be connected here (Apollo Twin USB cannot be bus powered). Rotate locking connector to prevent accidental disconnection. Important:... - Page 24 (18) Power Switch This rocker switch applies power to Apollo Twin USB. Switch to OFF when not in use. Caution: Before powering Apollo Twin USB, lower the volume of the monitor speakers and remove headphones from your ears. (19) Optical In This is a TOSLINK input for connection to other gear with an optical ADAT or S/PDIF output.
-
Page 25: Chapter 4: Specifications
Analog Round-Trip Latency 1.1 milliseconds @ 96 kHz sample rate Analog Round-Trip Latency with up to four serial 1.1 milliseconds @ 96 kHz sample rate UAD Powered Plug-Ins via Console application (continued) Apollo Twin USB Hardware Manual Chapter 4: Specifications... - Page 26 Signal-to-Noise Ratio 117 dB (A–weighting) Total Harmonic Distortion + Noise –101 dBFS Input Impedance 1M Ohms (variable via Unison plug-ins) Gain Range +10 dB to +65 dB Maximum Input Level +12 dBu (continued) Apollo Twin USB Hardware Manual Chapter 4: Specifications...
- Page 27 Connector Type ¼” Female TRS Stereo Dynamic Range 113 dB (A–weighting) Signal-to-Noise Ratio 113 dB (A–weighting) Total Harmonic Distortion + Noise –101 dBFS Maximum Output Power 80 milliwatts into 600 ohm load (continued) Apollo Twin USB Hardware Manual Chapter 4: Specifications...
- Page 28 3.85 pounds Weight (bare unit) 2.35 pounds Package Contents Apollo Twin USB DUO Unit External Power Supply with (4) changeable AC connectors supporting USA, Europe, UK, Australia, China USB 3 SuperSpeed Cable Getting Started URL Card Apollo Twin USB Hardware Manual...
-
Page 29: Hardware Block Diagram
Hardware Block Diagram Apollo Twin USB Hardware Manual Chapter 4: Specifications... -
Page 30: Chapter 5: Troubleshooting
1. Power off Apollo Twin USB 2. Press and hold the LEVEL KNOB, LOW CUT, and POLARITY controls 3. Power on Apollo Twin USB while continuing to hold all three controls 4. After all front panel LEDs flash rapidly for several seconds, release the controls... -
Page 31: Chapter 6: Notices
The unit has been dropped, or the enclosure damaged. Servicing – The user should not attempt to service the unit beyond that described in the operating instructions. All other servicing should be referred to qualified service person- nel. Apollo Twin USB Hardware Manual Chapter 6: Notices... -
Page 32: Warranty
You may also have other rights which vary by state or country. Maintenance Apollo Twin USB does not contain a fuse or any other user-replaceable parts. The unit is internally calibrated at the factory. No internal user adjustments are available. Repair Service... - Page 33 Audio, Inc. makes no warranties of any kind with regard to this manual, including, but not limited to, the implied warranties of merchantability and fitness for a particular purpose. Universal Audio, Inc. shall not be liable for errors contained herein or direct, indirect, special, incidental, or consequential damages in connection with the furnishing, performance, or use of this material.
- Page 34 Universal Audio, Inc. 4585 Scotts Valley Drive Scotts Valley, CA 95066 USA Customer Service & Technical Support: USA Toll-Free: +1-877-698-2834 International: +1-831-440-1176 www.uaudio.com...
Need help?
Do you have a question about the Apollo Twin and is the answer not in the manual?
Questions and answers