Table of Contents
Advertisement
Advertisement
Table of Contents

Related Manuals for Russell Hobbs EXPRESS CHEF RHPC1000


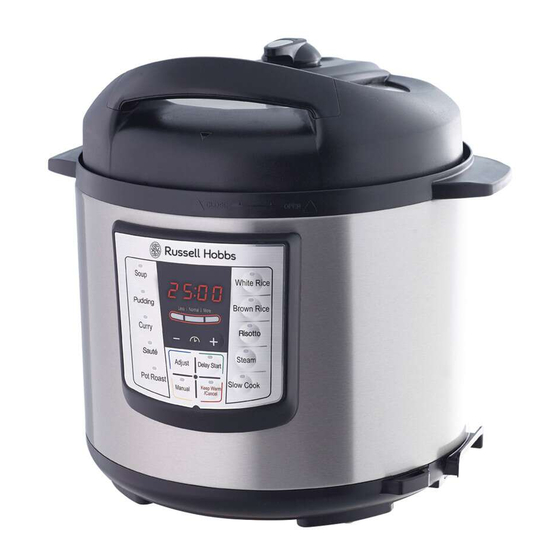
Summary of Contents for Russell Hobbs EXPRESS CHEF RHPC1000
- Page 1 EXPRESS CHEF PRESSURE COOKER 2 YEAR WARRANTY RHPC1000 INSTRUCTIONS & WARRANTY...
- Page 2 (Warranty Period), for the period of:- (a) Two (2) years for Russell Hobbs products (see product packaging for details) If y (b) Two (2) years with ve (5) year motor warranty for Russell Hobbs products (see product If y packaging for details) (c) Limited Lifetime, Ten (10) years for Russell Hobbs cookware.
- Page 3 Warranty Conditions 4. The Goods must be used in accordance with the manufacturer’s instructions. This Warranty does not apply should the defect in or failure of the Goods be attributable to misuse, abuse, accident or non-observance of manufacturer’s instructions on the part of the user.
- Page 4 Congratulations on the purchase of your new Russell Hobbs Express Chef Pressure Cooker. Each unit is manufactured to ensure safety and reliability. Before using the appliance for the first time, please read this instruction booklet carefully and keep it for future reference. Pass it on if you pass on the appliance.
- Page 5 HOW PRESSURE COOKING WORKS Your Russell Hobbs Pressure Cooker has been specially designed to safely control the steam pressure and temperature during cooking. When liquid inside a pressure cooker is boiled, steam builds up and creates pressure. This pressure allows the temperature to rise above the normal 100°C boiling point and creates a ‘superheated vapour’...
- Page 6 COOKING PREPARATION 1. How to open the lid Hold the lid handle and turn the lid counter-clockwise until the “ ” marking on the lid aligns with the “OPEN ” marking on the pressure cooker and lift the lid up and off the pressure cooker.
- Page 7 4. Inserting the cooking pot in the pressure cooker Be sure to remove any food residue and water droplets from the exterior of the cooking pot and interior of the pressure cooker. After placing the cooking pot into the pressure cooker, rotate the cooking pot slightly left to right to ensure the pot is in place and there is contact between the cooking pot and heating...
- Page 8 IMPORTANT INFORMATION FOR RELIABLE AND SAFE OPERATION REMOVAL AND INSTALLATION OF THE ANTI-BLOCK SHIELD AND THE GASKET Prior to each use, inspect and ensure the gasket, anti-block shield, red oat valve and red oat valve seal are clean correctly tted to the lid. Thoroughly clean after each use to ensure all food residues are removed.
- Page 9 GENERAL FUNCTIONS IMPORTANT: Be certain to use utensils that will not scratch the cooking surface of the cooking pot. Use the utensil provided or use silicone or rubber utensils when cooking and serving. Do not use metal utensils, be careful not to scrape the non-stick finish. Complete the Cooking Preparation as per pages 7 and 8.
- Page 10 DE-PRESSURISING AND OPENING THE LID CAUTION: The lid will not unlock until pressure inside the pot has been released. This will be indicated when steam has stopped coming out of the exhaust valve and the red float valve has lowered. Once cooking is complete, the pressure cooker will automatically switch to KEEP WARM.
- Page 11 HOW TO OPEN THE LID Wearing an oven mitt, hold the lid handle and turn the lid counter-clockwise until the “ ” marking on the lid aligns with the “OPEN ” marking on the housing. To open the lid, lift and tilt it so it opens from the back rst, to avoid steam coming towards you.
- Page 12 PRE-SET AUTOMATIC COOKING FUNCTIONS WHITE RICE The white rice function on the Pressure Cooker will create delicious uffy rice every time; and suits Basmati, Jasmine and Long Grain rice. Simply follow the packet instructions for the ratio of water to rice but as a general rule use 1 cup of white rice to 1 1/2 cups of water. There is also no need to rinse white rice or add salt or oil;...
- Page 13 POT ROAST Sunday roasts just got easier, as you can even cook roasts such as topside beef, shoulders of lamb or pork, whole chickens and silverside with the pot roast function. You can brown your piece of meat first using the SAUTÉ function to seal in the flavour. Then use 1-2 cups stock for the liquid in the bowl, place meat on the trivet and select POT ROAST function for required time and you will end up with a succulent roast in less time than a traditional oven.
- Page 14 PUDDINGS (AND CAKES) Using the pudding function you can cook stunning puddings, creamy rice desserts, cheese cakes and sponge style cakes in your pressure cooker. Desserts cooked in the pressure cooker come out beautifully moist and spongy and can be cooked in a round cake tin, pudding bowl or individual ramekins.
- Page 15 COOKING MENU FUNCTIONS Time for pressure to build up will vary depending on the recipe or function selected. Once pressure has built up, cooking time will commence. Please note cooking times will vary due to ingredient sizes, quantities and starting temperatures. Cooking Time Temperature...
- Page 16 PRESSURE COOKER FUNCTIONS ADJUST FUNCTION: The adjust function allows you to adjust the pre-set cooking time. It can be used depending on the quantity of food added to the cooking pot. A larger quantity may require more cooking time versus a smaller quantity. •...
- Page 17 Within 10 seconds of pressing your menu selection button, press the “Delay Start” button once and the hour flashes. Then use the “-“ & “+” buttons to select the amount of hours before you would like your meal to be ready. Press the “Delay Start”...
- Page 18 MANUAL OPERATION: NOTE: The STEAM function works using the same method as MANUAL. See detailed instructions on how to use the Manual and Steam functions below: The manual function can be used if the preset menu functions and timings do not suit your required cooking preferences.
- Page 19 MANUAL OPERATION GUIDE Follow the guide below as an approximate indication for recommended cooking times. VEGETABLES Vegetables cook in no time in the pressure cooker. Always use the quick pressure release method when the cook time has ended, this will ensure your vegetables retain some texture and don’t overcook.
- Page 20 MEAT, FISH & POULTRY Meat cooked in the pressure cooker will give a succulent and avoursome result, every time. For maximum avour, rst brown the meat or poultry (not sh) on all sides in the pressure cooker using 1 tablespoon of oil on the SAUTÉ function before locking the lid and commencing pressure-cooking.
- Page 21 RICE & GRAINS The following recommendations are only a guide. You can always return the lid and KEEP WARM to continue cooking slightly. Alternatively, add ½ cup of hot water and pressure cook for an additional 1 minute and leave to release pressure naturally. Never fill (combined rice/grain and liquid) past the halfway mark when cooking in the pressure cooker.
- Page 22 PRESSURE COOKING TIPS • The pressure cooker must never be lled more than 2/3 full or to the MAX. marking, the unused space is needed to produce pressure. • The amount of liquid required is less than for traditional cooking methods. •...
- Page 23 TROUBLESHOOTING Problem Possible Reason Solution Ensure the gasket is positioned Gasket not positioned correctly correctly Carefully push down using the Difficult to close the lid plastic edges of the lid Small amount of pressure remains in the cooking pot CAUTION: do not touch the metal part of the lid as it will be very hot Red float valve fails to lower after Press down on the red float valve...
- Page 24 IMPORTANT SAFEGUARDS When using this appliance, basic safety precautions should be followed, including but not limited to: To protect against electrical hazards do not immerse the power cord, plug or pressure cooker body in water or any other liquid. Do not use in the bathroom or near any source of water. Do not use outdoors.
- Page 25 22. Do not fill the pressure cooker with cooking oil or try to use it as a deep fryer. 23. Do not use keep warm mode to reheat cold rice or other foods. 24. Always take care when removing food after cooking as it is hot. 25.
- Page 26 RECIPE BOOK EXPRESS CHEF PRESSURE COOKER RHPC1000...
- Page 27 SLOW COOKED HONEY GARLIC CHICKEN Preparation Time: 20 minutes Cook Time: 4 hours (+ de-pressurising time) Ingredients: 3 chicken Maryland pieces, skin off ½ cup soy sauce ½ cup honey ¼ cup hoisin sauce ½ cup currants 1 tbs olive oil 3 cloves garlic, crushed 2cm piece of ginger, peeled &...
- Page 28 POTATOES WITH DILL & CHIVES Preparation Time: 5 minutes Cook Time: 10 minutes Ingredients: 1 tbs extra virgin olive oil 2 tbs butter 1 tsp celery salt 2 tbs fresh dill, chopped 6 large new potatoes, quartered lengthways 1 cup chicken stock, warm Pepper to taste 2 tbs chives, chopped Method:...
- Page 29 PEA AND PANCETTA RISOTTO Preparation Time: 10 minutes Cook Time: 25 minutes Ingredients: 1 tbs extra virgin olive oil 20g butter 2 cups Arborio rice 1 brown onion, nely diced 100g pancetta, diced 1 garlic clove, nely chopped ½ cup white wine 4 cups chicken stock, warmed ½...
- Page 30 THAI GREEN CHICKEN CURRY Preparation Time: 10 minutes Cook Time: 5 minutes Ingredients: 1 tsp vegetable oil 1 brown onion, peeled and quartered 1 garlic clove, crushed Knob of ginger, 1cm, peeled and finely grated 1 green chilli, nely sliced 2 tbs green curry paste 1.2kg chicken thigh llets, diced into 3cm pieces 250g can coconut milk...
- Page 31 MASSAMAN BEEF CURRY Preparation Time: 10 minutes Cook Time: 25 minutes (+ de-pressurising time) Ingredients: 1 tsp canola oil 2 brown onions, peeled and quartered 4 tbs Massaman curry paste 400g coconut milk 1.2kg beef chuck, cut into 2 cm pieces 1 cup vegetable stock 1 tbs sh sauce 1 tbs soy sauce...
- Page 32 CORNED BEEF Preparation Time: 10 minutes Cook Time: 1 hour, 20 minutes Ingredients: 1.2kg corned beef (silverside) 1 brown onion, peeled and halved 4 cloves 2 bay leaves 1tsp peppercorns 1 carrot, peeled and chopped 1tbs brown sugar 2 tbs malt vinegar Water (to cover corned beef) Method: Wash the corned beef under cold water and set aside.
- Page 33 MOROCCAN LAMB POT ROAST Preparation Time: 15 minutes (plus marinating time 30 minutes) Cook Time: 45 minutes Ingredients: 2kg lamb shoulder, de-boned 2 red onions, peeled and cut into thin wedges 3 tbs olive oil 4 garlic cloves, crushed 1 lemon, rind nely zested 1 tsp chilli akes 1 tsp ground cumin 1 tsp dried thyme leaves...
- Page 34 AROMATIC TOMATO SOUP Preparation Time: 5 minutes Cook Time: 15 minutes Ingredients: 2 tsp olive oil ½ brown onion, nely diced 2 carrots, nely diced 1 stalk celery, chopped 1 clove garlic, crushed and chopped 1 tsp dried rosemary 400g can diced tomatoes 2 tbs tomato paste 1L beef stock (or 3 beef stock cubes in 1L water) 2 tsp balsamic vinegar...
- Page 35 CHICKEN STOCK Preparation Time: 5 minutes Cook Time: 30 minutes (+ de-pressurising time) Ingredients: 1 small chicken 5 cups water 1 stick of celery, sliced 1 brown onion, peeled and halved 1 carrot, sliced 1 bay leaf 1 tsp whole pepper corns Method: Pour the water in the bottom of your pressure cooker and add all ingredients except the chicken.
- Page 36 ©2013 Spectrum Brands, Inc. Recipes are to be used in conjunction with the RHPC1000 Pressure Cooker by Russell Hobbs. All rights reserved. No part of this publication may be reproduced, stored in a retrieval system or transmitted in any form or by any means, electronic, mechanical,...
- Page 37 STEAMED VANILLA & GOLDEN SYRUP PUDDING Preparation Time: 15 minutes Cook Time: 40 minutes (+ 10 minutes de-pressurising time) Ingredients: 20g butter for greasing ½ cup castor sugar 120g butter, softened 1/2 tsp vanilla bean paste (or 1 tsp vanilla essence) 2 eggs 120g plain our ¼...
- Page 38 CREAMY RICE PUDDING Preparation Time: 10 minutes Cook Time: 25 minutes Ingredients: 2 tbs butter 3 cups milk, warmed 1 cup long grain rice 1/3 cup castor sugar 1 tsp vanilla 1 tsp ground cinnamon Method: Place the butter in the pressure cooker and press SAUTÉ. When the butter has melted, add the warm milk and stir in the rice, vanilla and sugar.
- Page 39 VANILLA SPONGE CAKE Preparation Time: 15 minutes Cook Time: 35 minutes Ingredients: 1½ cup castor sugar 2 eggs, at room temperature 2 cups self-raising our 1 cup milk 50g butter, melted ½ tsp vanilla bean paste (or 1 tsp vanilla essence) Cooking oil spray for greasing Cream or ice cream to serve Flaked almonds to serve...
- Page 40 APPLE RELISH Preparation Time: 10 minutes Cooking Time: 2 hours (+ de-pressurising time) Ingredients: 1.2kg Granny Smith Apples, peeled, cored & chopped 2 brown onions, nely diced 1/2 cup apple cider vinegar ¾ cup raw sugar ¼ tsp salt 1 tbs lemon juice ½...
- Page 41 POACHED PEARS Preparation Time: 10 minutes Cooking Time: 2 hours, 5 minutes Ingredients: 4 ripe pears, peeled and left whole 1 cinnamon stick 5 cloves 1 knob of ginger, 1cm 1 tsp lemon zest ¼ cup brown sugar 1 star anise 1 vanilla pod 2 cups water Method:...
Need help?
Do you have a question about the EXPRESS CHEF RHPC1000 and is the answer not in the manual?
Questions and answers