
Related Manuals for Aercus WeatherRanger


Summary of Contents for Aercus WeatherRanger
- Page 1 WeatherRanger® PROFESSIONAL WIRELESS WEATHER STATION WITH WIFI AND REAL-TIME INTERNET PUBLISHING...
- Page 2 Genuine faults can typically be diagnosed without requiring the unit to be returned and replacement parts sent quickly if needed. For all others please contact the retailer who sold you this item. Aercus Instruments™ - WeatherRanger® P a g e...
-
Page 3: Table Of Contents
Maintenance ............................47 Advanced Rain Gauge Cleaning ....................47 Troubleshooting Guide ........................49 Appendix 1 - Southern Hemisphere Wind Direction Recalibration ............52 Contact Information............................ 55 EU Declaration of Conformity ........................55 Aercus Instruments™ - WeatherRanger® P a g e... -
Page 4: Overview
1. Overview For optimal performance from your Aercus Instruments™ WeatherRanger® we strongly recommend you read this manual thoroughly before beginning installation. Installation is simple if the steps below are followed and doing so will ensure that you avoid the most common pitfalls of weather station operation. -
Page 5: Getting Started
3. Getting Started The WeatherRanger® weather station consists of a display console (receiver), an all in one sensor array, and wireless thermo-hygrometer-barometer. 3.1 Parts List Item Image Display Console Frame dimensions (LxWxH): 19.7 x 14.6 x 1.9 cm LCD dimensions (LxW): 15.9 x 8.9 cm... -
Page 6: Recommended Tools
Allen key User manual 3.2 Recommended Tools Precision screwdriver (for small Phillips screw on battery cover door) Adjustable wrench (for mounting pole) Compass or GPS (for wind direction calibration) Aercus Instruments™ - WeatherRanger® P a g e... -
Page 7: Sensor Array Setup
UV Sensor Solar Panel Light Sensor Battery Compartment Rain Collector (self emptying) LED Transmission Indicator (turns on for 4 Bubble Level seconds on power up, flashes once per 16 seconds) Reset Button Aercus Instruments™ - WeatherRanger® P a g e... -
Page 8: Install Wind Vane
(b) Tighten the set screw with the Allen key (included). Figure 2 3.3.2 Install Mounting Pole Reference Figure 3. Remove the mounting pole collar by rotating anti-clockwise. Figure 3 Aercus Instruments™ - WeatherRanger® P a g e... - Page 9 Reference Figure 4. Locate and align the groove on the sensor array and mounting pole. Figure 4 Aercus Instruments™ - WeatherRanger® P a g e...
-
Page 10: Install Batteries
16 seconds (the transmission update period). Close the battery door and tighten the screw. Aercus Instruments™ - WeatherRanger® 10 | P a g e... - Page 11 Figure 6 Aercus Instruments™ - WeatherRanger® 11 | P a g e...
-
Page 12: Mount Weather Station
Hockey Stick Mount for mounting to a flat vertical surface or a Tripod Mount for ground or roof mounting (see Figures 8a and 8b below). Aercus Instruments™ - WeatherRanger® 12 | P a g e... - Page 13 Reference Figure 9. Locate the four wind vane compass rose indicators of N, E, S, W (representing North, East, South and West). Align the compass rose direction upon final installation with a compass or GPS. Figure 9 Aercus Instruments™ - WeatherRanger® 13 | P a g e...
-
Page 14: Reset Button And Transmitter Led
Put the batteries back in and resynchronise with the console by powering the console down (by removing the AC adaptor), waiting 10 seconds and then reinserting the AC adaptor with the sensor array about 3m away (to eliminate any interference issues). Figure 11 Aercus Instruments™ - WeatherRanger® 14 | P a g e... -
Page 15: Indoor Thermo-Hygrometer-Barometer Transmitter
Note that the temperature, humidity and barometric pressure will be displayed on the LCD display. Looking at the back of the unit from left to right, the polarity is (-) (+) for the top battery and (+) (-) for the bottom battery. Figure 13 Aercus Instruments™ - WeatherRanger® 15 | P a g e... -
Page 16: Best Practices For Wireless Communication
Connect the display console power jack to AC power with the power adapter (included), as shown in Figure Place the sensor array and indoor thermo-hygrometer transmitter about 1.5-3m from the display console and wait several minutes for the remote sensors to synchronise with the display console. Aercus Instruments™ - WeatherRanger® 16 | P a g e... -
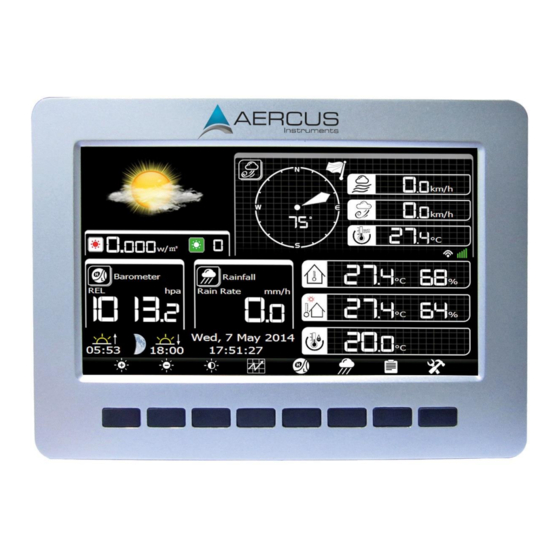
Page 17: Display Console Operation
“Menu box” example. From the home screen, press the History Key twice and the Recall Page key once. 4.1 Home Screen Display The display console home screen layout is shown in Figure 15. Aercus Instruments™ - WeatherRanger® 17 | P a g e... - Page 18 14 Indoor Temperature & Humidity Solar Radiation (Light) 15 Internet Connectivity Barometric Pressure 16 WiFi Connectivity Sunrise/Sunset 17 Wind Chill Moon Phase 18 Wind Gust Date and Time 19 Wind Speed Rainfall Aercus Instruments™ - WeatherRanger® 18 | P a g e...
- Page 19 Press this key to shift the display between Rain Rate, Rain Day, Rain Week, Rain Month, and Rain Year. History key Press this key to enter History Mode Set key Press this key to enter Set Mode Aercus Instruments™ - WeatherRanger® 19 | P a g e...
-
Page 20: History Mode
(1) The popup message “Are you sure you want to clear the max/min?” will appear. Select to highlight “Yes” and to confirm. Aercus Instruments™ - WeatherRanger® 20 | P a g e... -
Page 21: Archive Memory Mode
View archive memory for all parameter, based on the date and time. Figure 17 Recall Recall Scroll left Scroll Scroll up Scroll View Return annual page right down graphs home records Aercus Instruments™ - WeatherRanger® 21 | P a g e... -
Page 22: Recall / Delete Annual Archive Memory
4.2.2 Recall / Delete Annual Archive Memory Recall and delete annual archive memory. Figure 18 Delete annual Scroll left Scroll right Recall annual Return to archive record record memory mode Aercus Instruments™ - WeatherRanger® 22 | P a g e... -
Page 23: Page Selection
Figure 19 Increase page Decrease page Scroll digit to Scroll digit to Toggle OK or Toggle OK or number number left right cancel, then cancel, then press press confirm confirm Aercus Instruments™ - WeatherRanger® 23 | P a g e... -
Page 24: Historical Graphs
Figure 20 Zoom in Zoom out Scroll X- Scroll X- Recall Scroll Return to Return Y-axis Y-axis axis (time) axis (time) annual parameter Max/Min home left right archive pages data Aercus Instruments™ - WeatherRanger® 24 | P a g e... -
Page 25: Setup Mode
Select units Select units Select Select Scroll field Scroll field Enter sub- Return of measure of measure value value down setup mode home or scroll or scroll value up value down Aercus Instruments™ - WeatherRanger® 25 | P a g e... -
Page 26: Set Date And Time
ON. Press to toggle ON or OFF. Press highlight Update and to immediately update. Note: The time server will not work until the WiFi connection has been set up. Aercus Instruments™ - WeatherRanger® 26 | P a g e... -
Page 27: Set Time Format
Press to change the time format between h:mm:ss, AM h:mm:ss and h:mm:ss AM. 4.3.3 Temperature Units of Measurement to change the temperature units of measure between °F and °C. Press Aercus Instruments™ - WeatherRanger® 27 | P a g e... -
Page 28: Barometer Units Of Measurement
W/m^2, lux and fc. 4.3.8 Solar Display Increments Press to change the rainfall display increments between Daily Rain, Weekly Rain, Monthly Rain, Yearly Rain, and Rain Rate. Aercus Instruments™ - WeatherRanger® 28 | P a g e... -
Page 29: Graph Time
Automatically turn on/off the backlight or adjust brightness based on the time of day. Figure 23 Adjust up or Adjust down Select left Select right Scroll up Scroll down Return home check or uncheck Aercus Instruments™ - WeatherRanger® 29 | P a g e... -
Page 30: Barometer Display
WEST. To change to EAST, press the key. Press to change your longitude. The longitude x 100 will turn red. Press to increase or decrease the value. Press to change the remaining longitude variables. Aercus Instruments™ - WeatherRanger® 30 | P a g e... - Page 31 3. In this example, the location entered into the display is as follows: Latitude = 51.51 North Longitude = 0.13 West (note: the ‘-’ sign is not used) after rounding to two significant digits. Aercus Instruments™ - WeatherRanger® 31 | P a g e...
-
Page 32: Weather Threshold
The storm threshold can be set to suit the user’s requirements for storm forecasting - anywhere from 3 - 9hPa (default 4hPa). When there is a fall below the pressure threshold within any given 3 hour period the storm icon will appear. Aercus Instruments™ - WeatherRanger® 32 | P a g e... -
Page 33: Rainfall Season
The console is configured to send real-time data to Wunderground.com so there is no need to adjust the Server, Server type, and upload type. Enter your Station ID and password obtained from Wunderground.com. Aercus Instruments™ - WeatherRanger® 33 | P a g e... - Page 34 Press to return to the Wunderground.com setup page. Note: How to create a Wunderground.com account and station ID. 1. Join the Wunderground.com community. Sign up here: https://www.wunderground.com/members/signup.asp Aercus Instruments™ - WeatherRanger® 34 | P a g e...
- Page 35 2. Join the Personal Weather Station (PWS) network. Visit: http://www.wunderground.com/weatherstation/overview.asp and add your weather station and you will receive a Station ID. Aercus Instruments™ - WeatherRanger® 35 | P a g e...
-
Page 36: Wifi Scan
Note: The WiFi signal strength icon is displayed on the homepage. If wireless connectivity is successful and you are reporting to Wunderground.com, the WiFi icon will be displayed under the wind chill display on the home page. Figure Aercus Instruments™ - WeatherRanger® 36 | P a g e... -
Page 37: Alarm Mode
Press any key to mute the alarm. You can also set a time of day alarm using the same method. Figure 28 Aercus Instruments™ - WeatherRanger® 37 | P a g e... -
Page 38: Calibration Mode
To adjust the parameter, press to scroll to the parameter you wish to change. Press to highlight the sign (positive or negative, if applicable) and significant digit. Press to change the calibrated value. Aercus Instruments™ - WeatherRanger® 38 | P a g e... -
Page 39: When To Calibrate And When Not To
To calibrate temperature, we recommend a mercury or red spirit (fluid) thermometer. Bi-metal (dial) and digital thermometers (from other weather stations) are not a good source and have their Aercus Instruments™ - WeatherRanger® 39 | P a g e... - Page 40 4 x the distance of the tallest obstruction. For example, if your house is 8m tall and you mount the sensor on a 2m pole: Distance to mount away from house = 4 x (8 – 2) = 24m Aercus Instruments™ - WeatherRanger® 40 | P a g e...
-
Page 41: Factory Default
Make sure you periodically clean the rain gauge funnel. 4.6 Factory Default Enter the Factory Default Mode. Figure 30 Select Select Scroll left Scroll right Scroll field Scroll field Enter sub- Return setting setting down setup mode home Aercus Instruments™ - WeatherRanger® 41 | P a g e... - Page 42 Press to confirm the selection and the year field will turn from green to purple. Press to start the backup, press key again to cancel the backup. Aercus Instruments™ - WeatherRanger® 42 | P a g e...
- Page 43 Microsoft Excel. The TF card can be read by a computer with an SD card adaptor. Figure 31 Select Select Select year Scroll right Scroll field Scroll field Start or Return to setting setting history file down stop Factory backup menu Aercus Instruments™ - WeatherRanger® 43 | P a g e...
- Page 44 15 Daily Rain (in) 16 Weekly Rain (in) 17 Monthly Rain (in) 18 Yearly Rain (in) 19 Solar Rad. (lux) 20 Heat Index (°F) 21 UV (uW/cm^2) 22 UV Index Aercus Instruments™ - WeatherRanger® 44 | P a g e...
- Page 45 7. Language. Supports English, Chinese, Danish, Dutch, French, German, Italian and Spanish. Press to highlight this field. Press to select the language and to accept the changes. 8. About. Provides detailed information for troubleshooting purposes. Aercus Instruments™ - WeatherRanger® 45 | P a g e...
-
Page 46: Specifications
5.3 Power Consumption Base station : 5V DC Adaptor (included), Power Consumption: 7.5 Watts Indoor Thermo-hygrometer-barometer sensor : 2xAAA batteries (not included) Outdoor sensor array: 3xAA batteries (not included) Aercus Instruments™ - WeatherRanger® 46 | P a g e... -
Page 47: Maintenance
DO NOT STRESS THE WIRES. Open the sensor housing slightly, like a clam shell. 3. Clean any debris and spider webs, as shown in Figure 35. Aercus Instruments™ - WeatherRanger® 47 | P a g e... - Page 48 Figure 34 Figure 35 Aercus Instruments™ - WeatherRanger® 48 | P a g e...
-
Page 49: Troubleshooting Guide
Also avoid rechargeable batteries as many are 1.2V (standard 1.5V required) and they also leak their peak charge quickly even if they are 1.5V. Follow the reset procedure in section 3.3.5. Aercus Instruments™ - WeatherRanger® 49 | P a g e... - Page 50 Figure 13. Then power the console down (by removing the AC adaptor), wait 10 seconds and then reinsert the AC adaptor. Aercus Instruments™ - WeatherRanger® 50 | P a g e...
- Page 51 Make certain your time zone, longitude and latitude are set properly. Sunrise and sunset is incorrect FOR FURTHER ASSISTANCE CONTACT THE APPROPRIATE SUPPLIER AS PER THE CONTACT SECTION AT THE START AND END OF THIS MANUAL Aercus Instruments™ - WeatherRanger® 51 | P a g e...
-
Page 52: Appendix 1 - Southern Hemisphere Wind Direction Recalibration
Align the wind vane pointer with the ‘S’ marker on the moulded body of the outdoor Step 3: sensor. Use sticky tape or similar to prevent movement. Align wind vane pointer with S ‘S’ Marker Figure 36 Aercus Instruments™ - WeatherRanger® 52 | P a g e... - Page 53 Southern Hemisphere. Step 5: Enter the Calibration Mode. Press key to select Wind Direction which will be approximately 180º. Press key and key to set this value to 000º. Aercus Instruments™ - WeatherRanger® 53 | P a g e...
- Page 54 Figure 39 Make sure you remove the sticky tape from the wind vane! Step 6: Install the Outdoor Sensor Array outside as per 3.3 and face the solar panel North. Aercus Instruments™ - WeatherRanger® 54 | P a g e...
-
Page 55: Contact Information
For all others please contact the retailer who sold you this item. EU Declaration of Conformity Hereby, Aercus Instruments, declares that this Wireless Weather Station (Model: WeatherRanger) is in compliance with the essential requirements and other relevant provisions of Directive 1999/5/EC.
Need help?
Do you have a question about the WeatherRanger and is the answer not in the manual?
Questions and answers