Table of Contents
Advertisement
Advertisement
Table of Contents

Related Manuals for Swann OutbackCam


Summary of Contents for Swann OutbackCam
- Page 1 INSTRUCTION MANUAL OutbackCam...
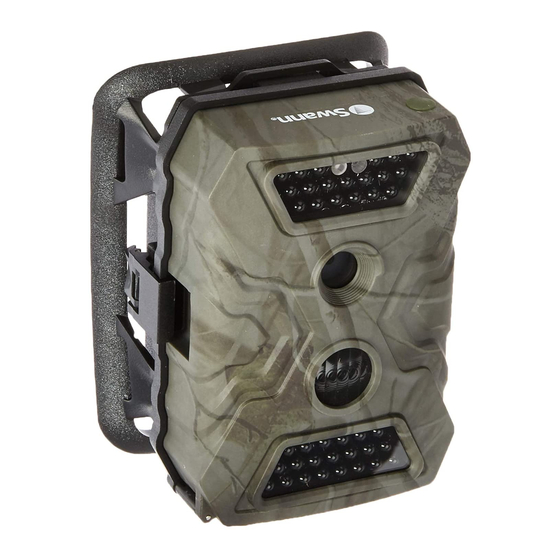
- Page 2 Overview Please take a moment to familiarize yourself with your Swann OutbackCam. Front Light sensor Status for night light detection 19 Infrared LEDs Lens Passive infrared motion sensor 21 Infrared LEDs Locking screw securing bottom cover...
- Page 3 Bottom Battery compartment TV Out port SD Card slot 12V DC-in power jack USB port (optional) Back Battery Pack port LCD screen Up/Down/ Left/Right buttons Menu button OK button GPRS Data ON/OFF switch switch (Feature is not available on this model) Video/Photo Mode switch IR LED Mode switch (19 or 40) Peel off the clear film protecting the LCD screen before use.
- Page 4 Battery Pack Battery cover latch Connector socket Locking latch Mounting Strap USB Cable...
- Page 5 Batteries and Storage Media Let's learn how to install batteries and storage media in your OutbackCam. First, release the bottom cover of the OutbackCam by twisting the locking screw anti-clockwise, and then follow the instructions below. Always switch off the OutbackCam before inserting or removing batteries or memory cards.
- Page 6 Battery Pack Enclosed in an integrated cradle, the Battery Pack provides your OutbackCam the extra juice to help it stay powered for even longer - great for long-term observations in the field. Install batteries 1. Release the latch on the sides of the Battery Pack, and then gently separate the battery pack from the OutbackCam.
- Page 7 OutbackCam is ready to monitor and capture motion triggered events. • The LCD screen only turns on when the OutbackCam is in preview mode. Press the OK button to go into preview mode. The status light illuminates to indicate the OutbackCam is in preview mode.
- Page 8 • The OutbackCam can also capture pictures while it is recording a video, and vice-versa. To do this, turn on the Camera + Video setting in the menu.
- Page 9 Menu. Connect to a computer • Using the included USB cable, you can copy videos and photos on your SD memory card in the OutbackCam to your computer. • To connect, make sure the OutbackCam is switched off, then plug one end of the USB cable into the USB port on the OutbackCam and the other end into an available USB port on your computer.
- Page 10 Menu Let's explore the camera settings available in the menu so you can get the most out of your OutbackCam. Option To do this... Camera ID Assign a 4-digit numerical ID for the OutbackCam, which will appear on your photos. This setting is useful if you own more than one OutbackCam and placed them in different locations.
- Page 11 OutbackCam can be triggered again. Longer delays (e.g., 15 - 30 seconds) improve battery life and prevent the OutbackCam from taking too many pictures of the same things. Audio Select whether to turn on or off sound Recording recording with the built-in microphone.
- Page 12 Language Select the menu language. Time/Date Set the time and date. Be sure the OutbackCam has the correct time and date, so captured events are accurately time stamped and the time lapse feature activates the OutbackCam at the right time.
- Page 13 Option To do this... Trigger Logs Turn this on if you want the OutbackCam to only log the times and dates it was triggered. The OutbackCam does not capture any photo or video during motion events, conserving battery life, which is useful if you just want to conduct an initial survey of a particular observation area for an extended time.
- Page 14 Compliance Information FCC Statement This equipment has been tested and found to comply with the limits for Class B digital device, pursuant to part 15 of the FCC Rules. These limits are designed to provide reasonable protection against harmful interference in a residential installation. This equipment generates, uses and can radiate radio frequency energy and, if not installed and used in accordance with the instructions, may cause harmful interference to radio or television reception, which can be determined...
- Page 15 Any unit which proves defective during the stated period will be repaired without charge for parts or labour or replaced at the sole discretion of Swann. The end user is responsible for all freight charges incurred to send the product to Swann’s repair centres.
- Page 16 Technical Support USA & Canada 1800 627 2799 UK & Europe 0808 168 9031 Australia 1800 788 210 New Zealand 0400 479 266 tech@swann.com © Swann Communications 2015 MOBC140270415E...
Need help?
Do you have a question about the OutbackCam and is the answer not in the manual?
Questions and answers