Philips Selecon Operation Manual
Accent spot cdm
Hide thumbs
Also See for Selecon:
- User manual (40 pages) ,
- Operation manual (13 pages) ,
- User manual (10 pages)
Advertisement
Quick Links
Philips Selecon Accent Spot – CDM
**OPERATION MANUAL**
THIS INFORMATION IS DESIGNED TO PROVIDE YOU WITH THE INFORMATION
YOU NEED IMMEDIATELY UPON DELIVERY OF YOUR NEW LUMINAIRE.
If you require further assistance please contact your Philips Selecon dealer. www.seleconlight.com/distributors
Philips Selecon has packaged this product using environmentally friendly packaging. Please consider either
reuse of the packaging or dispose of responsibly with your nearest recycling collection agency.
IMPORTANT!
Read this manual carefully before attempting to install, operate or maintain the Accent Spot. Follow the instructions in this manual. Philips
Selecon accepts no responsibility if the customer fails to do so.
For each customer, operating conditions will vary, sometimes greatly. Such variations may affect the luminaire‟s performance. Philips
Selecon has no control over the customer‟s unique operating environment. Hence, Philips Selecon makes no representations or warranties
concerning the luminaire‟s performance under the customer‟s actual operating conditions. All operating parameters must be validated for
each customer application by the customer‟s technical experts.
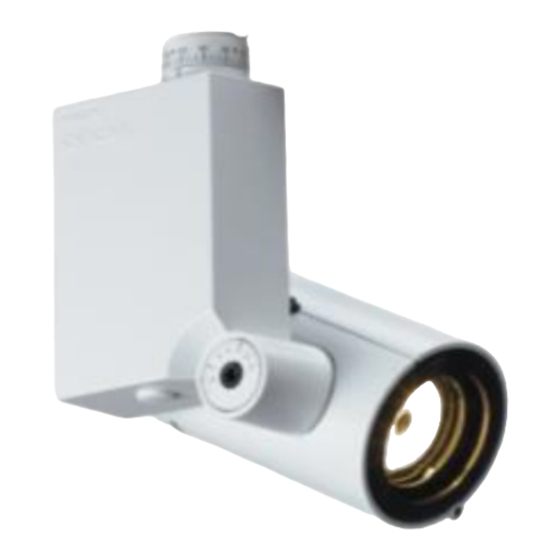
KEY OPERATING POINTS AND FEATURES
A: Pan lock with reference scale and Allen key lock-off
B: Tilt lock with reference scale and Allen key lock-off
C: Spot lid locking clip
D: Lamp Holder (accepts MR16 lamp with GX10 base)
E: Lamp Base (GX10)
F: Ventilation slots. These vents must be unobstructed at all times
G: Accessory holder (3 slots allows varies size accessories)
Front accessory slot accepts the beamshaper, barn door or snoot
LAMPING UP
20W PHILIPS MASTERColour CDM - GX10 Base
35W PHILIPS MASTERColour Elite CDM - GX10 Base
50W PHILIPS MASTERColour Elite CDM - GX10 Base
Recommendation to 'Burn-In' CDM-Rm Lamps
Due to colour shifts in new CDM MR16 lamps we recommend that these lamps are run continuously for a minimum „burn-in‟
period of 20hrs prior to final installation.
DIMMING NOTE:- CDM units CANNOT be installed and run on a dimmed power supply/track.
WARRANTY REGISTRATION:
Take full advantage of the Philips Selecon service commitment and
your new luminaires quickly and easily online
Carefully read the manufacturer‟s instructions for safe lamp handling / use and disposal of
used lamp.
To insert the lamp, push in the lid locking latch on the lamp housing and open the lid. Insert
the lamp into the lamp base and twist clockwise ensuring it is fully home. Push lamp in to lamp
holder and ensure it is located on the tabs at the bottom.
The Philips Selecon Accent Spot CDM has a built-in ballast to convert from your local voltage
to the voltage required by the lamp. Once you have installed the lamp your luminaire should
be ready for use.
JUNE 2012
© 2012 Philips Selecon All Rights Reserved
www.seleconlight.com/warrantyreg
A
D
G
register all
for full after-sales support.
F
B
C
Advertisement

Related Manuals for Philips Selecon


Summary of Contents for Philips Selecon
- Page 1 IMPORTANT! Read this manual carefully before attempting to install, operate or maintain the Accent Spot. Follow the instructions in this manual. Philips Selecon accepts no responsibility if the customer fails to do so.
- Page 2 - Earth LIMITED WARRANTY Philips Selecon (“Selecon”) warrants all Philips Selecon luminaires against defects in materials or workmanship. The term of this warranty is three years; from the date of delivery, and is dependent on the following operating conditions: FOR ARCHITECTURAL DISPLAY: the Accent Spot is used as a display light and in conditions typically found in a museum being 10 to 12 hours daily, 7 days per week.