Table of Contents
Advertisement
Advertisement
Table of Contents

Related Manuals for Telstra T-Gateway


Summary of Contents for Telstra T-Gateway
- Page 1 GettinG connected with your t-Gateway...
- Page 2 ON THE ROAD This guide is designed to help you get started with your new T-Gateway™. Please make sure you keep it in a safe place, as you may find you need to refer to it again at a later date.
-
Page 3: Table Of Contents
Welcome to BigPond ADSL What’s in the Box About your T-Gateway GETTING STARTED WITH YOUR T-GATEWAY Power on your T-Gateway Connect your T-Gateway to the filter/splitter Connect with a wall-mounted phone CONNECTING DEVICES TO YOUR T-GATEWAY Connect via Ethernet Cable Connect via Wi-Fi... -
Page 4: Introducing Your T-Gateway
INTRODUCING YOUR T-GATEWAY In this section: WELCOME TO YOUR T-GATEWAY Learn what your T-Gateway can do WHAT’S IN THE BOX Check that you have everything to get started ABOUT YOUR T-GATEWAY Learn what all the parts of your T-Gateway do... -
Page 5: Welcome To Your T-Gateway
YOUR T-GATEWAY CONGRATULATIONS ON YOUR NEW CONNECTION Thank you for choosing BigPond Broadband and this T-Gateway, your new connection to the world of high-speed Internet and home entertainment. Your T-Gateway lets you connect all your compatible devices using the Ethernet ports... -
Page 6: What's In The Box
4. 2 x Telephone cables (T-Gateway), 2x Filter/splitters Connect your phone on your ADSL line. 5. User guide Detailed information about your T-Gateway. 6. Wireless security card Contains the details you’ll need to connect any device to your T-Gateway via Wi-Fi. -
Page 7: Get Started
Got more than two phones? You’ll need additional filters. You can find them at a Telstra Shop. If you have a wall-mounted phone or you need a special filter, please contact us through one of the options in the ‘More Help’ section. -
Page 8: About Your T-Gateway
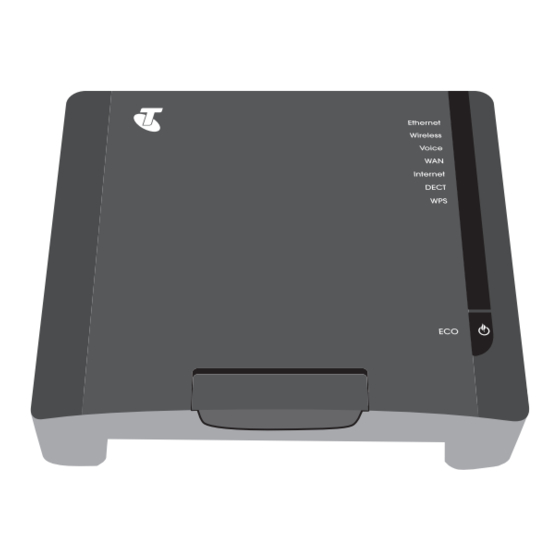
ABOUT YOUR T-GATEWAY YOUR T-GATEWAY FROM THE FRONT Your Gateway has 8 indicator lights on the front panel. These lights are active when:... - Page 9 2. Wireless A device is connected to your T-Gateway via Wi-Fi. 3. Voice Your Telstra Internet call is made via your T-Gateway (not available on ADSL). 4. WAN Your T-Gateway is connected to an active ADSL line/ NBN port. 5. Internet Your ADSL line has a working Internet connection.
- Page 10 YOUR T-GATEWAY FROM THE BACK & SIDE technicolor TG797n v3 SN : C P 1 3 0 4 R A Z Y M MAC : A 4 B 1 E 9 9 8 7 C 4 2 ACCESS KEY : MCH9Z2P0...
- Page 11 Connect any devices such as game consoles or a T-Box for super-fast speeds. 7. Gigabit Ethernet port WAN (red) This port is to connect your T-Gateway to your Velocity or Telstra on the NBN service allowing high speed transfer over Fibre networks.
- Page 12 T-Hu T-Hu Personal Computer GETTING STARTED WITH YOUR T-GATEWAY Power on your T-Gateway and connect it to your phone line – see page 14. CONNECTING DEVICES TO YOUR T-GATEWAY Connect devices using Ethernet cable or Wi-Fi – see page 31.
-
Page 13: Getting Started
WITH YOUR T-GATEWAY In this section: POWER ON YOUR T-GATEWAY Connect your T-Gateway to power and switch it on – 4 tasks CONNECT YOUR T-GATEWAY TO YOUR PHONE LINE Connect your T-Gateway and install filter/splitters on your phone – 4 tasks... -
Page 14: Power On Your T-Gateway
Connect the power adaptor from the kit to the power socket on the bottom right of the back of your T-Gateway. Important Note: Make sure you place your T-Gateway in a location that’s close to a working phone socket and power point for your ADSL service. - Page 15 w i r e l e s s u s e r c o d e s 7353-9124 N e t w o r k N a m e : W i r e l e s s K e y : M a d e i n V i e t n a m T e l s t r a 9 8 7 C 4 3 C 3 1 9 2 2 4 D 6 B...
- Page 16 7353-9124 W i r e l e s s K e y : M a d e i n V i e t n a m C 3 1 9 2 2 4 D 6 B R a t e d I n p u t : 12V STEP 3: Press the Power button on the bottom right at the back of your Gateway to switch it on.
- Page 17 STEP 4: Wait a couple of minutes until the light labelled ECO on the front of your T-Gateway stops blinking green and becomes a steady RED.
- Page 18 STEP 5: COMPLETE The first step is complete! Your T-Gateway is now powered up and ready for you to connect to your phone line. SEQUENCE & DURATION OF THE ECO LED The ECO indicator will go through the following sequence of light status when you turn on the gateway: 1.
- Page 19 MAC : A 4 B 1 E 9 9 8 7 C 4 2 ACCESS KEY : MCH9Z2P0 GW : DSLCBA649EKV6 CONNECT YOUR T-GATEWAY TO THE FILTER/SPLITTER N104006 OUI - SN : A 4 B 1 E 9 - C P 1 3 0 4 R A Z Y M...
- Page 20 STEP 2: Take a filter/splitter from the kit and connect the other end of the phone cable to the ‘ADSL MODEM’ socket on the filter/splitter. Note: Got a wall-mounted phone and socket? Turn to page 24 for instructions.
- Page 21 Unplug your existing phone cable from the wall socket and connect it to the ‘LOCAL PHONE’ socket on the filter/splitter. CALLS REDIAL RECALL IN USE CHARGING PAGE Important Note: If you don’t have a home phone near your T-Gateway, skip this step. CALLS REDIAL RECALL IN USE CHARGING PAGE...
- Page 22 STEP 4: Connect the short cable that’s part of the filter/splitter (it’s labelled ‘Wall socket’) to the phone wall socket.
- Page 23 STEP 5: COMPLETE The WAN indicator on your T-Gateway (see page 79) should flash green then become a steady green in a few minutes. Your T-Gateway is ready for you to connect your devices and to activate it. Important Note: Is the WAN indicator not green? Turn to page 79 for assistance.
-
Page 24: Connect With A Wall-Mounted Phone
These filter/splitters mount directly on your existing wall plate, meaning they take up less space on your wall. If you didn’t order a wall-mounted filter/splitter along with your T-Gateway, please contact us through one of the options in the ‘More Help’ section. - Page 25 ADSL MODEM STEP 2: Plug the cable labelled LINE on the filter/splitter into the wall plate socket. Align the mounting screws on the filter/splitter and wall plate then slide the filter/splitter down onto the wall plate until it stops sliding and is secure.
- Page 26 STEP 3: Plug the cable on the phone into the socket on the front of the wall-mounted filter/splitter that’s labelled LOCAL PHONE. Align the mounting holes on the phone with the mounting screws on the filter/splitter then slide the phone down until it stops sliding and is secure. LOCAL PHONE...
- Page 27 STEP 4: Plug the grey phone cable from our Gateway into the socket on the filter/ splitter labelled ADSL MODEM. ADSL MODEM Note: Your wall phone filter/splitter includes an additional socket for other phone devices if you need it.
- Page 28 STEP 5: COMPLETE The WAN indicator on your Gateway (see page 79) should flash green then become a steady green in a few minutes. Your Gateway is ready for you to connect your devices and to activate it. Note: Is the WAN indicator not green? Turn to page 75 for assistance.
- Page 29 If the indicator isn’t green, and you’ve received confirmation that your ADSL line is active, try turning the power off & on your T-Gateway and check that all cable connections are secure. If this doesn’t help, you may have faulty equipment or a line fault. Please contact us through one of the options in the ‘More Help’...
-
Page 30: Connecting Devices
In this section: CONNECT VIA ETHERNET CABLE Ethernet provides the best speed and reliability. It’s ideal for computers or other devices that are located near your T-Gateway and can be reached by Ethernet cables – 3 tasks. CONNECT VIA WI-FI Wi-Fi is great for mobility around the house, and for any device that doesn’t... -
Page 31: Ethernet Cable
CONNECT VIA ETHERNET CABLE CONNECT YOUR DEVICE TO YOUR T-GATEWAY STEP 1: Connect the yellow Ethernet cable from the kit to any of the yellow Ethernet ports at the back of your T-Gateway. technicolor TG797n v3 SN : C P 1 3 0 4 R A Z Y M... - Page 32 STEP 2: Connect the other end to the Ethernet port on your device and make sure the device is powered on. Important Note: Ethernet ports are normally located on the side of laptops; or the back of desktops, smart TV’s and game consoles.
- Page 33 STEP 3: Wait for a connection to be established. Your device should indicate that an Ethernet connection has been established. This generally takes around 15 seconds. {IMAGE OF A COMPUTER DESKTOP WITH MAGNIFIED VIEW ON THE SYSTEM TASK BAR} Important Note: Some devices may need you to activate the Ethernet function manually.
- Page 34 ON THE ETHERNET LED} WHAT’S NEXT? GET ACTIVATED! If you’re setting up your T-Gateway for the first time, you may need to first activate it to get on the internet. Turn to page 57 and activate your T-Gateway so you can get online. Otherwise, you’re now ready to go! If you also want to connect a wireless (Wi-Fi) device to your T-Gateway, turn to page 36.
- Page 35 IS YOUR ETHERNET CABLE NOT LONG ENOUGH? You can purchase longer cables from any good electronics store if the cable supplied with your T-Gateway is not long enough. Keep in mind that longer cables can cause slower internal connection speeds.
-
Page 36: Connect Via Wi-Fi
C319224D6B Keep the Wireless (Wi-Fi) Security Card that came in the box nearby; you’ll need it to connect your devices to your T-Gateway. If you happen to lose the card that comes with your kit – don’t worry! The Wi-Fi details are printed on the back of the modem. - Page 37 ‘10.0.0.138’ in the address bar of your browser. IS YOUR ECO LIGHT BLUE? If the ECO LED is lit up blue, then your T-Gateway Wi-Fi is switched off. Turn it back on by pressing the ECO button on the front.
- Page 38 CONNECT YOUR MAC TO YOUR T-GATEWAY STEP 1: On the top menu bar, click on the Wi-Fi icon and you will get a menu. If the Wi-Fi is not on, click ‘Turn Wi-Fi On’ to turn it on.
- Page 39 STEP 2: You’ll see a list of available wireless networks. Click on the one that matches the Wireless Network Name (SSID) on your Wireless security card. Note: If you don’t see the wireless network name, please turn to page 76 for assistance.
- Page 40 STEP 3: You’ll then be prompted to enter a password in the text box. Enter the Wireless security key (WPA) from your Wireless Security Card. Note: Ensure you enter your Wireless Security Key (WPA) exactly as it appears, as it is case sensitive.
- Page 41 CHECK THAT THE CONNECTION HAS BEEN ESTABLISHED STEP 4: Wait for a connection to be established. Visit ‘10.0.0.138’ on your desired browser to activate or manage your T-Gateway.
- Page 42 WHAT’S NEXT? GET ACTIVATED! If you’re setting up your T-Gateway for the first time, you may need to first activate it to get on the internet. Turn to page 57 and activate your T-Gateway so you can get online. Otherwise, you‘re now ready to go! You can visit our online forum on www.crowdsupport.telstra.com.au to get some ideas about what you can do.
- Page 43 CONNECT VIA WI-FI WINDOWS XP CONNECT YOUR WINDOWS XP PC TO YOUR T-GATEWAY STEP 1: Click on the Wireless Network icon located in the system tray, on the bottom right of your desktop. Important Note: If you don’t see this wireless icon it could mean that your wireless button/switch is off or your computer may need a wireless adaptor, check that your wireless adaptor is powered on.
- Page 44 STEP 2: You’ll see a list of available wireless network names. Double click on the one that matches the Wireless Network Name on your Wireless security card. Note: If you don’t see the wireless network name, please turn to page 76 for assistance.
- Page 45 STEP 3: You’ll then be prompted to enter a password or security key in the text box. Enter the Wireless Security Key (WPA) from your Wireless Security Card. Important Note: Ensure you enter your Wireless Security Key (WPA) exactly as it appears, as it is case sensitive.
- Page 46 CHECK THAT THE CONNECTION HAS BEEN ESTABLISHED STEP 4: Wait for a connection to be established. Visit ‘10.0.0.138’ on your desired browser to activate or manage your T-Gateway.
- Page 47 WHAT’S NEXT? GET ACTIVATED! If you’re setting up your T-Gateway for the first time, you may need to first activate it to get on the internet. Turn to page 57 and activate your T-Gateway so you can get online. Otherwise, you‘re now ready to go! CAN’T CONNECT?
- Page 48 CONNECT VIA WI-FI WINDOWS 7 CONNECT YOUR WINDOWS 7 PC TO YOUR T-GATEWAY STEP 1: Click on the Wireless Network icon located in the system tray on the bottom right of your desktop. Note: If you don’t see this icon, check that wireless is powered on. For laptops, there...
- Page 49 STEP 2: You’ll see a list of available wireless network names. Double click on the one that matches the Wireless Network Name on your Wireless security card. Note: If you don’t see the wireless network name, please turn to page 77 for assistance.
- Page 50 STEP 3: You’ll then be prompted to enter a password or security key in the text box. Enter the Wireless Security Key (WPA) from your Wireless Security Card. Note: Ensure you enter your Wireless Security Key (WPA) exactly as it appears, as it is case sensitive.
- Page 51 CHECK THAT THE CONNECTION HAS BEEN ESTABLISHED STEP 4: Wait for a connection to be established. Visit ‘10.0.0.138’ on your desired browser to activate or manage your T-Gateway.
- Page 52 WHAT’S NEXT? GET ACTIVATED! If you’re setting up your T-Gateway for the first time, you may need to first activate it to get on the internet. Turn to page 57 and activate your T-Gateway so you can get online.
- Page 53 CONNECT VIA WI-FI OTHER DEVICES CONNECT YOUR DEVICE TO YOUR T-GATEWAY STEP 1: On your phone, tablet, T-Hub 2, smart TV or gaming console navigate to the wireless networking section and switch on Wi-Fi. Please refer to the guides that came with your device for assistance.
- Page 54 STEP 3: You’ll then be prompted to enter a password in the text box. Enter the Wireless Security Key (WPA) from your Wireless Security Card. Note: Ensure you enter your Wireless Security Key (WPA) exactly as it appears, as it is case sensitive. STEP 4: Wait for a connection to be established.
- Page 55 Your device should also indicate a connection has been established. WHAT’S NEXT? GET ACTIVATED! If you’re setting up your T-Gateway for the first time, you may need to first activate it to get on the internet. Turn to page 57 and activate your T-Gateway so you can get online.
- Page 56 If your connection isn’t strong, or it drops out, try moving your device closer to your T-Gateway, or try connecting using the Ethernet cable. You can check out the HELP section on your T-Gateway, which has links to useful tools allowing you to measure your Wi-Fi connection in the various spots within your home.
- Page 57 ACTIVATE YOUR T-GATEWAY ACTIVATE YOUR BIGPOND ADSL SERVICE & GET CONNECTED STEP 1: Open a web browser on your device. On a PC, it may be Internet Explorer. On a Mac, it may be Safari. Other devices may have their own web browser.
- Page 58 STEP 3: COMPLETE You will now be shown the Gateway Management Interface landing page. Turn to page 81 for an explanation of what each section means.
-
Page 59: Managing Your T-Gateway
Reset your T-Gateway to Factory Default settings Use the ‘Help’ feature on your T-Gateway TROUBLESHOOTING Can’t connect to my internet service Can’t access my gateway web interface Can’t connect to my T-Gateway via Wi-Fi with additional devices My internet service is running slow... -
Page 60: The Gateway Management Interface
Your T-Gateway is optimised for use on Telstra products. It’s important to be aware that Telstra may not support any changes you make to the default configuration on your T-Gateway. You will be responsible for any advanced changes you make. - Page 61 HOW TO: ACCESS YOUR GATEWAY WEB INTERFACE STEP 1: Open a web browser on your device. On a PC, it may be Internet Explorer. On a Mac, it may be Safari. Other devices may have their own web browser. STEP 2: Enter http://10.0.0.138 in your browser’s address bar and go to the page.
- Page 62 STEP 3: COMPLETE {INSERT IMAGE OF BROWSER + LANDING PAGE} You will now be shown the Gateway Management Interface landing page. Turn to page 81 for an explanation of what each section means.
- Page 63 HOW TO: CHANGE YOUR INTERNET PASSWORD ON THE GATEWAY STEP 1: Open a web browser on your device. On a PC, it may be Internet Explorer. On a Mac, it may be Safari. Other devices may have their own web browser. STEP 2: Enter http://10.0.0.138 in your browser’s address bar and go to the page.
- Page 64 STEP 3: {INSERT IMAGE OF BROWSER + LANDING PAGE} You will now be shown the Gateway Management Interface landing page. Turn to page 81 for an explanation of what each section means. STEP 4: {INSERT IMAGE OF GATEWAY INTERFACE} Under Broadband Connection, click on PPPoEDSL. Note: Each time you change your BigPond Internet Password either through ‘My Account’...
- Page 65 STEP 5: COMPLETE Once you have typed in your new password, click on Connect.
- Page 66 HOW TO: RESTART YOUR GATEWAY STEP 1: Open a web browser on your device. On a PC, it may be Internet Explorer. On a Mac, it may be Safari. Other devices may have their own web browser. STEP 2: Enter http://10.0.0.138 in your browser’s address bar and go to the page.
- Page 67 STEP 3: You will now be shown the Gateway Management Interface landing page. Turn to page 81 for an explanation of what each section means. STEP 4: On the Gateway Interface, click on Technicolor Gateway.
- Page 68 STEP 5: Under Pick a task..., click on Restart my Technicolor Gateway.
- Page 69 STEP 6: COMPLETE On the Warning page, click on Yes, restart my Technicolor Gateway.
-
Page 70: Factory Default Settings
HOW TO: RESET YOUR GATEWAY TO FACTORY DEFAULT SETTINGS STEP 1: Open a web browser on your device. On a PC, it may be Internet Explorer. On a Mac, it may be Safari. Other devices may have their own web browser. STEP 2: Enter http://10.0.0.138 in your browser’s address bar and go to the page. - Page 71 STEP 3: You will now be shown the Gateway Management Interface landing page. Turn to page 81 for an explanation of what each section means. STEP 4: On the Gateway Interface, click on Technicolor Gateway.
- Page 72 STEP 5: Under Pick a task..., click on Reset my Technicolor Gateway. STEP 6: COMPLETE On the Warning: Reset to Factory Defaults page, click on Yes, reset my Technicolor Gateway.
- Page 73 HOW TO: USE THE ‘HELP’ FEATURE ON YOUR GATEWAY STEP 1: Open a web browser on your device. On a PC, it may be Internet Explorer. On a Mac, it may be Safari. Other devices may have their own web browser. STEP 2: Enter http://10.0.0.138 in your browser’s address bar and go to the page.
- Page 74 STEP 3: You will now be shown the Gateway Management Interface landing page. Turn to page 81 for an explanation of what each section means. STEP 4: On the Gateway Management Interface, click on Help. Note: This will open the Help menu in a new tab or pop up window. The help content is related to the category/topic, from where you have clicked on the Help button.
-
Page 75: Troubleshooting
TROUBLESHOOTING: CAN’T CONNECT TO MY INTERNET SERVICE One of the first things to do if your Internet service isn’t working, is to check your T-Gateway lights and find out what to do using the table below. T-GATEWAY LIGHT STATUS WHAT IT MEANS... -
Page 76: Web Interface
TROUBLESHOOTING: CAN’T ACCESS MY GATEWAY WEB INTERFACE One of the first things to do is to look at the T-Gateway lights, which will provide you further information on what may prevent you from accessing your gateway interface. T-GATEWAY LIGHT STATUS... - Page 77 TROUBLESHOOTING: CAN’T CONNECT TO MY GATEWAY ON WI-FI WITH ADDITIONAL DEVICES One of the first things to do is to look at the T-Gateway lights, which will provide you further information on what may prevent you from accessing the Internet.
-
Page 78: Further Information
In this section: INDICATOR LIGHTS Details of the different states for each indicator light on the front of your T-Gateway, and what they mean GLOSSARY A simple explanation of the technical terms used in this guide, such as ADSL and WPS... -
Page 79: Indicator Lights
INDICATOR LIGHTS ON YOUR GATEWAY UNDERSTANDING WHAT YOUR GATEWAY IS TELLING YOU The front of your Gateway has 8 indicator lights. These pages explain what it means when each of them is steady, blinking or off. INDICATOR LIGHT DESCRIPTION Ethernet Steady Green - Ethernet connection detected, but there is no activity. - Page 80 INDICATOR LIGHT DESCRIPTION Internet Green LED Steady Green - Connected to the Internet, but there is no activity. Blinking Green - Connected to the Internet and activity is ongoing. Red LED Steady Red - Internet connection has failed. Off - No connection to the Internet. DECT –...
- Page 81 UNDERSTANDING WHAT YOUR GATEWAY IS TELLING YOU Below is an explanation of key technical terms used in this guide, to help you understand more about how your T-Gateway works. Asynchronous Digital Subscriber Line – a technology that provides fast ADSL broadband over your existing copper/telephone line.
- Page 82 Voice over Internet Protocol, commonly refers to the communication protocols, technologies, methodologies and transmission techniques involved in the VOIP delivery of voice communications and multimedia sessions over Internet Protocol networks, such as the Internet. Wide Area Network is a network that covers a broad area or referred to an Internet connection, since the Internet itself is considered to be a WAN as well.
- Page 83 If you have Internet access, we offer some great ways for you to get help online: CROWDSUPPORT Telstra’s online community, 24x7. Join us to get support and advice about products and services from Telstra staff and your fellow users. Go to: crowdsupport.telstra.com.au FACEBOOK &...
- Page 84 NOTES...
- Page 85 Telstra Corporation Limited, ABN 33 051 775 556. ™ ®...
- Page 86 13 7663 visit a telstra store...
Need help?
Do you have a question about the T-Gateway and is the answer not in the manual?
Questions and answers