Philips HTS3100 User Manual
Dvd
Hide thumbs
Also See for HTS3100:
- Service manual (49 pages) ,
- User manual (49 pages) ,
- Specifications (2 pages)

Related Manuals for Philips HTS3100


Summary of Contents for Philips HTS3100
- Page 1 DVD HOME THEATRE SYSTEM HTS3100 User Manual Manuel D’utilisation Manual del usuario Benutzerhandbuch Gebruikershandleiding Downloaded From TheatreSystem-Manual.com Manuals...
-
Page 2: How To Connect Plug
Italia U.K. DICHIARAZIONE DI CONFORMITA’ Mains plug Si dichiara che l’apparecchio HTS3100, Philips risponde alle prescrizioni dell’art. 2 comma 1 This apparatus is fi tted with an approved 13 del D.M. 28 Agosto 1995 n. 548. Amp plug. To change a fuse in this type of... - Page 3 CAUTION Advarsel: Usynlig laserstråling ved VISIBLE AND INVISIBLE LASER RADIATION WHEN OPEN. AVOID EXPOSURE TO BEAM åbning når sikkerhedsafbrydere er ude af funktion. Undgå utsættelse for ADVARSEL stråling. SYNLIG OG USYNLIG LASERSTRÅLING VED Bemærk: Netafbryderen er sekundært ÅBNING UNDGÅ UDSÆTTELSE FOR STRÅLING indkoblet og ofbryder ikke strømmen fra nettet.
- Page 4 Disposal of your old product Your product is designed and manufactured with high quality materials and components, which can be recycled and reused. When this crossed-out wheeled bin symbol is attached to a product it means the product is covered by the European Directive 2002/96/EC. Manufactured under license from Please inform yourself about the local separate collection system for electrical and electronic products.
- Page 5 Index English ------------------------------------ 6 Français ---------------------------------- 46 Español ---------------------------------- 84 Deutsch -------------------------------- 122 Nederlands ---------------------------- 160 Downloaded From TheatreSystem-Manual.com Manuals...
-
Page 6: Table Of Contents
Table of contents General General Information ......................8 Setup precautions ..............................8 Accessories supplied ............................8 Cleaning discs ................................8 About recycling ..............................8 Product Overview Main Unit ........................... 9 Remote Control ......................10-12 Using the remote control ..........................12 Connections Basic Connections .....................13-15 Step 1 : Placing the speakers ...........................13 Step 2 : Connecting to TV and the speakers system ................14 Step 3 : Connecting the FM/MW antennas ....................15 Step 4 : Connecting the power cord ......................15... - Page 7 Selecting surround sound ..........................38 Selecting digital sound effects ........................38 Volume control ..............................38 Other Features ....................... 39 Controlling ‘Philips’ TV with the remote control ..................39 Software upgrades .............................39 Troubleshooting ......................40-41 Glossary ........................42-43 Specifi cations ........................44...
-
Page 8: General Information
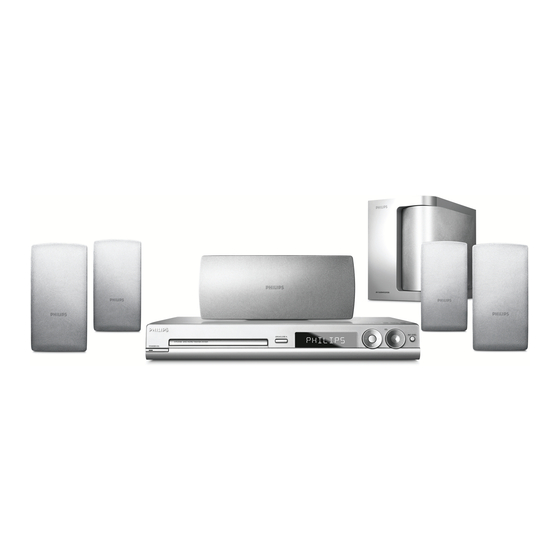
General Information CAUTION! Accessories supplied The machine does not contain any user-serviceable parts. Please leave – 1 passive subwoofer all maintenance work to qualifi ed – 4 satellite speakers personnel. – 1 centre speaker – 1 remote control with batteries –... -
Page 9: Main Unit
Main Unit STANDBY ON 2 f SOURCE – Selects the relevant active source mode: – Turns on the system or turns off to Eco DISC, TUNER (FM/MW), TV or AUX. Power standby mode. g VOL b Disc tray – Adjusts the volume level. c OPEN CLOSE ç... -
Page 10: Remote Control
– TUNER: hold down this button to erase the current preset radio station. TV VOL +- – Adjusts TV volume (Philips TV only). Numeric Keypad (0-9) – Enters a track/title number of the disc. – Enters a number of a preset radio station. - Page 11 During playback, display the disc title menu or return to the main menu. . > – DISC: hold down this button for fast forward and backward search. – TV: selects previous/next channel (Philips TV only). – TUNER: selects a preset radio station. PROGRAM PAUSE Å...
-
Page 12: Using The Remote Control
Remote Control (continued) CAUTION! Using the remote control – Remove batteries if they are exhausted or if the remote control is not to be used for a long time. – Do not mix batteries (old and new or carbon and alkaline, etc.). –... -
Page 13: Basic Connections
Step 1: Placing the speakers – The placement diagram shown here is only a guideline that will provide great system The Philips Home Theatre System is performance. You may fi nd other placement choices that are more suitable for your room simple to install. -
Page 14: Step 2: Connecting To Tv And The Speakers System
Basic Connections (continued) SUBWOOFER FRONT FRONT LEFT RIGHT CENTER REAR LEFT REAR RIGHT Helpful Hints: Step 2: Connecting to TV and – To prevent unwanted noise, do not place the speakers system the rear speakers too close to the DVD system, AC power adapter, TV or any other radiation sources. -
Page 15: Step 3 : Connecting The Fm/Mw Antennas
Basic Connections (continued) fi x the claw into the slot FM antenna antenna Step 3: Connecting the FM/ Step 4: Connecting the MW antennas power cord After everything is connected Connect the supplied MW loop antenna properly, plug the AC power cord to the MW socket. -
Page 16: Optional Connections
Optional Connections Connecting audio from an analogue audio/video device You can connect the audio output from an analogue audio/video device (e.g. VCR, Cable/Satellite Box or TV) to this Home Theatre Audio System in order to enjoy the multi-channel surround sound capabilities Use an audio cable (red/white - not supplied) to connect the AUX IN... -
Page 17: Getting Started
Getting Started Step 1: Turning on the DVD Step 2: Finding the correct system viewing channel Press STANDBY ON (2). Before you start ... Make sure you have completed all the Press the SOURCE button on the front necessary connections before proceeding. panel repeatedly to select : DISC Press SOURCE button until “DISC”... -
Page 18: Step 3: Setting Language Preferences
Getting Started (continued) Audio, Subtitle and Menu language Step 3: Setting language for DVD playback preferences You can select your preferred language settings for DVD playback. If the The language options are different selected language is recorded on the depending on your country or region. It DVD disc, the DVD system will may not correspond to the illustrations automatically play the disc in that... -
Page 19: Step 4: Setting The Tv
Getting Started (continued) If the language you want is not Step 4: Setting the TV available in the list, select { Others }. Use the numeric keypad (0-9) on the remote control to enter the 4-digit Selecting the matching colour language code ‘XXXX’... -
Page 20: Setting The Tv Display
Getting Started (continued) Select one of the options and press OK Setting the TV Display to confi rm. Set the aspect ratio of the DVD system Follow the instructions shown on the according to the TV type you have TV to confi rm the selection (if any). connected. -
Page 21: Step 5: Setting The Speakers' Channels
Getting Started (continued) keys to highlight { Speakers Step 5: Setting the speakers’ Delay }, then press channels You can adjust the delay times (centre Audio Setup Page and surround only) and volume level for Speakers Volume Speakers Delay individual speakers. These adjustments let Night Mode you optimise the sound according to CD Upsampling... -
Page 22: Disc Operations
Disc Operations IMPORTANT! Playable discs – If the inhibit icon (ø or X) appears on the TV screen when a button is pressed, it means the function is not available on the current disc or at the current time. – Do not put any objects other than discs on the disc tray. -
Page 23: Basic Playback Controls
Disc Operations (continued) Basic playback controls Selecting various repeat/ shuffl e functions Pausing playback During playback, press u (or Å on While playing a disc, press REPEAT on the remote control). the remote control repeatedly to choose While in pause mode, you can press a repeat play mode. -
Page 24: Programming Disc Tracks
Disc Operations (continued) Programming disc tracks Other playback features for video discs (DVD/VCD/ (not for Picture CD/MP3) SVCD) You can play the contents of the disc in the order you want by programming the playing order of the tracks. Press PROGRAM on the remote control. -
Page 25: Viewing Playback Information
Disc Operations (continued) Viewing playback information Resuming playback from the last stopped point This DVD system can display the disc This DVD system is able to resume disc playback information (for example, title playback from its last stopped point (only or chapter number, elapsed playing time, possible for the last 10 discs that were audio/subtitle language) and a number of... -
Page 26: Changing Sound Track Language
Disc Operations (continued) Changing sound track language Preview function (VCD/SVCD only) This operation works only on DVDs with This function allows you to preview the multiple soundtrack languages, you can contents of a VCD/SVCD. change the language you want while Press DISC MENU. -
Page 27: Playing An Mp3/ Jpeg//Window Media Audio Disc
Disc Operations (continued) During playback, you can; Playing an MP3/ JPEG/ Press ./ > to playback another Windows Media Audio disc ™ track/fi le in the current folder. This DVD system can playback most of Hold down ./ > to fast reverse/ the MP3, JPEG and Windows Media™... -
Page 28: Playing A Jpeg Image Fi Le (Slide Show)
Disc Operations (continued) Playing a JPEG image fi le Zoom picture (slide show) During playback, press ZOOM repeatedly to select a different zoom Before you start ... factor. Turn on your TV to the correct Video In keys to pan through the channel. -
Page 29: Playing Mp3 Music And Jpeg Pictures Simultaneously
Disc Operations (continued) Playing MP3 music and JPEG Playing a DivX disc pictures simultaneously This DVD system supports the playback of DivX movies which you can copy from You can create a musical slide show if the your computer onto a CD-R/RW, disc contains both the MP3 music and DVD+R/+RW disc (see ‘General Setup JPEG picture fi les. -
Page 30: Dvd Setup Menu Options
DVD Setup Menu Options Accessing the DVD setup menu General Setup Page Disc Lock see page 31 Display Dim This DVD system setup is carried out via Program the TV, enabling you to customise the OSD Language Screen Saver DVD system to suit your particular DivX(R) VOD Code requirements. -
Page 31: General Setup Page
{ Off } – Turns off the screen saver function. DivX(R) VOD code Philips provides you with the DivX¨ VOD (Video On Demand) registration code that allows you to rent and purchase videos using the DivX¨ VOD service. Press to see the registration code and press OK to exit. -
Page 32: Audio Setup Page
DVD Setup Menu Options (continued) Audio Setup Page (underlined options are the factory default settings) Speakers Volume Access the speaker’s level setup menu. Use keys to adjust the volume level for each connected speaker between -6dB to +6dB. Speakers Delay Access the speaker’s distance setup menu. -
Page 33: Video Setup Page
DVD Setup Menu Options (continued) Video Setup Page (underlined options are the factory default settings) TV Type Selects the colour system that matches the connected TV. It will enable playback of a different type of disc (PAL or NTSC disc) on this DVD system. -
Page 34: Preference Setup Page
DVD Setup Menu Options (continued) Preference Setup Page (underlined options are the factory default settings) Audio Selects the preferred audio language for DVD playback. Subtitle Selects the preferred subtitle language for DVD playback. Disc Menu Selects the preferred disc menu language for DVD playback. Note: If the selected audio/subtitle/disc menu language is not available on the DVD, the disc’s default language will be used instead. -
Page 35: Dvd Setup Menu Options
DVD Setup Menu Options (continued) Preference Setup Page (underlined options are the factory default settings) DivX Subtitle Selects the font type that supports the recorded DivX subtitle. { Standard } – Displays a standard list of Roman subtitle fonts provided by this DVD system. { Others } –... -
Page 36: Tuner Operations
display panel Tuner Operations IMPORTANT! Presetting radio stations Make sure the FM and MW antennas are connected. You can store up to 40 FM and 20 MW preset radio stations in the memory. There are three different ways to Tuning to radio stations programme the radio stations: –... -
Page 37: Using Automatic Preset
Tuner Operations (continued) Press PLAY until “START ...” appears Using manual preset on the display panel. Use manual presetting to store your The system will start searching from favourite radio stations. the FM band followed by the MW band. All the available radio stations with Tune to your desired radio station (see strong signal will be stored automatically. -
Page 38: Sound And Volume Controls
Sound and Volume Controls Selecting digital sound effects Select a preset digital sound effect that matches your disc’s content or that optimises the sound of the musical style you are playing. Press SOUND to select the available sound effect. MUTE When playing movie discs or in TV mode, you can select : SURR. -
Page 39: Other Features
Other Features Controlling ‘Philips’ TV with Software upgrades the remote control Periodically Philips will issue software upgrades to enhance your user This DVD system’s remote control experience. enables you to control the basic functions of your ‘Philips’ brand TV. Before you start ... -
Page 40: Troubleshooting
Do not open the system as there is a risk of electric shock. If a fault occurs, fi rst check the points listed below before taking the system for repair. If you are unable to solve a problem by following these instructions, consult your dealer or Philips for help. Problem (General) Solution No power. -
Page 41: Troubleshooting
Troubleshooting (continued) Problem (Playback) Solution The DVD system does not – Insert a readable disc with the playback side facing start playback. down. The DVD+R/CD-R must be fi nalised. – Check the disc type, colour system (PAL or NTSC) and region code. –... -
Page 42: Glossary
Glossary Analogue: Sound that has not been turned Dolby Surround Pro Logic II: It is an into numbers. Analogue sound varies, while improved matrix decoding technology that digital sound has specifi c numerical values. provides better spatiality and directionality These sockets send audio through two on Dolby Surround programme material, channels, the left and right. - Page 43 Glossary (continued) Playback control (PBC): Refers to the signal recorded on video CDs or SVCDs for controlling playback. By using menu screens recorded on a Video CD or SVCD that supports PBC, you can enjoy interactive playback and searching. Region code: A system allowing discs to be played only in the region designated.
-
Page 44: Specifi Cations
Specifi cations AMPLIFIER MAIN UNIT Output power: 200 W Power Supply Rating: 220–240 V; 50 Hz - Front : 25 W / channel Power Consumption: 70 W - Rear: 25 W / channel Eco Standby power: < 1 W - Centre : 50 W Dimensions: 360 x 54 x 324 (mm) - Page 45 Downloaded From TheatreSystem-Manual.com Manuals...