Table of Contents
Advertisement
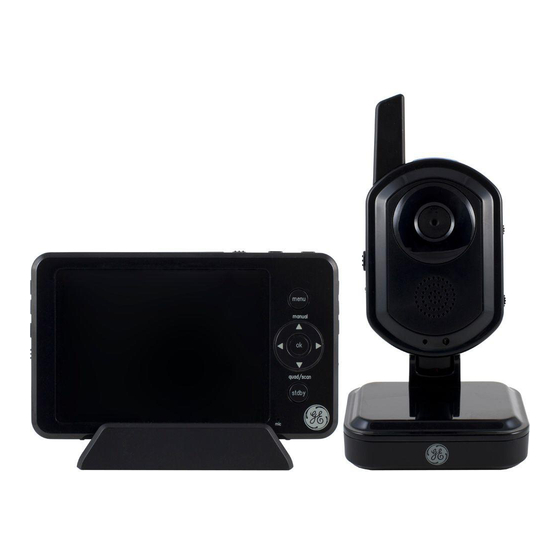
Wireless Color
Digital Home Monitoring Kit
User Manual
HOME
MONITORING
SMALL BUSINESS
PROTECTION
BABY
MONITORING
NANNY CAM
THEFT DETECTION
& PREVENTION
NIGHT VISION
DOORWAY
MONITORING
(INDOORS)
WAITING AREAS
CAREGIVER ASSITANCE/
MONITORING
PET SUPERVISION
NOTE: Camera and surveillance products may be prohibited by laws that vary under federal and state laws. IT IS
THE SOLE RESPOSIBILITY OF THE USER TO DETERMINE WHETHER THEIR USE OF THESE PRODUCTS VIOLATES ANY
APPLICABLE FEDERAL OR STATE LAWS.
http://goo.gl/3wUHy
45255
ver2
Advertisement
Table of Contents

Related Manuals for GE 45255


Summary of Contents for GE 45255
-
Page 1: User Manual
45255 ver2 Wireless Color Digital Home Monitoring Kit User Manual HOME MONITORING SMALL BUSINESS PROTECTION BABY MONITORING NANNY CAM THEFT DETECTION & PREVENTION NIGHT VISION DOORWAY MONITORING (INDOORS) WAITING AREAS CAREGIVER ASSITANCE/ MONITORING PET SUPERVISION NOTE: Camera and surveillance products may be prohibited by laws that vary under federal and state laws. IT IS THE SOLE RESPOSIBILITY OF THE USER TO DETERMINE WHETHER THEIR USE OF THESE PRODUCTS VIOLATES ANY APPLICABLE FEDERAL OR STATE LAWS. -
Page 2: Table Of Contents
FEATURES Automatically record with 1st priority motion and/or sound detection ............12 INITIAL SETUP Playback/Deletion of recorded videos ......12 Camera ..................... 5 Adjusting the amount of time recording continues Monitor ....................5 after motion and/or sound is detected ......13 THE BASICS Formatting optional MicroSD ™... -
Page 3: Features
Congratulations on your purchase of the GE Wireless Color Digital Home Monitoring Kit! Please review these instructions carefully and retain them for your future reference. FEATURES CAMERA 4.9mm lens • 2.4GHz digital wireless technology—private and secure monitoring with interference-free picture and sound... - Page 4 FEATURES speaker (audio from camera(s)) music controls/ lullabies MONITOR talkback control • High contrast 3.5” LCD color monitor for remote (speak to camera) video and audio monitoring kickstand monitor • 2.4GHz digital wireless technology—private and power switch secure monitoring with STATIC-FREE picture and sound •...
-
Page 5: Camera
INITIAL SETUP: CAMERA Wall wall mount NOTE: Before use, remove the plastic fi lm protecting the night mounting plate vision LEDs (around lens). Supply power to the camera using one of the following options: Tabletop • AC Adapter- stand 1. -
Page 6: The Basics
• AC Adapter into Cradle- interior walls, but the signal may be refl ected by power wires or plumbing inside those walls. Usually a slight adjustment to the 1. Plug-in the AC power adapter into an electrical outlet. position of the monitor and/or camera will improve reception. 2. -
Page 7: Features
TALK-BACK Speak directly to currently selected talk back control camera channel: 1. Locate the ‘talk back’ button on the left side of the monitor. 2. Press and hold the ‘talk back’ button. 3. Begin speaking. 4. Release when fi nished. To be notifi... -
Page 8: Temperature Alert
3. Press and release the ‘ok’ button. Use the directional keypad 1. Press and release the ‘menu’ button on the monitor. to highlight either ‘1x’ or ‘2x’. Using the directional keypad, highlight the ‘Settings’ option. 4. Press and release the ‘ok’ button. Press and release the ‘menu’ 2. -
Page 9: Adjusting The Brightness
ADJUSTING THE BRIGHTNESS 4. Using the directional keypad, highlight the ‘Default’ option. 5. Press and release the ‘ok’ button. 1. Press and release the ‘menu’ button on the monitor. Using the directional keypad, highlight the ‘Settings’ option. 6. Use the directional keypad to highlight either ‘Yes’ or ‘No’. 2. -
Page 10: View Live Video With 1St Priority Motion And/Or Sound Detection
• Press and release the ‘quad/scan’ button until multiple ‘jump’ to the applicable camera. The screen will remain lit for approximately 15 seconds after the video motion or sound stops. camera video streams appear on the screen. QUAD VIEW RECORDING WITH OPTIONAL MICRO SD ™... - Page 11 Automatically Record with motion and/or sound detection ...To be notifi ed with the screen illuminated Activates recording when motion and/or sound is detected by Adjust/disable audio & motion sensitivity (refer to the ‘Settings’ camera. section in the manual) 1. Press and release the ‘menu’ button on the monitor. •...
-
Page 12: Automatically Record With 1St Priority Motion And/Or Sound Detection
4. Press and release the ‘auto’ button on the right side of the • WITH notifi cation alarm- monitor. A red light will illuminate near the top left of the ...To be notifi ed with the screen illuminated display indicating automatic recording mode is active. In quad view only (split screen), the screen will ‘jump’... -
Page 13: Adjusting The Amount Of Time Recording Continues After Motion And/Or Sound Is Detected
4. Use the directional keypad to select the fi le desired. Press and release the ‘ok’ button to select. The video selected will start playing immediately. The following commands can be use during playback: Stop, Fast Forward, Rewind and Play from Beginning. 5. -
Page 14: Technical Support
5. Image on screen appears to illuminate or ‘pulse’ on and off repeatedly. The camera is likely pointed directly at a light source causing the camera sensor autofocus to not ‘lock-on’ to what is displayed on the screen. Try moving the camera slightly or moving the camera away from the light source (if known) to allow the camera to focus properly. -
Page 15: Specifications
SPECIFICATIONS: GENERAL MONITOR RF Frequency: .................2.4~2.48 GHz LCD Size: ..................... 3.5” Diagonal Transmit Power: ................... 16dBm Battery Life: ..................Up to 5 hours RF Range: ..........450ft Unobstructed Line of Sight System Resolution: ..........QVGA (320X240)-Monitor Modulation: ......................GFSK ....................VGA (640X480)-USB Spread Spectrum:....................FHSS Current Consumption: ................