
Related Manuals for Lyngdorf Audio DPA-1 RoomPerfect


Summary of Contents for Lyngdorf Audio DPA-1 RoomPerfect
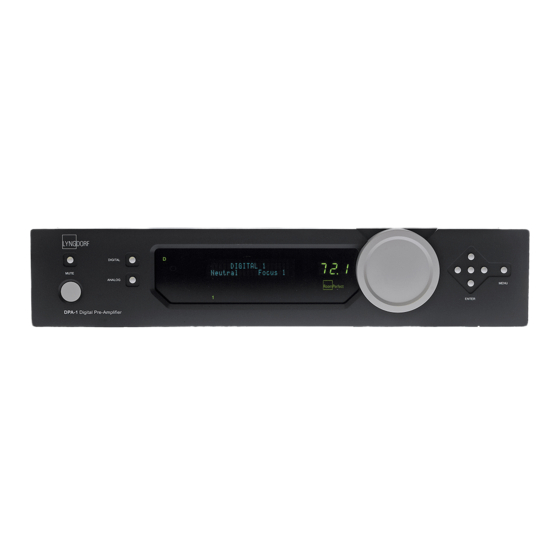
- Page 1 Owner´s manual DPA-1 RoomPerfect™ DIGITAL MUTE ANALOG MENU ENTER DPA-1 Digital Pre-Amplifier...
-
Page 3: Table Of Contents
Table of Contents Operating Voltage Unpacking the DPA-1 Serial Number Registration Introduction Accessories Front Panel Display Indicators Rear Panel Remote Control Connecting the DPA-1 - Connecting to sources and amplifi ers - Using Main and Line outputs Menu System - Navigating the Menu System Menu Tree Introduction to RoomPerfect™... -
Page 4: Operating Voltage
Serial Number Registration Please record the serial number of your DPA-1 here for future reference. The serial number is printed on the label on the rear panel. You will need this serial number, should you ever require service for your DPA-1. -
Page 5: Introduction
Introduction Congratulations on the purchase of your Lyngdorf Audio DPA-1 with RoomPerfect™. Besides being a state-of-the-art pre-amplifi er, it also enables you to take advantage of the most advanced room correction system on the market. It is implemented in such a way that you will always achieve the perfect result. -
Page 6: Accessories
Accessories You should fi nd the following accessories included: Mains cord Microphone digital info analog menu TUNER channel volume ENTER random repeat Remote control 8 m (26.25 feet) XLR – XLR cable Programming cable Microphone stand with Mic clamp (delivered in a separate carton) -
Page 7: Front Panel
DPA-1 Digital Pre-Amplifier Controls The buttons/controls on the front panel of the DPA-1 can all be operated either with direct presses or by operating the corresponding keys on the supplied remote control. All the keys on the front panel (except the Mains Switch) are duplicated onto the remote control as well. -
Page 8: Display Indicators
Display Indicators Illuminates to indicate whether the active input is Analog or Digital. Menu Alphanumeric Display (2*20 Characters). Illuminates the active input. RoomPerfect Logo Is illuminated when a fi lter is active. Volume Display 3 digits indicating Volume control setting from 00.0 to 99.9 – in dB’s. Mute is indicated by the Volume control setting ‘---’. - Page 9 115V and 230V Mains Voltage Switch. Switches between 115V and 230V mains input voltage. Make sure the rear selector is in the correct setting and connect the power input only to the appropiate AC source. The warranty will not cover any damage caused by connecting to the wrong type of AC mains.
-
Page 10: Remote Control
The remote control is used to access the menu system as well as the buttons directly accessible on the front panel. To control the DPA-1 the AMP key must be pressed (please note the DPA-1’s volume and mute buttons still work when in other modes). - Page 11 In menu mode they are used for navigation in the menu system. Pressing and holding down a key changes selected values fast. 17. Enter Turns the DPA-1 On from stand-by mode with the last selected input and works as Enter in menu sys- tem. 18. No Function.
-
Page 12: Connecting The Dpa-1
Connecting the DPA-1 Connecting to sources and amplifi ers The DPA-1 is very simple to hook up. Connect all sources to the DPA-1. Then connect the DPA-1 output signal to a poweramplifi er. Source(s) DPA-1 Digital Pre-Amplifier DPA-1 Poweramp... -
Page 13: Using Main And Line Outputs
Two Lyngdorf boundary woofers are connected to Main Output Left and Right, through a poweramp, and lowpass crossover set at 400Hz. Main Output Left + Right Highpass filter set at 400Hz Speakers Poweramp DPA-1 Main Output Right No filter No filter Poweramp DPA-1... -
Page 14: Menu System
Menu System The Main Display on the front panel of the DPA-1 shows all functionality and current status of the DPA-1. An overview of the menu tree can be seen in the ‘Menu Tree’ chapter. Navigating the Menu System Pressing the Menu button on the front panel or the remote enters the menu or steps back one level in the menu system. -
Page 15: Menu Tree
Menu Tree This is an overview of the entire DPA-1 menu structure. DPA -1 Main Menu RoomPerfect Guided setup Advanced options Measure Focus Pos Measure Room Pos RoomKnowledge RoomCorrection Display Display Timeout Disp . Brightness Volume Disp. Timeo. Volume Def. Volume Max. -
Page 16: Introduction To Roomperfect
Introduction to RoomPerfect™ Once the guided set-up has been successfully completed you have the option to listen to music through two listening settings; Focus 1 and Global room correction fi lters. The RoomPerfect™ fi lters are stored on the numerical buttons from 1 to 9 on the remote control. To change from one fi lter to the other you simply press the numerical button corresponding to the desired fi... -
Page 17: Roomperfect
RoomPerfect™ The sub menus accessible in the RoomPerfect™ menu are: Advanced options is only available when Guided set-up has been performed. Guided Setup When you enter the RoomPerfect™ Main Menu for the fi rst time, only the Guided setup is available. Press Enter to initiate the guided set-up. -
Page 18: Setting The Measurement Volume Level
Press Enter to confi rm and to commence the calibration process. The test signal will start and shortly thereafter the DPA-1 will suggest an initial estimate of the desired maximum calibration volume (in dB), displayed as ‘Desired vol. max XXdB – Retry/Save Current’... -
Page 19: Focus Measurement
Focus Measurement When the calibration is OK, press Enter to start the measuring process and ‘Measuring Focus position …’ will be displayed. Each measurement comprises four steps: • A low and a high frequency measuring signal fi rst in the left and then in the right channel. The length of each measurement depends on a combination of the measurement volume, set in the calibration process, and the background noise in your local environment. -
Page 20: Adding More Room Measurements
When a random measuring position and microphone orientation has been chosen press Enter. The measur- ing process will start and the display will show ‘Measuring room position 1’. The measurement will stop prematurely if an error occurs during the measuring process. In this case, the error message ‘Retry room measurement –... -
Page 21: Calculation Of Focus 1 And Global Filters
Calculation of Focus 1 and Global Filters When RoomPerfect™ calculates the fi lters the display shows the following, ‘Calculating fi lters - Please wait’. The fi lter calculation process can be expected to take anywhere between 5 seconds and a minute de- pending on the specifi... -
Page 22: Advanced Options
Advanced Options This section describes the options in the advanced menu, which is available after Guided Setup has been completed. Here you can add new listening positions and room measurements, check the RoomKnowl- edge of your current set-up, and check the RoomCorrection for the different fi lters. Measure Focus Pos Measure Focus Pos. -
Page 23: Roomknowledge
‘Add more room meas.? Yes/No’ will show in the display: • choose Yes to add another room measurement or, • choose No to stop adding more room measurements. If No is chosen the volume is returned to the default or lower. ‘Save room measurement(s)? Yes/No’... -
Page 24: Display
Display The sub menus accessible in the Display menu are: Display Display Timeout Disp. Brightness Volume Disp.Timeo. Display Timeout Display Timeout set-up is used for enabling/disabling the 10 sec. display ’switch’off’ feature. If enabled the Main Display reading will switch off after 10 sec of inactivity from the remote control or front panel buttons. -
Page 25: Volume
Volume The sub menus accessible in the Volume menu are: Volume Def. Volume Max. Volume Def. Vol. The Default Volume setting controls the default volume at start-up and can be set from 0 to 99 dB. However, a setting over 88 is not recommended as this corresponds to max output with full scale digital input. -
Page 26: Input Name
Input Name As default, digital inputs are called Digital 1-5 and Analog inputs are called Analog 1-4. To change the name, choose an input and then between the following preset names: • ADC, Analog 1-4, AUX, CD, CD-1, CD-2, DAB, DAT, DBS, DCC, Digital 1-5, DVD, DVD-1, DVD-2, FM, LD, MD, PC, PHONO, RADIO, RIAA, SACD, SAT, TAPE, TUNER, TV, VCR, VDP, VIDEO, VIDEO-1, VIDEO-2. -
Page 27: Advanced Setup
Master/Slave Master/Slave As default a DPA-1 is set as a Slave. If set as a Master the DPA-1 will control the connected applicable equipment, e.g. when adjusting the volume control and when switching on and off. If updating fi rmware the DPA-1 must be set in Slave mode in order to communicate with the PC. -
Page 28: Main Out
Fixed means there’s a constant full scale output – most often used as ‘tape out’ or when using a Lyngdorf Audio TDAI or SDAI as a second ‘slave’ amplifi er in a bi-amping set-up. Regulated (variable) means that the output level will follow the level of the volume control. This setting is chosen if you have, for instance, a power amplifi... -
Page 29: Routing
Routing In Routing it is possible to apply different settings to the Main and Line outputs: Symbol Highpass fi lter Lowpass fi lter Left and Right channel switching Mono lowpass fi lter A highpass and lowpass fi lter can be applied to the Main and Line outputs when you want to connect an additional amplifi... -
Page 30: Filter Type
However, if the distance isn’t identical and/or you are using a sub- woofer, or a Lyngdorf Audio 2+2 system, you need to set a delay in order to ensure that the sound from each loudspeaker reaches the listening position simultaneously. -
Page 31: Trigger Setup
Remote Control set-up makes it possible to activate or de-activate the remote control. Firmware Versions The Firmware Versions menu is used to check the current fi rmware version of your DPA-1 and the Room- Perfect™ module as well as the RoomPerfect™ serial number. -
Page 32: Roomperfect™ Troubleshooting
RoomPerfect™ Troubleshooting No microphone connected The error message ‘No microphone connected’ is displayed when no microphone is connected to the DPA-1. Solution: • Connect the microphone on input on the back panel. No signal 1. The error message ‘Fault – No signal’ is displayed when the incoming signal is classifi ed as pure noise. -
Page 33: Firmware Upgrading
Firmware Upgrading The DPA-1 fi rmware can be upgraded using the ‘Lyngdorf Audio – Serial Load’ software. This is in the PC package available from www.Lyngdorf.com. Follow the upgrade steps shown below to bring the product into upgrade mode. -
Page 34: Connectors
Trigger Connector The DPA-1 is equipped with a TRIGGER OUT 3.5mm mono jack connector. The trigger signal is a 12V short circuit-protected output signal for powering up external equipment when the DPA-1 is on, e.g. re- motely connected SDA 2175 power amplifi... -
Page 35: Technical Specifi Cations
Technical Specifi cations Audio Parameter Balanced input connectors Balanced input impedance Unbalanced input connectors Unbalanced input impedance DAC Out impedance Input sensitivity Unbalanced output Balanced output Frequency Response 20 - 20KHz +/-0.1dB THD+N A-wgt Digital to Analog S/N Ratio Digital to Analog Dynamic Range Digital to Analog THD+N A-wgt... -
Page 36: Protection
Protection Parameter Grounding Over temperature Mains Parameter Mains input connector Mains voltage range Power consumption Power consumption Trigger Parameter Trigger Out connector Trigger Out voltage Trigger Out Current Mechanical Parameter Width Depth Height Net weight Shipping weight Value Note Mains earth, chassis and audio ground are connected internally. -
Page 37: Technical Assistance
For latest version of the fi rmware, newest version of this document and ‘Questions and Answers’, please check the ‘Support’ section on the Lyngdorf Audio website. If you have any problems with or questions regarding your Lyngdorf Audio product, please contact your nearest Lyngdorf Audio representative or:... -
Page 38: Appendix
Appendix Voicing Curves For further information on the Voicing setting, please refer to the “Voicing” chapter. Music 1 Ma gnitude R esponse: Music 1 10 Hz 100 Hz F requency (Hz) Relaxed Ma gnitude R esponse: R ela x ed 10 Hz 100 Hz F requency (Hz) - Page 40 www.lyngdorf.com...
Need help?
Do you have a question about the DPA-1 RoomPerfect and is the answer not in the manual?
Questions and answers