Advertisement
Quick Links
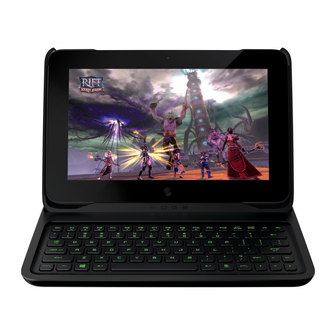
Designed with gaming in mind, we focused on developing the most powerful tablet in
the world that runs all PC games and applications. It's not just a tablet, but a PC and a
console. The Razer Edge is the world's first tablet designed for PC gamers.
The latest Intel® Core™ i5/i7 processor and NVIDIA® GeForce® graphics are powering
all of your favorite PC games and applications on a high definition multi-touch 10-inch
display, in an ultra-portable form factor.
The Razer Edge elevates the gaming experience to all tablets out there. It's a Tablet, it's
a PC, it's a Console. Pair the Razer Edge with the Razer Keyboard Dock to play any PC
game out of the box, with the Gamepad Controller for mobile console gaming, or
connect multiple gamepads to the Docking Station for a mobile or home console
gaming experience.
1 | razer™
Advertisement

Related Manuals for Razer EDGE


Summary of Contents for Razer EDGE
- Page 1 The Razer Edge elevates the gaming experience to all tablets out there. It’s a Tablet, it’s a PC, it’s a Console. Pair the Razer Edge with the Razer Keyboard Dock to play any PC game out of the box, with the Gamepad Controller for mobile console gaming, or connect multiple gamepads to the Docking Station for a mobile or home console gaming experience.
-
Page 2: Table Of Contents
2. DEVICE LAYOUT ..................4 3. SETTING UP YOUR KEYBOARD DOCK ............5 4. USING YOUR KEYBOARD DOCK ............... 9 5. CONFIGURING YOUR RAZER KEYBOARD DOCK ........11 6. SAFETY AND MAINTENANCE ..............24 7. LEGALESE ....................25 2 | For gamers by gamers™... -
Page 3: Package Contents / Registration / Technical Support
1. PACKAGE CONTENTS / REGISTRATION / TECHNICAL SUPPORT PACKAGE CONTENTS Keyboard Dock for Razer Edge Important Product Information Guide REGISTRATION Please visit www.razerzone.com/registration for online product registration. TECHNICAL SUPPORT What you’ll get: 1 year limited manufacturer’s warranty. -
Page 4: Device Layout
2. DEVICE LAYOUT A. Shock Resistant Rubber Cover B. Integrated Data / Power Connector C. Magnetized Base D. On-The-Fly Macro Record Key E. Gaming Mode Key F. Battery Compartment Door G. Battery Latches H. USB 2.0 Ports I. Power Port 4 | For gamers by gamers™... -
Page 5: Setting Up Your Keyboard Dock
3. SETTING UP YOUR KEYBOARD DOCK ATTACHING YOUR RAZER EDGE 1. Open the Keyboard Dock 2. Attach the rubber cover to the magnetized base. 3. Carefully insert your Razer Edge into the cradle. 5 | razer™... - Page 6 4. Press down on your Razer Edge. 5. Push the clasp to secure your Razer Edge. CAUTION: Do not tilt the cover when placed on the tablet stand. 6 | For gamers by gamers™...
- Page 7 REMOVING YOUR RAZER EDGE 1. Unfasten the rubber cover. 2. Carefully lift your Razer Edge. INSTALLING THE EXTENDED BATTERY PACK 1. Unlock the 2 battery latches. 7 | razer™...
- Page 8 2. Remove the battery compartment door. 3. Insert the extended battery pack diagonally. 4. Press down the battery until the latches lock into place. 8 | For gamers by gamers™...
-
Page 9: Using Your Keyboard Dock
) the audio output. The media keys allow you to play/pause ( ) a track or skip tracks backward ( ) and forward ( The screen brightness keys allow you to customize the brightness of the screen. 9 | razer™... - Page 10 Furthermore, you can maximize the effect of Anti-Ghosting by activating the Gaming mode function. You can also choose to disable the Alt + Tab and Alt + F4 functions by using the Gaming Mode Tab in Razer Synapse 2.0. An indicator will light up when Gaming Mode is active.
-
Page 11: Configuring Your Razer Keyboard Dock
5. CONFIGURING YOUR RAZER KEYBOARD DOCK Disclaimer: The features listed here require you to log in to Razer Synapse 2.0. These features are also subject to change based on the current software version and your Operating System. KEYBOARD TAB The Keyboard Tab is your default tab when you first install Razer Synapse 2.0. This tab allows you to customize your device’s profiles and key assignments. - Page 12 Profile A profile is a convenient way of organizing all your custom settings and you can have an infinite number of profiles at your disposal. Any changes made within each tab are automatically saved to the current profile and stored into the cloud servers. You can create a new profile by clicking the button or delete the current profile by clicking the...
- Page 13 Customize Tab The Customize Tab is where you can modify the basic functionalities of your device such as key assignments to suit your gaming needs. The changes made in this tab are automatically saved to your current profile. 13 | razer™...
- Page 14 Key Assignment Menu Initially, each key is set to DEFAULT. However, you may change the function of this key by clicking the desired key to access the Key Assignment Menu. Listed below are the customization options and their description. Default This option enables you to return the key to its original function.
- Page 15 Inter-device from the Key Assignment Menu, a sub-menu will appear. DEVICE TO LINK allows you to choose which currently connected Razer device can be linked while FUNCTION allows you to choose which functionality you want to use for the linked device.
- Page 16 Switch Profile The Switch Profile enables you to change profiles on the fly and immediately load all your pre-configured settings. When you select Switch Profile from the Key Assignment Menu, a sub-menu will appear that will allow you to choose which profile to use. An on-screen display will automatically appear whenever you switch profiles.
- Page 17 This option enables you to assign the key into an Operating System shortcut command. For more information please visit: http://support.microsoft.com/kb/126449 Disable This option renders the assigned key unusable. Use Disable if you do not want to use the key or if it interferes with your gaming. 17 | razer™...
- Page 18 Gaming Mode Tab The Gaming Mode Tab allows you to customize which keys to disable when Gaming Mode is activated. Depending on your settings, you may choose to disable the Windows key, Alt + Tab and Alt + F4. An indicator will light up when the function is currently turned ON.
- Page 19 To create a macro command, simply click the button and all your keystrokes and button presses will automatically register on the macro screen. When you are done recording your macro commands, click on the button to end the session. 19 | razer™...
- Page 20 The Macro section allows you to input the delay in-between commands. In RECORD DELAY the delay in-between commands are registered as how it is entered. The DEFAULT DELAY uses a predefined time (expressed in seconds) as the delay. And NO DELAY omits all the pauses in-between keystrokes and button presses.
- Page 21 The buttons gives you the option to move the command up or down. button allows you to put in additional keystrokes, button presses or time delays either before or after the selected command. 21 | razer™...
- Page 22 Once you have pressed the button, a new display window will appear beside the list of macro commands. The dropdown menu on this window allows you to choose a keystroke or a delay to be added in before or after the highlighted macro command.
- Page 23 You may add in a new set of macro commands by clicking the button on the keystroke menu; or input time delays on the duration field using the delay menu. 23 | razer™...
-
Page 24: Safety And Maintenance
1. Should you have trouble operating the device properly and troubleshooting does not work, unplug the device and contact the Razer hotline or go to www.razersupport.com for support. Do not attempt to service or fix the device yourself at any time. -
Page 25: Legalese
LIMITATION OF LIABILITY Razer shall in no event be liable for any lost profits, loss of information or data, special, incidental, indirect, punitive or consequential or incidental damages, arising in any way out of distribution of, sale of, resale of, use of, or inability to use the Product. In no event shall Razer’s liability exceed the retail purchase price of the Product. - Page 26 COSTS OF PROCUREMENT For the avoidance of doubt, in no event will Razer be liable for any costs of procurement unless it has been advised of the possibility of such damages, and in no case shall Razer be liable for any costs of procurement liability exceeding the retail purchase price of the Product.
Need help?
Do you have a question about the EDGE and is the answer not in the manual?
Questions and answers