
Related Manuals for Num'axes Canicom 800


Summary of Contents for Num'axes Canicom 800
- Page 1 Guide d’utilisation Fr - 3 User’s guide Gb - 19 Manual de instrucciones Es - 35 Gebrauchsanleitung D - 51 Manuale d’uso It - 69...
- Page 2 CANICOM 800 – CANICOM 1500 satisfont à toutes les dispositions de la Directive N° 1999/5/CE du 07/04/99 du Conseil Européen comply to all dispositions of the European Council Directives below N° 1999/5/CE...
- Page 3 These devices emit some static magnetic fields (a magnet is located in the remote control) (Frequency = 869 Mhz, at = 250 mW for CANICOM 800 and 500 mW for CANICOM 1500). The devices comply with the European Standard ETSI EN 300 220.
-
Page 4: Table Of Contents
Checking/replacing battery(ies) of remote control ...................27 Checking/replacing battery of receiver collar ....................28 Changing the contact points ..........................28 How to check that your CANICOM 800/CANICOM 1500 is functioning properly ..........29 Getting the best results .............................29 Fitting the collar ..............................29 Starting out with the training collar ........................30 The difference between «... -
Page 5: Contents Of The Product Canicom 800
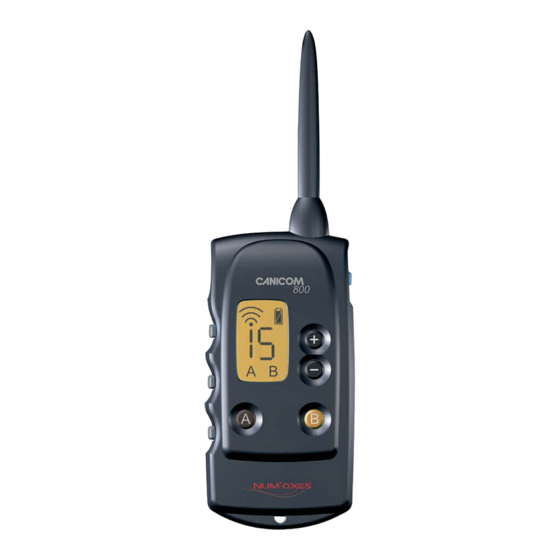
Contents of the product CANICOM 800 - CANICOM collar fitted with short contact points - CANICOM 800 remote control fitted with 1 lithium 3 Volts CR2 battery - lithium 3 Volts CR2 battery for the collar - test lamp... - Page 6 Dog 2 Selection key located black collar yellow collar Dog 1 black collar CANICOM 1500 remote control - Diagram 3 CANICOM 800 remote control - Diagram 2 Battery level Indicator of indicator radio Indicator of Battery level transmission radio transmission...
-
Page 7: First Use From New
Gb - 23 First use from new Fitting the battery in the receiver collar - Unscrew the 4 screws of the top of CANICOM using a screwdriver. - Insert the battery (3V Lithium CR2) paying attention to follow polarity indicated on the battery housing (ref. - Page 8 IMPORTANT : before beginning the coding (first use of the receiver or re-coding), make sure no other person is using his CANICOM 800/CANICOM 1500 or other products from the NUM'AXES range close by. Your receiver could accidentally record the code of his remote control. If that occurs, re-code the remote control with the receiver collar.
-
Page 9: How To Use The Remote Control
How to use the remote control The CANICOM 800 remote control is designed to operate with 1 or 2 receiver collars. The CANICOM 1500 remote control is designed to operate with 1, 2, 3 or 4 receiver collars. Before sending any training instruction (beep sound or stimulations), you have to select the dog you... - Page 10 CANICOM 1500 To select the dog you want to train on the remote control: For CANICOM 800: Press the A or B key in order to select the collar (the letter A or B will appear on the LCD screen).
-
Page 11: Checking/Replacing Battery(Ies) Of Remote Control
Be prepared to replace the battery(ies). significations suivantes : To check the condition of the battery(ies), turn “on” the CANICOM 800/CANICOM 1500 remote control and look at the battery level indicator on the LCD screen. The symbols which appear indicate the following: La pile est en bon état. -
Page 12: Checking/Replacing Battery Of Receiver Collar
- Insert the new battery(ies) paying attention to follow polarity indicated on the battery housing. - Put the battery cover back in place. - Retighten the screw. - Check the remote control operates correctly. Replacing battery Replacing batteries of CANICOM 800 of CANICOM 1500 remote control remote control Diagram 9 Diagram 10 WARNING... -
Page 13: How To Check That Your Canicom 800/Canicom 1500 Is Functioning Properly
- Turn « on » the remote control and receiver collar you want to test. - Select the receiver collar you want to test on the remote control: For CANICOM 800: Press the A or B key in order to select the collar (the letter A or B will appear on the LCD screen). -
Page 14: Starting Out With The Training Collar
Gb - 30 Starting out with the training collar • You can start using the collar with 6 month-old puppies that have already received some basic training: « stay », « sit », or at least « no ». • Do not use the collar with dogs that are not in good physical shape (i.e. cardiac problems, epilepsy) or have behavioural problems. • Your dog will need to get used to the collar; for a few days let the dog wear the collar but do not use it. • Positive and effective training takes time. Do not rush: - Choose a familiar area, a place your dog is used to. - Define the level of stimulation from which your dog reacts by starting with the level of the lowest intensity and increasing gradually. -
Page 15: Maintenance
Troubleshooting Should your CANICOM 800 / CANICOM 1500 stop working or develop a fault, first read this user’s guide over, then check the batteries and replace them if necessary and retry. Also check that you are using the product correctly. -
Page 16: Technical Specifications
Gb - 32 Technical specifications CANICOM 800 remote control CANICOM 1500 remote control CANICOM receiver collar Power 1 3-V lithium battery CR2 2 LR06 alkaline batteries 1 3-V lithium battery CR2 Battery life Continuous use: Continuous use: In stand by: approximately... -
Page 17: Guarantee Conditions
Gb - 33 Guarantee conditions 1. The guarantee will be valid only if the proof of purchase (invoice or sales receipt), without cancellation, is submitted to the distributor or to NUM’AXES. The guarantee is limited to the original purchaser. 2. - Page 18 Gb - 34 www.numaxes.com internationalsales@numaxes.com...
- Page 19 www.numaxes.com...
Need help?
Do you have a question about the Canicom 800 and is the answer not in the manual?
Questions and answers