Table of Contents
Advertisement
INSTALLATION & USER INSTRUCTIONS
Focal Point Fires plc.
Christchurch, Dorset BH23 2BT
Tel: 01202 499330
Fax: 01202 499326
www.focalpointfires.co.uk
Email: sales@focalpointfires.co.uk
Questions or problems with your appliance?
Don't take it back to the store
01202 588601
just give us a call on
lines open between 9am and 5pm, Monday to Friday
Please note: Except where otherwise stated, all rights,
including copyright in the text, images and layout of this
booklet is owned by Focal Point Fires plc. You are not
permitted to copy or adapt any of the content without
the prior written permission of Focal Point Fires plc.
WALL MOUNTED ELECTRIC FIRE
MODELS COVERED BY THESE INSTRUCTIONS
EF11-36
PASADENA
LIMOUSIN
we're here to help
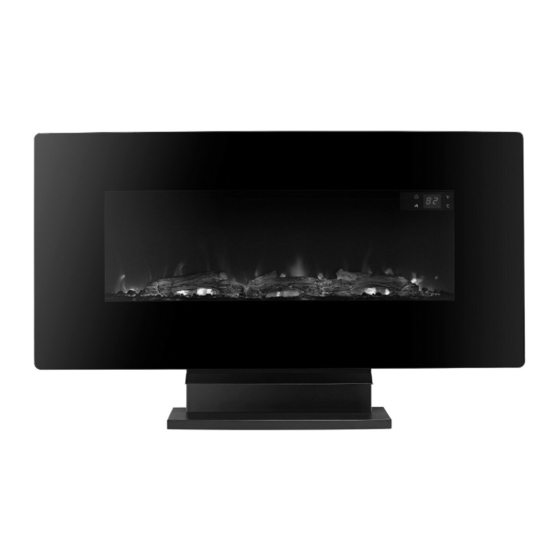
PASADENA LED ELECTRIC FIRE
All instructions must be handed to the user for
1
safekeeping.
Revision B- 03/15
©
2015 Focal Point Fires plc.
GB IE
Advertisement
Table of Contents

Related Manuals for Focal Point EF11-36 PASADENA


Summary of Contents for Focal Point EF11-36 PASADENA
- Page 1 Please note: Except where otherwise stated, all rights, including copyright in the text, images and layout of this booklet is owned by Focal Point Fires plc. You are not All instructions must be handed to the user for permitted to copy or adapt any of the content without safekeeping.
-
Page 2: Table Of Contents
Children aged from 3 years and less than 8 years shall not plug in, regulate and clean the appliance or perform user maintenance.The heater must not be used if the glass panels are damaged. © 2015 Focal Point Fires plc. -
Page 3: Installation Requirements
1. M4 x 8mm Screw x 12 2. Large Wall Anchor x 5 3. M5 x 50mm Screw x 5 5.0 COMPONENT CHECKLIST 1. Glass Fascia 2. Firebox 3. Mounting Bracket 4.Table Top Support 5. Front Brace 6. Deflector © 2015 Focal Point Fires plc. -
Page 4: Site Requirements
• The minimum distance from the bottom of the appliance to the floor is 200mm • The minimum distance to the sides of the appliance is 100mm • The minimum distance to the front of the appliance is 500mm © 2015 Focal Point Fires plc. -
Page 5: Installation Wall Mounted
CAUTION: DO NOT CONNECT THE APPLIANCE TO THE WARNING ELECTRICAL SUPPLY AT THIS TIME. Focal Point Fires plc. assumes absolutely no responsibility for injuries and damages The wall where the appliance is to be that may occur due to improper installation or handling. - Page 6 6.Tap 4 Large Wall Anchors (2) into the pre-drilled holes with a Hammer until they are flush with the wall. 7. Secure the Mounting Bracket (3) to the wall by using four M5 x 50 mm Screws (3). As shown. © 2015 Focal Point Fires plc.
- Page 7 10. Remove the Log Set from the insert window ledge at the front of the Firebox. As shown. 11. Arrange the pebbles on top of the fuel bed holder. © 2015 Focal Point Fires plc.
-
Page 8: Installation Table Top
1. Unpack the unit and confirm that you have all the hardware and required parts. 2. Align and attach the Table Top Support with the Table Top Base by inserting four M4 screws (1) and fully tighten the screws with a Phillips screwdriver. © 2015 Focal Point Fires plc. - Page 9 Firebox. As shown above. 6. Insert three M4 x 8 mm Screws (1) through the mounting holes on the Table Top Support and securely screw into the Firebox by a Phillips screwdriver. As shown. © 2015 Focal Point Fires plc.
-
Page 10: Operating The Appliance
13 feet. 1. Main Power Button 2. Flames Control Button 3.Timer Function Button 4. Side Light Control Button 5.Thermostat On/Off Button 6.Thermostat Control Button © 2015 Focal Point Fires plc. - Page 11 To change the colour of the lighting press the side light control button (4) again.You can control the side lights colour as described in the table. The colour rotation mode will cycle through the 3 different colour settings continuously. © 2015 Focal Point Fires plc.
-
Page 12: Cleaning And Maintenance
Replacing the remote control battery: When the battery becomes weak, the range of the remote control becomes shorter. Replace the battery with a new CR2025 lithium battery. Note: Keep the lithium battery out of the reach of children. © 2015 Focal Point Fires plc. -
Page 13: Troubleshooting Guide
3G Service Department to the address below. Alternatively, you can email or fax. Focal Point Fires, 3G Service Department, Reid Street, Christchurch, Dorset, BH23 2BT. Email: 3g@focalpointfires.co.uk, Fax.
Need help?
Do you have a question about the EF11-36 PASADENA and is the answer not in the manual?
Questions and answers
How to turn on Heat and operate
To turn on and operate the heat on a Focal Point EF11-36 PASADENA:
1. Plug in the unit and ensure it is in standby mode.
2. Press the "Main power" button to turn on the appliance.
3. Press the heater function button to turn the heater on or off.
4. Use the "+" and "-" buttons to select the desired temperature.
The heater can be controlled using the remote control or the machine keypad.
This answer is automatically generated