Celluon Magic Cube User Manual
Laser projection keyboard
Hide thumbs
Also See for Magic Cube:
- User manual (25 pages) ,
- User manual (25 pages) ,
- User manual (18 pages)
Table of Contents
Advertisement
Quick Links
• Copyright:
Copyright 2011
All rights reserved by Celluon. All page contents are properties of Celluon.
• Celluon, evoMouse®, Magic Cube™ are trademarks or registered trademark of Celluon.
All other products are trademarks or registered trademarks of their respective
companies.
• Please refer to host device instruction manual for Bluetooth pairing information.
User's Guide
Advertisement
Table of Contents

Related Manuals for Celluon Magic Cube


Summary of Contents for Celluon Magic Cube
- Page 1 • Copyright: Copyright 2011 All rights reserved by Celluon. All page contents are properties of Celluon. • Celluon, evoMouse®, Magic Cube™ are trademarks or registered trademark of Celluon. All other products are trademarks or registered trademarks of their respective companies.
-
Page 2: Safety Precautions
Safety Precautions surfaces. Place the product on a flat surface. Avoid table or surface that is as transparent or reflective as glass or 1. Avoid exposing this product to direct sunlight for extend- mirror. ed periods of time, and keep it away from heat sources. 2. - Page 3 - Reorient or relocate the receiving antenna. FCC Class B Notice - Increase separation between the equipment and receiver. This equipment has been tested and found to comply within - Connect the equipment to an outlet on a circuit different the limits for a Class B digital device, pursuant to Part 15 of from which the receiver is connected.
- Page 4 possibility of exceeding the FCC radio frequency RF Exposure Information exposure limit. The antenna used for this transmitter must be installed to provide a separation distance of at least 20 cm from all per- ❏ Laser Safety sons and must not be co-located or operating in conjunction IEC 60825 : CLASS I with any other antenna or transmitter.
- Page 5 To protect the environment, Charging time increases if product is used while charging. dispose of this product separately from household waste once it has reached its end of life, or take it to your nearest Celluon Service Center.
-
Page 6: Table Of Contents
Contents Cautions 1. For safety reasons, be sure to use only the mini USB to 1. Product Features ............12 USB cable specified for this product. 2. Package Contents ............12 2. Make sure to fully charge the battery before using the product for the first time. -
Page 7: Product Features
1. Product Features 3. How this Product Works • English QWERTY keyboard layout. This product emits infrared light from the lower end • Compact size for portability – perfect for on-the-go of the product to detect objects such as fingers. When •... - Page 8 Conditions to Avoid: light is too high, the keystroke recognition may become too sensitive or a “hovering” effect may occur. 1. Avoid direct sunlight 2. Avoid low color temperature light source, such as tung- (Hovering: keystroke is recognized before your finger sten, halogen, or incandescent lamp is used.
-
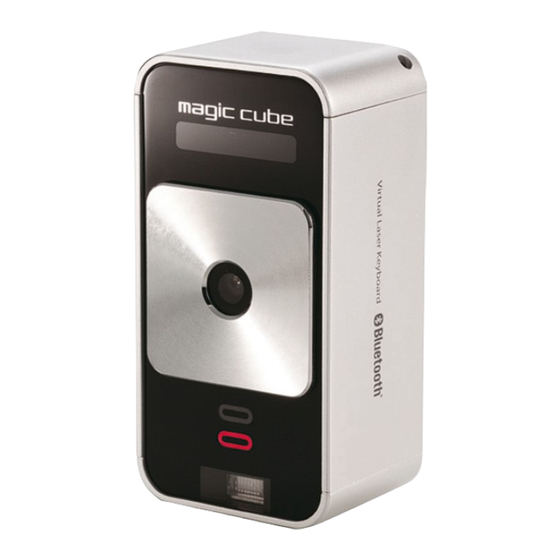
Page 9: Identifying Parts And Their Functions
4. Identifying Parts and their Functions. Caution Although this equipment is classified as Class 1 laser product, (1) Projector: Uses a red laser to project the image of a for your safety, do not directly expose your eyes to pattern keyboard onto a flat surface in front of the typist. -
Page 10: Front View
Front View Rear View Pattern Projector STRAP LOOP Sensor POWER SWITCH Battery / Bluetooth/ Keyboard/ Mouse/ Charging/ Operating Status LED Battery Lower LED USB Upper LED Charging Connected Green Green HID/SPP MODE MINI USB PORT Full Green SWITCH Keyboard Upper LED Orange Connected via USB Green Upper LED... -
Page 11: Using The Projection Keyboard
USB HID connection allows plug-n-play, without install- Bluetooth HID Switch (Top) ing a separate driver. 1) Connect Magic Cube™ and host device using supplied Bluetooth SPP Switch (Bottom) USB cable. Host device must support USB HID. Note: Most Windows devices support USB HID. -
Page 12: Connecting Via Bluetooth Hid
• Connection via Bluetooth SPP requires installation of tion on connecting Magic Cube™ to Android devices. diver, in the installation CD. • Windows XP/Vista/7 User must identify and use correct Bluetooth profile prior •... - Page 13 A green LED will become solid blue. indicate successful change of mode. If Magic Cube™ cannot locate previously paired host Changing mouse mode to keyboard mode. ■ device within 30 seconds, it will delete previously stored Tap only mouse cursor button once (do not press and connection information and revert to pair mode.
- Page 14 HID and a driver is not required. • Press and hold “FN” key and press left arrow key to 1) Make sure the Magic Cube™ is on a HID mode. (Slid- lower brightness. ing button should be pushed to ‘up’ position).
- Page 15 4) Turn Bluetooth on by tapping the ON button. 6) Locate “Celluon” under Device. 5) iPhone/iPad will now search for pairing device. 7) Select “Celluon” by tapping “Celluon”.
- Page 16 LED on Magic Cube™ becomes luon”. solid. 9) Type passkey on Magic Cube keyboard and press ENTER. 11) To turn off Magic Cube™, slide power button to the left. 12) With iPhone/iPad Bluetooth on, Magic Cube™ will connect automatically upon power on.
- Page 17 Note Pairing your Android device iPhone/iPad OS (iOS4) does not support mouse function. 1) Make sure the Magic Cube™ is on SPP mode by slid- When keyboard does not function with successful pairing, ing the slide button to lower position.
- Page 18 3) Navigate through Android as follows: 4) Turn on Bluetooth on Android by checking the box. Home → Main Menu → Settings → Wireless and Network → Bluetooth setting.
- Page 19 5) From the same screen, with Bluetooth ON, tap on 6) Android device will detect “Celluon” and display Scan devices. message “Pair with this device”. 7) Tap on “Pair with this device”. 8) A new message will display on your Android device: “Bluetooth pairing request.
- Page 20 Connecting via Bluetooth HID Note 1) Please make sure Magic Cube™ is on HID mode by Android OS supports mouse function. To switch from sliding the switch to the up position. keyboard to mouse mode, press and hold “FN” button 2) Turn on Magic Cube™...
- Page 21 Press and hold FN and tap ‘down’ arrow to lower USB to USB cable. volume 2) Turn on Magic Cube™ by slide the power button to the * Note: There are 6 stages of adjustments. Each adjust- right (ON). ment requires repeated steps.
- Page 22 Press and hold FN and tap ‘left’ arrow to lower bright- From mouse mode, tap on cursor button to switch ness back to keyboard mode. Solid LED indicates keyboard * Note: There are 3 stages of adjustments. Each adjust- mode. ments requires repeated steps.
-
Page 23: Specification
■ Electrical Characteristics Specification Item Specification ■ Pattern Projector External Power USB Power / less than 5V 500mA Item Specification Supply Light Source Red Laser Diode Lithium-polymer battery, Battery & Capacity 700mAH(MAX)@3.7V Keyboard Layout 19mm Pitch, QWERTY Layout Battery Operating Keyboard Size Width : 240mm, Height : 100mm Approx. - Page 24 -5 ~ 35°C (with Batteries included) ture ■ Dimensions and Weight Specifications Item Specification Size(mm) 38mm x 75mm x 29mm Weight (g) Max. 78 g Celluon, Inc. Ace High-End Tower 918, 235-2 Guro-dong, Guro-gu, Seoul, Korea (152-740) sales@celluon.com , support@celluon.com...
Need help?
Do you have a question about the Magic Cube and is the answer not in the manual?
Questions and answers