Table of Contents
Advertisement
Quick Links
Advertisement
Table of Contents

Related Manuals for frieling MILKchiller 0501


Summary of Contents for frieling MILKchiller 0501
- Page 1 OWNER’S MANUAL Model No. 0501 and 0601 ™ MILKchiller...
-
Page 2: Important Safeguards
Important Safeguards When using an electrical appliance, basic safety precautions should always be followed to reduce the risk of fire, electrical shock and injury to persons, including the following: 1. Read all instructions before using appliance. 2. Close supervision is necessary when any appliance is used near children. - Page 3 Important Safeguards (cont.) CAUTION: Do not block the cooling fan in the back of the unit nor the exhaust ports on the side the MILKchiller™. Allow ample space for air circulation. CAUTION: Do not immerse the power-supply, cord, or appliance in water or any other liquid.
-
Page 4: Table Of Contents
MILKchiller™ Parts and Accessories Parts List Item No. 1. MILKchiller™ unit 0501 or 0601 2. Power Supply and Plug 0713 3. Base with Drip Tray Cup 0721 4. Drip Tray Insert 0710 5. Drip Tray Metal platform 0711 6. Disposable Straw for Plastic Cartons 0702 and MILKchiller™... -
Page 5: Before Using For The First Time
Congratulations! MILKchiller™ is the unique solution for your beverage station because it… • Maintains dairy products at a safe temperature of 41ºF or below. • Features an LCD displays 8 types of dairy products: whole; cream; ½ & ½; 1%; 2%; skim; fat-free; and soy; in 5 different languages: English, French, German, Italian and Spanish. - Page 6 The MILKchiller™ is now ready for use. Plug the power supply connector into the Power Input on the MILKchiller™ control panel. Connect the power supply to the power cord and plug it into the wall outlet. Set the Power Switch to ON. Power Supply Power Inlet Connector...
- Page 7 Fine Tuning the Low Level Indicator The Low Level Indicator has been calibrated to trigger at approximately 18 ounces, 1/4 of a carton. This is the minimum amount of liquid remaining in the carton when the LOW indicator flashes. The Low Level Indication can be adjusted to trigger for more liquid remaining in the carton if desired.
- Page 8 The MILKchiller™ can now be loaded with a ½ gallon paper carton or the MILKchiller™ Refillable Container filled with dairy product. It is required to refrigerate all dairy products prior to use in the MILKchiller™. If using shelf stable milk, the MILKchiller™ will not operate until the milk has cooled to the safe temperature specification.
- Page 9 Load Container into MILKchiller™ To load the container into the MILKchiller™, regardless of the type of container: Lift the lid by pulling upward on the dispensing spout. Orient the container so that the Disposable Straw is pointing to the front of the machine.
- Page 10 Paper Half Gallon container Air Hose Plastic Half Gallon container Air Hose Please remember to pour out 2 oz. of liquid prior to loading plastic ½ gallon carton into MILKchiller™.
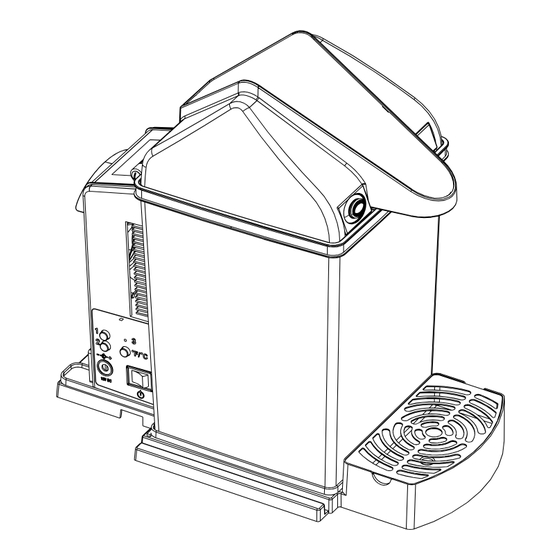
- Page 11 Control Panel Functions The MILKchiller™ is programmed for use worldwide. The LCD displays the dairy contents in 5 different languages. The MILKchiller™ must be initialized before use by first setting the language, and then setting contents. Reset Contents Language Temperature Display Power Input Power Switch...
- Page 12 Contents Button – Button 1 Sets the display to show the contents of the container in the MILKchiller™. Pressing the button cycles through CREAM the 8 types of dairy product: WHOLE, ½ & ½, 1%, 2%, SKIM, FAT FREE, SOY, CREAM. To set the CONTENTS: Stop pressing the Contents Button when the desired dairy type is displayed.
- Page 13 Display Settings The LCD on the front of the machine has many uses. 1. It shows the contents of the MILKchiller™ in daily use. 2. It displays the temperature of the liquid when Temperature Button is pressed. 3. It communicates the status of the machine: When the unit is first starting up the LCD flashes COOLING until it has reached cooling...
- Page 14 Dispensing Dairy Product The push button on the left side of the MILKchiller™ causes the dairy product to be delivered through the dispensing spout. Dairy product will be delivered for as long as the button is depressed up to 60 seconds. There might be a slight delay between pushing the button and the delivery of the dairy product.
- Page 15 Fasten Base to Countertop The base is equipped with two keyholes for locking it to the countertop, if desired. 1. Place base at desired location on counter top. 2. Mark screw locations at the bottom of the keyhole. 3. Remove base. Drill pilot holes into countertop.
- Page 16 Lock MILKchiller™ to Base Place the MILKchiller™ on the base, inserting the feet into the corresponding holes in the base. At the back of the unit and base, there are locking tabs that can be used to secure the MILKchiller™ to the base. Insert the provided wire tie through both openings in the locking tabs and fasten.
-
Page 17: Drip Tray Insert
Drip Tray Features The Drip Tray is an integral part of the base. The Drip Tray insert is provided so that when the base is fastened to the countertop, the insert can be removed and emptied. Drip Tray Insert Hole in Drip Tray There is a fitting located on the underside of the Drip Tray to which a hose can be attached. - Page 18 Replace the Air Filter The Air Filter located at the lower back of the MILKchiller™ filters the air being used to dispense the dairy product. It is recommended to change the filter at least once every three months, more often if the environment requires and the Air Filter turns dark in color.
-
Page 19: Drip Tray Metal Platform
Care and Cleaning CAUTION: Do not immerse the power supply, cord, or appliance in water or any other liquid. CAUTION: Do not use metal scouring pads to clean the appliance. Pieces of the pad may break off and touch electrical parts. CAUTION: Do not pour water or any liquid into the chilling chamber of the MILKchiller™. -
Page 20: Troubleshooting
Troubleshooting The MILKchiller™ is plugged Make sure the cord is securely plugged into in, however, the display is the power supply and the Power Switch is in blank. the ON position. The MILKchiller™ is plugged Call the MILKchiller™ HOTLINE for in and the Switch is in the ON service. - Page 21 Contact Us To contact us, call or email: Frieling USA, Inc. (P) 1-800-827-2582 ext. 2 or 704-329-5100 ext. 2 (F) 704-329-5151 email: MILKchiller@frieling.com For questions about the MILKchiller™ appliance, please call the MILKchiller™ TECHNICAL HOTLINE: 1-800-827-2582 ext. 2 or 704-329-5100 ext. 2 or send an email to MILKchiller@frieling.com.
-
Page 22: Disposable Straw For Plastic Cartons
Item UPC Code Description Image MILKchiller with 0501 728547005011 Black Housing MILKchiller with 0601 728547006018 Stainless Steel Housing Disposable Straw for 0701 728547070101 Paper Carton Package of 150 Disposable Straw for Plastic Carton or 0702 728547070200 MILKchiller™ Refillable Container Package of 150 MILKchiller™... -
Page 23: Air Filter
Item UPC Code Description Image MILKchiller™ 0724 728547072402 Refillable Container Air Filter Pad 0705 728547070507 Package of 4 Lid Assembly Package 0706 728547070101 including Lid Hinge Pin Assembly Lid Hinge Pin 0707 728547070200 Assembly 0710 728547071009 Drip Tray Insert Drip Tray 0711 728547071108 Metal Platform For replaceable MILKchiller™... -
Page 24: Wire Tie
Item UPC Code Description Image 0721 728547072105 Base with Drip Tray Drain Tube 0722 728547072204 (per linear foot) 0725 728547072501 Wire Tie Air Hose 0726 728547072600 Fitting Power Supply with 0713 728547071306 Cord For replaceable MILKchiller™ parts or accessories, please visit our website: www.MILKchiller.com. - Page 25 Repair, replacement or refund shall be the sole remedy of the purchaser under this warranty, and in no event shall Frieling USA, Inc. be liable for any incidental or consequential damages, losses or expenses. Some states do not allow the exclusion or limitation of incidental or consequential damages, so the above limitation or exclusion may not apply to you.
Need help?
Do you have a question about the MILKchiller 0501 and is the answer not in the manual?
Questions and answers