
Related Manuals for Megasat Shipman


Summary of Contents for Megasat Shipman
- Page 1 Brillantes Fernsehen Brillantes Fernsehen Shipman Shipman GPS/Auto Skew Deutsch Benutzerhandbuch und Installationsanleitung...
-
Page 2: Table Of Contents
7. Technische Daten ..............17 • 1x Antennenanschlusskabel (10 m) • 1x Antennenanschlusskabel (1 m) • Montagekleber (optional) • Netzteil 230 V (12 V, 5 A) (optional) • Bedienungsanleitung Megasat Werke GmbH | Industriestraße 4a | D-97618 Niederlauer | www.megasat.tv | info@megasat.tv DEUTSCH DEUTSCH... -
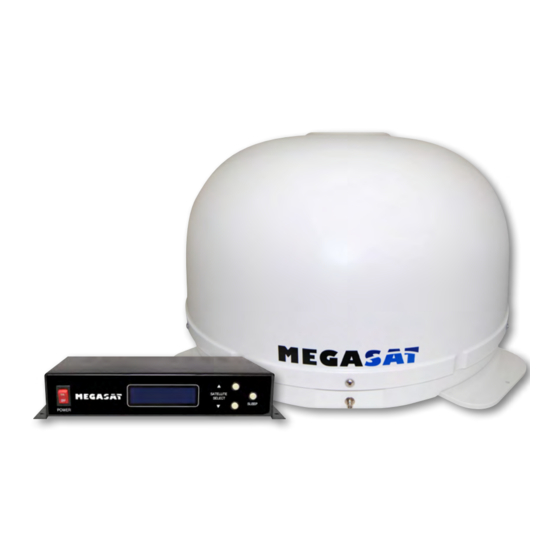
Page 3: Systemkomponenten
4. Säubern Sie die Montagefläche mit einem geeigneten Reiniger und Achtung: einem Vliestuch um Schmutz und Der Shipman GPS/AutoSkew besitzt zusätzlich eine Auto Skew Funktion, die Unreinheiten zu entfernen. Zeich- den Polarisationswinkel des LNBs automatisch einstellt und einen GPS Emp- nen Sie anschließend die Anten- fänger für eine exakte und schnelle Positionsbestimmung. -
Page 4: Klebeanleitung
Achten Sie darauf, dass die Kabel nicht zu sehr gebogen werden um Signalverlust und eine Beschädigung des Kabels zu vermeiden (kleinster Biegeradius max. 5-7 cm). Klebeanleitung Shipman 1. Bereiten Sie den Kleber für die Montage vor. 2. Tragen Sie nun den Kleber auf die Unterseite der Antennenfüße... -
Page 5: Das Steuergerät
Das Steuergerät Satellitenübertragung Vorderansicht des Steuergerätes Direct Broadcast Service (DBS) strahlt Audio, Video und Daten über den Satelliten aus, der sich in 35 km Höhe über der Erde befindet. Mit einer Empfangsstation wie die Antenne und einem Satelliten Receiver werden die Signale vom Satelliten empfangen und verar- LCD Display Satellitenauswahl beitet. -
Page 6: Inbetriebnahme Und Bedienung
Signal bringen. Diese Anpassung am LNB wird als „Skew Einstellung“ bezeich- 4. Der Shipman besitzt eine Tracking-Funktion (nachführendes System), die es ermög- net. Die folgende Abbildung zeigt Ihnen die optimale Einstellung des LNBs. Je genauer licht, auch während der Fahrt ein permanentes Signal zu empfangen. Dieses geschieht die Übereinstimmung, desto besser der Empfang. -
Page 7: Fehlerbehebung
• Vergewissern Sie sich, dass in den Einstellungen des Receivers die LNB Spannung eingeschalten ist. • Nur bei Shipman (ohne AutoSkew) Sollte die Antenne keinen Satelliten finden, überprüfen Sie die Skeweinstellung des Satelliten für ihren Standort. Eine Übersicht der Skew Einstellwerte finden Sie auf Seite 13. -
Page 8: Firmware Update
Firmware Update Updatevorgang: 1. Schalten Sie das Steuergerät aus. Wenn die Frequenz, auf der die Antenne den Satelliten idendifiziert, abgeschaltet wird, muss ein Firmwareupdate des Steuergerätes durchgeführt werden. 2. Stecken Sie die SD Karte in den Slot auf der Rückseite des Steuergerätes. Die aktuelle Firmware Version des Steuergerätes können Sie in den ersten 3 Sekunden 3. -
Page 9: Ausleuchtzone
Ausrichtungszeit ......1 - 2 min. Temperaturbereich ......-25° C bis +70° C Spannungsversorgung ....12 V DC @ 5 Ampere Gewicht ..........9 kg (Shipman) / 12 kg (Shipman GPS/AS) Abmessungen Spiegel ....450 x 300 mm (B/H) Abmessungen Antenne ....700 x 400 mm (Ø/H) Abmessungen Steuergerät ..245 x 43 x 147 mm (B/H/T) - Page 10 Brillantes Fernsehen Brillantes Fernsehen Shipman Shipman GPS/Auto Skew English Stand: v2.0 April 2013 User manual and installation instructions...
- Page 11 Startup and operation ............10 Setting the LNB skew ............11 Delivery 3. Troubleshooting ..............12 Shipman / Shipmas GPS/AS 4. Skew Settings ................13 • Control unit (IDU) incl. powercable 5. Firmware Update ..............14 • 1x antenna cable (10 m) •...
-
Page 12: System Components
System Components Installation Open box and remove the control unit, cables and packing material. Lift the antenna Basically, we recommend that you leave the installation to make by your dealer or work- straight up out of the box. Never place the system upside down! shop! Warning: Please also note that the antenna height of the vehicle will change accordin-... -
Page 13: Gluing Instructions
Connect the antenna as shown in the illustration below: the cable (bending radius max. 5-7 cm). Gluing instructions Shipman 1. Prepare the glue for mounting. 2. Now take the glue on the underside of the antenna bases in 12~24 V DC 5 A serpentine lines, so that the glue can harden well to the inside. -
Page 14: The Control Unit
Satellite broadcasting The contron unit Front view of the control unit Direct Broadcast Service (DBS) satellites broadcast audio, video and data information from satellites located 22 miles in space. A receiving station, such as the antenna, should include a dish and satellite receiver to receive the signals and process them for use by the LCD Display Satellite Select consumer audio and video equipment. -
Page 15: Startup And Operation
LNB is called „skew adjustment“. The following figure shows the optimal setting of the 4. The Shipman has a tracking function, which allows to receive even while driving a per- LNB. More accurate the match, the better of reception. -
Page 16: Troubleshooting
• Make sure that the settings of the set-top box to LNB voltage is switched on. This is indicated by the green LED on the control unit (LED green = LNB voltage present). • Only Shipman (without AutoSkew) If the antenna has not found satellites, check the Skew settings for the satellite at your location. -
Page 17: Firmware Update
Firmware Update Update process: 1. Turn off the controller. When the frequency is switched off, on which the antenna idendifiziert the satellite, you must update the firmware of the control unit. 2. Insert the SD card into the slot on the rear side of the control unit. The current firmware version of the control unit, you can read on the bottom of the 3. -
Page 18: Footprint
Alignment time........1 - 2 min. Temperature range ........-25° C to +70° C Power supply ..........12 V DC @ 5 Amps Weight ............9 kg (Shipman) / 12 kg (Shipman GPS/AS) Dimensions dish ........450 x 300 mm (B/H) Dimensions antenna ......700 x 400 mm (Ø/H) Dimensions control unit ....245 x 43 x 147 mm (B/H/T) - Page 19 Status: v2.0 April 2013...
Need help?
Do you have a question about the Shipman and is the answer not in the manual?
Questions and answers