Table of Contents
Advertisement
Quick Links
Advertisement
Table of Contents

Related Manuals for Boskon Guard 940-GSM2


Summary of Contents for Boskon Guard 940-GSM2
- Page 1 Cellular MMS HD Scouting Camera 940-GSM2 INSTRUCTION MANUAL 940-GSM2_CM 8/22/14...
-
Page 2: Table Of Contents
TABLE OF CONTENTS General Information 1.1) Description 1.2) Features 1.3) Application 1.4) Parts and Controls Quick Start 2.1) Load Batteries 2.2) Insert SIM Card and SD Card 2.3) Enter Into ON Mode 2.4) Enter Into Test Mode 2.5) Enter Into OFF Mode Advanced Setting 3.1) Parameter Settings 3.2) Supported Format... -
Page 3: General Information
GENERAL INFORMATION 1.1) Description This camera (940-GSM2) is a cellular digital scouting camera with MMS function. It can be triggered by movement in the field of view, detected by a highly sensitive passive infra-red (PIR) motion sensor, and then automatically capture high quality pictures (up to 12M pixels) or record HD video clips (1080P). -
Page 4: Application
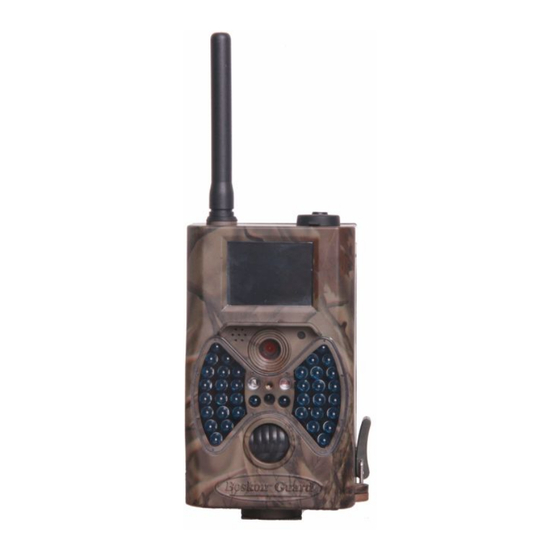
1.3) Application Act as Trail Camera for hunting Ø Act as Time Lapse Camera to observe an animal or event. Ø All indoor/outdoor surveillance where invasion evidence needed Ø 1.4) Parts and Controls Figure A shows the Front view Figure B shows the Back view Figure C shows the Bottom view GSM Antenna External DC Power (6V) - Page 5 Tilt Adjuster Security Rope hole Figure B: Back View The camera has the following I/O interfaces: USB connector, SD-card slot, SIM Card, TV output. The 3-way Power/Mode switch is used to select the main operating modes: OFF, ON and TEST. An anti-theft lock is provided on the back of the camera.
- Page 6 USB Port SIM Card Slot TV Out Connector Battery Cover Remote control Power/Mode Switch Lock Figure C: Bottom View The remote control is an input device of the camera and is primarily used for customer settings and password input. This is an infrared type wireless remote control. The maximum remote distance is 9 meters.
-
Page 7: Quick Start
possible acid leak that may damage the camera. This will void the warranty. QUICK START 2.1) Load Batteries To supply power to the camera, use eight AA size batteries. The batttery voltage should be 1.5V. Open the bottom cover by pulling down the lock hole. Confirm that the power switch is at the OFF position, pull out the battery depot. -
Page 8: Enter Into Test Mode
Slide the power switch to the ON position to power on the camera. Before switching on the camera, aim the camera at your target monitoring area using the laser pointer. After switching on the camera, the motion indication LED (red) will blink for 15 seconds before the autonomic capture of photos or videos. -
Page 9: Advanced Setting
ADVANCED SETTING 3.1) Parameter Settings This chapter explains the methods for customizing the camera settings. The settings can only be customized in TEST mode. There are two ways to customize the camera settings: remote control and Parameters Setup EXE file is stored on the CD provided with your camera. - Page 10 responds to any new triggers from the PIR sensor. During the selected interval, the camera will not take pictures/videos. This prevents the SD card from filling up with too many redundant images. NOTE: when you turn on Interval, the camera can also send MMS or SMS. Image Burst Optional from 1 photo to 5 Selects how many photos are taken in...
- Page 11 Series Number ON/OFF Set the Series number to record pictures Four Digit (From 0-9, A-Z) from a specific camera if install some unit outside. ON / OFF Password Set up a password to protect your camera Four Digit (From 0-9, A-Z) from unauthorized users.
-
Page 12: Supported Format
3.2) Supported Format Item Format Photo Video File Format FAT32 The SD card stores all original pictures and videos in folder \DCIM\100IMAGE, Pictures are saved with filenames IMAG0001.JPG and videos like IMAG0001.AVI. Here are some important notices. You don’t need to concern about the file system format of the camera unless you have problems with reading the SD card with other equipments. -
Page 13: Mms Menu Definition
NOTE: Be sure that the PIN of the SIM card is disabled before you insert it . You can disable the PIN of a SIM card via your mobile phone. 3.4 ) MMS Menu Definition Slide the power switch into “Test” mode, select “MMS Setup” and then press “OK” to open the MMS setup menu. -
Page 14: Set Up Camera/Mms On Pc
Email Input the email address to receive the MMS Mobile Number Input the Mobile number that will receive the MMS CAUTION: URL, APN, Gateway, PORT, Email, Mobile number must be setup with PC software. Refer to Section 3.5) Important Notes: 1) When in Camera Mode, the camera will send MMS 2) When in Video Mode, the camera will send SMS 3) When in Video+Camera mode, the camera will send SMS... - Page 15 Click Camera Setup to open the following interface: Please setup your camera according to your desired settings, click to get the computer time. Click to choose directory to save you settings. We highly recommend save the settings in the root directory of the SD card (insert the SD card in the SD card reader and plug it in your computer) and then, click .
- Page 16 name that was generated. Otherwise your camera cannot be setup. You can also user the manufacture default settings by clicking on Remove the SD card from the computer and insert it in the camera. Slide power switch into Test mode. A message will show up on the display, indicating the Camera has been successfully set up.
- Page 17 However, because each local mobile network operator has their own settings for their MMS service, and those settings can change, you may need to acquire the settings from your mobile network operator if the Auto-selected settings fail to work. Click on to choose the directory to save the settings, usually under the root directory of the SD card (You need to insert the SD card in the SD card reader and plug it in your .
-
Page 18: Smtp Function
3.6 SMTP Function Click on SMTP Setup. You will see the following interface (select BG-520SM). SMTP function is similar to MMS function. But setting and charging from operators is different. In some countries, SMTP function can save more money than MMS function. SMTP function sending MMS or SMS by GPRS, GSM sending MMS or SMS by GSM, and also SIM card operators have different charging standard for the two kinds of transmission. -
Page 19: Multi-Time Lapse Features
3.7 Multi-Time lapse features The camera multi-time lapse features can be used as a high quality time lapse camera. You can setup four timers for each day. The time spans of each timer cannot overlap. The camera will automatically take picture or videos clips according to the specified Time Lapse. This features can help observe the behavior of the plants or cold-blooded animals. -
Page 20: Downloading The Photos/Videos
4.4) Downloading the photos/Videos To download your photos/videos to a PC, the camera power switch must be in “TEST” mode. Connect the supplied cable to the camera USB port, and then connect it to the USB port on your computer. The camera will be recognized as a standard “USB mass storage” device. - Page 21 4. The camera will not take picturess if the SD card is write protected. Camera won’t power up Ø 1. Make sure that you have installed 8 AA batteries in the battery compartment. 2. Make sure the batteries are installed correctly. 3.
-
Page 22: Firmware Upgrades
4.7) Firmware Upgrades These cameras are equipped with an automatic upgrade function. Upgrading should be performed when a new firmware is available. Follow these steps to perform an upgrade. Back up the content on the SD card to your computer. Format the SD card if content is not Ø... -
Page 23: Appendix I Technical Specifications
Appendix I TECHNICAL SPECIFICATIONS Item Parameters Image sensor 5 Megapixel Max. pixel size 4000*3000 (12 MP) Lens F=3.1; FOV=52°; Auto IR-Cu IR-Flash 940 nm low-glow flash LCD screen 2 inch (960*240) Full definition color screen Memory card From 8MB to 32GB (4GB is recommended) 12 MP = 4000*3000;... - Page 24 Report Low battery SMS “Battery Low, Please replace new alert Batteries in time” Text Alert sent Power Supply 8*AA Stand-by current <0.1 mA Stand-by time 3-6 months Auto power off Auto power off in 2 min if no input in test mode Power consumption 150 mA (+350 mA when IR LED is on...
-
Page 25: Appendix Ii Packing List
Appendix II Packing List Digital camera Build-in MMS Module 1 SMTP & GPRS GSM antenna Battery box1 TV cable USB cable Strap External DC cable Installation CD External battery box (optional) DC power supply (Optional) Adjustment lock Rope (optional) Security lock (optional) External batteries (optional)
Need help?
Do you have a question about the 940-GSM2 and is the answer not in the manual?
Questions and answers