Table of Contents
Advertisement
Advertisement
Table of Contents

Subscribe to Our Youtube Channel
Related Manuals for Travelux Tiempo


Summary of Contents for Travelux Tiempo
- Page 1 RAVELUX TRAVEL TRAVELUX TRAVELUX TRAVELUX TRAVELUX TRAVELUX User Manual Travelux Tiempo...
-
Page 2: User Manual
User Manual BEFORE YOU ARE GOING TO USE YOUR NEW TRAVELUX TIEMPO SCOOTER, YOU AND / OR YOUR ATTENDANT MUST READ AND FULLY UNDERSTAND THIS MANUAL. General information You have just purchased a Van Os Medical UK ltd. scooter and we want to thank you for the confidence in our Travelux products. - Page 3 User Manual Fill out the information on your authorised dealer below: Company: ………………………………………………………………… Address: ………………………………………………………………… ………………………………………………………………… Telephone number: ………………………………………………………………… Fax number: ………………………………………………………………… Email address: ………………………………………………………………… Website: ………………………………………………………………… ~ 2 ~ © 2014 VAN OS MEDICAL UK Ltd. Excel House, Ashbrooke Park, Lincoln Way, Sherburn in Elmet, North Yorkshire, LS25 6PJ Tel.
-
Page 4: Table Of Contents
User Manual IDENTIFICATION ......................4 GENERAL EXPLANATION OF YOUR SCOOTER ............5 2.1 C ....................5 OMPONENTS OF THE SCOOTER 2.2 G ........6 ENERAL EXPLANATION OF THE FUNCTION AND POSSIBILITIES OF YOUR SCOOTER SAFETY REGULATIONS ....................6 3.1 G ....................6 ENERAL SAFETY REGULATIONS 3.2 W ......................6 ARNINGS FOR SAFE USE... -
Page 5: Identification
User Manual IDENTIFICATION Your Travelux Tiempo scooter is equipped with a unique serial number. You can find this number on the frame of your scooter. Below is an example of the frame label on which you can find the identification number. Furthermore you will find the explanation of the various data stored on the frame label listed below. -
Page 6: General Explanation Of Your Scooter
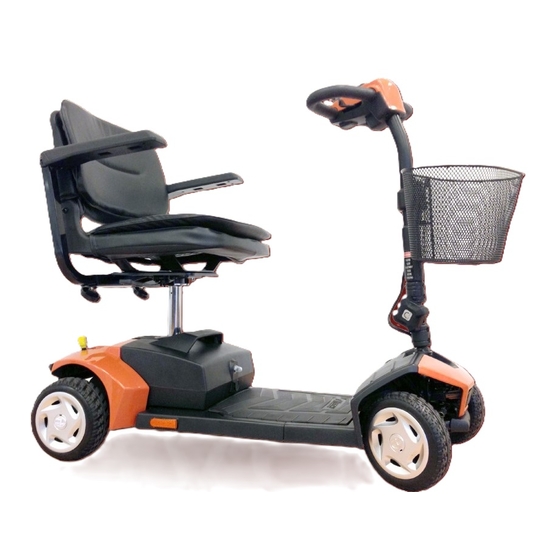
User Manual GENERAL EXPLANATION OF YOUR SCOOTER 2.1 Components of the scooter Control panel Foot board Hand grip Battery pack Tiller Rear wheel Basket Freewheel lever Tiller adjustment knob Seat column tube Front shroud Seat Front wheel Armrest Front bumper Arm pad Backrest Your scooter is equipped with a number of elements and parts. -
Page 7: General Explanation Of The Function And Possibilities Of Your Scooter
However, it is possible when the Travelux Tiempo scooter is not used correctly, dangerous situations may occur. 3.1 General safety regulations Protect your Travelux Tiempo scooter by checking it regularly. When a part of your Travelux Tiempo scooter is not functioning properly, a dangerous situating could occur. -
Page 8: Instructions For Use
INSTRUCTIONS FOR USE Your Travelux Tiempo scooter is a battery-operated personal mobility vehicle. Please exercise caution and consideration when you are operating it. Driving your scooter carefully and thoughtfully will help ensure your personal safety and the safety of other people. -
Page 9: Control Panel
User Manual 4.1 Control panel Battery indicator Speed adjustment dial Lever forward / Lever backward Key switch Horn Battery indicator The battery indicator shows the voltage of the batteries: Green; the batteries are fully charged; Yellow; the batteries are at half charge capacity. ... -
Page 10: Getting On And Off Your Scooter
User Manual Brakes and throttle lever When the throttle lever is in neutral position the electromagnetic brake will automatically release and your scooter will move. When the throttle lever is released it will return to the neutral position and the scooter will decelerate and come to a complete stop. -
Page 11: Before Driving
User Manual Batteries and charging Your scooter is equipped with two maintenance free batteries. These batteries require no maintenance other than ensuring they are properly charged. Because your batteries may only have a partial charge when you first receive your scooter, you may not experience full riding time until you have fully charged them about 12 hours. - Page 12 User Manual Turning your scooter on and off Make sure that your scooter is in the drive position; Make sure your scooter is turned off when getting off of your scooter or disassemble your scooter, see photo 2; Turn the key to the left when you want to use your scooter.
- Page 13 User Manual Freewheel mode Your scooter is equipped with a freewheel mode, see photo 4. Photo 4 On the decal next to the freewheel lever (photo 4) the Drive position is indicated by “D” and the freewheel mode is indicated by “N”. Freewheel mode Pull the lever downwards into the freewheel mode (photo 4).
-
Page 14: Basic Driving
User Manual 4.5 Basic driving Make certain that you are seated safely and properly on your scooter; Turn the speed control knob fully counter clockwise to the slowest setting; Insert the key into the key switch; Turn the key counter clockwise to the “On” position; ... -
Page 15: Control Through Tight Spots
User Manual 4.7 Control through tight spots Your scooter is developed to increase your mobility but you will undoubtedly encounter some obstacles that will require practice to manoeuvre smoothly and safely. Below are some common obstacles that you may encounter during the daily use of your scooter. -
Page 16: Going Up An Incline / Down A Decline
User Manual 4.8 Going up an incline / down a decline Driving on inclines For maximum stability lean forward; Drive with caution when attempting to drive up to any incline, even handicap access ramps; Always climb or descend an incline by driving straight up or straight down ... -
Page 17: Emi / Rfi
User Manual Procedure 1: Under power Set the key switch to the “Off position”; Get off of your scooter; Set the key switch to the “On position”; While standing next to your scooter, carefully operate the controls at the lowest ... - Page 18 User Manual Warning: Unintended movement or brake release could cause an accident or injury. The FDA has determined that each make and model of scooter can resist EMI/ RFI to a certain level. The higher the lever of resistance, the greater the degree of protection from EMI/ RFI –...
-
Page 19: Instructions For Use And Mounting Options
User Manual MAKING ADJUSTMENTS TO YOUR SCOOTER CAN CAUSE BIG RISKS FOR YOUR SAFETY AND THE FUNCTION OF YOUR SCOOTER. ADJUSTMENTS MADE BY YOURSELF ARE STRONGLY ADVISED AGAINST AND CARRIED OUT AT YOUR OWN RISK. INSTRUCTIONS FOR USE AND MOUNTING OPTIONS 5.1 Technical information Total length 106 cm... -
Page 20: Armrest Adjustments
User Manual 5.2 Armrest adjustments Armrest width adjustment To adjust the armrest width: Loosen the adjustment knob at the back of the seat (photo 5); Slide the armrest in or out to the desired width; Tighten the adjustment knob. ... -
Page 21: Seat Adjustments
User Manual 5.3 Seat adjustments Seat rotation lever The seat turning lever (at the bottom of the seat) allows the seat to rotate from 45º till 360 Push the seat rotation lever up (photo 7) and rotate the seat to the desired ... -
Page 22: Disassemble
User Manual 5.5 Disassemble Warning: Remove the key from the key switch before you disassemble your scooter! Remove the seat You can disassemble the seat of the scooter. First remove the armrests of the seat to decrease the weight of the seat; ... -
Page 23: Assembly
User Manual Folding down the tiller Loosen the knob of the tiller; Fold the tiller completely down; Retighten the knob to lock the tiller. Separating the front frame from the rear frame Pull the lever that will disassemble the front frame of the rear frame upwards ... -
Page 24: Transporting Your Scooter
CARE AND MAINTAINANCE Routine maintenance The Travelux Tiempo scooter is practically maintenance free. All of the bearings on your scooter are permanently lubricated and sealed. No additional lubrication is required however there are several things that you can do to help keep up the appearance and maintain the performance of your scooter. -
Page 25: Problem Analysis And Solutions
When you are not using the scooter for more than a week, fully charge the batteries and then disconnect them from the scooter. PROBLEM ANALYSIS AND SOLUTIONS Your Travelux Tiempo scooter is inspected and adjusted so that you can use it immediately. Beep codes 1 beep The batteries need to be charged. - Page 26 User Manual 3 beeps Consult your authorised dealer. 4 beeps Indicates that the motor is overloaded or overheated. Remedy Turn the power off of your scooter and allow the scooter to rest for 10 minutes. 5 beeps Indicates a brake or brake wiring problem. The freewheel lever may be in the disengaged position.
-
Page 27: Warranty
WARRANTY 9.1 Warranty application Together with your Travelux Tiempo scooter you get the factory warranty. This warranty is only granted to you as the consumer. It is not intended to be used commercially (like hiring or institutional use). The warranty is limited to defects to materials and possible hidden shortages. -
Page 28: General Maintenance Instructions
While this manual is created with care it is not exclusive. The warranty is only valid during the indicated period. If adjustments are made to the Travelux Tiempo scooter, which have structural impact on the product, the warranty will expire completely. You can visit www.vanosmedical.com... - Page 29 User Manual Product identification Product: Electrically powered, scooters and their chargers Brand: Travelux Model/type: Tiempo Version: Manufacturer: Name Van Os Medical UK ltd. Address Koperslagerij 3 4651 SK Steenbergen Country The Netherlands EU Representative: Name W. van Os Address Koperslagerij 3...
- Page 30 Van Os Medical UK Ltd. Van Os Medical B.V. Excel House Koperslagerij 3 Ashbrooke Park, Lincoln Way 4651 SK Steenbergen (NB) Sherburn in Elmet Nederland North Yorkshire LS25 6PJ Tel.+44 (0) 1977 68 1400 Tel.+31 (0) 167 57 30 20 Fax.
Need help?
Do you have a question about the Tiempo and is the answer not in the manual?
Questions and answers