Magellan RoadMate 800 Reference Manual
Hide thumbs
Also See for RoadMate 800:
- Reference manual (107 pages) ,
- Manuel de référence (106 pages) ,
- Quick start manual (40 pages)
Table of Contents
Advertisement
Quick Links
Download this manual
See also:
Reference Manual
Advertisement
Table of Contents

Related Manuals for Magellan RoadMate 800


Summary of Contents for Magellan RoadMate 800
- Page 1 Magellan RoadMate ® ™ Reference Manual Instructions for Operating the Magellan RoadMate 800...
- Page 2 • The battery in the Magellan RoadMate is rechargeable and should not be removed. If it needs to be replaced, please fol- low the instructions in this document and dispose of the old battery in accordance with local hazardous material requirements.
-
Page 3: About The Battery
© 2005 Thales Navigation, Inc. All rights reserved. The Magellan Logo, Magellan, Magellan RoadMate, Turn it on and go, TrueView, QuickSpell, SmartDetour, TrueFix and SmartVolume are trademarks of Thales. No part of this user manual may be reproduced or transmitted in any form or by any means, electronic or mechanical, including photocopying and recording, for any purpose other than the purchaser’s personal use, without the prior written permission of Thales. -
Page 4: Table Of Contents
Chapter 3: Vehicle Installation ..............................11 Installing the Windscreen Mount ...................................... 11 Chapter 4: Antenna Position ..............................13 Chapter 5: Magellan RoadMate Tools Installation ........................14 Installing the Software ........................................14 Connecting Your Magellan RoadMate ....................................14 Chapter 6: Magellan RoadMate Music Manager ........................15 Chapter 7: Music Player ................................ - Page 5 Adding Individual POIs ........................................25 Importing a Data File ........................................27 Chapter 11: Basic Operation of Vehicle Navigation ........................28 Turning the Magellan RoadMate On Out of the Box ................................28 Suspend Power or “Sleep” Mode....................................28 Power Management........................................28 Resetting the Magellan RoadMate ....................................
- Page 6 TABLE OF CONTENTS Favourites ............................................ 48 Editing a Favourite ........................................49 Deleting A Favourite ........................................49 List Addresses..........................................50 Editing an Address ........................................50 Deleting an Address ........................................51 Create New Entry.......................................... 51 Search by Town .......................................... 51 Search by Postcode ........................................52 Search by County ........................................
- Page 7 TABLE OF CONTENTS Viewing a Saved Trip Report ...................................... 82 Deleting a Trip Report ........................................ 83 Chapter 15: System Settings ..............................84 Brightness ............................................84 Power Management .......................................... 84 Password ............................................84 Set Password..........................................84 Remove Password ........................................84 Language ............................................85 Chapter 16: System Status .................................
-
Page 8: Contact Information
*free of charge phone access available from Eire, UK, Portugal, Spain, France, Italy, Belgium, The Netherlands, Germany, Austria, Switzerland, Norway, Sweden, Denmark and Finland For Magellan product telephone support in English, French or German from other European, Middle Eastern or African locations, please dial:... -
Page 9: Chapter 1: Information
Chapter 1: Information 1.1 About Satellite Navigation Global satellite navigation is an exciting technology, providing enhanced productivity and accuracy in a vast number of industries. It adds a new level of enjoyment and safety to a wide range of navigation, sports and recreational activities. A Global Navigation Satellite System (GNSS) is a network of satellites that transmit high-frequency radio signals containing time and distance data that can be picked up by a receiver, allowing users to pinpoint their precise locations anywhere around the globe. -
Page 10: A Word On The Safe Usage Of Gps Maps
1.5 Signal Acquisition Time The first time you use your Magellan RoadMate, or if you travel over 500 miles with the unit off, there may be a delay in receiving the initial satellite fix; depending on your position and the position of the satellites, this could take 15 minutes or more. - Page 11 For instance, the Magellan RoadMate GPS receiver should be operated only by vehicle passengers or by the driver when the vehicle has come to a complete stop.
-
Page 12: Chapter 2: Magellan Roadmate
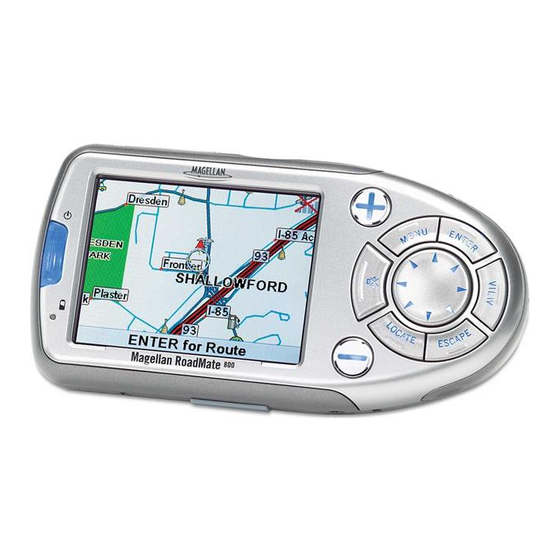
Chapter 2: Magellan RoadMate 2.1 Front View Suspend Button Press to enable “sleep” mode. While viewing the map, press to zoom in on the centre of the display. Zoom In Button The Zoom In Button can also be used with long lists to scroll one page at a time. -
Page 13: Rear View
Chapter 2: Magellan RoadMate 2.2 Rear View Speaker Used for audible segmenting instructions and music playback. Rotate up when in use to receive signals from the GPS satellite network. Antenna See Chapter 4 “Antenna Position” on page 13. External Antenna Connection... -
Page 14: Top View
Chapter 2: Magellan RoadMate 2.3 Top View Used to backup and restore personal navigation data and to transfer Storage Card slot image files. Rotate left or right to increase or decrease the volume. Press to repeat Volume Control last voice prompt. -
Page 15: Bottom View
Plug in the AC Adapter or the 12-volt vehicle power adapter. 2.5 Left-hand side View Stereo Headphone Connection Used to connect the stereo headphones. Plug the Magellan RoadMate into your PC to upload music, photos and USB Connection custom POIs. -
Page 16: Right-Hand Side View
Wire Catcher Used to secure the power cable. Windscreen Mount connection Insert the notches of the windscreen mount here. Cradle Release Press to release Magellan RoadMate from cradle. Mount Screw Holes Attach another mounting device that requires an adapter plate. -
Page 17: Using Removable Storage Cards
2.8 Using Removable Storage Cards The Magellan RoadMate is equipped with a storage card slot at the top of the unit which accepts Secure Digital (SD) cards and Multimedia Cards (MMC). These cards are mainly used to back up and restore navigation data and to transfer image files to and from the hard disk. -
Page 18: Battery Removal And Installation
2.9 Battery Removal and Installation The battery in the Magellan RoadMate 800 is a rechargeable lithium-ion battery which you should not need to replace. If the battery fails to charge or is defective, please follow these procedures to remove the battery and install the replacement. -
Page 19: Chapter 3: Vehicle Installation
Take care when mounting the Magellan RoadMate in your vehicle, whether you are using the windscreen mount or other mount, that it does not obstruct the driver’s view of the road. Make sure that the fitting of the Magellan RoadMate and cable does not interfere with the operation of vehicle safety devices, such as air bags. - Page 20 Then, route the cable along the back of the cradle and insert it into the wire catcher. Plug the power adapter into your vehicle’s cigarette lighter or 12-volt receptacle. Rotate the antenna upward (see page 13 for correct antenna position). Installation is complete, and you are ready to turn the Magellan RoadMate on and go.
-
Page 21: Chapter 4: Antenna Position
Chapter 4: Antenna Position The antenna on the Magellan RoadMate 800 is designed in such a way as to receive the satellite signal at the front face of the antenna. It is important to angle the antenna so that the front face is mostly towards the sky. Ideally in most vehicles,... -
Page 22: Chapter 5: Magellan Roadmate Tools Installation
Chapter 5: Magellan RoadMate Tools Installation 5.1 Installing the Software Insert the Magellan RoadMate Tools PC Application CD into your PC’s CD drive. The setup application will begin automatically. If not, browse your computer’s CD drive and double-click on the setup.exe file. -
Page 23: Chapter 6: Magellan Roadmate Music Manager
Turn on your Magellan RoadMate by sliding the Reset switch to position “1” (See “Top View” on page 6) or by pressing the Suspend button if the unit is in “sleep” mode (See “Front View” on page 4). When the Warning screen appears, insert the small end of the USB cable into the USB port on your Magellan RoadMate. -
Page 24: Chapter 7: Music Player
Chapter 7: Music Player The Magellan RoadMate Music Player enables you to play, in MP3 or WMA format, music files which are stored on the hard disk of your Magellan RoadMate or on an optional storage card. If you have not already done so, you must install the Magellan RoadMate Tools application (page 14) and transfer files onto your unit using the Magellan RoadMate Music Manager (page 15). -
Page 25: Play
Chapter 7: Music Player The Playlist menu will appear. To exit from the playlist menu, select 7.2.1 Play Play To hear a previously created playlist, select Use the Up or Down arrow to select the required playlist. Select The songs will begin playing automatically in order. 7.2.2 Create To make a new playlist, select Create... -
Page 26: Rename
Chapter 7: Music Player 7.2.5 Rename Rename If you want to change the name of a playlist, select Select the playlist that you would like to rename, then select Use the backspace key (<-) to erase the name and the keypad to enter a new name for your playlist. When you have finished, select 7.3 Play Mode Play Mode... -
Page 27: Chapter 8: Magellan Roadmate Photo Manager
Turn on your Magellan RoadMate by sliding the Reset switch to position “1” (See “Top View” on page 6) or by pressing the Suspend button if the unit is in “sleep” mode (See “Front View” on page 4). When the Warning screen appears, insert the small end of the USB cable into the USB port on your Magellan RoadMate. -
Page 28: Chapter 9: Photo Viewer
Chapter 9: Photo Viewer The Magellan RoadMate Photo Viewer enables you to view, in JPG or BMP format, image files which are stored on the hard disk of your Magellan RoadMate or on an optional storage card. In order to transfer files from your PC to the Magellan RoadMate, you must install the Magellan RoadMate Tools application (page 14) and copy the files onto your unit using the Magellan RoadMate Photo Manager (page 15). -
Page 29: Slideshow
Chapter 9: Photo Viewer 9.1.3 Slideshow Press the Slideshow button to automatically cycle through all the photos in the Pictures folder. 9.1.4 Pan If you enlarge an image beyond the screen boundaries, press the Pan button to enable image scrolling. While enabled, you can drag the image in any direction to view other areas of the image. -
Page 30: Properties
Chapter 9: Photo Viewer 9.2.4 Properties Properties To view information on the selected file or folder, press . A thumbnail of the image will be displayed along with the width and height in pixels, the size and the format (image type). When viewing the properties for folders, width, height and format are not shown. -
Page 31: Chapter 10: Magellan Roadmate Poi Manager
Chapter 10: Magellan RoadMate POI Manager The Magellan RoadMate POI Manager enables you to transfer custom points of interest files from your computer to your Magellan RoadMate. Before we add any custom POIs to the unit, you should understand how the POI Manager plots POIs. -
Page 32: Altitude
USB cable into an available USB port on your computer. 20m Above Sea Level 0m Turn on your Magellan RoadMate by sliding the Reset switch to position “1” (See “Top View” on page 6.) or by pressing the Suspend button if the 20m Below unit is in “sleep”... -
Page 33: Creating A New Poi File
Chapter 10: Magellan RoadMate POI Manager Locate the POI files that you would like to load. When you have selected a file, the Copy To Unit arrow will turn green. Click on the arrow to copy the file to your unit. - Page 34 Chapter 10: Magellan RoadMate POI Manager The Alert feature is an audible alarm that lets you know when you are within a certain distance of the POI. You can set an initial reminder (Distance 1) and a secondary reminder (Distance 2).
-
Page 35: Importing A Data File
Chapter 10: Magellan RoadMate POI Manager 10.7 Importing a Data File The POI Manager software supports ASCII file format (.ASC,.CSV,.TXT), GPS Exchange file format (.GPS,.XML), Magellan Waypoint file format (.WPT,.RTE) and Garmin PCX5 Waypoint file format (.WPT,.RTE). Click on the... -
Page 36: Chapter 11: Basic Operation Of Vehicle Navigation
VOLUME CONTROL lever is located at the top of the Magellan RoadMate (see “Top View” on page 6). Use the lever to set the volume of the speaker to a suitable level. The volume level indicator will appear on screen. -
Page 37: Inputting Text Characters
11.6 Inputting Text Characters Whenever you need to input names or street addresses, etc., the Magellan RoadMate will display a keyboard. Touch the letter you want. If you make a mistake, use the Backspace key to go back one character at a time. The Spacebar is used to insert spaces between characters or words. -
Page 38: What Is Quickspell
QuickSpell eliminates the possibility of a misspelled word or looking for a town or street that is not in the loaded database. As you begin entering characters, the QuickSpell feature of the Magellan RoadMate dims out those characters that are not available, thereby speeding up the data entry process. -
Page 39: Multi-Word Indexing
11.10 Multi-Word Indexing The Magellan RoadMate employs a search feature known as “Multi-Word Indexing”. This feature enables you to search the database for possible matches based on the characters that have been entered. The returned matches will start with the characters that have been entered. -
Page 40: Chapter 12: Travelling
Chapter 12: T ravelling 12.1 Guidance Information Screens The Magellan RoadMate has three screens that you can use for help in travelling to your destination: the Map screen, the Segment List screen and the TrueView 3D/Split TrueView screen. : When a new destination is selected and calculated, the Map screen will be displayed. This screen will display a map of your surrounding area along with the planned route (if calculated) and information about the route. -
Page 41: Map Screen
Chapter 12: T ravelling 12.2 Map Screen The Map screen is the most commonly used screen in the Magellan RoadMate, and it provides you with detailed information about where you are and where you are going. Current Road GPS Signal Strength SmartDetour Icon POI Icon †... -
Page 42: Changing The Map Zoom Levels
Chapter 12: T ravelling 12.4 Changing the Map Zoom Levels You can zoom in by pressing the + (plus) key or zoom out by pressing the Zoom In key (minus) key. Note: The Zoom In and Zoom Out keys can also be used to scroll through long lists. -
Page 43: Trueview 3D Screen
Chapter 12: T ravelling 12.6 TrueView 3D Screen The Magellan RoadMate uses TrueView 3D technology to display a three-dimensional picture of the change of direction. The VIEW TrueView 3D screen can be viewed only after a route has been calculated. From the Map screen, press the key twice to view the TrueView 3D screen. -
Page 44: Choosing The Routing Method
12.7 Choosing the Routing method Every route is calculated based on the Routing method criteria selected. Every time a new destination is selected, the Magellan RoadMate prompts you for the method that will be used to calculate the route. Shortest Time : This selection calculates a route that should take the least amount of time using speed limits and other information in the database. -
Page 45: Detouring From The Planned Route
2. If you leave the planned route before it has been completed and you turn off your vehicle, the Magellan RoadMate will switch to battery power, unless your cigarette lighter maintains constant power. In either situation, the unit will automatically suspend power when this is enabled through customisation. -
Page 46: Displaying Information About Your Current Location
12.14 Finding POIs Along Your Route When you are driving along a route, if you need to find a petrol station, cash point or other POI, the Magellan RoadMate can find the nearest POI and route to it. Then, when you have completed the detour, resume guidance to your original destination. -
Page 47: Finding A Detour Along Your Route
A list of the nearest POIs will be displayed. Use the Navigation key to scroll the list up or down (if necessary) and select the required POI. The Magellan RoadMate will calculate a new route to the selected POI from your current position. When you have arrived at the new destination, you will be prompted to resume Resume guidance to your original destination. - Page 48 Enter the number of miles for your detour and then select Select Route . The Magellan RoadMate will recalculate the alternative route to your destination. You can also choose to let the Magellan RoadMate route you around traffic automatically by enabling smart detour. See “Detour Options” on page 74.
-
Page 49: Chapter 13: Selecting Destinations
The current destination country will be displayed at the top of the Destination screen. 13.3 Entering and Routing to Your Home Address The Magellan RoadMate enables you to enter an address to assign to your Home button. The Home button allows you one-touch access to the address that you route to most often. -
Page 50: Selecting A Destination Using Select Address
Chapter 13: Selecting Destinations Now, when you press the Home button, you will be prompted to either route to or change the Home address. 13.4 Selecting a Destination Using Select Address Search by Town – page 43 Search by Postcode – page 43 Select Address Search by County –... -
Page 51: Search By Town
Enter the street address. The acceptable range of numbers will be displayed at the top of the Done screen. Select Select the required routing method. The Magellan RoadMate will calculate the route. When the calculations are complete, the Map screen will be displayed. 13.4.2 Search by Postcode Street Address... -
Page 52: Search By County
Enter the street address. The acceptable range of numbers will be displayed at the top of the Done screen. Select Select the required routing method. The Magellan RoadMate will calculate the route. When the calculations are complete, the Map screen will be displayed. 13.4.3 Search By County Street Address... -
Page 53: Previous Town
Enter the street address. The acceptable range of numbers will be displayed at the top of the Done screen. Select Select the required routing method. The Magellan RoadMate will calculate the route. When the calculations are complete, the Map screen will be displayed. -
Page 54: Selecting A Destination Using The Address Book
Route Select Select the required routing method. The Magellan RoadMate will calculate the route. When the calculations are complete, the Map screen will be displayed. 13.5.1.1 Saving a Previous Destination to the Address Book Address Book Previous Destinations... - Page 55 Chapter 13: Selecting Destinations Use the Navigation key to scroll the list up or down (if necessary) and select the required previous destination. Select Edit The top line (Name) and the bottom line (Information) can be edited. The address cannot be changed.
-
Page 56: Deleting A Previous Destination
Use the Navigation key to scroll the list up or down (if necessary) and select the destination from the list of addresses. Route Select Select the required Routing method. The Magellan RoadMate will calculate the route. When the calculations are complete, the Map screen will be displayed. -
Page 57: Editing A Favourite
Chapter 13: Selecting Destinations 13.5.2.1 Editing a Favourite Address Book Favourites From the Destination screen, select , then select Use the Navigation key to scroll the list up or down (if necessary) and select the required favourite. Edit Select The top line (Name) and the bottom line (Information) can be edited. The address cannot be changed. -
Page 58: List Addresses
Route Select Select the required routing method. The Magellan RoadMate will calculate the route. When the calculations are complete, the Map screen will be displayed. 13.5.3.1 Editing an Address From the Destination screen, select Address Book... -
Page 59: Deleting An Address
Chapter 13: Selecting Destinations 13.5.3.2 Deleting an Address Address Book List Addresses From the Destination screen, select , then select Use the Navigation key to scroll the list up or down (if necessary) and select the required address. Delete Select A dialog box will appear to confirm your selection. -
Page 60: Search By Postcode
Chapter 13: Selecting Destinations Enter the street address. The acceptable range of numbers will be displayed at the top of Done the screen. Select The top line (Name) and the bottom line (Information) can be edited. The address cannot be changed. Select the line you want to modify. Use the keypad to enter the required text and select . -
Page 61: Search By County
Chapter 13: Selecting Destinations The top line (Name) and the bottom line (Information) can be edited. The address cannot be changed. Select the line you want to modify. Use the keypad to enter the required text and select . You can also designate the address as a favourite by ticking the box at the bottom of the screen. -
Page 62: Previous Town
Chapter 13: Selecting Destinations The top line (Name) and the bottom line (Information) can be edited. The address cannot be changed. Select the line you want to modify. Use the keypad to enter the required text and select . You can also designate the address as a favourite by checking the box at the bottom of the screen. -
Page 63: Trip Planner
Chapter 13: Selecting Destinations 13.5.5 Trip Planner Using the Trip Planner, you can enter multiple destinations for your “trip” and route to each one of them in order. 13.5.5.1 New Address Book Trip From the Destination screen, select , then select (Trip button). -
Page 64: Optimizing A Trip
Chapter 13: Selecting Destinations 13.5.5.2 Optimizing a Trip With Route Optimization, you can sort the destinations in your trip from closest to farthest. Edit From the Trip Planner screen, select Select the trip to optimize. Optimize Select The destinations are sorted from closest to farthest from your current location. Select Save... -
Page 65: Guide Me
Select the required routing method. The Magellan RoadMate will calculate the route. When the calculations are complete, the Map screen will be displayed. 13.5.5.4 Edit Destinations within a trip can be moved up or down, deleted or added to. -
Page 66: Delete And Rename
Chapter 13: Selecting Destinations Select the destination that you would like to delete and select Delete from the pop-up menu. Select the destination that you would like to change, and select Move Up from the pop-up menu. When you have finished, select Save and you will be returned to the Trip Planner screen. - Page 67 Chapter 13: Selecting Destinations A dialog box will appear to confirm your selection. Select The trip has been deleted. Select Rename Select the trip to be renamed. Use the backspace key to delete the old name, then enter the new name for the trip. When you have finished, select The trip has been renamed.
-
Page 68: Selecting A Point Of Interest As A Destination
Points of Interest (or POIs) are commercial or recreational locations, landmarks or services that are preloaded into the Magellan RoadMate database. There are over six million POIs in the database, which range from restaurants, parks, petrol stations and banks, to schools and police stations and more. The purpose of the POI database (accessed through the Points Of Interest menu option) is to provide you with a list of popular destinations, so that you do not have to enter the address manually in order to route to them. -
Page 69: List By Town
Use the Navigation key to scroll the list up or down (if necessary) and select the required POI. Select the required Routing method. The Magellan RoadMate will calculate the route. When the calculations are complete, the Map screen will be displayed. 13.6.1.2 List By Town If you select List by Town the POIs matching the name you entered within a selected town will be listed. -
Page 70: Select Category
A list of all the POIs in the selected categories nearest to your current position will be displayed. Select the POI from the list. Select the required routing method. The Magellan RoadMate will calculate the route. When the calculations are complete, the Map screen will be displayed. 13.6.2.2 List by Town If you select List by Town the POIs in the selected category within a specified town will be listed. -
Page 71: Spell Name
Use the Navigation key to scroll the list up or down (if necessary) and select the required POI. Select the required routing method. The Magellan RoadMate will calculate the route. When the calculations are complete, the Map screen will be displayed. 13.6.2.4 Cuisine Type When selecting restaurants, you will be presented with an additional method for finding POIs. -
Page 72: Selecting A Junction As A Destination
Select Custom POI menu. Select the required routing method. The Magellan RoadMate will calculate the route. When the calculations are complete, the Map screen will be displayed. 13.7 Selecting a junction as a Destination Search by Town – page 65 Search by Postcode –... -
Page 73: Search By Town
Use the Navigation key to scroll the list up or down (if necessary) and select the second street from the list. Select the required routing method. The Magellan RoadMate will calculate the route. When the calculations are complete, the Map screen will be displayed. 13.7.2 Search by Postcode... -
Page 74: Search By County
Use the Navigation key to scroll the list up or down (if necessary) and select the second street from the list. Select the required routing method. The Magellan RoadMate will calculate the route. When the calculations are complete, the Map screen will be displayed. 13.7.3 Search by County... -
Page 75: Previous Town
Use the Navigation key to scroll the list up or down (if necessary) and select the second street from the list. Select the required routing method. The Magellan RoadMate will calculate the route. When the calculations are complete, the Map screen will be displayed. -
Page 76: Chapter 14: Navigation Options
14.1.2 Custom POIs The Custom POI menu enables you to select POIs that you have previously loaded into your Magellan RoadMate using the Magellan RoadMate POI Manager software (see page 23). The following instructions assume that you have loaded one or more custom POIs into your Magellan RoadMate. - Page 77 Chapter 14: Navigation Options Select Select a POI File Use the Navigation key to scroll the list up or down (if necessary) and select a POI file. With the file selected, you will be returned to the Custom POIs menu. Select Display Categories The categories that you created will be displayed in the same way as the built-in POIs.
- Page 78 Chapter 14: Navigation Options Select the POI category to customise. The Detection Angle is set to alert you when you are within so many degrees of the POI. Select Detection Angle Use the numeric keypad to enter the number of degrees at which to set the alert. When you have finished, select...
- Page 79 Chapter 14: Navigation Options The First Warning is set to alert you when you are within a certain number of feet of the POI. First Warning Select Use the numeric keypad to enter the number of feet at which to alert you. When you have finished, select The Last Warning is set as a final alert when you are within a certain number of feet of the POI.
-
Page 80: Map Options
Chapter 14: Navigation Options Select Last Warning Use the numeric keypad to enter the number of feet at which to alert you. When you have finished, select When you have set the parameters to your satisfaction, select Save 14.1.3 Map Options Map Options enable you to determine the behaviour of the Map while you are driving. -
Page 81: Trueview Options
Select Map Colour Select Automatic Night Mode With enabled, the Magellan RoadMate will switch between a Day screen and a Night screen based on sunrise and sunset times for your current location. Day Screen Select to choose a colour scheme for the map while you are driving during the day. -
Page 82: Route Preferences
The Magellan RoadMate comes equipped with SmartDetour. If you are driving on the motorway with SmartDetour enabled and your speed drops below 15 mph, you may press the detour icon on the Map screen so that the Magellan RoadMate can calculate an alternative route around traffic. -
Page 83: Voice Options
Chapter 14: Navigation Options Next, select the amount of time the Magellan RoadMate will wait before alerting you. Select the Time button. Enter the number of minutes and select Enable Automatic Detour is selected by default as shown by the ticked checkbox. To disable... -
Page 84: Menu Colours
Chapter 14: Navigation Options 14.1.9 Menu Colours You can change the colour of the menu screens by selecting one of four colour schemes. Menu Colours Select Select the required colour scheme. Save When you have finished, select 14.1.10 Tone Options As you approach a segment, an audible alert will sound to tell you to negotiate the segment. -
Page 85: Set Gps Position
Go to the Map screen. Your current position is now set to the address you entered. 14.1.12 Simulator Mode In Simulator Mode, you can demonstrate the capabilities of the Magellan RoadMate without actually driving. In order for the simulation to work, you must set a route first. Select Simulator Mode. -
Page 86: Map Regions
The Magellan RoadMate 800 comes preloaded with North American and European map data. If you are travelling to North America, you can take your Magellan RoadMate with you and use it while you are driving abroad. To unlock the North American map, contact our Customer Service department for pricing and unlock-code information or visit our Web site at www.magellanGPS.com. -
Page 87: Automatic Volume
When it has finished, you will have access to the North American maps. 14.1.14 Automatic Volume The Magellan RoadMate can be set to automatically increase the volume when the vehicle exceeds 45 mph to compensate for road noise. Automatic Volume Select Select the number increment by which to increase the volume. -
Page 88: Restore
The files will be copied to the hard disk. 14.1.16 Map Information Product Information displays information about the map and database installed in your Magellan RoadMate. This information helps our Technical Support Representative find a solution to whatever problem you may have. 14.2 Trip Computer The Trip Computer is a valuable tool for recording the mileage and time spent driving while on business or on holiday. -
Page 89: Current Trip
Chapter 14: Navigation Options To access these features, press the MENU key on the unit and select Navigation Options Trip Computer Select 14.2.1 Current Trip When you begin a new trip and you need to record the information, access the Trip Computer. There you can save the information displayed for the current trip (if needed) and reset the Trip Computer in preparation for your new trip. -
Page 90: Saving The Current Trip Report
Chapter 14: Navigation Options 14.2.1.2 Saving the Current Trip Report When you have finished with your trip, you can save the information for later viewing. Select Save at any time. Use the keypad to enter a name for the Trip Report and select when you have finished. -
Page 91: Deleting A Trip Report
Chapter 14: Navigation Options 14.2.1.5 Deleting a Trip Report Select the Trip Report to be deleted. Delete Select The trip will be deleted and you will be returned to the Trip Computer screen. -
Page 92: Chapter 15: System Settings
Chapter 15: System Settings The System Settings Menu contains system wide customisation features, including: Brightness, Power Management, Password and Language. MENU System Settings To access these features, press the key on the unit and select 15.1 Brightness To change how light the screen appears, select Brightness Use the right arrow to make the screen appear lighter and the left arrow make the screen appear darker. -
Page 93: Language
Chapter 15: System Settings 15.4 Language To change the language for the menu text and voice prompts for navigation, select Language Select the required language. A dialog box will appear asking you to confirm your selection. Select The unit will restart itself with the new language enabled. -
Page 94: Chapter 16: System Status
Chapter 16: System Status The System Status menu offers you further options to check the performance of your Magellan RoadMate. 16.1 Product Information Select Product Information to show the current application software versions. Also, the current hardware and firmware version will be displayed. -
Page 95: Chapter 17: Help
Chapter 17: Help The Help feature provides you with an interactive tutorial on the features and functions of the Magellan RoadMate along with contact information should you need assistance. 17.1 Quick Tips Quick Tips for New Users provides information in the following categories on basic usage and how to get the best signal reception: •... -
Page 96: Appendix
Appendix \POI Categories The Magellan RoadMate POI database has 37 different categories. The icons will appear on the Map screen (if enabled): Restaurant Fast food, cafes and food shops Bank/Cash Point Most financial services Petrol Station Most fuel services Roadside Assistance... -
Page 97: Specifications
Appendix Rest Area Lay-bys along major highways Shopping Shopping malls and other retail stores Ski Resorts Most major ski resorts Sports & Recreation Stadiums, parks, lakes Tourist Attraction Places most visited by tourists Transportation Bus and train stations Vineyard Vineyards and tasting locations Worship Churches, temples, mosques When selecting restaurants, you can further narrow the search by cuisine type such as French, Italian, Greek or Mexican,... -
Page 98: Pc Requirements
Appendix PC Requirements • IBM Compatible PC, Pentium or higher • Microsoft ® Windows® 2000 or XP • 128 MB RAM • CD Drive for Software Installation • DVD Drive for Map Upgrades • USB Port GPS Status Screen GPS STATUS Screen Structure-first page It is ordered by the channel number from 1 to 12. -
Page 99: Bad Fix Code
Appendix Bad fix code 0 PVT_OK :good fix 2 ILLEGAL_ALT: illegal altitude < -10km or > 17.5km 4 POSITION_JUMP: too big position jump between two epoch (300 miles) 5 ILLEGAL_VELOCITY_OR_ALT: max velocity 951mile 7 TOO_BIG_ACCELERATION max 15m around 1.5g 8 TOO_SMALL_ALTITUDE -10000 m 9 TOO_BIG_ALTITUDE 17,500 m... -
Page 100: Gps Status Screen Structure - Second Page
Appendix GPS STATUS Screen Structure - second page Heading XXX (degree) Speeding XX.X (meter per second) Current Lat: DDD.DDDDD W/E (current latitude, degree) Current Long: DDD.DDDDD N/S (current longitude, degree) Current altitude XXXX (altitude in mean sea level meter) TTFF XXXXs (Time-To-First-Fix in second) #Satellite (U/T) XX/XX (the number of satellite used and tracked) PDOP XX.X (Position Dilution Of Precision) -
Page 101: Typical Gps Status Screen Display
Appendix Typical GPS STATUS Screen Display First Page Second Page Heading 0 Speed 0.0 m/s Current Lat: 34.10939 N Current Long:117.82599 W GPS Version: Current altitude 255 TTFF 116s #Satellite (U/T) 11/12 PDOP 2.3 VDOP 1.7 TTFF 0.0 HDOP 1.3 FOMS P/V/H UTC TIME 08/16/2004 22:56:53... -
Page 102: Frequently Asked Questions
Selection” on page 68. The Magellan RoadMate uses the latest POI data available. Chances are that the POI you are looking for is relatively new and has not been added to the database. If this is not the case, it may have been overlooked or changed since the POI database was created.
Need help?
Do you have a question about the RoadMate 800 and is the answer not in the manual?
Questions and answers