Table of Contents
Advertisement
Quick Links
Advertisement
Table of Contents

Related Manuals for Leaf AFi

Summary of Contents for Leaf AFi
- Page 1 Leaf AFi Camera System User Guide 653-01541A-EN Rev A 731-01362A-EN Rev A...
- Page 3 PDF file for internal use. Copies produced from the PDF file must be reproduced in whole. Trademarks Kodak and Leaf are trademarks of Kodak. Adobe, Acrobat, Adobe Illustrator, Distiller, Photoshop, PostScript, and PageMaker are trademarks of Adobe Systems Incorporated.
- Page 4 Internal 731-01362A-EN Rev A Revised May 2008...
-
Page 5: Table Of Contents
Quick start..........11 Attaching an external power adapter to the Getting to know your camera imaging module..........54 system ............13 Tethered power management......55 Leaf AFi camera system.......15 Setting tethered power to battery....56 Front view...........16 Handling your camera Side view showing controls......17 system ............57 Base view............18... - Page 6 Contents Adjusting settings for a Locking the exposure setting and the shoot autofocus............99 ............77 Setting the EV compensation.....100 Choosing the Shots folder for your shoot..79 Advanced settings for shutter release Assigning a base name for your files....79 mode............100 Shooting with lossless compression.....81 Defining the camera in the imaging Focusing the camera ....103...
- Page 7 Contents Locating a shot in Edit view.......133 Changing the Shoot view options in Leaf Sorting your images........134 WiView.............158 Flagging and annotating images in Edit Changing the interface language in Leaf view............135 WiView.............159 Flagging and annotating a shot in Shoot Viewing the Leaf WiView version view............136...
- Page 8 Contents 16 Caring for your camera User button..........220 system Suitcase contents........221 ..........191 Tips for handling your Leaf AFi camera system............193 Cleaning the camera system......194 Restoring the camera's factory settings..199 Restoring the imaging module's factory settings.............199 Updating the firmware......200 17 Troubleshooting ......203...
-
Page 9: Quick Start
Quick start... -
Page 11: Quick Start
Attach a PQ or PQS lens. Attaching a lens on page 64. ® Turn on the Leaf AFi camera system and set the shutter release mode. See Turning on the camera system and setting the shutter release mode on page 73. - Page 12 Quick start Set the focus mode. Focus modes on page 105. Push the shutter release button to take a shot. Taking a shot on page 75.
-
Page 13: Getting To Know Your Camera System
Getting to know your camera system... -
Page 15: Leaf Afi Camera System
(CCD) sensors. The Leaf AFi camera system is the world's first medium-format camera to include a large (6 x 7 cm) built-in LCD touch screen, offering an innovative graphic user interface, and a variety of functions and predefined settings. -
Page 16: Front View
Getting to know your camera system Front view... -
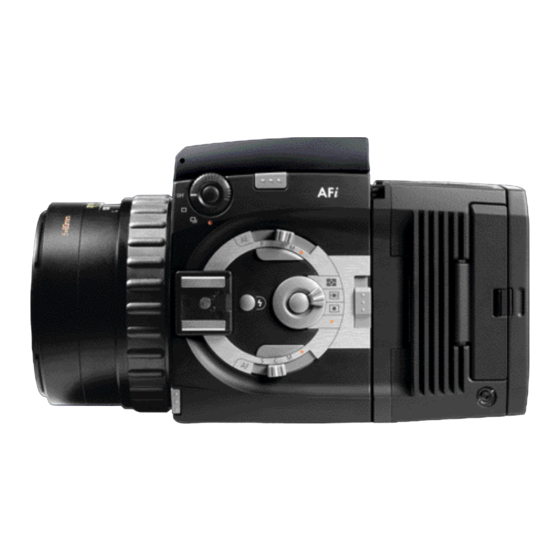
Page 17: Side View Showing Controls
Side view showing controls Side view showing controls... -
Page 18: Base View
Getting to know your camera system Base view... -
Page 19: Side View Showing Handgrip
Side view showing handgrip Side view showing handgrip... -
Page 20: Top View Showing Handgrip
Getting to know your camera system Top view showing handgrip... -
Page 21: Top View
Top view Top view... -
Page 22: Back View
Getting to know your camera system Back view The Leaf AFi imaging module includes a built-in (6 x 7 cm) LCD touch screen with an innovative graphic user interface. Use the stylus provided to tap the touch screen. -
Page 23: Imaging Module Display
Imaging module display Imaging module display The imaging module has four views for setting up your shoot and for editing and managing your shots. Use the options in Camera view to prepare for your shoot: Designate the Shots folder Assign a base name for your shots Set global settings, such as ISO, compression, camera orientation, gray balance, develop curve, color, sharpness, and crop mask size Enter camera and copyright information... - Page 24 Getting to know your camera system Use Edit view to manage your shots: Display images in various layouts for easy browsing Sort and move images from one folder to another Flag, annotate, and delete single or multiple images Use the options in Setup view to set your preferences and configure your imaging module: Set options for working in Shoot view Set user button functionality Set the date, time, owner information, and language...
-
Page 25: Handgrip Display
Handgrip display Handgrip display The handgrip display has two user interfaces: AUTOMATIC which displays basic information, and ENHANCED, which displays detailed camera settings. Automatic handgrip display... - Page 26 Getting to know your camera system Enhanced handgrip display...
-
Page 27: Viewfinder Display
Viewfinder display Viewfinder display The organization of the information in your viewfinder display differs depending on which viewfinder you use. Familiarize yourself with the differences between the displays of the camera system's viewfinders. Display in waist-level viewfinder... - Page 28 Getting to know your camera system Display in the 45º prism + 90º viewfinder An A appearing next to the aperture or shutter speed signifies the following: When the AE switch is set to P (program autoexposure), the A indicates that the camera will automatically select the aperture and the shutter speed.
-
Page 29: Preparing The Battery And Cf Card
Preparing the battery and CF card... -
Page 31: Battery Charging
Battery charging Battery charging The Leaf AFi camera system utilizes a sophisticated power mechanism, which is designed to maximize battery life. Follow the charging instructions to get the most from your batteries. There are two ways to use the battery charger:... -
Page 32: Charging The Battery
Before performing this procedure, refer to the Safety Guide (part number 761-00055A-MUL) on the Leaf Capture software CD. Use the hähnel MCL 103 battery charger provided with the Leaf AFi camera system to charge the lithium ion battery. Connect one end of the 12-volt DC power supply cable to the MCL 103 battery charger. - Page 33 Battery charging Important: Use only the power supply cable provided. Holding the battery with the contacts facing down, slide the battery into the charger all the way down until the contacts meet. Charging begins, and an indicator light turns on. The indicator light begins to blink when the battery is 95% charged.
-
Page 34: Formatting A Compactflash Card
Preparing the battery and CF card Charging the battery in your car Use the 12-volt cigarette lighter power adapter provided with the Leaf AFi imaging module to charge the lithium ion battery in your car. Before performing this procedure, refer to the Safety Guide (part number 761-00055A-MUL) on the Leaf Capture software CD. - Page 35 To read the card, you can use a card reader or the Leaf AFi imaging module. Note: If you use the Leaf AFi imaging module as a card reader, we recommend that you format the card on a computer running Mac OS X.
- Page 36 Insert the CompactFlash card. Formatting a CompactFlash card in Mac OS X You must format a CompactFlash card before using it in the Leaf AFi camera system. Note: Formatting a CF card erases all data on the card. Insert the CompactFlash card into the card reader or the Leaf AFi imaging module.
- Page 37 Formatting a CompactFlash card On the left panel of the Disk Utility dialog box, select the removable disk that you want to format. Click the Erase tab. In the Volume Format box, select MS-DOS (FAT).
- Page 38 Preparing the battery and CF card In the Name box, type LEAF-CF...
- Page 39 Click Erase. The Erase Disk message appears. Click Erase. Formatting is complete when the progress bar disappears from view, the Volume Format box shows MS DOS (FAT32), and the Name box shows Untitled. 10. On the desktop, select LEAF-CF volume.
- Page 40 The CF card is now ready for use with the Leaf AFi camera system. Formatting a CompactFlash card in Windows You must format a CompactFlash card before using it in the Leaf AFi camera system. Note: Formatting a CF card erases all data on the card.
- Page 41 Insert the CompactFlash card in a card reader. In Windows Explorer, click My Computer. Right-click Removable Disk, and from the menu, select Format. The Format dialog box appears. In the File System box, select FAT32. In the Volume label box, type LEAF-CF...
- Page 42 The CF card is formatted. When the format is complete, a message appears. Click OK. In Windows Explorer, click My Computer. 10. Right-click LEAF-CF, and from the menu, select Eject. You can now remove the CF card and use it with the Leaf AFi camera system.
- Page 43 If the CF card is new, or if you have used the CF card on a non-Leaf digital camera back, perform a regular format and not a quick format.
- Page 44 Preparing the battery and CF card Tap the disk that you want to format, and then tap choose. Tap ok. Removing a CF card in portable mode Remove the CompactFlash card from the imaging module to change cards or to download your images using an independent CF card reader.
- Page 45 CF card reader. Removing the CF card from the imaging module while shooting in tethered mode stops communication between the imaging module and Leaf Capture software. Do not remove the CF card from the imaging module while:...
- Page 46 Preparing the battery and CF card Do one of the following: If you are tethered to a Mac, eject the CF card via the Apple® Macintosh® desktop. If you are tethered to a PC, eject the card via the CF card icon in the icon tray. The CF card ejects from the imaging module.
-
Page 47: Powering The Camera System
Powering the camera system... -
Page 49: Power Supply
Power supply Power supply There are various ways to power your Leaf AFi digital camera system: A single battery solution, using a battery located in the handgrip A split supply solution using a battery in the handgrip and a second battery on the imaging module. -
Page 50: Inserting A Battery In The Handgrip
Powering the camera system Inserting a battery in the handgrip You must have a charged battery in the handgrip in order to use your camera system. Before using the camera system for the first time, charge the batteries for 12 hours. After the initial charge, charging the batteries takes just a few hours. - Page 51 Inserting a battery in the handgrip Pull the compartment drawer away from the camera as far as possible, and then pull the compartment drawer downward. Position the battery in the compartment drawer so that the flat side faces the camera body, and the terminals are at the top of the battery.
-
Page 52: Removing The Battery From The Handgrip
Powering the camera system Move the compartment drawer upward, and push it into the handgrip until it locks shut. Removing the battery from the handgrip Remove the battery from the handgrip to recharge the battery, or to store the battery separately from the camera system when it is not in use. -
Page 53: Attaching A Battery To The Imaging Module
Push the button on the underside of the Leaf AFi imaging module to remove the battery slot cover. Press the battery into the recess on the underside of the Leaf AFi imaging module, and then slide the battery across until it snaps into place. -
Page 54: Removing The Battery From The Imaging Module
Leaf AFi imaging module, you must manually switch off the imaging module when you shut down the Leaf AFi camera system and when the camera system enters power save mode. Attaching an external power adapter to the imaging module Attach the external power adapter provided to the imaging module when you want to optimize the power supply. -
Page 55: Tethered Power Management
Note: In addition to the external power supply, you need a charged battery in the handgrip. You can also use your FireWire cable to Insert the end of the external power adapter into the FireWire port on the Leaf AFi imaging module. power your imaging module when you shoot tethered. -
Page 56: Setting Tethered Power To Battery
Both the camera and the imaging module are now powered using the battery in the handgrip. As you shoot, your shots are sent to your computer. Important: The Tethered Imaging Poweris set to Battery until you change it. If you use your Leaf AFi camera system on a different computer, reset the Tethered Imaging Power to FireWire. -
Page 57: Handling Your Camera System
Handling your camera system... -
Page 59: Using The Viewfinder
Using the viewfinder Using the viewfinder Use the viewfinder to compose and focus your shots. A waist-level viewfinder equipped with a pop-up loupe is provided with the Leaf AFi camera system. Optional 45° prism and 90° viewfinders are also sold separately. - Page 60 Handling your camera system Changing the viewfinder You can change the viewfinder according to your preference. Press the viewfinder release buttons on each side of the camera, and pull the attached viewfinder off the camera body. Store the viewfinder in a safe place. Place the second viewfinder horizontally on the top of the camera, and press the viewfinder downward.
- Page 61 The pop-up loupe opens and locks in place. Changing the focusing screen and mask The Leaf AFi camera system comes with an AF High D focusing screen. You can switch the screen with other optional Leaf AFi camera system screens, according to preference.
- Page 62 Handling your camera system Slide out the viewfinder screen. If there is a mask, slide it out as well. Slide in the new focusing screen and mask between the springs and the tabs. Note: The matte side of the focusing screen should face down. Push down the viewfinder frame until it clicks.
- Page 63 Replacing the diopter lens in the 45° prism viewfinder Put one hand under the pop-up loupe, and support it on both sides of the diopter lens. Grasp the top of the diopter bayonet ring, and rotate the ridged tabs approximately 30° counterclockwise.
-
Page 64: Attaching A Lens
Tighten the retaining ring with the small screwdriver. Attaching a lens ® Note: The Leaf AFi camera system is compatible with all PQ and PQS lenses built for the Rollei 6008 camera. Press the lens release button, and rotate the body cap counterclockwise to remove the cap on the Attach lenses to the front of the camera system. -
Page 65: Removing A Lens
Important: If you use an extension tube, teleconverter, retro adapter, or bellows attachment with the Leaf AFi camera system, always remove the lens and accessory together from the camera body before releasing the lens from the accessory. Do not connect or disconnect the lens and the accessory while the tube is attached to the camera body. - Page 66 Note: Use the covers provided to protect the back of the camera and the front of the Leaf AFi imaging module when the imaging module is detached from the camera body and not in use.
-
Page 67: Adjusting The Handgrip Position
Adjusting the handgrip position Adjusting the handgrip position The handgrip can be locked in one of four positions. You cannot remove the handgrip. Holding the Leaf AFi camera system securely, push up and hold the handgrip release button. -
Page 68: Attaching The Neck Strap
Handling your camera system Rotate the handgrip to any of the positions. Release the handgrip release button. The handgrip locks into place. Attaching the neck strap The neck strap has a metal lug at each end for securing it to the camera system. Remove the imaging module from the camera body. - Page 69 Attaching the neck strap Hold one of the neck strap lugs so that the bend at the top of the lug is facing outwards. Insert the lug into one of the slots located on the side of the camera. Push the metal lug down until you hear a click. Note: If you do not hear a click, wiggle the lug until you hear the click.
-
Page 70: Removing The Neck Strap
The neck strap comes off the camera. Attaching the handgrip strap Use the handgrip strap to help you hold the Leaf AFi camera system. Use a small, thin object such as the stylus to release the lug bolts. The handgrip strap is attached to the camera in two places by lug bolts. -
Page 71: Removing The Handgrip Strap
Removing the handgrip strap Removing the handgrip strap You need a small, thin object such as the stylus to release the lug bolts. The handgrip strap is attached to the camera in two places by lug bolts. Insert the end of the stylus into the lug bolt hole, push the bolt all the way in, and maintain pressure on the stylus. -
Page 72: Locking The Mirror
Handling your camera system Locking the mirror Lock your camera's mirror into the up position to increase shooting speed, to avoid vibrations that might occur when the mirror moves, to shoot with Live View in tethered mode, or to clean the inside of the camera. -
Page 73: Tripod Plate
Your camera system is equipped with two tripod sockets, 1/4 inch and 3/8 inch. The camera's 3/8 inch socket comes with a 1/4 inch insert. The tripod plate on the bottom of the Leaf AFi camera system is designed to be clamped on a Novoflex ®... -
Page 74: Turning Off The Camera System
Handling your camera system Set the power dial to single shot, continuous, or—for advanced settings—the red dot. Note: If you set the power dial to the red dot for advanced settings, set exposure bracketing, focus bracketing, the self-timer, or to shoot continuously with the mirror locked up. Briefly push the shutter release button to prepare the camera for use. -
Page 75: Taking A Shot
Taking a shot Taking a shot Push the shutter release button to take a shot. Busy symbol: Do not take a shot when the busy symbol is displayed on the imaging module. Push the shutter release button down all the way. The indicator light on the top of the imaging module blinks orange. - Page 76 Handling your camera system...
-
Page 77: Adjusting Settings For A Shoot
Adjusting settings for a shoot... -
Page 79: Choosing The Shots Folder For Your Shoot
Assigning a base name for your files Define a base name for your shots so that the Leaf AFi camera system will apply the name to all shots, adding a number in sequence each time, until you define a new base name. - Page 80 Adjusting settings for a shoot Tap File name. Tap kbd. On the virtual keyboard, tap a base name for the shot, and then tap ok.
-
Page 81: Shooting With Lossless Compression
Tap ok. Defining the camera in the imaging module If you use the imaging module on a camera other than the Leaf AFi camera, define which camera so that the camera-related settings are automatically adjusted in the imaging module. This task is performed on the Leaf AFi imaging module, in Camera view. -
Page 82: Selecting A Gray Balance Setting For Your Shoot
Selecting a gray balance setting for your shoot Select a gray balance setting for your shoot that suits the lighting you are using. This task is performed on the Leaf AFi imaging module, in Camera view. Scroll down and tap Gray Balance. - Page 83 Setting gray balance Take a shot that includes a gray card, or make sure that it has a neutral gray area in the shot. The shot appears on the imaging module. If the gray area is not large enough to accurately select a neutral spot in full-screen view, use...
-
Page 84: Setting The Develop Curve
Setting the develop curve Select a develop curve setting for your shoot that suits the shooting conditions. This task is performed on the Leaf AFi imaging module, in Camera view. Tap Develop Curve. Tap the develop curve setting and tap ok. -
Page 85: Setting Shots To Appear With Overlays
Setting shots to appear with overlays Set whether your shots appear on the imaging module with the image information and histogram showing. This task is performed on the Leaf AFi imaging module, in Setup view. Tap Shoot View Options. Tap On Shoot. -
Page 86: Setting Shots To Appear In Full-Screen View
Set your shots to appear on the imaging module with the menu buttons hidden for a full-screen view of your shots as you shoot. This task is performed on the Leaf AFi imaging module, in Setup view. Tap Shoot View Options. -
Page 87: Adding A Description And Copyright Information To Your Shots
Add a description and copyright information to your shots to facilitate image management and copyright protection. This task is performed on the Leaf AFi imaging module, in Camera view. Scroll down and tap Notes. Tap the area where you want to add information—the Description area or the Copyright Notice area. - Page 88 Adjusting settings for a shoot...
-
Page 89: Setting The Exposure
Setting the exposure... -
Page 91: Setting The Iso
The camera settings that you specify are applied to all future shots. Metering system Your Leaf AFi camera system uses seven different sensors to measure exposure. There are two sensors at the top of the frame, one in the center, and two pairs of sensors at the bottom. The camera system's microprocessor assigns different weights to the measurements of the various sensors according to the metering mode that you select. - Page 92 Setting the exposure The multizone metering method assigns a weight of 33.33% to the two upper sensors, and 66.66% to the four lower sensors. Center-weighted metering In the center-weighted metering mode, the camera system uses all seven sensors to measure light intensity. The center-weighted metering method assigns a weight of 50% to the central sensor, and 50% to the remaining six sensors.
- Page 93 Metering system Spot metering In the spot metering mode, the camera system uses the central sensor to measure light intensity of one spot in the scene (about 1% of the viewfinder area).
-
Page 94: Selecting A Metering Mode And Taking A Reading
Setting the exposure Selecting a metering mode and taking a reading Select a light metering mode that best fits the lighting conditions, and take a light reading. Set the metering mode switch to the desired mode. -
Page 95: Setting Exposure Metering Activation
Setting exposure metering activation Push the shutter release button until it reaches the halfway position and you encounter light resistance. The camera system measures the light and stores the reading as long as you hold the shutter release To lock the button in the halfway position. -
Page 96: Exposure Modes
Setting the exposure Push the options button to close the Options menu. Exposure modes Move the AE switch to select from a range of exposure modes. Option Meaning Description Program autoexposure The camera system automatically selects the optimal aperture and shutter combination. - Page 97 Exposure modes Option Meaning Description Red dot Advanced While holding down the AE button, you can use the rear dial to set options for exposure: MANUAL (Manual setting of exposure control) APERTURE PRIO. (Aperture priority exposure control) SHUTTER PRIO. (Shutter priority exposure control) PROGRAM (Program autoexposure) BULB: the shutter opens for as long as you hold the shutter release button, to a maximum of 32 seconds.
-
Page 98: Selecting An Exposure Mode
Setting the exposure Selecting an exposure mode Use the AE switch to select an exposure mode. Move the AE switch to select the desired exposure mode. Note: If you are working with non-AFD lenses, you must set the aperture ring to A for the automatic functions (program, aperture priority, and shutter priority) to work. -
Page 99: Locking The Exposure Setting And The Autofocus
Locking the exposure setting and the autofocus Still holding the shutter release button halfway, push and hold down the AE button. The exposure is locked. Release the shutter release button. Position the camera and take a shot of the desired subject. When you press the shutter release button halfway, the camera autofocuses for the shot. -
Page 100: Setting The Ev Compensation
Setting the exposure Setting the EV compensation Set the EV compensation when you want to override the camera's autoexposure. Push the metering mode button, and rotate the rear dial to set the amount of EV compensation. You can compensate +/-5 EV in one-third stop increments. The EV compensation is shown on the handgrip and viewfinder display. - Page 101 Setting the self-timer set to aperture priority, the shutter is adjusted automatically for the bracketed exposures. When the camera is set to program mode, the camera selects a new aperture, a new shutter speed, or both to give the bracketed exposures. Set the power dial to the red dot.
- Page 102 Setting the exposure Rotate the front dial to set the amount of time that you want to delay before taking the shot, from ¼ second to 2 minutes, 8 seconds. To cancel the Release the shoot options button. self-timer once it has been activated, push The self-timer is set.
-
Page 103: Focusing The Camera
Focusing the camera... -
Page 105: Focus Modes
Focus modes Focus modes Select an automatic or manual focus mode or advanced autofocus options. Mode Meaning Description Single The camera automatically focuses on an object until the sharpest focus is achieved. Continuous The camera automatically continues to focus on an object for as long as you keep the shutter release button pushed halfway down. -
Page 106: Shooting With Single Autofocus
Focusing the camera Shooting with single autofocus Shoot with single autofocus when you want the camera to automatically focus on an object until the sharpest focus is achieved. Set the AF switch to S. If the lens doesn't The single autofocus icon appears in the handgrip display. -
Page 107: Shooting With Continuous Autofocus
Overriding autofocus Shooting with continuous autofocus Shoot with continuous autofocus when you want the camera to automatically focus and continue to focus on an object for as long as you keep the shutter release button pushed halfway down. Set the AF switch to C. The continuous autofocus icon appears in the handgrip display. -
Page 108: Shooting With Manual Focus
Focusing the camera Shooting with manual focus Use manual focus when you want to control the focus yourself. Set the AF switch to M. Aim the camera at the subject. To focus automatically when you are in When the focus area is over the subject, adjust the lens focusing ring. manual focus mode, To help you focus, use the pop-up loupe in the waist-level viewfinder. - Page 109 Setting a focus trap Push and hold down the shoot options button, and rotate the rear dial to set Focus Trap in the handgrip display. Release the shoot options button. The focus trap icon appears in the handgrip display. Set the focus trap by manually focusing on a subject at the desired distance. Point the camera at subject that is outside the focus range.
-
Page 110: Focus Bracketing
Focusing the camera Focus bracketing Focus bracketing enables you to take a series of shots in which the plane of focus automatically shifts over a distance in each shot. Use focus stacking After you select the central focus point in your base shot, the camera calculates the depth of field based software to combine on the selected aperture and the lens. -
Page 111: Locking The Autofocus Without Locking The Exposure Setting
Locking the autofocus without locking the exposure setting Using the front dial, select the number of exposures in the series. If you are using a studio strobe or portable flash, it is recommended that you use a slow shutter speed to give the strobe or flash time to recycle. -
Page 112: Viewing The Depth Of Field
Focusing the camera Viewing the depth of field You can check the depth of field visually using the viewfinder. Note: You can also calculate the depth of field by making a visual calculation using the aperture numbers and distance scale of the lens. Push the depth of field preview button, and hold it down. - Page 113 Calculating depth of field Calculate the depth of field using the two distances marked on the lens barrel between the matching f-stop markings.
- Page 114 Focusing the camera...
-
Page 115: Evaluating Your Shots
Evaluating your shots... -
Page 117: Checking The Exposure
Checking the exposure by examining the histogram display size of your Examine the histogram to find out whether any parts of the shot are underexposed or overexposed. shot, double-tap the shot. This task is performed on the Leaf AFi imaging module, in Shoot view. Tap histog. - Page 118 Checking the exposure of a specific spot on the image Use the picker tool to check the exposure for a specific spot on the image. This task is performed on the Leaf AFi imaging module, in Shoot view. Tap histog.
- Page 119 Activate the exposure alarm to display a blinking mask over your shot showing the parts of the image that are underexposed, overexposed, or both. Use the mask to help you check the exposure of your shot. This task is performed on the Leaf AFi imaging module, in Shoot view. Tap over.
-
Page 120: Checking The Focus
Checking the focus of a shot at full-screen size Open an image to full-screen size to enlarge it for checking the focus or composition. This task is performed on the Leaf AFi imaging module, in Shoot view. Double-tap the shot that you want to view at full-screen size. - Page 121 Checking the focus of a shot by zooming in Zoom into your shot to get a close-up view, and to check the focus. This task is performed on the Leaf AFi imaging module, in Shoot view. Tap zoom Using the zoom options, examine your image and check the focus: To magnify the image area to 100%, tap 1:1 actual and then tap the image.
-
Page 122: Checking Composition Using The Grid
Checking composition using the grid Place a grid on your shot as an aid for composition and alignment of an image. This task is performed on the Leaf AFi imaging module, in Shoot view. Tap more and then tap grid. - Page 123 The grid appears over the image. Evaluate the composition. Moving the grid lines Move the grid lines to help you align your composition. This task is performed on the Leaf AFi imaging module, in Shoot view. Tap more and then tap gridset.
- Page 124 To move the grid lines 1 pixel at a time, tap the short arrows Changing the color of the grid lines Change the grid line color according to preference. This task is performed on the Leaf AFi imaging module, in Shoot view.
- Page 125 Continue to tap to cycle through available colors until the desired color appears. Setting grid attributes Select the number of grid lines and the line type. This task is performed on the Leaf AFi imaging module, in Setup view. Tap Shoot View Options.
-
Page 126: Viewing Information About Your Shot In Shoot View
Viewing information about your shot in Shoot view As you shoot, you can see the shot information and EXIF data of the shot for your reference. This task is performed on the Leaf AFi imaging module, in Shoot view. Tap info. -
Page 127: Browsing Through Shots In Shoot View
Browsing through shots in Shoot view Move from one shot to the next when you view images in Shoot view. This task is performed on the Leaf AFi imaging module, in Shoot view. Use these methods to move from one shot to the next: Tap more, and then tap the prev or next button. - Page 128 Evaluating your shots...
-
Page 129: Editing Your Images
Editing your images... -
Page 131: Accessing Edit View From Shoot View
Accessing Edit view from Shoot view While you shoot, you can easily access Edit view to edit your shots. This task is performed on the Leaf AFi imaging module, in Shoot view. Tap edit. You are now in Edit view. -
Page 132: Selecting A View Mode In Edit View
The folder is opened in Edit view. Selecting a view mode in Edit view Select how your shots are displayed in Edit view. This task is performed on the Leaf AFi imaging module, in Edit view. Tap more and then tap view. -
Page 133: Locating A Shot In Edit View
Locating a shot in Edit view Browse through your shots to locate a shot for editing. This task is performed on the Leaf AFi imaging module, in Edit view. Move from one shot to the next by doing one of the following: Tap the prev or next button. -
Page 134: Sorting Your Images
Any action that you perform, such as adding a note or deleting the shot, applies to the selected shot. Sorting your images Sort your images by name, time, or flag to make navigation easy when you are editing them on the imaging module. This task is performed on the Leaf AFi imaging module, in Edit view. Tap more. -
Page 135: Flagging And Annotating Images In Edit View
Add or edit a note and add a flag for one or more images at a time in Edit view. This task is performed on the Leaf AFi imaging module, in Edit view. Tap the image that you want to flag or annotate, and then tap flag or note. -
Page 136: Flagging And Annotating A Shot In Shoot View
Shoot and Edit view. This task is performed on the Leaf AFi imaging module, in Shoot view. Tap the image that you want to flag or annotate, and hold your stylus on the image until the flag, note, and delete buttons appear. -
Page 137: Viewing Information About Your Shot In Edit View
Viewing information about your shot in Edit view Viewing information about your shot in Edit view See information about the shot along with the shot This task is performed on the Leaf AFi imaging module, in Edit view. Tap more. Tap view. -
Page 138: Deleting An Image
Delete images if you no longer need them, and want to free up memory. You can also perform This task is performed on the Leaf AFi imaging module, in Edit view. You can also delete images in Shoot a quick format on your view the same way. -
Page 139: Accessing Shoot View From Edit View
Accessing Shoot view from Edit view While you edit your shots, you can easily access Shoot view to view your shots. This task is performed on the Leaf AFi imaging module, in Edit view. Tap the image that you want to view. - Page 140 Editing your images Tap more and then tap shoot. You can also double-tap the image to view it at full-screen size. The shot opens in Shoot view.
-
Page 141: Managing Files In Your Imaging Module
Managing files in your imaging module... -
Page 143: Resetting The File-Name Counter
If you have defined a base name for your shots, the file-name counter automatically numbers each shot that you take. You can reset the counter to zero at any time. This task is performed on the Leaf AFi imaging module, in Camera view. Tap File name. -
Page 144: Creating A Folder For Your Shots
Your shots are automatically saved to your CompactFlash (CF) card in portable mode. Create folders to store your shots in an organized manner. This task is performed on the Leaf AFi imaging module, in Camera view. Tap Shots Folder. Tap down. -
Page 145: Organizing Your Images In The Imaging Module
To create a subfolder, tap the new folder, tap open, and then tap new. Organizing your images in the imaging module Move your images between folders to manage your files stored on the CompactFlash card in the imaging module. This task is performed on the Leaf AFi imaging module, in Edit view. - Page 146 Managing files in your imaging module Tap the image that you want to move, and hold your stylus on it until the Multi and Move buttons appear on the image. To select more than one image, tap the Multi button, and then tap the images that you want to select.
-
Page 147: Download Images To Your Computer
CF card. Download images in one of two ways: By moving or copying directly the shots directly from your Leaf AFi imaging module when tethered By moving or copying the shots from the card using a CompactFlash card reader Downloading images directly from the imaging module Download your images to your computer directly from your imaging module. - Page 148 Managing files in your imaging module Downloading images when using a CF card reader As an alternative to downloading directly from your imaging module, you can also download your images from your CF card to your computer by using a CompactFlash card reader. Remove the CF card from your imaging module and place it in a CompactFlash card reader that is connected to your computer.
-
Page 149: Leaf Wiview: Working With Hp Ipaq Pocket Pc
Leaf WiView: working with HP iPAQ Pocket PC... -
Page 151: Leaf Wiview
Pocket PC. If the incoming shot interrupts your workflow, your changes are not saved unless you actively saved them before the shot arrived. Note: Avoid editing images or setting gray balance on the Leaf AFi camera system and iPAQ Pocket PC at the same time. -
Page 152: Changing The Pin For Wireless Connection On The Imaging Module
The wireless connection is activated, and the Bluetooth symbol is displayed. The connection is active while the imaging module is turned on until you set Wireless to Off, even if you turn your Leaf AFi camera system off and on again. -
Page 153: Establishing A Connection Between Your Ipaq And The Imaging Module
The first time you work with your camera system and your iPAQ, you must establish a connection between the two devices. Thereafter, the iPAQ connects to the imaging module whenever you start the Leaf WiView application, so long as the imaging module wireless connection is on. - Page 154 Leaf WiView: working with HP iPAQ Pocket PC To open the Leaf WiView application, select Start > Programs > Leaf WiView. Tap Setup, and then tap Wireless.
- Page 155 Establishing a connection between your iPAQ and the imaging module Tap Search. Wait while the Leaf WiView application searches for the imaging module. This process takes about 30 seconds. A list of available imaging modules appears.
-
Page 156: Changing The Name Of The Imaging Module
The iPAQ Pocket PC connects to the imaging module. Note: After the first time you have established a connection between your Leaf AFi imaging module and your iPAQ Pocket PC, the iPAQ connects to the camera system automatically. If your iPAQ does not connect to the imaging module automatically, repeat steps 2-7 of this procedure. -
Page 157: Evaluating Shots On The Ipaq
Using the virtual keyboard, tap a new name and tap ok. Evaluating shots on the iPAQ While another person is shooting with the Leaf AFi camera system, you can evaluate your shots in Shoot view on the iPAQ Pocket PC. -
Page 158: Editing With Leaf Wiview
Leaf WiView: working with HP iPAQ Pocket PC Editing with Leaf WiView While another person is shooting with the Leaf AFi camera system, you can edit your shots in Edit view on the iPAQ Pocket PC. Use the iPAQ to do the following: View shot information. -
Page 159: Changing The Interface Language In Leaf Wiview
186. Changing the interface language in Leaf WiView You can change the interface language on the iPAQ independent of the language on the Leaf AFi camera system. To change the iPAQ interface language, see Setting the interface language of the imaging module page 181. - Page 160 Leaf WiView: working with HP iPAQ Pocket PC Tap About. The Leaf WiView application About window displays the Leaf WiView version number. Tap the screen again to close the window.
-
Page 161: Tethered Shooting
Tethered shooting... -
Page 163: Tethered Mode
In the Camera Settings dialog box Camera list, select the camera that you are using, and click OK. Connect one end of the FireWire 800 cable to the to the FireWire port on the Leaf AFi imaging module, and the other end of the FireWire cable to your computer. - Page 164 Tethered shooting The connect icons in the Shoot panel and in the lower bar turn green, indicating that the camera system is successfully connected.
-
Page 165: Using Flash
Using flash... -
Page 167: Flash Adapter
Flash sync Flash adapter The Leaf AFi camera system uses optional SCA flash adapters for portable flash units. These SCA adapters enable you to use through the lens (TTL) mode. The Metz SCA 300 flash adapter was made for conventional film photography; the SCA 3562 flash adapter is for digital photography. -
Page 168: Setting The Flash Mode
Using flash Setting the flash mode Set the flash mode to trigger the flash as the shutter opens or to trigger the flash after the shutter opens. Push and hold the flash button, and rotate the front dial to set the flash synchronization: Select NORMAL SYNC to trigger the flash immediately as the shutter opens. -
Page 169: Setting Flash Ev Compensation
Setting flash EV compensation Setting flash EV compensation Adjust the intensity of your flash when using TTL mode by modifying the flash EV compensation setting. Push and hold the flash button, and rotate the rear dial to set the desired amount of EV compensation. You can compensate +/-3 EV. - Page 170 Using flash...
-
Page 171: Configuration And Preferences
Configuration and preferences... -
Page 173: Adjusting The Display For Lighting Conditions
Setting the contrast on the handgrip display Adjusting the display for lighting conditions Setting the contrast on the handgrip display Set the contrast of the handgrip display to be able to see the display in differing light conditions. Push the options button, and use the rear dial to select LCD CONTRAST. Use the front dial to select high contrast (00-16) or low contrast (48-63). - Page 174 Setting the brightness of the imaging module display Set the brightness of the imaging module display to be able to see the display in differing light conditions. This task is performed on the Leaf AFi imaging module, in Setup view. Tap Display.
- Page 175 Set the conditions under which you want the backlight on the imaging module to turn on. To save power, the backlight on the imaging module remains off when the imaging module is not in use. This task is performed on the Leaf AFi imaging module, in Setup view. Tap Display.
- Page 176 To save power, set the backlight on the imaging module to turn off after the camera system has been idle for a certain amount of time. This task is performed on the Leaf AFi imaging module, in Setup view. Tap Display.
- Page 177 Setting your camera to save power (sleep mode) Setting your camera to save power (sleep mode) Set your camera system to enter sleep mode when it is not in use. In sleep mode, your camera uses less power. Push the options button, and use the rear dial to select POWER SAVE. Use the front dial to select the amount of time that the camera system is inactive until it enters sleep mode.
-
Page 178: Setting Your Preferences
Setting the date and time Set the date and time when you receive your Leaf AFi camera system, when your clock changes for daylight saving time, or if you change time zones. This task is performed on the Leaf AFi imaging module, in Setup view. - Page 179 Tap the date and time unit you want to set, and then tap the digits on the virtual keyboard. Tap ok. Setting the owner information Enter your information to identify your imaging module. This task is performed on the Leaf AFi imaging module, in Setup view.
- Page 180 Configuration and preferences Tap Owner Information. Tap the area where you want to enter information. Use the virtual keyboard to enter the desired information, and tap ok.
- Page 181 Configuring the user button for Shoot view Setting the interface language of the imaging module Set the language used in the imaging module display. This task is performed on the Leaf AFi imaging module, in Setup view. Tap Interface Language. Tap the desired language.
- Page 182 Configuring the user button for Edit view You can set the user button to flag or to delete the selected image when you push the button in Edit view. This task is performed on the Leaf AFi imaging module, in Setup view. Tap User Button.
- Page 183 You can set a long press of the user button to turn the display on and off, or to lock and unlock the touch screen in order to avoid activating the imaging module by accidental taps. This task is performed on the Leaf AFi imaging module, in Setup view. Tap User Button.
- Page 184 You can set the volume of each of the sounds made by the imaging module: the ready to shoot signal, the sound made when you tap on the touch screen, and the sound made when you push the user button. This task is performed on the Leaf AFi imaging module, in Setup view. Tap Sounds.
- Page 185 Set the size of the crop mask that you can set to appear on your shots as you shoot. The crop size is applied to the image during processing. This task is performed on the Leaf AFi imaging module, in Camera view. Scroll down and tap Size.
- Page 186 Adjusting the transparency of the histogram and info bar Select the transparency of the histogram and the Info bar when displayed over a shot. This task is performed on the Leaf AFi imaging module, in Setup view. Tap Shoot View Options.
-
Page 187: Aligning The Touch Screen
Tap Display. Tap Align Touch Screen, and follow the instructions on the screen. Viewing the camera system firmware information View firmware version information for the Leaf AFi camera system control module, body, and mirror module. Push the options button. Rotate the rear dial until you reach the LEAF AFI firmware screen. -
Page 188: Viewing The Imaging Module Version Information
Configuration and preferences Viewing the imaging module version information View the version information for the imaging module. This task is performed on the Leaf AFi imaging module, in Setup view. Tap About. The imaging module version information is displayed. Locking the camera system controls Lock the front and rear dials on the handgrip and the imaging module touch screen to avoid changing your settings while you work. -
Page 189: Configuring A Press Of The Soft Key
Configuring a press of the soft key Configuring a press of the soft key You can set the soft key to lock and unlock the front and rear dials in order to avoid changing your settings accidentally. Push the options button, and use the rear dial to select CONTROLS. Use the front dial to select the desired option: Select KEY LOCK to lock the front and rear dials on the handgrip when you push the soft key. - Page 190 Configuration and preferences...
-
Page 191: Caring For Your Camera System
Caring for your camera system... -
Page 193: Tips For Handling Your Leaf Afi Camera System
When you need to put the camera system down while working, rest it on its left side or base side. Storing the camera system To protect your Leaf AFi camera system when you are not working, remove the battery, and store it in the suitcase provided in a cool, dry place. -
Page 194: Cleaning The Camera System
Caring for your camera system Cleaning the camera system Your Leaf AFi camera system is a precision instrument. Keep the camera system as clean as possible to enjoy reliable operation for many years to come. Avoid exposing your camera system to dusty environments, especially when you separate the components to attach other components or for cleaning. - Page 195 Important: To prevent contamination of the sensor, do not remove the protective IR filter glass. The protective IR filter glass can be replaced only by Leaf dealers or by the Leaf Service Center. If you remove the IR filter glass, the warranty on the Leaf AFi camera system is void.
- Page 196 Caring for your camera system Spray the protective IR filter glass with ionized nitrogen to remove large dust particles. Important: Never spray compressed air directly on the imaging module. Prepare the cleaning wipe to fit the width of the protective IR filter glass, as shown in the figure. Important: Do not touch any part of the cleaning wipe that will come in contact with the protective IR filter glass.
- Page 197 Cleaning the camera system Using tweezers, fold the cleaning wipe as shown: Dampen the cleaning wipe in the cleaning fluid, making sure that the wipe is sufficiently wet but not dripping. Important: Do not use a dry wipe to clean the IR filter glass because it can scratch the glass.
- Page 198 Repeat the circular motion until the protective IR filter glass is clean. Note: If you are unable to clean the IR filter glass, contact your local Leaf dealer. Discard the cleaning wipe after use. Important: Do not reuse cleaning wipes.
-
Page 199: Restoring The Camera's Factory Settings
When the handgrip display shows LENS UNLOCKED, release the lens release button. The factory settings are restored. Restoring the imaging module's factory settings Reset the imaging module to factory settings. This task is performed on the Leaf AFi imaging module, in Setup view. -
Page 200: Updating The Firmware
To obtain new features and enhance the functionality of your camera system, update it with the firmware versions that Leaf periodically provides. Pre-requisites: The Leaf Capture software must be open on your computer. Use the latest Leaf Capture version to load the latest firmware. You must have a fully-charged battery in the handgrip. - Page 201 Updating the firmware Connect your Leaf AFi imaging module to your computer with the FireWire cable. If a firmware update is available, this message appears: Click OK. The firmware is uploaded to your Leaf AFi camera system. Important: Do not disconnect the FireWire cable or turn off the camera system while the firmware is being updated.
- Page 202 Caring for your camera system...
-
Page 203: Troubleshooting
Troubleshooting... -
Page 205: Camera System Does Not Turn On
Pre-requisites: The Leaf Capture software must be open on your computer. Use the latest Leaf Capture version to load the latest firmware. You must have a fully-charged battery in the handgrip. - Page 206 The handgrip display lights up, and still appears blank. Release the four buttons. Use a FireWire cable to connect your camera system to your computer. A firmware compatibility message appears. Click OK. The firmware is uploaded to your Leaf AFi camera system.
-
Page 207: Camera System Turns Off Unexpectedly
Camera system turns off unexpectedly Important: Do not disconnect the FireWire cable or turn off the camera system while the firmware is being updated. Click OK. Turn the camera system off and then on again. The camera system operates as expected. Camera system turns off unexpectedly The camera may appear to be turned off when it is in power save mode, or have turned off if the battery level is too low. -
Page 208: Autofocus Lens Does Not Focus Automatically
When the power dial is no longer set to red dot, the self-timer is cancelled. Lens is triggered then locks The lens is triggered, and then locks. The lens is incompatible with the camera system. Non-PQ/PQS lenses are not compatible with the Leaf AFi camera system. To reset the Remove the lens from the camera system, and replace it with a compatible lens. -
Page 209: Unable To Take Meter Reading
When you look through the viewfinder, you are unable to see the scene. The mirror may be locked up, or the lens may be incompatible. Non-PQ/PQS lenses are not compatible with the Leaf AFi camera system. Push the mirror lock button to make sure that the mirror is down. -
Page 210: Unable To Change The Exposure Time And Aperture Settings
Troubleshooting Unable to change the exposure time and aperture settings When using a non-AFD lens, the exposure time and aperture settings are not adjusted on the handgrip display when you move the front dial. The lens aperture ring must be set to A. Turn and lock the lens aperture ring to A. -
Page 211: Underexposed Flash Shots
Shots appear black Underexposed flash shots Shots taken with flash appear underexposed. This can occur if the flash duration is longer than the shutter speed, or if the camera system is set to REAR SYNC. Change your settings to use a slower shutter speed or use a flash with a shorter duration. Change the flash setting to NORMAL SYNC. - Page 212 Troubleshooting...
-
Page 213: Reference
Reference... -
Page 215: List Of Menus
Camera view menu List of menus Camera view menu Overview of the imaging module Camera view menu items. Menu item Description Shots Folder Create and set the Shots folder for your shoot. File name Enter a base file name for your shots. Compression Save compressed shots. - Page 216 Quick Format Perform a quick format if you have been using the CF card with your Leaf AFi imaging module and you want to erase all the data on the card or if the card is not performing as expected.
- Page 217 Shoot View Options menu Display Set the brightness of the imaging module display, set when the backlight should come on and go off, and align the touch screen if it is not responding as expected. Sounds Set the volume of each of the sounds made by the imaging module. Wireless Turn on Bluetooth to enable wireless connection with your HP iPAQ Pocket PC.
-
Page 218: Options Button
Reference Auto-Rotation When the imaging module is rotated, set the shot to be automatically rotated as it appears on the imaging module display after you take the shot. Grid Setting Set the number of grid lines and the line type. Crop Masking Turn crop masking on and off. - Page 219 RE ACTIVATION Select the activation method for the camera exposure meter: MANUAL or RELEASE BTN. Leaf logo Splash screen. SOFTKEY FUNC Set the functionality of the soft key to KEY LOCK to lock the front and rear dials when the soft key is pressed. Note: LIVE VIDEO is for future use.
- Page 220 Reference User button Configure the imaging module user button's function when you are in Shoot view or Edit view or when you push and hold the user button. Shoot view Configure the camera's response when you push the user button in Shoot view. Function Option Description...
- Page 221 Lock / Unlock Touch Locks and unlocks the touch screen of the imaging Screen module Suitcase contents Your Leaf AFi camera system contains the items listed here. To avoid operation problems, use only the items supplied in the suitcase.
- Page 222 Reference For information on Leaf AFi camera system accessories, check the Leaf website or contact your dealer. For information on Rollei lens and accessory compatibility, check the Leaf website. Case for safe storage of your digital camera system Leaf AFi camera system 800 to 400 FireWire cable (4.5 m / 15 ft.)
- Page 223 Suitcase contents Car charger lead Two rechargeable lithium ion batteries Fast charger for lithium ion batteries 12V DC power supply Three AC cables (EU, US, and UK) Diffuser...
- Page 224 Reference Gray card Covers for the imaging module touch screen, digital back sensor and camera front and rear Neck and hand straps Stylus (spare) Cleaning supplies (cleaning wipes and tweezers)
- Page 225 Suitcase contents Leaf Capture software and documentation CD User Guide...
- Page 226 Reference...
- Page 227 Index Index EV compensation 100, flash AE switch 96, Center-weighted metering 92, EXIF AF button Cleaning Exposure AF lens camera chamber self-timer AF switch IR filter glass alarms 119, Alarms 119, outer surfaces bracketing Aligning the touch screen reflex mirror checking 117, 118, Annotating images 135, sensor...
- Page 228 Spot metering 93, external power adapter for tethered shooting 55, backlight Tethered mode 55, types of contrast Time and date PQ/PQS 64, 208, Leaf Capture Toggle exposure mode Program autoexposure Lens Touch screen, aligning attaching Tripod plate removing Q-Base system...
- Page 229 Index Viewfinder 27, 59, changing displays Volume Wireless 151, 152, connecting to iPAQ Pocket PC enabling setting the PIN WiView...
- Page 230 Index...
- Page 232 www.leaf-photography.com...
Need help?
Do you have a question about the AFi and is the answer not in the manual?
Questions and answers