Table of Contents
Advertisement
Advertisement
Table of Contents

Related Manuals for Stagg HEAD BANGER 10 SLI MHW HB10


Summary of Contents for Stagg HEAD BANGER 10 SLI MHW HB10
- Page 1 User Manual HEADBANGER10 SLI MHW HB10...
- Page 2 Table of Contents 1.BEFORE USAGE This package contains Unpacking Introduction Specifications Features 2.INSTALLATION Installation requirements Power Connection DMX Serial Data Link 3. OPERATION Menu Map Operating Instructions DMX Channels...
- Page 3 1. BEFORE USAGE This package contains 1x HeadBanger 10 • 1x Power Cable • 1x User Manual • Unpacking • Thank you for purchasing this product, it has been thoroughly tested and has been shipped in perfect operating condition. •...
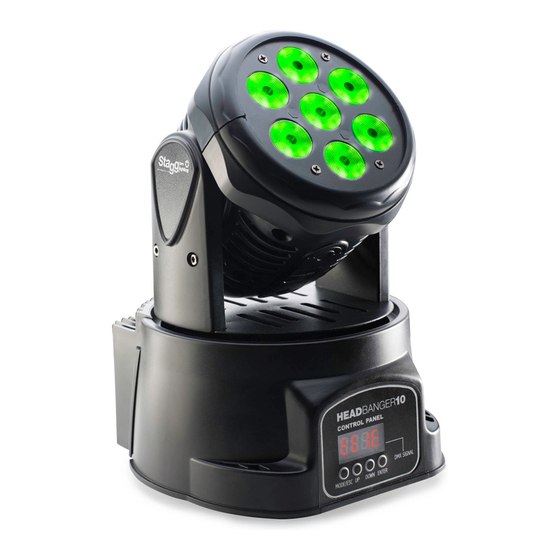
- Page 4 Specifications Voltage: AC100V 240V, 50-60Hz • Power Consumption: 80W • Light source: 7x 10W RGBW 4 in 1 LED • Beam angle: 25° • Max output @1m: 6100 Lux • PAN 540°, Tilt 270° with 16bit control • DMX channels: 7 or 12 DMX Channels •...
- Page 5 1. Connect the male 3pin DMX input of the first fixture to the female 3pin DMX output of the lighting controller using 110 Ohm DMX cable, for example a Stagg Commandor 10 (skip this step when not using a controller) 2.
- Page 6 3. OPERATION Menu Map ADDR DMX Adress A001-A512 CHND Channel Mode 7CH/12CH SLND Master/Slave NAST/SL1/SL2 SOUN Sound Sensitivity 0-100 AUTO Auto Mode NO/YES STBY Standby NO/YES PAN Reverse NO/YES TILT TILT Reverse NO/YES LED On/Off ON/OFF DISP Display On/Off ON/OFF TEST Self Test...
- Page 7 Operating Instructions Take note: All changes made to the unit become active and saved when the unit exits it's menu. This is activated by not touching the control buttons for 5 seconds. The unit will then display the active running mode (NST/SL1/SL2 for Sound Control, AUTO for Automatic Programs or the DMX address when DMX input is detected).
- Page 8 AUTO - Automatic Programs Setup • Press MENU, then Up or DOWN until "AUTO" is displayed, then press ENTER • "Yes": When this option is selected, the HeadBanger 10 will run automatic programs if there is no DMX input signal detected. •...
- Page 9 DISP - Display Inversion • Press MENU, then UP or DOWN until "DISP" is displayed, then press ENTER • By pressing ENTER, the unit's display can be inverted so that when the light is hung upside-down, the display will still be properly readable by the user. TEST - Self-Test •...
- Page 10 12 Channels Mode CHANNEL VALUE FUNCTION Stop 1~255 Adjust Pan Stop 1~255 Adjust Pan fine Stop 1~255 Adjust Tilt Stop 1~255 Adjust Tilt fine 0~10 Close 11~255 Dimmer Close 1~255 Close 1~255 Green Close 1~255 Blue Close 1~255 White Close 10~255 Color Macros...
- Page 11 ...
- Page 12 IMPORTANT SAFETY INSTRUCTIONS READ AND KEEP THESE INSTRUCTIONS. HEED ALL WARNINGS. • If, after you have followed the instructions outlined above, this device fails to function, please contact your dealer. Under no circumstances should this device be opened. Leave all servicing to qualified personnel.
Need help?
Do you have a question about the HEAD BANGER 10 SLI MHW HB10 and is the answer not in the manual?
Questions and answers