Table of Contents
Advertisement
Quick Links
Advertisement
Table of Contents

Related Manuals for Widex PA-440


Summary of Contents for Widex PA-440
- Page 1 User’s instructions PA-440 Receiver-in-canal...
- Page 2 We furthermore reserve the right to make any changes considered necessary. Hearing aids, accessories and batteries should not be disposed of with normal household waste. Please consult your na- tional Widex distributor for advice on how to dispose of these items.
-
Page 3: Table Of Contents
Contents Thank you..........6 Hearing aid with an open ear-tip . -
Page 4: Thank You
❑ Closed ear-tip ❑ Open ear-tip ❑ Custom ear-tip We hope you will be pleased with your new Widex hearing aid. Important Unless otherwise indicated, the information provid- ed in this booklet applies to all three ear-set types. In... -
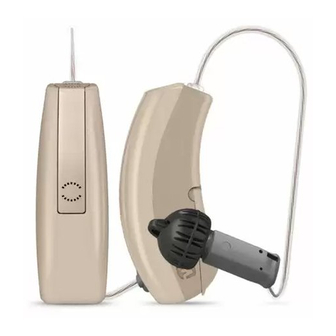
Page 5: The Hearing Aid
General The hearing aid Right/left identification If you wear hearing aids on both ears, it is a good idea The illustration below shows the hearing aid without to ask your hearing care professional to put coloured the ear-set. marks on the hearing aids (red mark = right and blue mark = left). -
Page 6: The Battery
General The battery Inserting the battery Before inserting a new battery in We recommend Zinc Air batteries. Use a size 10 bat- the hearing aid, remember to re- tery for your hearing aid. move the adhesive tab. Once the tab has been removed, the battery To obtain replacement batteries, please consult your will start functioning after a few hearing care professional. -
Page 7: Low Battery Indication
General Place the battery in the drawer as illustrated, so that Low battery indication the plus (+) sign on the battery is facing in the direction In the standard setting, the hearing aid will produce a indicated by the small plus (+) sign on the round bat- spoken message when the battery is nearly exhausted tery holder (see the long arrow in drawing 1). -
Page 8: Turning The Hearing Aid On And Off
General Turning the hearing aid on and off Changing the microphone grid The battery drawer of your hearing aid also functions The microphone grid is available in different variants. as the on/off switch. For further information about selection and how to change the grid, please contact your hearing care pro- Close the battery drawer to turn on fessional. -
Page 9: Possible Start-Up Settings
General Possible start-up settings Fine tuning volume The hearing aid can be set to start up in two different Ordinarily, you cannot fine tune the volume in your ways: hearing aid. • In the standard start-up setting, the hearing aid min- However, if you have a remote control for your hearing imises whistling while it is being placed on the ear. -
Page 10: Remote Control
General Remote control Listening programs - an alternative way of operating the hearing aid. Ordinarily, your hearing aid has one listening program (Master). A remote control is an accessory for the hearing aid. It gives you a However, if you have a remote control for your hearing number of additional options, such aid, you can have several listening programs intended as adjusting the volume or chang-... - Page 11 General You can choose from the following programs: The Zen program may be used with amplification so both the surrounding sounds and the Zen tones are Master: Standard program heard together. Or, it may be used alone (without am- plification) in quiet when you are not required to hear Acclimatisation*: Has the same features as the Master surrounding sounds.
-
Page 12: Switching Between The Listening Programs
General Using a telephone Switching between the listening programs If you have access to several programs via a remote When using a telephone, we rec- control, a spoken message will sound in the standard ommend that you hold the tele- setting each time you switch to another program (see phone against your head at an an- page 9). -
Page 13: Hearing Aid With A Closed Ear-Tip
Hearing aid with a closed ear-tip Hearing aid with a closed ear-tip Right/left identification The earwire is available in different The ear-set consists of the following parts: lengths for the right and left ear, 1. Earwire respectively. The individual size is 2. -
Page 14: Placing The Hearing Aid And Closed Ear-Tip
Hearing aid with a closed ear-tip Placing the hearing aid and closed ear-tip Removing the hearing aid and closed ear-tip Place the hearing aid behind Remove the hearing aid from its the ear, so that the earwire position behind the ear. rests comfortably on the ear, close to your head. -
Page 15: Cleaning
Hearing aid with a closed ear-tip Cleaning The hearing aid Clean the hearing aid with The following cleaning accessories are available for the the provided cloth after use. hearing aid and ear-set. Never use water or cleaning solutions to clean the hear- 1. - Page 16 Hearing aid with a closed ear-tip The ear-tip If necessary, the ear-tip can – First change the NanoCare wax when disconnected from the guard (see pages 60-63) and rest of the ear-set – be rinsed then use the holder to push the thoroughly in lukewarm water.
-
Page 17: Changing The Ear-Set
Hearing aid with a closed ear-tip Changing the ear-set The ear-tip Remove the ear-tip from the earwire by pushing the re- The ear-set should be changed as required. The life of ceiver out of the ear-tip as described on page 30. an ear-set is individual and depends on a number of factors, such as how much the hearing aid is used and Place the new ear-tip on the ear-set. -
Page 18: Earwire And Ear-Tip Size
Hearing aid with a closed ear-tip Earwire and ear-tip size Pull the pointed end of the an- chor through the upper hole on The ear-set must fit your ear exactly. It is important to the receiver located at the end choose the correct earwire length and ear-tip size in or- of the earwire. - Page 19 Hearing aid with a closed ear-tip The anchor can also be trimmed to fit your ear: The anchor loop has the correct size when it supports the position of the ear-tip in the ear canal, and the ear- Pull the pointed end of the an- set sits securely in and on the ear.
-
Page 20: Hearing Aid With An Open Ear-Tip
Hearing aid with an open ear-tip Hearing aid with an open ear-tip Right/left identification The earwire is available in different The ear-set consists of the following parts: lengths for the right and left ear, respectively. The individual size is 1. Earwire printed on the ear-set (see arrow). -
Page 21: Placing The Hearing Aid And Open Ear-Tip
Hearing aid with an open ear-tip Placing the hearing aid and open ear-tip Make sure that the anchor is positioned correctly, so that the position of the ear-set is secured. Place the hearing aid behind the ear, so that the earwire Check at regular intervals that the hearing aid and the rests comfortably on the ear, ear-set are positioned correctly. -
Page 22: Removing The Hearing Aid And Open Ear-Tip
Hearing aid with an open ear-tip Removing the hearing aid and open ear-tip Cleaning Remove the hearing aid from its The following cleaning accessories are available for the position behind the ear. hearing aid and ear-set. 1. Cloth 2. Brush Carefully pull the ear-tip out of the ear canal, while holding the lower part of the earwire. -
Page 23: The Hearing Aid
Hearing aid with an open ear-tip The hearing aid The ear-tip Clean the hearing aid with If necessary, the ear-tip can be the provided cloth after use. rinsed. Never use water or cleaning solutions to clean the hear- Disconnect the ear-tip from the ing aid. -
Page 24: Changing The Ear-Set
Hearing aid with an open ear-tip Changing the ear-set The ear-tip Pull the ear-tip off the earwire. The ear-set should be changed as required. The life of the ear-set is individual and depends on a number of Place a new ear-tip on the earwire. It is very important factors, such as how much the hearing aid is used and to ensure that the ear-tip is firmly secured. -
Page 25: Earwire And Ear-Tip Size
Hearing aid with an open ear-tip Earwire and ear-tip size Pull the pointed end of the an- chor through the upper hole on The ear-set must fit your ear exactly. It is important to the receiver located at the end choose the correct earwire length and ear-tip size in or- of the earwire. - Page 26 Hearing aid with an open ear-tip The anchor can also be trimmed to fit your ear: The anchor loop has the correct size when it supports the position of the ear-tip in the ear canal, and the ear- Pull the pointed end of the an- set sits securely in and on the ear.
-
Page 27: Hearing Aid With A Custom Ear-Tip
2. Receiver (placed inside the custom ear-tip) 3. Custom ear-tip with extraction cord The custom ear-tip has ”Widex” 4. Connector printed on it (see arrow). Red print 5. NanoCare wax guard indicates that it is for the right ear 6. -
Page 28: Placing The Hearing Aid And Custom Ear-Tip
Hearing aid with a custom ear-tip Placing the hearing aid and custom ear-tip Removing the hearing aid and custom ear-tip Insert the custom ear-tip in the ear canal while holding the low- Remove the hearing aid from its er part of the earwire. It may also position behind the ear. -
Page 29: Cleaning
Hearing aid with a custom ear-tip Cleaning The hearing aid Clean the hearing aid with The following cleaning accessories are available for the the provided cloth after use. hearing aid and ear-set. Never use water or cleaning solutions to clean the hear- 1. -
Page 30: If The Earwire Needs To Be Replaced
Hearing aid with a custom ear-tip If the earwire needs to be replaced The custom ear-tip Important: The custom ear-tip, in which the receiver is Changing the earwire for the custom ear-tip requires placed, must never come into contact with water. special tools and experience. -
Page 31: Nanocare Wax Guard
General NanoCare wax guard Changing the NanoCare wax guard Hearing aid with a closed ear-tip The NanoCare wax guard helps protect the hearing aid The wax guard can be changed with or without the ear- against earwax. Always use NanoCare wax guards with tip attached to the earwire. - Page 32 General 3. Now turn the holder around After inserting the new wax so that the used wax guard is guard, discard the holder with away from the receiver and the used wax guard attached to the new one is in position to the removal hook.
-
Page 33: In Case Of Malfunction
General In case of malfunction Problem Potential cause Solution Problem Potential cause Solution The hearing The hearing aid is Make sure the battery The hearing The battery is Insert a new battery in aid volume is nearly exhausted the hearing aid aid is dead not turned on drawer is closed... -
Page 34: Caring For Your Hearing Aid
Replace the secured in the ear-tip. If the problem • In environments with high humidity, a Widex drying ear-tip persists, contact your kit may be used daily to reduce the amount of mois- hearing care ture inside the hearing aid. -
Page 35: Good Advice
Also keep batter- • Widex hearing aids are not certified for use in mines ies out of children’s reach and discard used batteries or other areas with explosive gases. -
Page 36: Your Hearing Aid
General Your hearing aid • The hearing aid will not restore normal hearing but can help you make best possible use of your remain- (To be filled out by the hearing care professional) ing hearing ability. However, you should be aware that it takes time to get used to a new hearing aid Date: _______________________ and new sounds. - Page 37 Printed by HTO / 2009-05 ¡9 514 0126 001r¤ ¡#01v¤ 9 514 0126 001 #01...
Need help?
Do you have a question about the PA-440 and is the answer not in the manual?
Questions and answers