Table of Contents
Advertisement
Quick Links
Download this manual
See also:
User Manual
Advertisement
Table of Contents

Related Manuals for Plextalk POCKET PTP1

Summary of Contents for Plextalk POCKET PTP1
- Page 1 PLEXTALK POCKET PTP1 version 6 User's Guide for U.S. English ©2008 Shinano Kenshi Co., Ltd.
-
Page 2: Important Notices
FCC NOTICE Declaration of Conformity Model Number: PTP1 Trade Name: PLEXTALK Responsible party: Shinano Kenshi Co., Ltd. Address: 1078, Kami-maruko, Ueda-shi, Nagano-ken 386-0498 JAPAN This device complies with Part 15 of the FCC Rules; Operation is subject to the following... - Page 3 This digital apparatus does not exceed the Class B limits for radio noise emissions from digital apparatus set out in the Radio Interference Regulations of the Canadian Department of Communications. This class B digital apparatus complies with Canadian ICES-003. Cet appareil numerique de la classe B est conforme a la norme NMB-003 du Canada. CAUTION: Use of controls or adjustments or performance of procedures other than those specified herein may result in hazardous radiation exposure.
-
Page 4: Table Of Contents
2.6.1. Unit care ......................22 2.6.2. Battery care ......................22 2.6.3. Crossed-out dustbin mark................... 23 2.7. Turning PLEXTALK on and off .................. 23 2.8. Key Describer function ....................24 2.9. Key Lock function ...................... 24 2.10. Inserting and ejecting SD card ................24 3. - Page 5 6.16.3. Navigating to bookmarks .................. 39 6.16.4. Clearing bookmarks ..................40 6.16.5. Turning on and off Voice Bookmark speech ............. 41 6.17. Understanding how PLEXTALK groups files and folders ........41 7. Playing DAISY titles ....................... 42 7.1. Heading navigation ....................42 7.2.
- Page 6 10.6. Playback mode ......................53 11. Playing Audio Book ..................... 54 12. Recording a DAISY title ....................55 12.1. Basic information about recording with PLEXTALK ..........55 12.2. Recording hardware ....................55 12.3. Recording media ..................... 56 12.4. Recording states ..................... 56 12.5.
- Page 7 18.1. Connecting to the wireless network ................. 79 18.1.1. Enable wireless network device ................ 79 18.1.2. Confirm available wireless network and connect ..........79 18.2. How PLEXTALK connects to a network ..............81 18.3. Advanced Network settings ..................81 18.3.1. Confirming network information ................ 81 18.3.2.
- Page 8 21.4. Finish Network Folder ..................... 95 22. Using PLEXTALK as an external drive ..............96 22.1. What can PLEXTALK be used for when connected to a personal computer? ..96 22.2. Connecting PLEXTALK to a computer ..............96 22.3. Disconnecting PLEXTALK from a computer ............97 23.
- Page 9 4. Available recording time for the specified sound qualities .......... 113 Appendix E: Questions and Answers on Network setting ........... 115 Appendix F: List of entering characters ............... 117...
-
Page 10: Safety Precaution And Legal Information
1.1. Important safety information Failure to follow these safety instructions could result in fire, electric shock, or other injuries, or damage to PLEXTALK or other property. Read all the safety information below before using PLEXTALK. The symbols below differentiate the level of danger. - Page 11 PLEXTALK. Otherwise, it may cause fire, electric shock or malfunction. If liquids or foreign object enter the PLEXTALK, turn off the power immediately, disconnect the power plug from the power outlet, remove the battery and contact your dealer.
- Page 12 If the cable get damaged, it may cause fire or electric shock. ! WARNING Make sure that the PLEXTALK, mains adapter and mains plug are securely connected. Otherwise, it may cause fire or electric shock. ! WARNING Wipe off any dust that accumulates on the power plug regularly.
- Page 13 If the medical facility or airplane has specified zones where use or possession of signals of mobile devices is prohibited, do not use the PLEXTALK. ! CAUTION Do not use the PLEXTALK near machinery occurring with a strong electromagnetic wave. Otherwise, it may cause malfunction. < Adverse effect on human body >...
-
Page 14: Legal And Copyright Information
! CAUTION Wipe dust and dirt from the PLEXTALK with a soft cloth dampened slightly with a diluted neutral detergent, then wipe dry with a cloth. If you wipe the equipment with alcohol, paint thinner or benzine, the surface of the equipment may be worn or torn . -
Page 15: Restrictions On Copying Or Recording
< General information > This PLEXTALK device is designed to help you record and reproduce sound works, to which you own the copyright, or where you have gained permission from the copyright owner or the rightful licenser. - Page 16 foundation or contributors be liable for any direct, indirect, incidental, special, exemplary, or consequential damages (including, but not limited to, procurement of substitute goods or services; loss of use, data, or profits; or business interruption) however caused and on any theory of liability, whether in contract, strict liability, or tort (including negligence or otherwise) arising in any way out of the use of this software, even if advised of the possibility of such damage.
-
Page 17: Getting Started
2.2. What you get in the box Below is a list of all the items you should find in the box with your PLEXTALK. Please make sure that all items are included. If there are any missing items, please contact your local agent. -
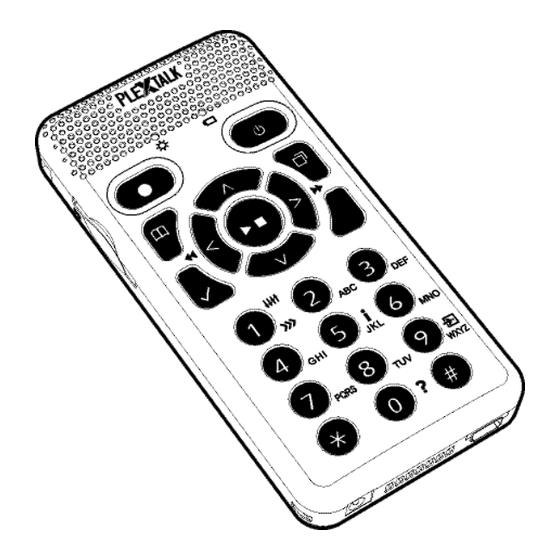
Page 18: Description Of The Unit
Turn the unit so that you are holding it with the keys uppermost and with the grill away from you. The PLEXTALK should now be set up in its normal operating position. Keep the unit in this position as the physical layout is described. -
Page 19: Top Edge
2.3.2. Top edge On the top edge of the PLEXTALK, there are 2 sockets - one towards the left side and one in the center. The socket on the left is for an external microphone and line in and the center socket is for headphones. -
Page 20: Right Edge
This is the USB socket. 2.3.6. Back face Carefully turn over your PLEXTALK and hold it face down in one hand, keeping the end with the grill away from you. In the center of the Back face, there are 2 raised ridges. These are at the top end of the battery cover. -
Page 21: Charging Plextalk
2.5. Charging PLEXTALK In order to charge the internal battery, you need to connect the PLEXTALK to the AC adaptor or to a computer using the supplied USB cable. Do this as follows: •Place the PLEXTALK face up in its normal operating position. -
Page 22: Maintenance And Battery Care
PLEXTALK for the first time, or after one month of storage, you should connect to a mains power supply for at least 24 hours. •If the PLEXTALK is not to be used for over a month, remove the battery and store it in a cool place with low humidity. -
Page 23: Crossed-Out Dustbin Mark
Our product is designed and manufactured with battery and accumulator components which can be recycled or reused. 2.7. Turning PLEXTALK on and off To turn the unit on or off, do the following:... -
Page 24: Key Describer Function
•To apply the lock, push the Key Lock switch towards the top of the unit. •To unlock the PLEXTALK, pull the Key Lock switch towards the bottom of the unit. 2.10. Inserting and ejecting SD card To insert the SD card, do the following:... - Page 25 •Insert the SD card into the card slot on the left edge of the unit. •Press the card all the way into the slot ensuring that it engages properly, with the outer edge flush with the body of the PLEXTALK. Do not use excessive force when doing so.
-
Page 26: Introduction To The Menu System
3. Introduction to the menu system A number of the features of the PLEXTALK are accessed through the built in menu system. This chapter aims to give you an understanding of how the menu is structured and how you access it. -
Page 27: Shortcut For The Menu Selection
•Press the Menu key and go to the menu item you want to register. •While pressing and holding the Menu key, press and hold your favorite Number Pad until confirmation sounds. Then the PLEXTALK will register the specific menu item with this number. -
Page 28: Setting Up Your Plextalk
Enter key. •Use the Left or Right key to select your preferred voice and confirm it by pressing the Enter key. PLEXTALK will make your selection the new default setting and will exit the menu system. -
Page 29: Selecting The Key Press Confirmation Sound
When the PLEXTALK is busy, such as when it is accessing a media, it plays a sound to indicate that it is carrying out that action. To select your preferred waiting sound, do the following: •Press the Menu key once to access the Main Menu. -
Page 30: Power Management Features
When the PLEXTALK is operating on battery power and the power level drops to a level where it needs to be recharged, the PLEXTALK will say "Low battery." Then player will shut down in one minute. If you wish to continue to use the PLEXTALK, you need to plug in the AC adaptor. -
Page 31: Setting The Sleep Timer
5.4.2. Cancelling the sleep timer To cancel the sleep timer, do the following: •Quickly press and release the Power key. The PLEXTALK will tell you that the sleep timer is currently on and the number of minutes remaining before shut down. -
Page 32: Playing Features Common To All Formats
6.1. Start and stop playback To start or stop playback, do the following: •To start playback, press the Play/Stop key. The PLEXTALK will start playback from the position where it was stopped previously. •To stop playback, press the Play/Stop key. -
Page 33: Changing The Playback Volume
Note: There are no functions of fast-forward and fast-rewind for playing web radio. 6.3. Changing the playback volume The volume can be set on a scale from 0 to 25, in steps of 1, with 0 being silent and 25 being the Highest possible setting. -
Page 34: Changing The Guide Volume
Note: Pressing and holding the Up or Down key, will cause the guide speed setting to change rapidly in the relevant direction. 6.8. Accessing the Navigation menu One of the most useful features of the PLEXTALK is the ability to choose how you want to navigate. To use the Navigation Menu, do the following:... -
Page 35: Selecting The Media And Title
At times you may wish to switch from using an SD card to the USB media or vice versa. You can do this as follows: •Press the Title key repeatedly until your desired media is announced. PLEXTALK will move sequentially through the available options: "SD card", "USB" and "Voice Memo". -
Page 36: How To Play Music
Down key once or twice to switch to the "title" level. The PLEXTALK will say "Select title". Use the Left or Right key to search the title you wish to play. -
Page 37: Switching Sorting Order Of Titles
•Use the Left or Right key to go to the "Media and title information" option and select it by pressing the Enter key. •PLEXTALK will announce the information on the current media and title. •When you have noted the relevant information, press the Enter key to exit the menu... -
Page 38: Getting Information On The Current Status
6.16. Using bookmarks 6.16.1. Types of bookmark There are 3 types of bookmark you can use in PLEXTALK as follows: •Numbered Bookmarks: You can insert up to 10000 Numbered Bookmarks. Each bookmark is assigned a unique number in the range 1 to 65000. -
Page 39: Inserting Bookmarks
Resume Bookmarks are inserted automatically by PLEXTALK when you move to a different title, album or file, or when you shut down the player. No action is required from you. -
Page 40: Clearing Bookmarks
•Use the Left or Right key to go to the "Clear all bookmarks in current title" option and select it by pressing the Enter key. •PLEXTALK will ask you to confirm this action. If you wish to proceed, press the Enter key and PLEXTALK will say "Deleted". -
Page 41: Turning On And Off Voice Bookmark Speech
Enter key to confirm your choice. 6.17. Understanding how PLEXTALK groups files and folders When PLEXTALK accesses the SD card or USB media, it automatically assesses the contents and groups items into "DAISY title", "Recordings", "Music", "Text", "Audio book", "Podcast"... -
Page 42: Playing Daisy Titles
Note: When navigating in this way, PLEXTALK will stop at all headings that have a level the same as or higher than the level you have selected. For example, if you chose to navigate on Level 3, PLEXTALK will find all Level 1, Level 2 and Level 3 headings as you move backwards or forwards. -
Page 43: Page Navigation
•Press the Number 0 key followed by the Enter key and the playing position will move to the end of the current title. 7.3. Page navigation Navigating to pages is very similar to heading navigation. To go direct to a specified page, do the following: •Press the GoTo key once. -
Page 44: Minutes Skip, 30 Seconds Skip
You can navigate by a percentage of the file. To navigate by percentage, do the following: •Press the GoTo key three times. •Type in a percentage between 0 percent and 100 percent, and press the Enter key. PLEXTALK will move the playback position to that position. 7.9. Navigating by keyword... -
Page 45: Playback Mode
•After you finish entering the keyword, press the Down key. •PLEXTALK will search for the keyword from the current position to the end of the file. If the keyword is found, PLEXTALK will play the line that contains the keyword. -
Page 46: Multimedia Daisy Playback Setting
You can select from two playback modes when using a DAISY title. The available options are as follows: •Normal playback: it plays through the title and stops when finished. •Repeat title: the current title will repeat continuously until playback is stopped. 7.11. -
Page 47: Playing "Recordings
DAISY titles placed in the "PlexRecording" folder are placed into the category called "Recordings". A title recorded with this PLEXTALK is automatically stored into the "PlexRecording" folder. Playback method of "Recordings" is the same as a DAISY title. Note: If you back up a "Recordings" title from SD card to USB device, it will be stored in the "PlexBackup"... -
Page 48: Playing Audio Files Or Music Cds
•AMR-WB+ Files. •Ogg Vorbis Files: from 45 kbps to 320 kbps CAUTION: PLEXTALK may not be able to play a Music CD that is not compliant with the CD digital audio (CD-DA) standard, such as copy-protected Music CDs. Note: PLEXTALK cannot be used to record or edit Audio Files on either SD cards or USB media. -
Page 49: Album Navigation
9.2. Album navigation You can either go to albums direct or you can move through the available albums one at a time. To go direct to a specified album, do the following: •Press the GoTo key twice. •Using the Number Pad, type in the number of the album you wish to go to. •Press the Enter key to confirm or the Cancel key to clear your entry. -
Page 50: Announcing Albums And Tracks By Name Or Number
•PLEXTALK treats file folders as albums and recognizes up to 8 hierarchies including root. •If a folder contains a DAISY book, PLEXTALK does not search the other contents under the folder. Note: When there are a large number of folders, PLEXTALK may take longer to read the SD card or USB information. -
Page 51: Playing Text Files
10. Playing Text Files PLEXTALK is able to play the Text Files by using synthetic voices. PLEXTALK supports following types of text files: •Plain text •Microsoft Word .doc, .docx •HTML •EPUB2 Note: Word file on external USB CD/DVD media are unable to play. -
Page 52: Navigating By Keyword
•Press the Play/Stop key to listen to the keyword you entered. •After you finish entering keyword, press the Down key. •PLEXTALK will search the keyword from the current position to the end of the file. If the keyword is found, PLEXTALK will play the line that contains the keyword. -
Page 53: Navigating By Page
10.4. Navigating by page •Press the GoTo key repeatedly to select page navigation. •Using the Number Pad, type in the number of the page you wish to go to. •Press the Enter key to confirm or the Cancel key to clear your entry. Note: Page navigation is only available in EPUB2 file. -
Page 54: Playing Audio Book
Create an "Audible" folder at the root of the SD card and store the ".aa" files in this folder. If there are other types of audio files than ".aa" in the "Audible" folder, PLEXTALK does not recognize these files. PLEXTALK handles an ".aa" file as one title. Therefore, an ".aa"... -
Page 55: Recording A Daisy Title
12. Recording a DAISY title PLEXTALK is able to record DAISY titles to an SD card or USB device. This chapter shows you the recording method and recording settings. Note: PLEXTALK is also able to record Voice Bookmarks and Voice Memos to internal memory. -
Page 56: Recording Media
This section highlights a number of issues that you should be aware of before recording. •With PLEXTALK, you can use an SD card or USB device to record and edit DAISY titles and you can erase and rerecord as many times as you want. -
Page 57: Basic Recording Technique
DAISY title, the PLEXTALK automatically starts the DAISY editing mode. PLEXTALK also starts this mode when you create a title or prepare to edit a DAISY title. When you want to finish the DAISY editing mode, do the following;... -
Page 58: Connecting And Selecting An Input Source
•If PLEXTALK says "External Microphone mode", this indicates that the "Select external audio input jack" setting is set for a microphone. •If PLEXTALK says "Line in mode", this indicates that the setting is set for a line in input. •If you have connected a microphone and PLEXTALK says "Line in mode", or if you have connected an audio cable and PLEXTALK says "External Microphone mode",... -
Page 59: Selecting A Recording Mode And Sound Quality Setting
Note: At this stage, PLEXTALK does not know if you have connected a microphone or an audio cable. The speech that you hear only indicates what the "Select external audio input jack" setting is currently set to. To change the external input source setting, do the following: •Press the Menu key to access the Main Menu. -
Page 60: Selecting A Preset Recording Mode
•Use the Left or Right key to go to the mode you want and select it by pressing the Enter key. •PLEXTALK will then offer you a chance to select a sound quality setting. Use the Left or Right key to move through the available options and select the one you want by pressing the Enter key. -
Page 61: Selecting The Custom Recording Mode
"Time to auto stop recording when no sound", "Trigger of starting recording" and "Background noise level of input sound". •PLEXTALK will speak the name of the parameter. Use the Left or Right key to go to the option you want and select it by pressing the Enter key. -
Page 62: Selecting The Title To Record Into
•Press the Record key to go into recording standby. •Whilst in recording standby, use the Left and Right keys to select which title you wish to record into. As you move right you will find that PLEXTALK generates a title called "New title". -
Page 63: Using The Level Monitor
•As you make the adjustments, PLEXTALK will announce the new recording level and will say either "Low", "Good" or "High" to indicate that the recording level is too low, about right or too high. You should aim to get PLEXTALK to say "Good" more often than "Low" or "High". -
Page 64: Turning The Recording Monitor On And Off
12.13. Turning the recording monitor on and off PLEXTALK enables you to monitor any recording as it is being made, so you can gauge how the recording will sound in the end. You can turn the recording monitor on or off in recording stand by, recording pause or during recording. -
Page 65: Editing A Daisy Title
•Use the Left or Right key to go to the "Set heading" option and select it by pressing the Enter key. •PLEXTALK will then tell you that you are about to set Heading XX and will ask you to set the position. -
Page 66: Cancelling A Heading Setting After Recording
•Use the Left or Right key to go to the "Remove section" option and select it by pressing the Enter key. •PLEXTALK will now ask you to select the first section to be removed. Use the Left or Right key to move back or forward in the title until you hear the section and select it by pressing the Enter key. - Page 67 •Finally, PLEXTALK will ask you to confirm that you wish to proceed. Press Enter to confirm the action or Cancel to abort. Note: If you only wish to remove a single section, simply press Enter on the same section for both the start section and end section and proceed as for removing multiple sections.
-
Page 68: Media Management Features
14. Media management features 14.1. Erasing an SD card or USB device PLEXTALK allows you to erase an SD card and USB device. To erase an SD card or USB device, do the following: •Press the Menu key once to access the Main Menu. -
Page 69: Deleting A File
•Use the Left or Right key to go to the "Delete the selected title" option and select it by pressing the Enter key. •PLEXTALK will then ask you to confirm that you wish to proceed. Press the Enter key to confirm or the Cancel key to abort. -
Page 70: Building A Daisy Title
•PLEXTALK will speak a message asking you if you wish to proceed. If you wish to continue, press the Enter key or press the Cancel key to abort the process. •During the process, PLEXTALK will speak progress messages and will announce when it is complete. -
Page 71: Using Plextalk's Voice Memo Functions
15. Using PLEXTALK's Voice Memo functions In addition to using PLEXTALK as a DAISY player, music player and as a DAISY recorder, you are also able to use it for recording simple Voice Memos. 15.1. Recording a new Voice Memo To record a new Voice Memo, do the following: •Press and hold down the Record key and speak the memo. -
Page 72: Back Up Voice Memos To Sd Card
•Use the Left or Right key to go to the "Delete the selected Voice Memo" option and press the Enter key. •PLEXTALK will ask you to confirm that you wish to continue. Press the Enter key again to continue or the Cancel key to abort. -
Page 73: Backup
•Press the Title key to Navigate to Voice Memo and press the Enter key. •Press the Number 9 key once to access the Backup feature. •PLEXTALK will ask you to confirm that you wish to continue with the backup. Press the Enter key to continue or the Cancel key to abort. -
Page 74: Backup A Title
Enter key to confirm your selection. •When backing up from a Music CD, PLEXTALK will ask you to which category you are going to backup, "Music" or "Audio Book". Use the Left or Right key to select your preferred category and press the Enter key. - Page 75 Note: All times are approximate. The backup time will depend on the size of the source title and numbers of files. It will also depend on the writing speed of the SD card.
-
Page 76: Entering Text
Character is confirmed after two seconds automatically. After selecting a character, the character is automatically confirmed after two seconds inactivity and PLEXTALK announces the character. Entering multiple characters mapped to a key continuously. To enter multiple characters mapped to a key without waiting two seconds, press the Right key to enter next character. -
Page 77: Entering Numbers By Number Mode
0 contains ?, _, =, and 0 Confirming entered characters. Press the Play/Stop key to listen to the entered text. Changing character type. To change type of characters, press the bookmark key to switch between "ABC mode", "Number mode" and "Symbol table". Note: If the input allows number only, the mode is not switched even if the bookmark key is pressed. -
Page 78: Moving Entering Position
17.4. Moving entering position Move back a character. Press the Left key to move back a character. Move ahead a character. Press the Right key to move ahead a character. Moving to the top. Press and hold the Left key to move to the top. Alternatively press the Star key and 5 key together. -
Page 79: Network Settings
Press the Left or Right key to confirm information on another network •If you select the network which is connecting and press the enter key, PLEXTALK disconnects the network and closes the Menu. From this time, PLEXTALK will not connect to this network automatically. - Page 80 •If "Enable" is selected, enter the address of the proxy server and press the Down key when the entering is finished. •Then enter a port number of the proxy server and press the Down key. PLEXTALK tries to connect to the wireless network.
-
Page 81: How Plextalk Connects To A Network
After the network function is not used for more than five minutes without AC adaptor power, it may take a few seconds to a few minutes at most for PLEXTALK to resume the network function. This is because PLEXTALK turned the network function into power saving mode and tries to reconnect to the network. -
Page 82: Loading Network Setting
This software is contained in the attached CD. 18.3.3. Saving the network setting Network settings in the PLEXTALK can be saved to the SD card or USB device for backup. To save settings, do the following: •Connect SD card or USB memory to the PLEXTALK. -
Page 83: Adding Wireless Network Setting
•Use the Left or Right key to go to "Save network settings" and press the Enter key. •PLEXTALK will ask you to confirm saving the setting file or not. Press the Enter key to proceed. The file is saved to the root of the SD card or USB device. To cancel, press the Cancel key. -
Page 84: Network Folder Setting
•Use the Left or Right key to select "Connect automatically at highest priority" or "Do not connect automatically" and press the Enter key. •PLEXTALK will ask whether to proceed or not. Press the Enter key to proceed or the Cancel key to abort. -
Page 85: Initializing Network Settings To Default
Enter key. •PLEXTALK announces the network devise name, user ID, and password. PLEXTALK will ask you whether you would like to change them. Press the Down key if you would like to change any one of them. •PLEXTALK will announce the network device name. If you accept the current name, just press the Down key. - Page 86 •Use the Left or Right key to go to "Initialize all network settings to default" option and press the Enter key. •PLEXTALK will ask you to confirm that you wish to reset the network setting. Press the Enter key to reset or the Cancel key to cancel.
-
Page 87: Podcast Receiver
After adding the list of your favorite Podcasts to PLEXTALK, you can download the updated audio files in the series. Audio files delivered from Podcast are hereinafter referred to as "Episode". -
Page 88: Registering Podcast Feeds Using Podcast Receiver Software
Note: The "PLEXTALK Transfer" software can transfer the opml file to the PLEXTALK. Select opml file from source list, then press "Send" button to transfer into the PLEXTALK. Note: You can also download the "PLEXTALK Transfer" software from the PLEXTALK web site. -
Page 89: Listening To Podcasts
•Use the Left or Right key to select your favorite podcast feed from "Podcast" category and press the Enter Key. •If the PLEXTALK will ask you to update the "episodes list", press the Enter key. Then the PLEXTALK starts downloading the latest list of the episodes. -
Page 90: Obtaining The Latest Episode List
•If selecting "10 minutes" or "30 seconds", press the Right key to move to 10 minutes or 30 seconds forwards. Use the Left key to move to 10 minutes or 30 seconds backwards. However, the destination always stays in an Episode. Note: Fast-forward and fast-rewind are also limited within an Episode. - Page 91 •To check the download progress, press the 5 key. You can confirm the number of Episodes left to download. •If you turn off the power during the download, the download will be cancelled. If you want to download the episode again, you need to try again.
-
Page 92: Web Radio Streaming
20. Web radio streaming You can listen to web radio on various web sites with PLEXTALK. You need to add the URL of your favorite web radio station to the playlist and access the site for streaming. 20.1. Adding web radio station to the playlist To listen to web radio, you have to register web radio stations in advance. -
Page 93: Network Folder Function
By using the network folder function, your personal computer can access the SD card or USB device in the PLEXTALK via Wireless LAN network as a network shared folder. CAUTION: Whenever you erase an SD card or USB device using a personal computer, make sure you select "FAT 16"... -
Page 94: Start Network Folder
•Use the Left or Right key to go to the "Network folder" option and press the Enter key. •PLEXTALK connect to the network and network folder is started. PLEXTALK will announce the network device name when it connected. If you not configured network... -
Page 95: Log On To The Network Folder At Your Computer
To finish the Network folder function, do the following: •Press the Cancel key of the PLEXTALK. •PLEXTALK will ask you to confirm that you wish to finish. •Press the Enter key to finish the function or the Cancel key to continue. -
Page 96: Using Plextalk As An External Drive
22.1. What can PLEXTALK be used for when connected to a personal computer? With PLEXTALK connected to a computer as a card drive, you can perform standard file management functions such as: •Transfer DAISY titles, Audio Files and Text Files between the PLEXTALK and the computer. -
Page 97: Disconnecting Plextalk From A Computer
22.3. Disconnecting PLEXTALK from a computer When disconnecting PLEXTALK from a computer, use the procedure below: •Left click the "USB" or "Safely remove hardware" icon located in the System Tray at the lower right of the computer screen. •Choose this drive at the Safely Remove Hardware option in the System Tray. -
Page 98: Other Useful Features
•Press the Number 0 key once. 23.2. Checking system properties To find out the system version or the serial number of your PLEXTALK and PDTB key information, do the following: •Press the Menu key once to access the Main Menu. -
Page 99: Deleting Authorization Keys
•Use the Left or Right key to select "Initialize all settings to default" and press the Enter key. •PLEXTALK will ask you to confirm that you wish to proceed. Press the Enter key to set all settings to factory defaults or the Cancel key to abort. After a short while,... - Page 100 The following is a list of the default settings for the PLEXTALK. •Select recording mode: Default •Select auto section setting: Off •Select time to auto stop recording when no sound: Off •Select trigger of starting recording: When record key is pressed.
-
Page 101: Appendix A: Main Specifications
Appendix A: Main Specifications Note: Shinano Kenshi reserves the right to modify the products specification at any time without prior notice. General specifications SD card slot: SD/SDHC card Playable contents: Books conforming to DAISY 2.0, 2.02 and 3.0 standards. DAISY PDTB and PDTB2. Audio files in MP3, unprotected WMA, AMR-WB+, Ogg Vorbis, Wave (PCM) formats, Audible Format 4(.aa) and LKF. -
Page 102: Audio Features
Built in speaker (Monaural) Externally connected terminal: USB 2.0 USB OTG (USB bus power) File system: FAT-32/16 Clock precision: Approximately 60 seconds per month Electric Power Source: AC adaptor, AC 100 V to 240 V, 50 or 60 Hz Dimensions and weight: Length 112 mm Width 55 mm Height 16 mm... -
Page 103: Main Functions
Jack 3.5mm diameter stereo mini jack Built In Speaker: Output impedance 8 ohm Output 150mW Build-in Microphone: Mode Electric condenser microphone Main functions Guide voice: Gives spoken information about the current operation. Provides key descriptions in Key Describer mode. Speaks menu items. Gives help information (press the Number 5 key). -
Page 104: Battery Specifications
DAISY MP3 128kbps stereo 30 hours DAISY MP3 64kbps mono 60 hours DAISY MP3 32kbps mono 120 hours Recording level adjustment: Select input between External Microphone and Line input 0 to 20 (in increments of 1) Available Auto Gain Control Memory function: Bookmarks and voice Bookmarks, maximum is 10000 Voice Bookmarks, Total 30 minutes recording... -
Page 105: Memory Card Drive Of A Personal Computer Via Usb Cable
Memory Card Drive of a personal computer via USB cable Type: SD/SDHC card Operating systems: Windows 2000, XP, Vista, Windows 7 or Windows 8 Wireless communication function Wireless LAN: IEEE802.11b/g Available security mode: WEP, WPA-PSK(TKIP), WPA-PSK(AES), WPA2-PSK(TKIP), WPA2-PSK(AES) -
Page 106: Appendix B: Menu Hierarchy
Appendix B: Menu Hierarchy This appendix lists all menu items in the Main Menu along with their corresponding sub menu hierarchy. EDIT: Set heading Cancel heading Remove section Exit DAISY editing mode RECORDING SETTINGS: Select recording mode Default Conference Audio Analog cassettes Radio Custom... - Page 107 Repeat album (Music) Repeat entire albums (Music) Shuffle repeat (Music) Reading audio file name Read audio file name Read audio track number Multimedia DAISY playback setting Auto Audio Text Skippable ("Play" or "Skip" for each skippable item.) Select page number Select footnote Select note reference Select annotation...
- Page 108 Prepare for editing Build book Network folder SYSTEM SETTINGS: System properties System version Serial number Installed key (if obtained.) Select the text to speech voice Voice 1 Voice 2 Select the waiting sound Waiting sound 1 Waiting sound 2 No waiting sound Select the key press confirmation sound Key press confirmation sound on Key press confirmation sound off...
-
Page 109: Appendix C: Troubleshooting
Symptom: You turn on the Power Switch, but the power does not come on. Possible cause 1: Loose power cord or AC adaptor. Solution: Firmly reinsert the mains power cable into PLEXTALK and ensure that the AC adaptor is firmly inserted. -
Page 110: Spoken Errors During Daisy Playback
Solution: Free up some memory by deleting unnecessary Voice Memos. You may also wish to backup your memos before carrying out this process. Errors when using PLEXTALK as an SD card drive on a computer Symptom: Drive does not work. - Page 111 Solution: Check that the Power cord and AC adaptor are securely connected, and turn on the Power Switch. Symptom: Nothing can be added to the SD card. Possible cause 1: There is not enough space on the SD card for added data. Solution: Free up some space on the SD card and try again.
-
Page 112: Appendix D: Technical Data About Recording Modes And Sound Qualities
Each recording mode has predetermined settings for the following 4 parameters: •Auto section setting; PLEXTALK can be set to automatically create a new section, in a DAISY recording, after a specified amount of time with no audio input, for example 2 seconds. -
Page 113: Available Settings For Custom Mode
Analogue Cassette mode: •Select auto section setting: 4 seconds •Select time to auto stop recording when no sound: 1 minute •Select trigger of starting recording: When sound is detected. •Select background noise level of input sound: Normal (-28 dB) Radio mode: •Select auto section setting: Off •Select time to auto stop recording when no sound: 1 minute •Select trigger of starting recording: When sound is detected. - Page 114 •SD card, 2GB: 3 hours •SD card, 4GB: 6 hours •SD card, 8GB: 12 hours PCM 22.05kHz mono: •SD card, 1GB: 6 hours •SD card, 2GB: 12 hours •SD card, 4GB: 24 hours •SD card, 8GB: 48 hours MP3 256 kbps stereo: •SD card, 1GB: 7.5 hours •SD card, 2GB: 15 hours •SD card, 4GB: 30 hours...
- Page 115 Non broadcasted SSID require a long time to am using non broadcasted SSID. establish a connection between PLEXTALK. Please allow the PLEXTALK up to 5 minutes to see if it finally succeeds or not. If possible, please try to configure your access point setting to enable broadcasting the SSID name.
- Page 116 Plextalk cannot connect to the When you are using WEP security with fixed IP network service. I am using WEP address setting, PLEXTALK will succeed in security with Fixed IP address. connecting to the access point even it has a wrong password.
- Page 117 Appendix F: List of entering characters ABC mode Key name Assignment Symbols “.”, “@”, “/”, “:”, “1” a, b, c, 2, A, B, C, d, e, f, 3, D, E, F, g, h, i, 4, G, H, I, j, k, l, 5, J, K, L, m, n, o, 6, M, N, O, p, q, r, s, 7, P, Q, R, S, t, u, v, 8, T, U, V,...
- Page 118 Not used Down Hold: Go to the lowermost part of the table Not used Not used Enter the Symbol (Symbols) Table has 8 Column * 4 row . , ‘ “ : ; ? | + - = / \ _ [ ] ! @ # $ % ` { } ^ &...
Need help?
Do you have a question about the POCKET PTP1 and is the answer not in the manual?
Questions and answers