Table of Contents
Advertisement
Quick Links
Download this manual
See also:
Training Manual
Advertisement
Table of Contents

Related Manuals for Roland GR-55


Summary of Contents for Roland GR-55
-
Page 2: Table Of Contents
Preparations for Using the GR-55 . . . . . . . . . . . . . . . . . . - Page 3 Using the GR-55 as an Audio Player . . . . . . . . . . . . . . . . .
-
Page 4: Using The Unit Safely
Refer all until the child is capable of following all the rules essential for the safe servicing to your retailer, the nearest Roland Service Center, or an autho- operation of the unit. -
Page 5: Important Notes
• The explanations in this manual include illustrations produce audible noise. If it is not practical to use a it may not be possible to restore the data, and Roland that depict what should typically be shown by the separate electrical outlet, connect a power supply assumes no liability concerning such loss of data. -
Page 6: Main Features
In addition, your picking position as well as the differences between notes played with a pick or with your fingers are also detected and transmitted to the sound generator, giving the GR-55 a range of performance expression that’s much broader and more natural than any previous guitar synthesizer. -
Page 7: Settings
This chapter explains how to make the necessary settings when using the GR-55 for the first time. First, get your guitar/bass ready • In order to use the GR-55, you’ll need a guitar or bass equipped with a divided pickup (GK pickup), which outputs a separate signal for each string. -
Page 8: Preparations For Using The
If you don’t want the power to turn off automatically, turn the “AUTO POWER OFF” setting off! With the factory settings, the GR-55’s power will automatically be switched off 10 hours after you stop playing or operating the unit. If you want to have the power remain on all the time, change the “AUTO POWER OFF” setting to “OFF” as described on p. 71. -
Page 9: Selecting Guitar Or Bass (Guitar<->Bass)
(GK settings). Making these settings will ensure that the GR-55 is operating Before you use the GR-55, you must make a mode setting that specifies optimally. whether you’re using it with a guitar or with a bass. -
Page 10: Adjusting Your Guitar Pickup
Preparations for Using the GR-55 4. Use the cursor [ ] [ ] buttons to select each string, and Adjusting Your Guitar Pickup for each string, specify the distance from the center of the pickup to the bridge saddle . -
Page 11: Adjusting Your Bass Pickup
Preparations for Using the GR-55 3. Use the cursor [ ] [ ] buttons to move the cursor to “GK PU Adjusting Your Bass Pickup POS,” and use the dial to select the position of the divided pickup . 1. Use the cursor [ ] [ ] buttons to move the cursor to “PU TYPE,”... -
Page 12: Specifying The Output System (Output Select)
Setting Description This is the appropriate setting when using headphones, LINE/PHONES or for when the GR-55 is connected to a keyboard amp, mixer, or digital recorder. Choose this setting if the GR-55 is connected to the guitar JC-120 input of a Roland JC-120 guitar amp. -
Page 13: Tuning Your Instrument (The Tuner Function)
You will return to the original screen. You can also return to the original screen by pressing the [EXIT] button. Here’s how you can use the GR-55’s Tuner function to tune your guitar Settings in the TUNER screen or bass. - Page 14 MEMO...
-
Page 15: Quick Guide
Quick Guide This chapter explains basic operation. Before you play, you should set your GK pickup’s select switch to “MIX”! If a different setting is selected, the sound might not be output correctly. -
Page 16: Selecting And Playing Sounds
Selecting and Playing Sounds Now that you’ve finished with preparations, here’s how to operate the GR-55 while you play. Adjusting the Output Level 1. Adjust the GR-55’s output level by turning the [OUTPUT LEVEL] knob . Turning the knob toward the right will increase the volume;... -
Page 17: Playing Your Guitar
Selecting and Playing Sounds Selecting a User Patch New patches that you create are saved in the GR-55 as “user patches” (p. 18). Press the [USER] button to select user patches in Step 1 of “Selecting a Sound (Patch). ” The rest of the procedure is the same as when selecting a preset patch. -
Page 18: Creating An Original Sound
Selecting and Playing Sounds Creating an Original Sound Using the EZ EDIT Function to Create a Sound You can easily edit the selected patch to your taste by using the GR-55’s EZ EDIT function. Step 1 Step 2 Select a patch (p. 16). -
Page 19: Reference
Reference... -
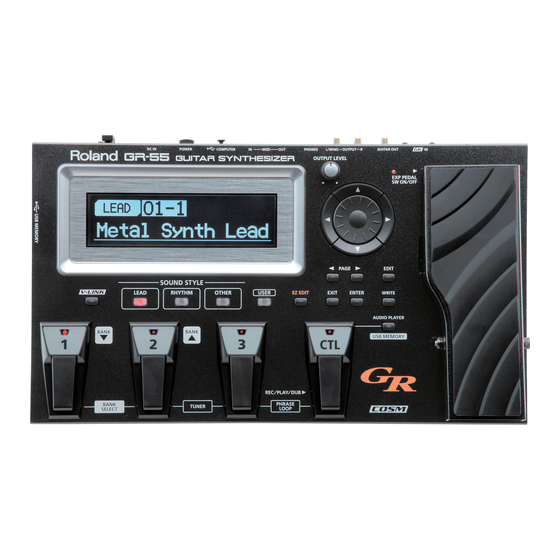
Page 20: Panel Descriptions
About the Top Screen About the EDIT Screen A short while after you turn on the power of the GR-55, this screen The EDIT screen will appear when you press the [EDIT] button. Use the will appear. In this manual, the explanations of various procedures will PAGE [ ] [ ] buttons to switch between tabs in the EDIT screen. -
Page 21: Rear Panel
Panel Descriptions Rear Panel 7. USB COMPUTER connector 1. Security Slot ( Use a USB cable to connect the GR-55 to your computer (p. 66). http://www.kensington.com/ 8. [POWER] switch 2. GK IN connector This turns the power on/off (p. 8). Use the included GK cable (or a separately sold GKC-5 or GKC-10) to 9. DC IN (AC adaptor) jack... -
Page 22: How The Gr-55 Works
A “patch” is a unit of sound on the GR-55. In addition to settings determining the type of sound, a patch also contains effect settings. You can modify (edit) the settings of a patch, and save it as a “user patch.” (The patches already built into the GR-55 are called “preset patches.”) The following illustration shows how a patch is structured internally. -
Page 23: Editing The Tones (Tone)
Editing the Tones (TONE) As shown in the illustration below, a GR-55 patch consists of several tones. You can create a new patch by selecting different tones or by editing the detailed settings of each tone. PATCH Synthesizer sound PCM TONE 1... -
Page 24: Editing The Tone
Editing the Tones (TONE) Editing the Tone Editing a Tone (Detailed Settings) Here’s how to make various settings for the tone. Here’s how to edit the tone settings in detail. If you want to edit detailed settings, refer to “Editing a Tone (Detailed Basic operation Settings)”... -
Page 25: Parameter List (Pcm Tone 1/Pcm Tone 2)
Editing the Tones (TONE) Parameter List (PCM TONE 1/PCM TONE 2) Group Parameter Value Description Turns the tone on/off. SWITCH OFF, ON Tones that are turned “OFF” will not sound (they are muted). TONE CATEGORY Selects the category (group) of tones. TONE NUMBER Selects the tone number. - Page 26 Editing the Tones (TONE) Group Parameter Value Description The filter will not be used. Low Pass Filter. The region above the cutoff frequency will be cut, making the sound more mellow. Band Pass Filter. The region around the cutoff frequency will remain, and the regions above and below will be cut.
- Page 27 Editing the Tones (TONE) Group Parameter Value Description TVA ATTACK TIME # -50–+50 Adjusts the attack time of the amp envelope. TVA DECAY TIME -50–+50 Adjusts the decay time of the amp envelope. TVA SUSTAIN LEVEL -50–+50 Adjusts the sustain level of the amp envelope. TVA RELEASE TIME # -50–+50 Adjusts the release time of the amp envelope.
- Page 28 Editing the Tones (TONE) Using the Nuance parameters The Nuance parameters detect when you play your guitar/bass with a soft touch, and apply a corresponding change to the sound of the PCM tone. For example, if CUTOFF NUANCE SENS is set to a positive “+” value, the cutoff frequency of the PCM tone will be lowered when you play a muted or a finger-picked note, producing a softer tone quality.
-
Page 29: Parameter List (Modeling Tone)
Editing the Tones (TONE) Parameter List (MODELING TONE) Group Parameter Value Description SWITCH OFF, ON Turns the tone on/off. Tones turned “OFF” will not sound (i.e., they are muted). If GUITAR<->BASS is set to “GUITAR” (p. 9) E.GTR, Selects the category (group) of tones. E.BASS, SYNTH TONE CATEGORY... - Page 30 Editing the Tones (TONE) * Company names and product names appearing in this document are the registered trademarks or trademarks of their respective owners . This document uses these names in order to appropriately describe the sounds simulated by COSM technology . TONE CATEGORY: E.GTR TONE NUMBER (PICKUP) Description...
- Page 31 Editing the Tones (TONE) TONE CATEGORY: SYNTH TONE NUMBER (PICKUP) Description GUITAR BASS This is the sound of a classic analog polyphonic guitar (bass) synthesizer. It provides hexa-distortion, with a hexa-VCO and VCF (variable frequency filter) that generates independent 18: ANALOG GR 10: ANALOG GR pitch-shiftable sawtooth waves for the six strings, letting you enjoy analog synthesizer sounds that reflect the nuances of your guitar or bass performance.
- Page 32 Editing the Tones (TONE) STEEL Group Parameter Value Description Specifies the acoustic guitar type. MA28 The sound of a Martin D-28. Older model known for its exquisitely balanced sound. The sound of a Martin 000-28. This model features a full low-end resonance and crisp, TRP-0 distinct contour.
- Page 33 Editing the Tones (TONE) BANJO Group Parameter Value Description Specifies the strength of the attack when you pluck the string strongly. As this setting ATTACK # 0–100 is increased, the attack will be sharper, and the sound will be crisper. BODY RESO 0–100...
- Page 34 Editing the Tones (TONE) RICK Group Parameter Value Description REAR VOL 0–100 Sets the volume of the rear pickup. FRONT VOL 0–100 Sets the volume of the front pickup. REAR TONE 0–100 Adjusts the tone of the rear pickup. FRONT TONE 0–100 Adjusts the tone of the front pickup.
- Page 35 Editing the Tones (TONE) SYNTH ANALOG-GR Group Parameter Value Description Specifies whether to sound the hexa-VCO (sawtooth wave), the hexa-distortion (square wave), or both. Only the hexa-VCO will sound. MODE # The hexa-VCO and hexa-distortion will sound together. DIST Hexa-distortion will sound. If this is “ON, ”...
- Page 36 Editing the Tones (TONE) Group Parameter Value Description Switches the pitch shift setting of the hexa-VCO that responds to the pitch of the string vibrations. * Pitch shift applies only to the hexa-VCO; it does not apply to hexa-distortion . If you want to use the pitch shift function, set MODE to “VCO”...
- Page 37 Editing the Tones (TONE) WAVE SYNTH Parameter Value Description This is an analog-synth type sound suitable for leads. TYPE # SQUARE This is an analog-synth type sound suitable for backing. COLOR # 0–100 Adjusts the tone quality. Increasing this value makes the sound brighter. FILTER BASS Parameter Value...
-
Page 38: Effect Settings (Effect)
Effect Settings (EFFECT) The GR-55 contains seven effects processors (AMP, MFX, MOD, CHORUS, DELAY, REVERB, EQ), which are organized as shown in the illustration below. (The illustration is for Structure 1.) PCM TONE 1 Multi-effect Equalizer PCM TONE 2 Guitar effects... -
Page 39: Editing The Effects
Effect Settings (EFFECT) Editing the Effects Effect Editing (Detailed Settings) Here’s how to edit the effect settings. Here’s how to make detailed changes to the effect settings. For details on these settings, refer to “Effect Editing (Detailed Settings)” Basic operation (p. 39). -
Page 40: Changing The Structure/Specifying The Connection Destination
If you want to change the way in which the effects are arranged, you can switch the structure. The GR-55 provides two structures, which have the following features. This structure uses AMP+MOD and MFX in parallel. Use this structure when you want to apply the effects If the border is a dashed line, the tone switch is separately;... -
Page 41: Parameter List (Effect)
Effect Settings (EFFECT) Parameter List (EFFECT) Group Parameter Value Description Selects the speaker type. * Company names and product names appearing in this document Turns off the speaker simulator. are the registered trademarks or trademarks of their respective The built-in speaker of the amp ORIGIN owners . -
Page 42: Mod
A high-gain sound suitable for use with bass guitars. 01: BOSS CLEAN A clean sound that is smooth and warm. 02: JC-120 The sound of the Roland JC-120. 03: JAZZ COMBO A sound suited to jazz. A sound with flat response. - Page 43 Effect Settings (EFFECT) MOD Type 02: WAH Parameter Value Description 01: OD/DS Selects the wah mode. You can use an expression pedal to control Parameter Value Description MANUAL (*3) wah. MODE # Selects the type of effect. T.UP Produces a wah effect matched to the intensity of picking.
- Page 44 Effect Settings (EFFECT) 06: PHASER 11: PAN Parameter Value Description Parameter Value Description Selects the number of stages that the phaser effect uses. 0–100, RATE # Adjusts the rate of change in the pan position. BPM – A four-phase effect. A light phaser effect 4 STAGE is obtained.
-
Page 45: Mfx
Effect Settings (EFFECT) 14: EQ LOW GAIN LO-MID GAIN HI-MID GAIN HIGH GAIN Group Parameter Value Description SWITCH OFF, ON Turns MFX OFF/ON. Adjusts the pan position. Frequency Name of L50–R50 The PAN parameter is valid even if MFX type SWITCH is “OFF. - Page 46 Effect Settings (EFFECT) 02: SUPER FILTER 03: PHASER This is a filter with an extremely sharp slope. The cutoff frequency can be varied This is a stereo phaser. A phase-shifted sound is added to the original sound and cyclically. modulated. L in L out Super Filter...
- Page 47 Effect Settings (EFFECT) 06: TREMOLO Parameter Value Description Cyclically alters the volume. Selects whether the left and right phase of the modulation will be the same or the opposite. L in L out Tremolo 2-Band EQ The left and right phase will be INVERSE opposite.
- Page 48 This type provides modified response for the rotary speaker, with the low end boosted Adjusts the deviation with further. PRE DELAY 0–20 respect to the sounding of the This effect features the same specifications as Roland VK-7 organ’s built-in rotary DEVIATION various chorus sounds. speaker. Adjusts the difference in DEPTH DEVIATION -20–+20...
- Page 49 Effect Settings (EFFECT) 11: SPACE-D Parameter Value Description This is a multiple chorus that applies two-phase modulation in stereo. It gives no Adjusts the proportion of the impression of modulation, but produces a transparent chorus effect. flanger sound that is fed back FEEDBACK # -98–+98% into the effect.
- Page 50 Effect Settings (EFFECT) 14: GUITAR AMP SIMULATOR Specifications for Each Speaker Type This is an effect that simulates the sound of a guitar amplifier. The “Speaker” column indicates the diameter of each speaker unit (in inches) and the number of units. L in L out Type...
- Page 51 Effect Settings (EFFECT) 16: LIMITER 18: TIME CTRL DELAY Compresses signals that exceed a specified volume level, preventing distortion from A stereo delay in which the delay time can be varied smoothly. occurring. L in 2-Band EQ L out L in Limiter 2-Band EQ L out...
-
Page 52: Delay
Effect Settings (EFFECT) 19: LOFI COMPRESS DELAY This is an effect that intentionally degrades the sound quality for creative purposes. Group Parameter Value Description 2-Band L in L out Compressor Lo-Fi SWITCH OFF, ON Turns the DELAY OFF/ON. Use this to choose the type of delay. 2-Band 01:SINGLE A simple monaural delay. -
Page 53: Chorus
Effect Settings (EFFECT) Group Parameter Value Description Adjusts the volume of the signal sent MFX SEND 0–100 from the MFX output to REVERB. Group Parameter Value Description Adjusts the volume of the signal sent 0–100 LOW GAIN LO-MID GAIN HI-MID GAIN HIGH GAIN SEND SEND... -
Page 54: Patch Settings (Master)
GK Pickup Settings for Each Patch (GK SET) If you’re using the GR-55 for live performance, you might change guitars depending on the song you’re performing. 3. Use the cursor [ ] [ ] buttons to select the icon for the If so, you can create a GK SET (“GK SETTING, ”... -
Page 55: Parameter List (Master)
Patch Settings (MASTER) Parameter List (MASTER) PEDAL/GK CTL Parameter Value Description STATUS (CTL, EXP SW OFF, ON Switches the pedal on/off (reflects the indicator’s illumination status). only) Here you can specify the function that will be assigned to the [CTL] pedal, the expression pedal switch, or the GK [S1]/[S2] buttons. No function will be assigned to the above pedal or switch. - Page 56 Patch Settings (MASTER) Parameter Value Description AUDIO PLAYER PLAY/ Starts/stops the audio player. STOP AUDIO PLAYER SONG Selects the audio file in USB memory played by the audio player. CTL, AUDIO PLAYER SONG EXP SW, FUNCTION GK S1, AUDIO PLAYER SW Performs the same operation as when the panel’s [AUDIO PLAYER] button is pressed.
-
Page 57: Assign
Patch Settings (MASTER) Parameter Value Description Controls the principal parameter for each type of MOD effect. This is valid if MOD SWITCH is “ON. ” MOD CONTROL Value Description Parameter Specifies the range of change for the parameter. The values will depend on the parameter that’s assigned by MOD type. -
Page 58: Patch Tempo
Patch Settings (MASTER) Parameter Value Description Specifies how the motion of the internal pedal will be triggered. *1 PATCH CHANGE Triggered when you switch patches. CTL PDL Triggered when you operate the [CTL] pedal. EXP LOW Triggered when you move the expression pedal to minimum. EXP MID Triggered when you depress the expression pedal through the center value. -
Page 59: Guitar Out
For each patch, specifies the signal that will be sent from the GUITAR OUT jack. The system parameter GUITAR OUT lets you specify whether to use the GUITAR OUT setting for each patch or the overall setting (system setting) for the entire GR-55. For details, refer to “GUITAR OUT Jack Settings (GUITAR OUT)” (p. 70). -
Page 60: Saving A Patch (Patch Write)
Saving a Patch (PATCH WRITE) Saving a Patch (PATCH WRITE) Changing the Order of Patches (PATCH EXCHANGE) If you edit a patch and then select another patch before saving the edited patch, the changes you made will be lost. If you want to keep the changes for future use, you must save the patch. -
Page 61: Controller Assignments
FUNCTION PATCH SETTING p. 77 When the GR-55 is shipped, each patch assigns the pedals to the functions that are most useful for that particular patch. If you want • MASTER a pedal to have the same function regardless of the patch that is selected, proceed as follows. -
Page 62: Specifying The Parameter To Be Controlled By The Controller
Page For details on how to set system parameters, refer to “Settings for the FUNCTION PATCH SETTING p. 76 Entire GR-55 (SYSTEM)” (p. 69). 2. Select the patch whose assignments you want to change • MASTER (p . 16) . ASSIGN 3. In the EDIT screen, choose the MASTER tab and set ASSIGN... - Page 63 Controller Assignments Example setting 2 NOTE! If you edit the value of a parameter that’s assigned to a controller, and then save the patch, some parameters will be overwritten with For guitar solos, you want to be able to step on the [CTL] the initial state of the controller.
-
Page 64: Using Phrase Loop
Using Phrase Loop You can record up to 20 seconds of a performance and play back the recorded section over and over. You can also layer additional performances with the recording as it plays back (overdubbing). When playback stops, the recorded data is deleted. Press &... -
Page 65: Using The Gr-55 As An Audio Player
AUDIO PLAYER screen by place. pressing the [CTL] pedal once again. • If the GR-55 is connected to your computer via a USB cable, you won’t be able to use USB memory to play audio files. [CTL] pedal • Dimensions of USB memory that can be installed: 60 (length: including... -
Page 66: Connecting External Equipment
Hi-Speed operation. 1. Install the USB driver in your computer . • Turn on the GR-55’s power before you start up your DAW software on the computer. Do not turn the GR-55’s power on/off while the In order to use the GR-55’s USB functionality, you must first install the DAW software is running. -
Page 67: Connecting The Gr-55 To Midi Devices
The GR-55 can switch patches in response to the incoming MIDI data. specification that allows musical data to be transferred * It’s not possible to play the GR-55’s sound generator via input from between electronic musical instruments and computers. If the MIDI IN connector or the USB-MIDI connector . -
Page 68: Connecting The Gr-55 To V-Link Devices (V-Link)
For example, if the GR-55 is connected to a Roland P-10 Visual Sampler, you would be able to switch images and control the brightness or hue of the image. -
Page 69: Settings For The Entire Gr-55 (System)
. you’ve adjusted the height of the divided pickup. The GR-55 lets you create and store ten sets of GK settings (GK set). If Icon Description Page you’re using the GR-55 with more than one guitar, you should prepare... -
Page 70: Switching Gk Sets
SYSTEM parameter “GK SET SELECT” (p . 74) will take priority . You can specify the device (amp) that’s connected to the OUTPUT jacks. The tone will be adjusted inside the GR-55 to ensure that the Switching GK Sets optimal sound will be heard on the specified device. -
Page 71: Changing The Output Sound From The Guitar Out Jack For Each Patch
GUITAR OUT Jack for Each Patch (POWER) 1. Set the system parameter GUITAR OUT–SOURCE (p . 80) to The GR-55 can turn off its power automatically. The power will turn “PATCH . ” off automatically when 10 hours have passed since you last played or operated the unit. -
Page 72: Saving Gr-55 Settings To Usb Memory (Backup)
Memory (BACKUP) Here’s how data that you backed up to USB memory can be restored to Here’s how to save (back up) all of the GR-55’s settings to USB memory. the GR-55. * One set of backup data can be saved to each USB memory device . -
Page 73: Adjusting The Pedal Sensitivity (Calib)
The display will indicate “OK, ” and then the following screen will appear. The next time you power up the GR-55, it will start up in the factory-set condition. 7. Apply strong pressure to the toe area of the expression pedal . -
Page 74: Parameter List (System)
Settings for the Entire GR-55 (SYSTEM) Parameter List (SYSTEM) GK SETTING Parameter Value Description Selects the GK SET that will be used when the master parameter “GK SET” (p. 58) is set GK SET SELECT 1–10 to “SYSTEM. ” This is also where you’ll select the GK SET whose GK settings you want GK SET SELECT to edit. -
Page 75: Output Select
JC-120. Depending on the amp you’re using, the “JC-120” setting might produce better results. Choose this setting if the GR-55 is connected to the guitar input of a stack-type guitar amp (a type in which STACK the amp and speaker are separate units). -
Page 76: Pedal/Gk Ctl
Settings for the Entire GR-55 (SYSTEM) PEDAL/GK CTL Parameter Value Description Here you can specify the function that will be assigned to the [CTL] pedal, the expression pedal switch, or the GK [S1]/[S2] buttons. No function will be assigned to the above pedal or switch. - Page 77 Settings for the Entire GR-55 (SYSTEM) Parameter Value Description AUDIO PLAYER PLAY/ Starts/stops the audio player. STOP AUDIO PLAYER SONG CTL, EXP SW, Selects the audio file in USB memory played by the audio player. FUNCTION AUDIO PLAYER SONG GK S1,...
- Page 78 Settings for the Entire GR-55 (SYSTEM) Parameter Value Description Controls the principal parameter for each type of MOD effect. This is valid if MOD SWITCH is ON. MOD CONTROL Value Description Parameter Specifies the range of change for the parameter. The values will depend on the parameter that’s assigned by MOD type.
-
Page 79: Midi/Usb
OFF, 1–31, 64–95 When using program change data transmitted from an external MIDI device to switch patches on the GR-55, this setting specifies whether the correspondence between the received program number and the patch will be fixed, or whether it can be specified freely. -
Page 80: Other
1–10 Adjusts the contrast of the display. The GR-55 is able to turn off its power automatically. The power will automatically turn off when 10 hours have passed since you last played or operated the unit. A message will appear in the display approximately 15 minutes before the power... -
Page 81: Appendix
Appendix... -
Page 82: Patch List Guitar Mode
GR-55 Patch List GUITAR MODE SOUND STYLE No . LEAD RHYTHM OTHER 01-1 Metal Synth Lead 12st AG & Ch Org Ultimate Pulse 01-2 Rock Lead Organ DoubleFlatHeavy Heavy Hit&Groove 01-3 GR-300 Ctl:+1Oct SoftBrightPad+L4 Jazz Trio 02-1 Nice Tenor RICH STRINGS... - Page 83 GR-55 Patch List SOUND STYLE No . LEAD RHYTHM OTHER 18-2 Vibraphone R12st+Clavi+Xylo Euro Beat Slicer 18-3 Dark Trumpet Harpsichord CTL Fuzz Heaven 19-1 High Note Tp Celesta Arabian Nights 19-2 Fat Brass Sec Accordion Morpheus 19-3 Solo Fr.Horn Bell&Mallet+(Bs)
- Page 84 GR-55 Patch List SOUND STYLE No . LEAD RHYTHM OTHER 36-2 Drop D Trance SITAR Drop-D Slices 36-3 Soft Syn Lead Mandlin&AG+Acord Bell&SynBrass Gt 37-1 Soft Res Lead Kalimba Pad GR-Wonderland 37-2 Octa Sync Mix AsianOpenG-Slide FallDown(ExpPdl) 37-3 Filtered PolySyn...
-
Page 85: Bass Mode
GR-55 Patch List BASS MODE SOUND STYLE No . LEAD RHYTHM OTHER 01-1 Double String Bs Super Saw Bass Ultimate Pulse 01-2 Oct Unison Lead M-Man Brass Ambient Sparkle 01-3 Cotton Harp Fat Upright Auto Groove 02-1 Jazz Trio Organ ViolinBass... -
Page 86: Troubleshooting
Troubleshooting If the GR-55 is not producing sounds or if you think it is not operating properly, first check the following points. If checking these points fails to resolve the problem, consult your dealer or the nearest Roland service center. - Page 87 Troubleshooting When using the GR-55 with other MIDI devices / When using the GR-55 with the computer Problem Items to check Action Page Do the MIDI channels of the transmitting Match the MIDI channels. p. 79 and receiving devices match? The external sound module...
-
Page 88: Error Messages
Check that there is no problem with the MIDI cable connected MIDI OFFLINE! The MIDI IN connection was broken. to the GR-55’s MIDI IN, and that the MIDI cable was not disconnected. An unusually large amount of MIDI data was received,... -
Page 89: Signal Flow
Signal Flow... -
Page 90: Midi Implementation Chart
MIDI Implementation Chart Date : September 9, 2010 GUITAR SYNTHESIZER Version : 1.00 Model GR-55 Transmitted Recognized Remarks Function... Basic Default 1–16 1–16 Memorized Channel Changed 1–16 1–16 Default Mode 3, 4 (M = 6) Mode 3 Memorized Messages Mode... -
Page 91: Main Specifications
24-bit + AF method AD Conversion * AF method (Adaptive Focus method) Normal Pickup This is a proprietary method from Roland & BOSS that vastly improves the signal-to-noise (S/N) ratio of the A/D and D/A converters . DA Conversion 24-bit Sampling Frequency 44.1 kHz... -
Page 92: Index
GR-55 Settings ........ - Page 93 Index USB..............79 USB audio .
- Page 94 For China For EU Countries...
-
Page 95: Declaration Of Conformity
This product contains chemicals known to cause cancer, birth defects and other reproductive harm, including lead. For the USA DECLARATION OF CONFORMITY Compliance Information Statement Model Name : GR-55 Type of Equipment : Guitar Synthesizer Responsible Party : Roland Corporation U.S. Address : 5100 S.Eastern Avenue, Los Angeles, CA 90040-2938 Telephone : (323) 890-3700... - Page 96 Information When you need repair service, call your nearest Roland Service Center or authorized Roland distributor in your country as shown below. TAIWAN ECUADOR RUSSIA OMAN AFRICA EUROPE ROLAND TAIWAN ENTERPRISE Mas Musika Roland Music LLC TALENTZ CENTRE L.L.C. Rumichaca 822 y Zaruma Dorozhnaya ul.3,korp.6...
Need help?
Do you have a question about the GR-55 and is the answer not in the manual?
Questions and answers
I have a Parker fly midi and the D string isn't effective through the pick up to the synth. How do I re set it to activate a signal@
The context does not provide specific instructions for resetting the D string signal on a Parker Fly MIDI guitar with a Roland GR-55. However, general troubleshooting steps for signal issues with the GR-55 include:
1. Checking that all cables, connectors, and sockets are properly plugged in.
2. Cleaning the connectors and sockets using a contact cleaner like deOxit.
3. Trying a different cable to rule out a faulty connection.
4. Inspecting the 13-pin socket for possible dry joints.
5. Performing a factory reset on the GR-55 and reloading saved patches.
If the issue persists, the problem may be with the pickup or internal wiring of the guitar.
This answer is automatically generated