Douwe Egberts Cafitesse 110 Operating Instructions Manual
Douwe egberts cafitesse 110 coffee machine
Hide thumbs
Also See for Cafitesse 110:
- Quick reference card (8 pages) ,
- Service manual (94 pages) ,
- Quick reference cards (8 pages)
Table of Contents
Advertisement
Advertisement
Table of Contents

Related Manuals for Douwe Egberts Cafitesse 110


Summary of Contents for Douwe Egberts Cafitesse 110
- Page 1 xxxxx STOP xxxxx GEBRUIKSAANWIJZING OPERATING INSTRUCTIONS 35264400 12.03...
-
Page 2: Table Of Contents
Contents CONTENTS Introduction ........................26 Safety Instructions ......................27 Technical Data ........................28 Dispenser Components ..................... 29 Operation ..........................30 Description of the Operating Elements ................30 Putting into Operation ......................31 Cup Carrier .......................... 32 Beverage Delivery Modes ....................33 Hot Water Delivery ....................... -
Page 3: Introduction
Introduction/Safety Instructions INTRODUCTION SAFETY INSTRUCTIONS • Regular cleaning of the dispenser is • Before putting the dispenser into The dispenser has to be installed on a table operation, the operating instructions necessary for functional and hygienic or a similar piece of furniture. It is to be must have been read and understood. -
Page 4: Safety Instructions
Safety Instructions • The dispenser may not be subject to • The dispenser must be connected to • Do not switch off the dispenser the drinking water system and to the between beverage deliveries in order frost during operation, storage and transport. -
Page 5: Technical Data
Technical Data TECHNICAL DATA The technical data of each dispenser type are given on the rating plate. Dimensions: Height: 645 mm Width: 210 mm Depth: 455 mm Weight: 21 kg (net) Water connection: Drinking water line with stop valve. Connection to hot water supply via copper pipes only. -
Page 6: Dispenser Components
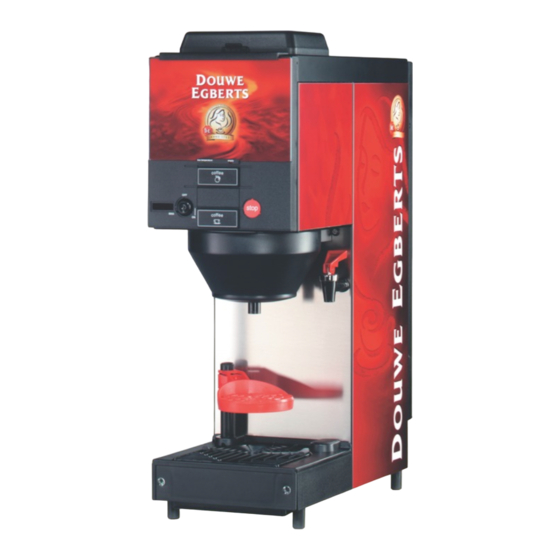
Dispenser Components DISPENSER COMPONENTS - CUP / POT VERSION for delivery into cups and pots 1 Cooling compartment lid 2 Glass panel 3 Operating panel 4 Main switch (accessible after removal of the drip tray) Lift the drip tray to access the xxxxx switch. -
Page 7: Operation
Operation xxxxx STOP xxxxx DESCRIPTION OF THE OPERATING ELEMENTS 1 LOW TEMPERATURE INDICATOR: 2 CONCENTRATE PACK EMPTY Yellow LED Yellow LED INDICATOR: flashes (short : Water temperature in Light off = ready for operation the boiler and cooling flashing Shines red = concentrate pack of this compartment tempera- frequency) -
Page 8: Putting Into Operation
Operation xxxxx xxxxx STOP STOP xxxxx xxxxx POWER POWER PUTTING INTO OPERATION • Open the water cock. • If the dispenser has been out of • Set the key of the key switch (optio- operation for a longer period of time nal) to position "ON"... -
Page 9: Cup Carrier
Operation xxxxx STOP xxxxx CUP CARRIER • Prior to the delivery of coffee, - turn the cup carrier (1) aside (for - adjust the height of the cup carrier ( 1) the delivery per pot) (Fig. 8). (for the delivery per cup) (Fig. 7). - put the pot on the drip tray (2) (Fig. -
Page 10: Beverage Delivery Modes
Operation xxxxx STOP xxxxx BEVERAGE DELIVERY MODES • Depending on how the dispenser was 2) Continuous delivery • Examples of possible portion sizes adjusted by the service technician A beverage is delivered as long as the (if necessary ask the service during installation, beverage delivery correponding delivery button is technician):... -
Page 11: Hot Water Delivery
Operation xxxxx xxxxx STOP STOP xxxxx xxxxx POWER HOT WATER DELIVERY SWITCHING OFF THE DISPENSER • For the delivery of hot water, always • Switch the power switch (1) to "OFF" actuate the right hot water tap (1). (Fig. 11). (Fig. -
Page 12: Options
Options xxxxx xxxxx STOP xxxxx OPTIONS - KEY SWITCH / COUNTER Position OFF Delivery stopped, buttons locked Position ON Delivery enabled Position 0000 Resetting the counter Our service technicians can program 2 2. Indicating mode OFF different indicating modes (Fig. 12): •... -
Page 13: Version With Water Tank 'Tank Top Version
Options VERSION WITH WATER TANK 'TANK TOP VERSION' If there is no water connection or if the Filling the dispenser quality of the drinking water is bad, the • Plug the power supply plug into the socket. dispenser can be equipped with a tank by our service technicians. -
Page 14: Version For The Delivery Of Café Cool (Option)
Options xxxxx xxxxx STOP xxxxx xxxxx xxxxx STOP xxxxx VERSION FOR THE DELIVERY OF CAFÉ COOL (OPTION) Check the drinking water quality We recommend to put some ice Instructions for the delivery of before delivering Café Cool. cubes into the glass before Café... -
Page 15: Cleaning And Maintenance
Cleaning and Maintenance CLEANING AND MAINTENANCE GENERAL INSTRUCTIONS Make sure that all components • Use a cleaning agent approved by the • Switch the main switch off, before are installed correctly after the food industry and recommended by your starting to clean the dispenser. cleaning procedure. -
Page 16: Daily Cleaning Cleaning The Drip Grid
Cleaning and Maintenance DAILY CLEANING CLEANING THE DRIP TRAY CLEANING THE DRIP GRID CLEANING THE OUTSIDE • Remove the drip grid (1) and soak it • Remove the drip tray (2). Use the Wipe the dispenser off daily with in warm water containing cleaning main switch to switch the dispenser a wet and clean piece of cloth. -
Page 17: Weekly Cleaning Cleaning The Cup Carrier
Cleaning and Maintenance xxxxx STOP xxxxx WEEKLY CLEANING CLEANING THE CUP CARRIER CLEANING THE OUTLET TROUGH • Carry out the daily cleaning process. • Compress the trough (1) with your • Remove the shielding cover. (Fig. 19) thumb and index finger and take it out. •... -
Page 18: Weekly Cleaning - Cleaning The Cooling Compartment
Cleaning and Maintenance CLEANING THE COOLING COMPARTMENT • Remove the concentrate pack. (Fig. 20). • Clean the cooling compartment with a wet cloth and the brush which has been delivered with the dispenser (Fig. 21). • Dry the cooling compartment. Do not pour any water and no cleaning agent into the cooling compartment. -
Page 19: Daily Cleaning Cleaning The Water Tank
Cleaning and Maintenance DAILY CLEANING CLEANING THE WATER TANK The water tank must never be • Switch off the device by means of the Fill the tank with cold drinking subjected directly to sunlight. main switch. water only (max. 30°C). Observe local regulations The kit water tank must only be •... -
Page 20: Trouble Shooting
Trouble Shooting TROUBLE SHOOTING If the dispenser does not function correctly, check the following points before calling the service: CAUSE REMEDY FAULT Dispenser not switched on Switch on the dispenser Dispenser does not function Key switch (option) not switched to "ON" Switch the key switch to "ON"...
Need help?
Do you have a question about the Cafitesse 110 and is the answer not in the manual?
Questions and answers
Possibilité de raccorder sur carte interface12C ST 02 : Ajout Cmde avec système de payement ?