Table of Contents
Advertisement
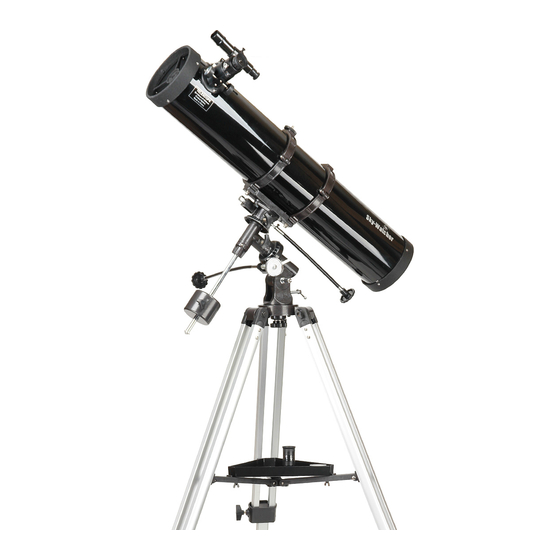
INSTRUCTION MANUAL
Optical Tube: 130mm/900mm
C
B
A
11
10
9
8
7
6
5
a
b
FOR 1309EQ2
D
E
F
G
4
Equatorial Mount: EQ2
H
1
2
3
1
A.
Dust Cap (not shown)
Remove before Viewing
B.
Focus Tube
Finderscope Bracket
C.
D.
Finderscope
E.
Finderscope Adjustment
Screws
F.
Eyepiece
G.
Focus Knob
H.
Telescope Main Body
1.
Hour Axis Scale
2.
Dec. Flexible Control Cable
3.
Altitude Adjustable T-bolt
4.
R.A. Flexible Control Cable
5.
Counterweight
6.
Counterweight Thumb
Screw
7.
Counterweight Rod
8.
R.A. Lock Knob
9.
Dec. Scale
10.
Dec. Lock Knob
11.
Tube Rings
a.
Accessory Tray
b.
Tripod Leg
Advertisement
Table of Contents

Related Manuals for SKY-WATCHER 1309EQ2


Summary of Contents for SKY-WATCHER 1309EQ2
- Page 1 INSTRUCTION MANUAL FOR 1309EQ2 Equatorial Mount: EQ2 Optical Tube: 130mm/900mm Dust Cap (not shown) Remove before Viewing Focus Tube Finderscope Bracket Finderscope Finderscope Adjustment Screws Eyepiece Focus Knob Telescope Main Body Hour Axis Scale Dec. Flexible Control Cable Altitude Adjustable T-bolt R.A.
-
Page 2: Assembling Your Telescope
900mm technical support. f/ratio Highest Practical 260x If you are interested in submitting telephotographs taken with Power Fainest Steller Sky-Watcher telescopes, or articles concerning any Sky-Watcher 13.3 Magnitude products, please call us at 604-241-7027. Resolving Power (arc sec.) Finderscope 5x24 1.25"... - Page 3 RIPOD SET UP ATTACHING MOUNT TO TRIPOD (1) 1) Locate Tripod legs and AZ mount/tripod head. 2) Fasten tripod legs to the bottom of the mount using bolts and wingnuts already attached to the top of each tripod leg. Align the tripod legs so that the hinge for the accessory tray faces inwards.
- Page 4 ATTACHING THE TUBE RINGS TO MOUNT(5) 1) Remove the telescope tube from its plastic packaging. ELESCOPE 2) Remove the tube rings from telescope by releasing their thumb nuts and opening their hinges. ASSEMBLY 3) Using the bolts provided, fasten the tube rings to the mount with the 10mm wench provided.
- Page 5 OPERATING YOUR TELESCOPE 1) Focus the telescope eyepiece on a distant object. Fig.a 2) Once the object has been centered in the telescope view, ensure the locking screws are tightened. 3) Use the three alignment screws to center the finderscope crosshairs on the object seen in the telescope view (Fig.a).
- Page 6 OPERATING YOUR TELESCOPE Fig.c The equatorial mount has controls for both conventional Altitude adjustment altitude (up-down) and azimuthal(left-right) directions of (up-down) motion. These two directions are recommended for large direction changes and for terrestial viewing. Use the large knurled knob near the base of the mount for azimuthal adjustments, and the altitude adjustment T-bolts for altitude Azimuth adjustment (left-right)
- Page 7 SUGGESTED READING Beginner's Guide to Amateur Astronomy: Astrophotography for the Amateur by Michael Covington (Cambridge University Press, An Owner's Manual for the Night Sky by David J. Cambridge, UK, 2nd edition,1999). Eicher and, Michael Emmerich (Kalmbach Publishing Co., Books Division, Waukesha, WI, 1993). Splendors of the Universe: A Practical Guide to Photographing the Night Sky by Terence Dickinson NightWatch: A Practical Guide to Viewing the...
Need help?
Do you have a question about the 1309EQ2 and is the answer not in the manual?
Questions and answers