Table of Contents
Advertisement
English Language User Manual
AV420
USB Windows® Device
ARCHOS™ POCKET VIDEO RECORDER
• MPEG-4 Video Player & Recorder
• MP3 & WMA Music Player
• Photo Viewer
• USB 2.0 Hard Disk
• Digital Audio Recorder
User Manual for ARCHOS Pocket AV420
USB Windows
Device
®
Manual version 1.0
Please visit our website to download the most recent manual and software for this product.
1
Advertisement
Table of Contents

Related Manuals for Archos AV420


Summary of Contents for Archos AV420
- Page 1 • MPEG-4 Video Player & Recorder • MP3 & WMA Music Player • Photo Viewer • USB 2.0 Hard Disk • Digital Audio Recorder User Manual for ARCHOS Pocket AV420 USB Windows Device ® Manual version 1.0 Please visit our website to download the most recent manual and software for this product.
-
Page 2: Table Of Contents
Table of Contents INTRO - Ports, Buttons and Connections INTRO - First Time Usage Plugging in the AC Adapter Turning on the AV400 Shutting off the AV400 and Battery saving features Changing the Interface Language Foreign Character Sets Charging the Batteries Caring for the AV400 Hardware Reset VIDEO - Playing Video Files... - Page 3 10 MUSIC - Playing Music Files 10.1 Button Control 10.2 Play Screen Icons 10.3 Browsing through your Music Library 10.4 Playing Through your Stereo System 10.5 Setting a Bookmark 10.6 The Resume Function 11 MUSIC – Putting Music onto your AV400 11.1 Synchronizing Music from Windows Media 11.2...
- Page 4 18 SETTINGS 18.1 Sound Settings 18.2 Play Mode Settings 18.3 Clock Settings 18.4 Display Settings 18.5 Power Settings 18.6 System Settings 18.7 TV control 19 Updating the AV400 Firmware Operating System (OS) Download the Update_AV400.AOS file Read the History.txt File Copy to the AV400 ‘Hard Drive’...
- Page 5 Dear Customer, ARCHOS thanks you for your choice of this exciting AV400 product. Never before has one been able to record, play, and carry with them, so much digital media. Be it digital videos, digital music or digital photos, you can enjoy all of these, on the go, without a computer.
-
Page 6: Intro - Ports, Buttons And Connections
INTRO - Ports, Buttons and Connections Hard disk activity indicator (red) On indicator (green) Battery charger indicator (green) Move UP (also increases volume during media playback) Move DOWN (also decreases volume during media playback) Move LEFT (also plays previous song or fast reverse through song or video) Move RIGHT (also plays next song or fast forward through song or video) On/Enter/Play/Go Escape/Stop/Off... - Page 7 USB 2.0 high speed port (USB 1.1 compatible) to connect the AV400 to your computer Power Connector (use only the supplied Archos power charger/adapter) Multi-connect jack* – for headphones, TV Cradle, and AV in/out connections *The optional multi-connect adapter and AV cable allow for audio and video playing (cable) and recording (cable+adapter) without the TV Cradle.
-
Page 8: Intro - First Time Usage
(CHG) light just below the navigation pad will start to blink when the battery is charged. • You may use the Archos Video AV400 while its battery is charging, but it will then take longer before the battery is completely charged. -
Page 9: Changing The Interface Language
(ex: Korean, Japanese, Simplified Chinese, etc.). You can find the language files CodePage_name.4FZ in the font folder under /Archos on the AV400 hard disk or on the Archos website under the heading Software. If, for example, you would like to have the Korean language display, then you would copy the file... -
Page 10: Caring For The Av400
Caring for the AV400 The Archos Video AV400 is an electronic product that needs to be treated with more care than typical consumer electronic products. • Do not subject it to shock. • Do not subject it to heat. Keep it ventilated (especially when connected to a computer). -
Page 11: Video - Playing Video Files
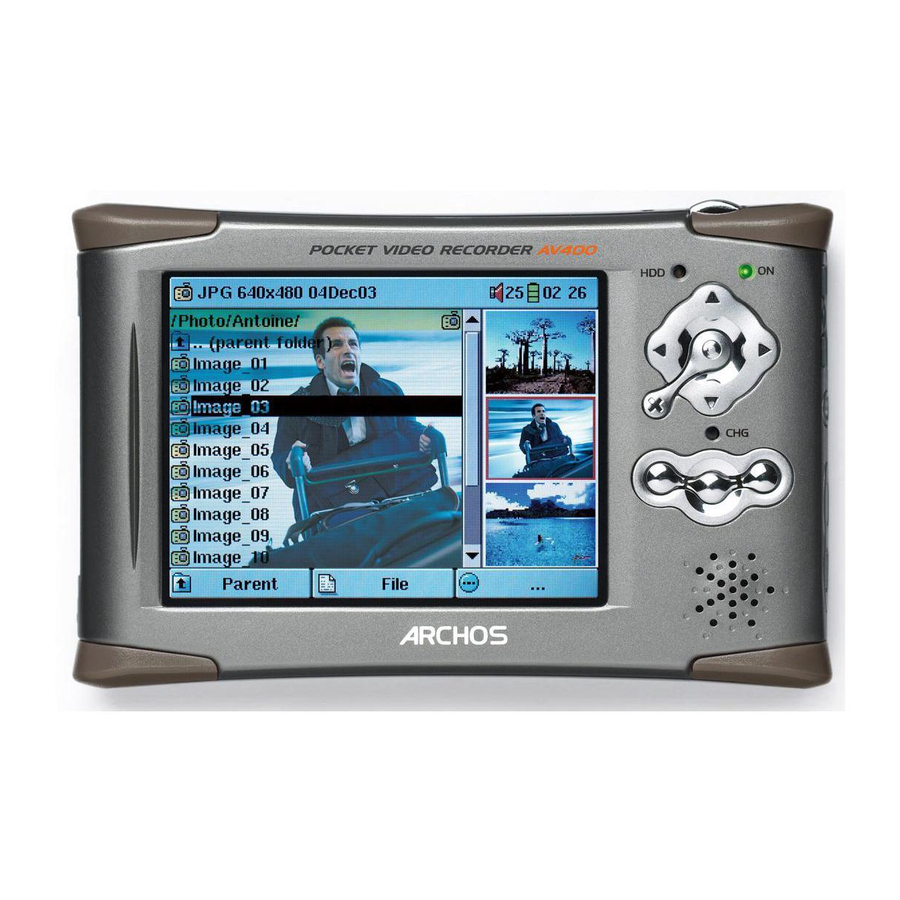
VIDEO - Playing Video Files Click on the Video icon in main menu, highlight the desired video file and then click on PLAY/GO . The thumbnail images on the right side will show you a frame from the highlighted video file (center) as well as a frame from the file above and the file below the highlighted one. -
Page 12: Setting A Bookmark
LEFT – Slow /2 Put video into motion view. You can cycle through the values Normal , ½ , ¼ , and 1/8 speed. The sound is muted when in slow motion. While in slow mode and paused, you can step image per image with the LEFT button. -
Page 13: The Resume Function
The Resume Function When you turn on your AV400 you will sometimes notice that the icon which is highlighted on the main screen is not the Browser but rather the Resume icon. This icon is highlighted when the AV400 can resume the last played audio or video file. Display Format Settings You will notice in the Options button (center function button), that you have a number of display format options. -
Page 14: Playing Video Files From The Internet
Playing Video Files from the Internet When using Windows Media the advantage of being able to download protected video content from the Internet. When you see the PlaysForSure symbol on a web site for Windows (PMC), then these protected downloads will be playable on your AV400. -
Page 15: Video - Recording Video Files
VIDEO - Recording Video Files 1. Select VideoCorder on the main menu screen. In the pre-record screen, you should see movement on the sound level bar indicating that sound will be recorded. Adjust the sound level by clicking the LEFT/RIGHT buttons. Before starting the recording, you can adjust the recording parameters via the middle function button Settings. -
Page 16: Setting The Recording Parameters
Setting the Recording Parameters Rename Allows you to change the filename before the recording begins. On, Off. If set to On, the AV400 will stop recording after the Auto Stop duration set in the next line. For example, you want to record a television show for two hours but do not want to stay around for the two hours to stop the recording. - Page 17 Resolution TV, LCD. Use this to set the resolution of the recorded image. If you plan on playing the video most of the time on the built-in screen, then set it to LCD to record at the screen resolution of 320x240 pixels.
-
Page 18: Where Is The Recording Saved
SAVE. You can now put your AV400 into standby mode by pressing on the red Standby/wake-up button on your Archos remote control. Once the scheduler is set, you will see an icon on the top VideoCorder status bar... - Page 19 • Click on the right function button Scheduler. • Set each line to the desired date and time (and channel if you are using the InfraRed emitter to control your VCR, cable box, or satellite receiver). Click on the center function button Title to set the file name of the scheduled recording.
- Page 20 17th at 2am. • Once a scheduled recording has been made, or the date of a recording has been passed, without the recording having been made (the Archos unit was not in the TV Cradle or not in Standby mode), the schedule entry will be erased from the scheduler.
-
Page 21: Video - Automated Yahoo! ® Tv Recording Scheduler
• If the TV programs from your personal calendar do not seem to be correctly copied to the AV400 scheduler, go to the Archos web site to make sure that have the very latest version of the AV400 firmware. Update your firmware (Operating System) as explained in the chapter “Updating the AV400 firmware”. - Page 22 • If a personal calendar recording event does not find the station name in your list of channels, it will put the event into the scheduler and mark it with a ?, indicating that you must assign a channel number to the name.
-
Page 23: Video - Setting The Infrared Emitter Code
VIDEO – Setting the Infrared Emitter Code This is a one time step to set your AV400 to send the correct infrared codes to your video cassette recorder, cable box, or satellite receiver in order that the AV400, via its TV cradle, can turn on and off your video device and also change its channels. -
Page 24: Part 2: Testing The Emitter Codes
You can fill these in by hand. Or, if you use the My Yahoo! calendar to set your recording scheduler, any unknown station name will be indicated in the scheduler with a ?. You then have the possibility to assign a channel number to the station name by clicking on the center function button Set Channel. - Page 25 the Infrared Emitter stuck to your device and turn your device on and off. Click this test button again and your device should change from on to off or off to on. If pressing this button does not turn on and off your device, try the next code for your device (step 3 above).
-
Page 26: Video - Editing Video Files
VIDEO - Editing Video Files Video files recorded by the AV400 (not internet files) can be modified by deleting the sections you do not wish included. The editing you can do is either cropping or cutting of particular segments of the video file. You will mark a segment of your video file, and then you will tell the AV400 to CROP it out (delete everything except the marked segment) or to CUT it out (delete the marked segment from the video file). - Page 27 This part of the video recording will now be cut out. Fast-forward to the center of the recording and make a Start Mark (c) where the section that you want to suppress begins, and make an End mark (d) when it finishes. Again, choose the CUT option and this section will be cut out.
-
Page 28: Video - Creating Mpeg4 Video Files With Your Computer
VIDEO - Creating MPEG4 video files with your computer How to create an MPEG-4 video file Please understand that video re-encoding is not always a simple one button process. Video segments that come from your digital camcorder or which are freely available on the Internet are encoded in many different ways. If not already in the proper MPEG4 Simple Profile format, transforming these videos into this format readable by the AV400 requires use of the below mentioned software tools. -
Page 29: Installing The Pc Software
find it. MPG4 Translator This program, developed by Archos, is a “Front-end” for the Virtual Dub program. It has a simple interface which you use and it then tells Virtual Dub how to process the video file. It sets all the parameters for Virtual Dub specifically to create a video file in the right size and format to be read by... -
Page 30: Mp3 Sound Codec
You should download the codec and install it on your computer. If the Virtual dub program has not been installed, you will also be notified, and you should install it (either with the Archos Installation If you are unsure what codecs (audio... -
Page 31: Select Source & Destination Files
Select Source & Destination Files In the example above, a source file 24 hours of Lemans.avi has been selected as the source video. You can see on the bottom of the window its original characteristics (width 720, height 576, frame rate 30). Next, you must then tell the program where to place (Set Destination file) the newly recoded version of the file (don’t worry, it will not erase the original). -
Page 32: Target & Priority
Target & Priority You should select the target as AV400. You will see a Priority box appear. This control is to allow you to select which feature of the video to be AV400 can play. Thus, the MPG4 Translator program will have to decrease the resolution. -
Page 33: Music - Playing Music Files
MUSIC - Playing Music Files When you click on this icon in the main screen, you will be sent directly to the ARCLibrary. From here you can choose to either browse your music by the file system (Browse hard drive) or by music characteristics (Album, Artist, title, Genre, Year). -
Page 34: Play Screen Icons
10.2 Play Screen Icons Status Stopped Blinks while playing a track Pause Recording a track * See the PlayMode section under the Settings chapter of this manual for details. 10.3 Browsing through your Music Library The ARClibrary is your AV400’s music library. It is a system for indexing your music by album, artist, song title, etc. -
Page 35: Playing Through Your Stereo System
WMA or MP3 files) then the ARCLibrary will put them under the category (Unknown). Audio files created with the microphone will be indexed as Artist = (ARCHOS) and Album = (Audio Recordings). You can reach the PlayMode settings screen from Setup > PlayMode. The play mode determines how your music is played (just the current folder of music, all music, one file, etc.). -
Page 36: Setting A Bookmark
10.5 Setting a Bookmark If you are listening to a song, or perhaps a long recording, and would like to place a bookmark in it in order to pick up from this point at another time, you can use the Bookmark function. You simply click on the center function button labeled Options, then choose Set Bookmark. -
Page 37: Music - Putting Music Onto Your Av400
Internet to your computer and organize it. You will also use it to sync (copy) the contents of your Windows Media library to your Archos™ device. See the comparison chart below for an explanation of the different features available when running Windows Media Player 9 and 10 or check out the web site www.playsforsure.com. -
Page 38: Comparison Of Windows Media Player 10 To Windows Media Player 9
XP (home or professional) and to Windows ® list below shows the advantages. Functionality Auto-synchronize the WMP library to Archos AV400 on connecting to PC Can synchronize subscription music (‘to go’ services) to your AV400 Carefree USB disconnection (no special green arrow unmount procedure) Will convert video files* to play on your AV400... -
Page 39: Installing Windows Media ® Player 9 (Wmp9)
2) Open the hard drive AV400 with Windows on it in My Computer). 3) Open up the folder named Archos and then open the folder PC Installation. Double-click on the file named Setup.exe (it may just be shown as Setup). -
Page 40: Installing Windows Media ® Player 10 (Wmp10)
11.5 Installing Windows Media Player 10 (WMP10) ® You must be running Windows XP (Service Pack 1 or better) in order to ® install Windows Media Player 10. Please visit Microsoft’s PlaysForSure ® Website (www.playsforsure.com) and download the very latest version of Windows Media Player. -
Page 41: Music - Playlists
MUSIC - Playlists A Playlist is a list of songs that the AV400 will automatically play one after the other. The AV400 can load one playlist at a time into its internal memory. You can create new playlists, add or delete songs from a playlist, or Save a playlist as a file (file type .m3u) to be used another time. -
Page 42: Creating A Playlist
12.2 Creating a Playlist small mark next to the music icon will be made to indicate that it is in the Playlist. Continue searching and adding songs in this manner until you are satisfied. You can also click the Add or Insert button when highlighting a folder. -
Page 43: Adding Songs To A Playlist While Listening To Music
Save – Saves the current playlist to the folder open in the left window. The * next to the playlist name indicates that this playlist has not been saved. Close – Closes the windows and returns to the main menu screen. Rename –... -
Page 44: Music - Recording Music
13.1 Cable Connections for Audio Recording If you are using the Archos TV cradle, then you will have to plug the Red and White connectors of the AV IN cables to the output of your Hifi or other audio device that you are recording from. If you are using the... -
Page 45: Microphone
An amplified signal will make for a terribly distorted recording. You can also use a high quality pre-amplified microphone, such as the one Archos sells as an option. -
Page 46: Incremental Recording
Incremental Recording While recording, you will notice the center function button labeled Next. This allows you to create incremental recordings. That is, the current recording stops and a new recording instantly begins. The next recording has an additional number appended to its name. - Page 47 00:00 (0min 0sec) 12:15 To keep just this section (cropping it), you will: • locate this file from the Browser mode • Select Edit from the File menu in order to enter the edit mode • In the edit mode, set the cut-IN point (12:15 in our example) •...
-
Page 48: Music - Using Itunes™ With Your Av400
find it in the folder /Data/i-Tunes Plug-in on the AV400 hard disk or from the Archos website. In this folder you will find a plug-in for Mac OS 9.x and another folder for Mac OS 10.x. You will also find a JPEG image illustrating where you need to copy the plug-in to. -
Page 49: Photo - Viewing Photos
PHOTO - Viewing Photos The AV400 series support the viewing of JPEG (.jpg) and Bitmap (.bmp) image formats. Progressive JPEG images are not supported. The AV400 will resize the image to fit on the built-in screen or on a television screen if you choose the television output. -
Page 50: Magnifying Photos
• Click the left function button #-Pic to change the number of photos in the carrousel view. • Click the center function button Picture to display the picture options. • Click on the right function button Hide to hide the picture name and function buttons. - Page 51 AV400. *If your camera uses SmartMedia™, Memory Stick or Secure Digital™ (SD) memory cards, you can purchase the optional Archos 4-1 CompactFlash™ adapter which will allow these card types to be read by the AV400. When you insert the card, the AV400 will recognize it and open up two browser windows.
-
Page 52: Browser - Using The Browser
BROWSER - Using the Browser The browser is used to navigate the file system on the AV400. The file system is FAT32, the same type of file system that is found on Windows hierarchical system which includes folders and subfolders. Because you will be putting hundreds of files on your AV400, it is STRONGLY ADVISED that keep a neat and orderly file structure. -
Page 53: File And Folder Operations
Move the cursor up and down to the previous or next file or folder. 16.2 File and Folder Operations Depending on where you are in the directory system, you will have the option to manipulate files and folders. From the main menu, click on Browser. -
Page 54: Copying And Moving Files And Folders
Copying and Moving Files and Folders By using the unique Archos double browser system, you can copy or move files from one location in the file structure to another (1000 files per folder maximum). You simply click on the RIGHT button, and a second browser window will open. -
Page 55: Using The Virtual Keyboard
3) Click the RIGHT button again to move the cursor to the right browser and find the desired destination folder. 16.3 Using the Virtual Keyboard It is recommended that you create folders and rename files or folders from your computer when it is connected to the AV400. The computer keyboard is much easier. -
Page 56: Connecting/Disconnecting* The Av400 To/From Your Pc
AV400 freeze up. The AV400 is not compatible with Windows or Windows 98 (first edition). Windows 98SE ® downloaded from the Archos web site. While connected as a hard disk to your computer, the AV400 buttons are blocked and are no longer functional. Device and will be ®... -
Page 57: Windows ® Xp
Windows ® Please verify* that you have Windows updated it to at least, Service Pack 1. You must also have Windows Media computer. This way, you can take advantage of connecting it as a ‘Windows Device’. You can just connect it to your PC as enumerated above and you can then see it in Windows Explorer and WMP10. -
Page 58: Macintosh™ Os X
Macintosh™ OS X now use the Hard disk called JUKEBOX like any other external hard disk. 17.3 Disconnecting the AV400 from your Computer Windows Device Mode Verify that no data is being transferred between your AV400 and your computer (the HDD light on your AV400 is not flickering). You can now safely unplug the USB cable from your AV400 and/or computer. -
Page 59: Macintosh
1. The safe remove icon is in the system tray next to the clock. Windows ® 2. Click on the icon to eject (unmount) the AV400 from the computer and select the ‘Safely remove’ message. Windows ® 3. There will be a message indicating that it is now safe to disconnect the AV400. You can now go ahead and unplug the USB cable from the AV400. -
Page 60: Settings
SETTINGS From the home screen, select the Setup option to reveal the menu options for various settings. 18.1 Sound Settings If you would like to customize the sound quality, you can adjust the Bass, Treble, and other audio settings to suit your particular taste. -
Page 61: Play Mode Settings
The Sound Parameters Parameter Built-in Speaker Turns on and off the built-in speaker. Same as long press on the center function button. Volume 00 - 99 Bass 10 levels. Decreases or Increases the low frequencies. Treble 10 levels. Decreases or Increases the high frequencies. Balance 10 levels. -
Page 62: Clock Settings
Repeat & Shuffle ARCLibrary Update ARCLibrary Picture Pause 18.3 Clock Settings The AV400 has an internal real time clock. The time of day is shown on the top right of the screen in either 24 hour or 12 hour display mode. To set it, go to Setup then select Clock. -
Page 63: Display Settings
18.4 Display Settings These settings regulate the interface language and the presentation of the screen. Setting Language The AV400 can be set to English (default), French, German, Spanish, or Russian. TV Standard NTSC (USA), PAL (Europe). In order to view images or vid- eos on an external television, select one option to send the video signal compatible with your country’s television system. -
Page 64: Power Settings
LCD Stability This setting is only for some models. Use this to reduce any LCD screen flicker you might have. Move the setting to the left and right to get the clearest image. Appearance Change the interface appearance Setting On, Off. When set to On, the selected picture (next item) will Wallpaper be displayed as the AV400 screen background. - Page 65 Parameter Power Off 1-9 minutes. The number of minutes of user inactivity (no buttons pressed) before the AV400 shuts off. During the playback of music or video files, this setting takes effect only after the files are finished playing. 10-90 seconds, Never. The time of user inactivity (no Backlight Off buttons pressed) before the AV400 turns off the screen to conserve power.
-
Page 66: System Settings
18.6 System Settings The System settings allow you control over the low level parameters of the AV400. Parameter On (default), Off. If set to Off, the Jukebox will only display Show all files the file names of file types, with their corresponding icons, that it knows how to play. -
Page 67: Tv Control
Hard Disk Displays the amount of free and used space on the AV400’s hard disk. Reported number of megabytes is binary based counting (1 kb=1024 bytes). Thus each reported MB represents approximately 1.05 megabytes (decimal). Formatting also takes up space. 18.7 TV control See chapter 7 VIDEO –... -
Page 68: Updating The Av400 Firmware Operating System (Os)
Operating System (OS) Archos periodically updates the Operating System (OS) and makes it available for free download on the ARCHOS website (www.archos. com). Updates to the Operating System include new features, feature improvements, and bug fixes. You should check to make sure that you are running the most recent version of the OS. -
Page 69: Hard Drive' Or 'Windows Device
‘Hard Drive’ or ‘Windows Device’? If your AV400 is seen as a Hard, then you simply need to drag the Update_AV400.AOS file onto this icon, and Windows file into the top most directory (root) of the AV400. It should not be placed inside any folder within your AV400. -
Page 70: Technical Support
Archos website should fill out the RMA return request form on the website. • There is an FAQ – Frequently Asked Questions section at the ARCHOS Website www.archos.com that can help answer many of your questions. - Page 71 ARCHOS Technology 3, Goodyear - Unit A Irvine, CA 92618 USA Phone: 1 949-609-1483 Fax: 1 949-609-1414 United Kingdom ARCHOS (UK) Limited 3 Galileo Park Mitchell Close West Portway Andover SP103XQ Andover United Kingdom Phone: +44 (0) 1264 366022 Fax: +44 (0) 1264 366626 Worldwide Offices...
-
Page 72: Troubleshooting
17.2. • Only if using Windows 98SE, you must first install the Windows98SE drivers found at the Archos web site (www.archos.com). • If you installed the Windows 98SE driver on your Windows or ME edition, this could cause problems. -
Page 73: Charging And Power Issues
• On older Win98SE computers, if there is a line “lastdrive=” in the config.sys file, make sure that it is “lastdrive=z”. • If the Files Allocation Table (FAT) gets corrupted, the AV400 may not show up in Windows XP for over one minute, and then it comes up as local drive. -
Page 74: The Computer Locks-Up (Freezes Operation) Or Stops
21.4 The Computer locks-up (freezes operation) or Stops Problem: The computer locks-up. Answer: Most likely because you did not use the green ‘safely remove hardware’ icon in the system tray in order to remove the AV400 from your computer. 21.5 File issues, corrupted data, formatting, and partitioning Problem: I want to clean up my AV400’s hard drive, but Windows not let me use the standard hard drive cleaning tools. - Page 75 Problem: I want to reformat the AV400’s hard disk. Answer: You can do this, but it will erase ALL of the data on your AV400. Sometimes this may be necessary if your FAT (File Allocation Table) becomes so corrupted that nothing seems to fix your file problems. First, as explained below, you should run ScanDisk or the DOS chkdsk (Check Disk) program to try to fix your problem.
-
Page 76: Windows ® 98Se & Me Running Scan-Disk (Error Checking)
Windows 98SE & ME Running Scan-Disk (Error Checking) ® • Quit all running applications. • Properly connect the AV400 to your computer as explained in chapter 17.2. • Make sure external AC adapter is powering the AV400. • Right click on the AV400 hard disk in Windows Properties. -
Page 77: Technical Specifications
Video output in PAL (EU) or NTSC (US) standard. Playback Autonomy** Up to 12 hours audio, up to 4 hours video. Scalability Free Operating System updates downloadable from ARCHOS website Ports CompactFlash™ slot to read CompactFlash™ type 1 memory cards AV Connections Audio/video Multi-connect jack. -
Page 78: Legal
The above exclusion may not apply to you. In no event will ARCHOS’s licensor(s), and their directors, officers, employees or agents (collectively ARCHOS’ licensor) be liable to you for any consequential, incidental or indirect damages (including damages for loss of business profits, business interruption, loss of business information, and the like) arising out of the use of inability to use the licensed materials even if ARCHOS’... -
Page 79: Warnings And Safety Instructions
Warnings and Safety Instructions CAUTION To prevent risks of electric shock, this unit must only be opened by qualified service personnel. Power off and disconnect the power supply cable before opening the unit. WARNING To prevent fire or shock hazard, do not expose the unit to rain or moisture. Use of this product is for personal use only. -
Page 80: Copyright Notice
This means that during the period of guarantee for your country or jurisdiction, if the screen on your product has two or more defective pixels, Archos will repair or replace your AV400 product at its cost. Thus, one defective pixel is not grounds for replacement or repair of the product.
Need help?
Do you have a question about the AV420 and is the answer not in the manual?
Questions and answers