Table of Contents
Advertisement
Advertisement
Table of Contents

Related Manuals for Sitecom X5 N600 WLM-5600


Summary of Contents for Sitecom X5 N600 WLM-5600
- Page 1 WLM-5600 User Manual...
-
Page 2: Table Of Contents
Addendum B: Declaration of Conformity ..............60 Revision 1.1 © Sitecom Europe BV 2015 Note: All the information contained in this manual was correct at the time of publication. However, as our engineers are always updating and improving the product, your device’s software may have a slightly different appearance or modified functionality than presented in this manual. -
Page 3: Introduction
Internet attacks, and also provides safe VPN pass-through. With Sitecom Cloud Security, Sitecom goes one step further and ensures that you can surf the Internet even more safely, not only on your PC, but on all the devices in your home which you use to access the Internet. -
Page 4: Key Features
Support 802.1x authenticator, Provide mutual authentication (Client 802.11i (WPA/WPA2, AES), VPN and dynamic encryption keys to enhance pass-through security Sitecom Cloud Security Protect your home against cybercrime while browsing. USB Port Connect any USB device and share it in your network. -
Page 5: Package Contents
Package Contents Open the package carefully, and make sure that none of the items listed below are missing. Do not discard the packing materials, in case of return; the unit must be shipped back in its original package. The WLM-5600 WiFi Modem Router N600 ... -
Page 6: Cautions
Cautions This router’s design and manufacturer has your safety in mind. In order to safely and effectively use this router, please read the following before usage. Usage Cautions The user should not modify this router. The environmental temperature should be within +5 ~ +35 degrees Celsius. -
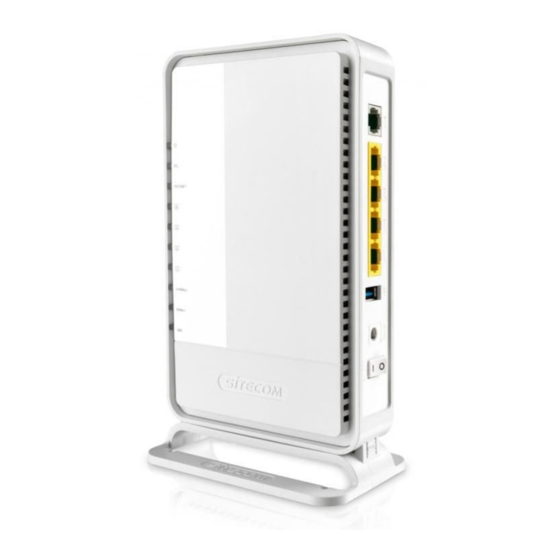
Page 7: Product Layout
Product Layout Port Description Power connector Connect the 12V DC adapter to this port USB Port Connect a USB device to this port LAN (Yellow) Connect your PCs or network devices to these ports ADSL (Grey) Connect your ADSL cable to this port Backlabel and Network Details Folder The Network Details Folder describes the IP address, login details, network name, security code and OPS button functionality. - Page 8 LED Definition As shown from the top to the bottom. Port Description Power (Red) Shows the device is turned on. DSL (Green) Shows the DSL signal is synchronized. Internet (Blue) Shows the Internet connection is active. LAN (Blue) Shows the cable is connected. LAN (Blue) Shows the cable is connected.
-
Page 9: Network + System Requirements
Network + System Requirements To begin using the router, make sure you meet the following as minimum requirements: PC/Notebook. Operating System – Microsoft Windows XP/VISTA/7 or Mac OSX 1 Free Ethernet port. WiFi card/USB dongle (802.11 a/b/g/n) – optional. ... -
Page 10: Setup Your Router
Setup your Router You can place the router on a desk or other flat surface, or you can mount it on a wall. For optimal performance, place your router in the center of your home (or your office) in a location that is away from any potential source of interference, such as a metal wall or microwave oven. -
Page 11: Setup Your Computer
Click on the icon for wireless connectivity. This is usually located in the System Tray, next to the clock. Select the Sitecom network. The correct network name can be found on the sticker on bottom of the router, or in the Network Details Folder. ... - Page 12 Click on the icon for wireless connectivity. This is usually located in the System Tray, next to the clock. Select the Sitecom network. The correct network name can be found on the sticker on bottom of the router, or in the Network Details Folder. ...
- Page 13 Click on the icon for wireless connectivity. This is usually located in the System Tray, next to the clock. Select the Sitecom network. The correct network name can be found on the sticker on bottom of the router, or in the Network Details Folder. ...
-
Page 14: Login To Your Router
LOGIN procedure • OPEN your browser (e.g. Internet Explorer). • Type http://sitecom.modem or http://192.168.0.1 in the address bar and press [Enter]. • Type user name and password. The default username is admin, the password can be found on the back label on the bottom of your router. -
Page 15: Configure Your Internet Connection
Configure your Internet connection From the menu, select “Internet Settings”. Depending on the chosen setting, you may need to enter your user name and password, MAC address or hostname in the following window. After you have entered the correct information, click Apply. -
Page 16: Ipv6 Configuration
IPv6 Configuration The IPv6 (Internet Protocol version 6) section is where you configure your IPv6 Connection type. IPv6 Connection Type There are several connection types to choose from: Static IPv6, Autoconfiguration, 6RD and Link-local only. If you are unsure of your connection method, please contact your IPv6 Internet Service Provider. - Page 17 6RD Mode In the 6RD mode, no additional configuration is necessary. Link-local Mode The Link-local address is used by nodes and routers when communicating with neighboring nodes on the same link. This mode enables IPv6-capable devices to communicate with each other on the LAN side.
-
Page 18: Status
Status The pages in the status section provide you general information about the operational status of your device. Status The System status section allows you to monitor the current status of your modem/router: the UP time, hardware information, serial number as well as firmware version information is displayed here. - Page 19 Statistics You can view statistics on the processing of IP packets on the networking interfaces. You will not typically need to view this data, but you may find it helpful when working with your ISP to diagnose network and Internet data transmission problems. To display statistics for any new data, click “Refresh”.
- Page 20 Diagnostics The Diagnostics page allows you to test the current configuration. Click ‘Start’ to let the modem router perform several tasks to verify if the connection is operational.
-
Page 21: Configuration Wizard
Configuration Wizard Click Wizard to configure the modem. The Setup wizard will now be displayed; check that the adsl line is connected and click “Start Scan” to do an automatic detection of the ADSL settings. If you want to configure the modem manually you can click “Skip Scan”. Select your country from the Country list. - Page 22 Depending on the chosen provider, you may need to enter your user name and password or hostname in the following window. After you have entered the correct information, click Next. Click Finish to complete the configuration.
-
Page 23: Basic Settings
Basic Settings LAN Settings This page is used to configure the LAN interface of your ADSL Router. You can set IP address, subnet mask, and IGMP Snooping or modify the IPv6 address range . DHCP Settings... - Page 24 You can configure your network and the router to use the Dynamic Host Configuration Protocol (DHCP). This page allows you to select the DHCP mode that this router will support. There are two different DHCP Modes: DHCP Server and DHCP Relay. When the router is acting as DHCP server, please configure the router in the “DHCP Server”...
- Page 25 WAN Settings This page allows you to manually configure the ADSL/WAN settings. The settings on this page require some knowledge concerning the WAN configuration. We advise less- experienced users to configure the WAN settings using the Wizard. VPI (Virtual Path Identifier) and VCI (Virtual Channel Identifier) define a virtual circuit. VPI: The valid range for the VPI is 0 to 255.
- Page 26 may already be configured. ATM QoS: Select CBR to specify fixed (always-on) bandwidth for voice or data traffic. Select UBR for applications that are non-time sensitive, such as e-mail. Select VBR for burst traffic and bandwidth sharing with other applications. PCR: Divide the DSL line rate (bps) by 424 (the size of an ATM cell) to find the Peak Cell Rate (PCR).
- Page 27 2.4GHz/5GHz WiFi This section provides the wireless network settings for your router. You can enable and configure the wireless AP function here. SSID: The SSID (up to 32 printable ASCII characters) is the unique name identified in a WLAN. The ID prevents the unintentional merging of two co-located WLANs. Channel Width: Set channel width of wireless radio.
- Page 28 Security Settings This router provides complete wireless LAN security functions, include WEP, IEEE 802.1x, IEEE 802.1x with WEP, WPA with pre-shared key and WPA with RADIUS. With these security functions, you can prevent your wireless LAN from illegal access. Please make sure your wireless stations use the same security function.
- Page 29 WPA Authentication Mode: There are two types of authentication mode for WPA. Enterprise (RADIUS): It uses an external RADIUS server to perform user authentication. To use RADIUS, enter the IP address of the RADIUS server, the RADIUS port (default is 1812) and the shared secret from the RADIUS server. Please refer to “Authentication RADIUS Server”...
- Page 30 Allow: Only allow the wireless clients with the MAC Address you have specified can access to the router. Deny: The wireless clients with the MAC Address you have specified will be denied accessing to the router. MAC Address: Enter the MAC Address of the wireless clients for the filtering control. When you finish, click ‘Submit’...
- Page 31 When you finish, click ‘Save’ to save the settings made and restart the router so the settings will take effect after it reboots. Wireless WPS Wi-Fi Protected Setup (WPS) is the simplest way to establish a connection between the wireless clients and the wireless router. You don’t have to select the encryption mode and fill in a long encryption passphrase every time when you try to setup a wireless connection.
-
Page 32: Advanced Settings
Advanced Settings QoS allows you to classify Internet application traffic by source/destination IP address and port number. You can assign priority for each type of application and reserve bandwidth for it. The packets of applications with higher priority will always go first. Lower priority applications will get bandwidth after higher priority applications get enough bandwidth. - Page 33 UPnP When the UPnP function is enabled, the router can be detected by UPnP compliant system such as Windows 7. The router will be displayed in the Neighborhood of Windows 7, so you can directly double click the router or right click the router and select “Invoke” to configure the router through web browser.
- Page 34 You may need to define routes if your home setup includes two or more networks or subnets, if you connect to two or more ISP services, or if you connect to a remote corporate LAN. Click ‘Add route’ to add a self-defined route. Destination IP: The destination can be specified as the IP address of a subnet or a specific host in the subnet.
- Page 35 DDNS Dynamic DNS (DDNS) allows you to map the static domain name to a dynamic IP address. You must get an account, password and your static domain name from the DDNS service providers. DDNS Provider: Select your DDNS service provider here. Host Name: Enter the domain name you’ve obtained from DDNS service provider.
- Page 36 TR-69 As a bidirectional SOAP/HTTP-based protocol, it provides the communication between customer-premises equipment (CPE) and Auto Configuration Servers (ACS). It includes both a safe auto configuration and the control of other CPE management functions within an integrated framework. In the course of the boom of the broadband market, the number of different Internet access possibilities grew as well (e.g.
- Page 37 Firewall The Broadband router provides extensive firewall protection by restricting connection parameters, thus limiting the risk of hacker attacks, and defending against a wide array of common Internet attacks. However, for applications that require unrestricted access to the Internet, you can configure a specific client/server as a Demilitarized Zone (DMZ). This page is used to IP addresses for Access Control.
- Page 38 IP Filter Click “Add a rule” to add a filtering rule. Enable: Select to enable IP filter rule. Source IP: The source IP address or range of packets to be monitored. Subnet Mask: It is the destination IP addresses based on above destination subnet IP Source Port: This Port or Port Ranges defines the port allowed to be used by the Remote/WAN to connect to the application.
- Page 39 When you finish, click ‘Submit’ to save the settings made. IP Filter Listing #: Item number. Enable: Whether the connection is currently active. Src IP Mask: The source IP address or range of packets to be monitored. Dest IP Mask: This is the destination subnet IP address. Protocol: It is the packet protocol type used by the application, select either TCP or UDP or ICMP Src port: This Port or Port Ranges defines the port allowed to be used by the...
- Page 40 URL Filter Here it’s possible to block certain websites. Enter the website you wish to block and make sure the rule is active. Click ‘Save’ to apply the new rule. The DMZ Host is a local computer exposed to the Internet. When setting a particular internal IP Address as the DMZ Host, all incoming packets will be checked by the firewall and NAT algorithms then passed to the DMZ Host.
- Page 41 Virtual Server Use the Virtual Server function when you want different servers/clients in your LAN to handle different service/Internet application type (e.g. Email, FTP, Web server etc.) from the Internet. Computers use numbers called port numbers to recognize a particular service/Internet application type.
-
Page 42: Toolbox
Your Sitecom device comes with a 6 month free Sitecom cloud security subscription. Activating Sitecom Cloud Security After you have set up your Sitecom device for internet access, open the web browser and enter http://www.sitecomcloudsecurity.com in the address bar. - Page 43 With the protection of unsafe websites activated the Sitecom Cloud Security will always check if a website is safe. If it is not safe it will inform you that is not safe to enter. If you still wish to visit this webpage click on ‘proceed anyway’. Alternatively click ‘Back to Safety’...
- Page 44 Or click ‘License’ to renew your subscription. Disabling Sitecom Cloud Security If you wish to disable to Sitecom cloud security at any time, open the webpage of your Sitecom product and log in with the supplied credentials (these can be found on the back...
- Page 45 Go to Toolbox and select “Sitecom Cloud Security”. Click the “Disable” radio button and click ‘Apply’ for the settings to take effect. Password You can change the password required to log into the router's system web-based management. Passwords can contain 0 to 12 alphanumeric characters, and are case sensitive.
- Page 46 Current Time: The current time of the specified time zone. You can set the current time by yourself or configure by NTP server. NTP server: The IP address or the host name of the NTP server. You can select from the list or set it manually.
- Page 47 Enable Automatic firmware update: When enabled the router will check for updates on the firmware if an updated firmware has been released the router will inform you that a newer firmware is available and offers to download and install the firmware. This page also allows you to manually upgrade the firmware for the router.
-
Page 49: Addendum A: Usb Port Control Center
Addendum A: USB Port Control Center The netUSB functionality of your router requires additional software to work with your computer. The following section will describe how the software can be installed and used. Windows Insert the CD-ROM that was included with your router and select install utility from the cd-menu. - Page 50 Enter your username and organization if applicable and click Next to continue. Choose a folder where the software should be installed or keep it to default and click Next to continue.
- Page 51 The software is now ready to be installed, Click Install to continue. Once the installation is finished the software will inform you. If “Launch Sitecom USB Device Server” checked the software will automatically be launched after you clicked Finish.
- Page 52 MacOS Insert the CD-ROM that was included with your router and select “Install” from the cd- menu. Click Install to continue installation. Enter your Mac username and password and click OK to continue. Once the installation is finished the software will inform you and requires to restart the system.
- Page 53 Connect & Disconnect “NetUSB” allows you to use USB printers when they’re actually connected to the Sitecom USB server. The “connect” operation is a software operation that simulates an actual USB device plug-in. Therefore, when you do a “connect” operation in the Control Center, the PC can detect a USB device’s plug-in, although actually you do not plug in any USB device to...
- Page 54 Connect the USB device to the USB port of the router. Run the Control Center. In the “USB MFP Server List” window, you can see the host names and IP addresses all of the Sitecom servers (in blue) on the network, as shown below. ...
- Page 55 PC will automatically detect that the USB device is plugged-in. On the right side of the Windows Task Bar, you can see the information of the new device. Continue to follow the user manual of the USB device to do the rest jobs of installation, until the driver installation has finished.
- Page 56 NetUSB Printing using Auto-Connect Printer After the driver is installed, you can see a newly created printer in the Control Panel. Follow the steps below to perform NetUSB printing. In the Control Center, click the MFP server that has the desired printer (or MFP) attached.
- Page 57 When you do a print job again. The control center will automatically do a connecting operation on printing again. This is so-called “Auto Connect / Disconnect” operation. Note: Under the “Auto-Connected Printer” setting, it is not necessary to manually press the “Connect”...
- Page 58 NetUSB Scanning using Network Scanning In the Control Center, click the MFP server that has the desired MFP attached. Click the desired MFP. Click the “Network Scanner” button. Then you can see that the Control Center will automatically do a “connect” operation.
- Page 59 Follow the usual steps to do scanning.
-
Page 60: Addendum B: Declaration Of Conformity
Addendum B: Declaration of Conformity...
Need help?
Do you have a question about the X5 N600 WLM-5600 and is the answer not in the manual?
Questions and answers