Table of Contents
Advertisement
Advertisement
Table of Contents

Related Manuals for Pandigital PANSCN05


Summary of Contents for Pandigital PANSCN05
-
Page 1: User Guide
User Guide PANSCN05... -
Page 2: Table Of Contents
Table of Contents Read This First ................4 Important Safety Precautions ..........4 Disclaimer ................6 Copyright ................. 6 Notes about copyrighted materials .......... 6 Disposal of this product ............6 What’s in the Box ..............7 Introduction ................7 Photo Converter Overview ............ - Page 3 Scan2PC Manager (Photo Converter to PC Utility) ....28 System Requirements ............28 Installing the Scan2PC Manager ........... 28 Using the Scan2PC Manager ..........30 Uninstalling the Scan2PC Manager ........31 Photo Converter Maintenance ..........32 Cleaning the Photo Converter ..........32 Clean the Outer Casing ............
-
Page 4: Read This First
Read This First Please read the following important safety instructions carefully before using the Photo, Slide & Negative Converter (Photo Converter). Failure to observe these instructions may result in personal injuries or damages to the Photo Converter. Important Safety Precautions Always follow these basic safety precautions when using your Photo Converter. - Page 5 Do not drop or apply shock/vibration to this device. Strong impacts may damage the components inside. Do not insert objects other than compatible memory cards into the memory card slots of this Photo Converter. The metal contacts inside the slots can easily become damaged by foreign objects.
-
Page 6: Disclaimer
Copyright Copyright Pandigital. All rights reserved. No part of this publication may be reproduced, transmitted, transcribed, stored in a retrieval system or translated into any language or... -
Page 7: What's In The Box
What’s in the Box Check the package for the following items. If there are any items missing or damaged, please contact your place of purchase immediately. Photo, Slide & Negative Converter AC Power Adapter USB Cable SD Memory Card Negative & Slide Adapter Calibration Card Roller Cleaning Sheet Sensor Cleaning Swab... -
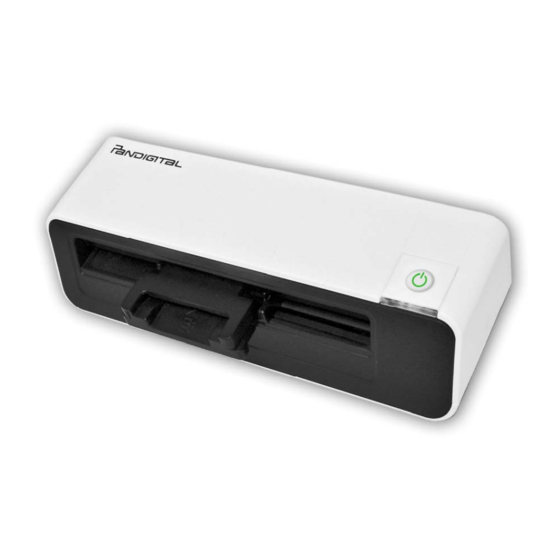
Page 8: Photo Converter Overview
Photo Converter Overview Front View Name Function/ Description Press to power on or off. Press and hold this button for 5 seconds to enter Power Button cleaning mode. (Refer to "Cleaning the Photo Converter" on page 32.) Power Indicates the power status of the Photo Converter. Indicator (Refer to “Indicator Lights”... -
Page 9: Rear View
Rear View Name Function/ Description Accepts the following types of memory cards: SD, SD/xD/MMC/ xD, MMC and MS. (Refer to "Supported Memory MS card slot Cards" on page 13.) Output slot The scanned original comes out from this slot. Mini USB For connecting to a computer via a USB cable. -
Page 10: Photo Converter Indicator Lights
Photo Converter Indicator Lights Listed below are the indicator light patterns and the functions they represent: Status Power /Card The Photo Converter is ready for use. Scanning current original. Please wait until the process is complete before scanning another original. The Photo Converter is powered off. -
Page 11: Suitable And Unsuitable Original Types
Suitable and Unsuitable Original Types Suitable The Photo Converter is designed to obtain the best scanning results with the following types of originals: 3.5”x5” and 4”x6” photos (max size 4.1”x12”) Business cards (max 1.0mm) 35mm negative/monochrome 6-frame filmstrips, and un-mounted positive slides (negative & slide adapter required). - Page 12 Negative filmstrips with any of the following conditions: Ends of the filmstrip are taped. Remove the tape and clean any residue of glue before scanning. Ends of the filmstrip have not been cut straight across. Cut the ends straight across before scanning. Ends of the filmstrip are folded.
-
Page 13: Supported Memory Cards
Supported Memory Cards MS (MemoryStick) MS Pro MS Pro Duo (adapter required) MS Duo (adapter required) MMC (MultiMediaCard) RS-MMC (adapter required) xD (extreme Digital, H-type and M-type) SD (SecureDigital) Mini SD (adapter required) micro SD/T-Flash (adapter required) Anti-curl Plastic Sheaths For your older, fragile photos, we suggest you use the included anti-curl plastic sheath before scanning. -
Page 14: Orientation Of The Original And Scanned Image
2. Insert the sheath into the feeding slot of the Photo Converter flat and level as shown below. Notes: Keeping the original flat and level when feeding prevents possible jamming. Keep originals free from finger prints, oil, dirt, and dust for optimum scanned image quality. -
Page 15: Operating The Photo Converter
Note: Scanning the same original in different orientations may produce scanned images that look slightly different in color tones and brightness. This is not a malfunction. Operating the Photo Converter Preparation and Initial Setup 1. Peel off the tape that secures the guide lever (first time only). -
Page 16: Power On The Photo Converter
Notes: Always insert a memory card before scanning. Make sure the memory card is unlocked (writable) The Photo Converter only accepts memory cards in FAT16 or FAT32 file system. NTFS and other file systems are not supported. Power on the Photo Converter Power 1. - Page 17 2. With the side to be scanned facing upward and in correct orientation as indicated by the orientation guide, place one edge of the photo on the Photo Converter and adjust the guide lever so that the photo aligns against the left side of the feeding slot.
-
Page 18: Scan 35Mm Negatives & Slides
CAUTION: Insert only one photo at a time, and insert the next photo only when the previous one is done, otherwise the Photo Converter may malfunction. Notes: Do not remove the memory card or disconnect the power supply while the indicators are blinking. This Photo Converter only supports output images in JPEG (.jpg) format, and the date/ time attribute will not be added. -
Page 19: Auto Image Mirror/Flip
Auto Image Mirror/Flip The Photo Converter can detect the orientation of a filmstrip when the printed numbers on the edge of the filmstrip are in the same orientation as the image. If you feed the filmstrip with the image mirrored or upside-down, the Photo Converter will automatically adjust the scanned image during the scan. -
Page 20: This Photo Converter Feed Filmstrips
This Photo Converter Feed Filmstrips 1. Make sure that the feeding slot is clear of any original. 2. Slide the paper guide lever all the way to the right side of the feeding slot. 3. Align the negative & slide adapter with the grooves and then gently insert it all the way into the feeding slot, being careful not to bend the metal parts. - Page 21 5. The filmstrip will be fed into the slot and scanned automatically. The Power and Status/Card indicator lights blink while scanning. Make sure proper space in front and behind the filmstrip converter for proper straight position of the filmstrip during scanning to achieve the best result possible.
-
Page 22: Automatic Image Cropping
To remove the negative & slide adapter after all filmstrips are scanned, gently pull it out from the feeding slot. To power down the Photo Converter, press and hold the power button for one second. The power indicator will blink and then go off. Now you can safely disconnect the power and remove the memory card from the Photo Converter. -
Page 23: Connect Photo Converter To A Pc
Note: When scanning darker originals (for example, a photo of the night sky), over-cropping may occur. Please insert the original in a different direction (orientation) and try again. Note: When scanning over-exposed, older or lighter color (faded) filmstrip originals, an irregular auto-cropping may occur. - Page 24 Note: The type of power plug and socket illustrated may differ from that of your region. 3. Insert the Pandigital SD memory card (included) or an unlocked (writable) memory card into the memory card slot. Note: Memory card is required. The scanned image files...
-
Page 25: For Windows Vista Users
The Photo Converter will be recognized by the computer as a removable disk (Windows system). Now you are ready to view or edit the files on the memory card. For Windows Vista Users When the PC recognizes the Photo Converter, with an inserted SD Card, a pop-up “AutoPlay”... -
Page 26: After Successful Connection
When the Photo Converter connects with the PC, an additional drive will be listed in the Explorer window. If you are using the Pandigital SD memory card, the drive will be titled PDSCAN [drive letter] If you are using your own memory card, the drive will be titled... - Page 27 PHOTO1 The scanned images will be saved in the folder. Each scanned image is given a file name with the prefix followed by a 4- digit sequential number in the order the PD_0001.jpg PD_0002.jpg images are stored. For example, PD_9999.jpg PHOTO1 If the file name reaches in the...
-
Page 28: Safely Disconnect The Photo Converter From Pc
1. Connect the Photo Converter to your PC (see instructions Pandigital SD card beginning on page 23), using the (included with Photo Converter). 2. When the Windows Explorer window opens, click the ‘+’ PDSCAN next to the Pandigital folder (listed under the Utility drive), and then select the folder. - Page 29 3. In the right window pane, double-click the “Scan2PC_Setup_Vxxxx.exe” file to begin the Scan2PC installation (see example above). 4. Follow the on-screen instructions to complete the installation. Notes: Scan2PC Manager Once installed, the runs automatically upon PC startup, and the icon stays on the system tray.
-
Page 30: Using The Scan2Pc Manager
Using the Scan2PC Manager CAUTION: To maximize memory usage, close all other applications programs before scanning multi- image filmstrips. 1. When the Photo Converter is connected via USB cable to the PC, the Status/Card light will be blinking. The Scan2PC Manager following window will appear: 2. -
Page 31: Uninstalling The Scan2Pc Manager
Each scanned image is given a file name with the prefix followed by a 4- digit sequential number in the order the PD_0001.jpg PD_0002.jpg images are stored. For example, PD_9999.jpg Photo1 If the file name reaches in the folder, a Photo2 new folder titled will automatically be created to store... -
Page 32: Photo Converter Maintenance
Photo Converter Maintenance Cleaning the Photo Converter In order to maintain the scanned image quality and prevent dust accumulation, it is recommended that you clean the Photo Converter (outer casing, image sensor and roller inside the Photo Converter) approximately every 50-100 scans. Clean the Photo Converter also if: vertical lines or stripes appear on the scanned image photos or film will not feed... -
Page 33: Clean The Image Sensor
3. With Photo Converter powered off, press and hold the Power button for 5 seconds. The Photo Converter will enter cleaning mode. The power and Status/Card indicators will be on. 4. Insert the supplied roller cleaning sheet as shown. Note the direction of the white sponge on the sheet when inserting. -
Page 34: Calibrate The Photo Converter
2. With the Photo Converter powered off and disconnected from the power supply, insert the sensor cleaning swab into one end of the output slot. Note: Make sure that there is no visible dust on the swab before inserting it into the output slot. 3. -
Page 35: Storing The Photo Converter
2. Insert the calibration card as shown. The Photo Converter will scan the pattern on the calibration card and perform calibration to the sensor inside automatically. Note: Make sure that the calibration card is inserted in the correct direction, otherwise the calibration won’t work. Storing the Photo Converter If the Photo Converter will not be used for a prolonged period of time, follow the instructions below to store the Photo Converter for... -
Page 36: Technical Specifications
Technical Specifications Specification Photo, Slide & Negative Photo Converter Photo/35mm negative film Media Type Un-mounted positive slide 3.5”x5”, 4”x6” & 4x11” Common Document Size (sheath only supports 3.5”x5” & 4”x6”) Actual Feed Slot Size up to 4.1x12” Length: 12 inches (304.8mm) Width 4.1 inches (105mm) Output image formats JPEG with compression (4:2:2) -
Page 37: Frequently Asked Questions
Frequently Asked Questions Q: There are strange lines on the scanned image, or the image is not clear. A: Check the following: Are there scratches on the original, or is the original clean? Remove any stains or dust from the original before scanning. -
Page 38: Limited Warranty
PARTS: For a period of one (1) year from the date of purchase, if this product is found to be defective, Pandigital will supply at no cost, new or rebuilt replacement parts, at its option, at no charge. After this one (1) year period, parts will be charged for on a case by case basis. - Page 39 Pandigital or its suppliers and is protected by United States and international copyright laws or other intellectual property laws and treaties. Said content shall not be reproduced or used without express written permission from Pandigital and its suppliers respectively.
Need help?
Do you have a question about the PANSCN05 and is the answer not in the manual?
Questions and answers