Table of Contents
Advertisement
Important Information: These instructions must be kept with
the product at all times. This product is a prescribed Medical
Device. To be used only under the guidance of a Therapist
or Prescribing Practitioner. You must read these instructions
carefully before use.
INSTRUCTION FOR USE
Junior
Size 1
Max user weight: 50 kg
Weight of product: 39 kg
Size 2
Max user weight: 50 kg
Weight of product: 39.5 kg
Size 3
Max user weight: 50 kg
Weight of product: 40.2 kg
Version 006
Advertisement
Table of Contents

Related Manuals for Jenx Junior


Summary of Contents for Jenx Junior
- Page 1 Version 006 INSTRUCTION FOR USE Junior Size 1 Max user weight: 50 kg Weight of product: 39 kg Size 2 Max user weight: 50 kg Weight of product: 39.5 kg Size 3 Max user weight: 50 kg Weight of product: 40.2 kg Important Information: These instructions must be kept with the product at all times.
- Page 2 INSTRUCTION FOR USE Junior Note: Some fabric and plastic colours may vary, adjustments are not affected.
-
Page 3: Table Of Contents
Contents General Information Optional Accessories Safety Labels ............7 Powered Base ............31 Basic Safe Configuration ........8 Seat Extension ............34 Care and Cleaning Instructions ......8 Headrests ............... 35 Maintenance ............9 Multigrip Headrest ..........36 Product Induction & Hand Over ......10 PU Adjustable Headrest ........ - Page 4 Any changes or alterations carried out by persons other than a Jenx authorised service person will invalidate the warranty and Jenx can accept no liability for any injury or damage so caused. All Jenx products are Medical Devices and are sold on the understanding that they will be...
- Page 5 Junior Key to Components Swiss clip T-Nut Wing knob Allen key bolt Wing nut Star knob Plastic spacer Plastic washer Key for Users Carers and Re-issue Professional and home users and stores technical users Scallop wheel...
-
Page 6: General Information
CHAPTER ONE General Information Carers and Re-issue Professional and home users and stores technical users... -
Page 7: Safety Labels
(see picture), which is located on the product. Please quote this number on all correspondence. Product Labels Each Jenx product has a number of pictorial safety labels attached, these refer to the explanations below. Client weight Limit (chang- es per model and size) Attention/ Warning... -
Page 8: Basic Safe Configuration
General Information Basic Safe Configuration The following features must be kept on the Junior at all times: Seat base, Seat back, Lumbar pad, Lap strap, Hip Supports and Footplate. Failure to use these basic features may pose a risk to the user. Other accessories can be added but these basic features must always be used. -
Page 9: Maintenance
Unauthorised accessories may affect the safety of this product and invalidate your warranty • Check that gas spring levers are not bent. Do not use the product if any levers are bent. Contact Jenx Limited to arrange replacement Monthly Checks... -
Page 10: Product Induction & Hand Over
If the product is to be re delivered, ensure adequate and secure packaging is used • If in any doubt as to the safety of this product do not issue it, contact Jenx Limited for advice • Products must only be issued fully assembled, clean and in good working order. Instruction for Use must be with the product Jenx Limited offer Technical User Courses for stores personnel. -
Page 11: Specification & Warranty
Junior Specification & Warranty Size 1 (JUC01) Size 2 (JUC02) Size 3 (JUC03) Age range (approx.) 18 months - 5 years 3 years - 8 years 5 years - 12 years Max user weight 50 kg 50 kg 50 kg... -
Page 12: Main Features And Benefits
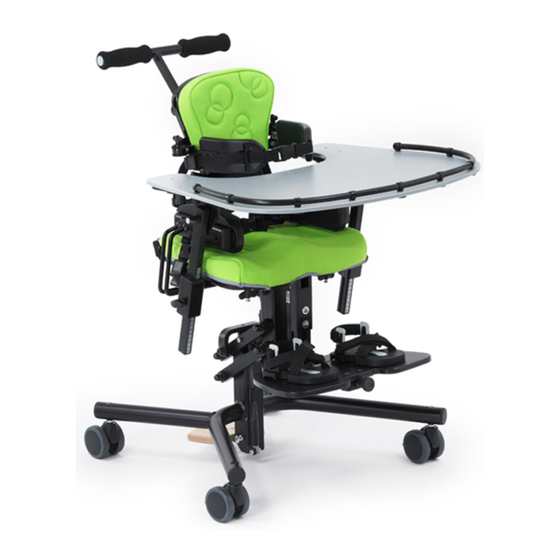
4 POINT LAP STRAP Hold ASIS in correct position for secure hip base SMALL FOOTPRINT Jenx Y base with convenient flip-away foot pedal and safety knob. Fits through most standard doors HEADREST OPTIONS Jenx Multi-grip, Oval, Memory Metal, and Stealth headrests can... - Page 13 Junior Contoured Back Lumbar support Hip pad Contoured seat Back angle adjustment Raise & Lower pedal (Folding) Foot plate Hydraulic lift & lower unit Steel base Locking Castor...
-
Page 14: Frequent Adjustments
CHAPTER TWO Frequent Adjustments Carers and Re-issue Professional and home users and stores technical users... -
Page 15: Lap Strap
Junior Lap Strap The distance between the pads on the front of the strap is variable to accommodate the variation in the size of children Adjust the distance between the pads so that the centre of the pads rest on the Anterior Superior Iliac Spines of the child All belts and harnesses should be used at all times. - Page 16 Frequent Adjustments Lap Strap Pull the strap from the Velcro ® To make the strap longer Pull the buckle along both straps until the desired distance between the pads is achieved To make the strap shorter Pull both straps through the buckle until the desired distance between the pads is achieved...
- Page 17 Junior Lap Strap When the straps are the required length press the straps against the Velcro ® secure them Placing the Child in the Chair For a child with postural problems, the lap belt is often the most important adjustment you make on a chair,...
- Page 18 Frequent Adjustments Lap Strap Ensure the buckle is aligned with the centre of the child’s body Adjust the long straps that pass through the cam locks at the rear and sides until the padded sections of the lap strap rest on the anterior superior iliac spines. Lock the cam locks at the rear of the chair...
- Page 19 Junior Lap Strap Lock the cam locks at both side of the chair Fine Adjustment of the Lap Strap When the Lap Strap is fitted it is possible to finely adjust its position Adjust the pressure on the pelvis by tightening or...
-
Page 20: Castors
Frequent Adjustments Lap Strap & Castors Press the buckle in the positions shown to release the buckle Castors This product is supplied with four double locking Castors. The locking mechanism stops the Castors from turning and swivelling. When all four Castors are in the locked position this secures the chair from unintended roll or movement. -
Page 21: Seat Height
1. Press pedal to raise seat height 2. Press pedal and push down on handle to lower seat Note: Image shown of Bee, Junior adjusts in the same way Why? Benefits of the Adjustment: Height adjustment is used for seating for two main reasons: To suit the lower leg length of the child so that they sit with their feet as near to the floor as possible. -
Page 22: Flip Away Foot Pedal
Frequent Adjustments Flip Away Foot Pedal Why? Benefits of the Adjustment: The Foot Pedal can be tucked away under the chair to prevent accidental operation. The Pedal is held in place by friction. Push the Foot Pedal under the chair. The Pedal can be locked closed by engaging the Plunger. -
Page 23: Tilt-In-Space
Junior Tilt-in-Space Why? Benefits of the Adjustment: By altering the position of your child in space, you can help them to perceive the environment that surrounds them in different ways and thereby help their cognitive development. By putting the chair into prone you may improve your child’s head control and arm function. -
Page 24: Footplate
Frequent Adjustments Footplate Why? Benefits of the Adjustment: Set the Footplate height to suit the length of your child’s lower leg....As the child grows, adjust the Footplate height accordingly. WHY? The range of the Footplate movement Loosen the bolt and adjust the Footplate to the desired height. - Page 25 Junior Footplate Flip-up Footplate Why? Benefits of the Adjustment: The Footplate flips up out of the way to aid placing and removing your child to and from the chair. Simply lift the foot plate and place it against the footpost. The magnet in the footpost will hold it in the upright position.
-
Page 26: Clinical Adjustments
CHAPTER THREE Clinical Adjustments Re-issue Professional and and stores technical users... -
Page 27: Back Angle
Junior Back Angle Loosen the locking wing knob Rotate the scallop wheel until the desired back angle is achieved Tighten the locking wing knob to lock the back angle Back Pad & Lumbar Pad Do not move or remove the barrel... -
Page 28: Hip Guides
Clinical Adjustments Hip Guides Why? Benefits of the Adjustment: The width of the hip guides should be set depending on the size of your child. The angle of these guides will help to keep your child’s hips in a position with the correct amount of abduction or adduction Loosen the wing knob under the seat and adjust the position and angle of the hip guide. -
Page 29: Seat Pad & Abduction Roll
Junior Seat Pad & Abduction Roll Removable abduction roll* for children with Memory foam pad slight internal rotation Reversible foam quilted cover *Optional abduction block available for Contoured side walls children with increased tone and tonal pull to adduction Soft PU moulded... -
Page 30: Optional Accessories
CHAPTER FOUR Optional Accessories Carers and Re-issue Professional and home users and stores technical users... -
Page 31: Powered Base
Junior Powered Base Handset Footpost with stop switch Battery Actuator... - Page 32 Optional Accessories Powered Base Footpost with stop switch. When the switch touches the floor or other object under the footplate, the seat stops descending Raising and Lowering the Seat To adjust the height of the seat push the arrow required...
-
Page 33: Charging The Battery
Junior Powered Base Charging the Battery Push the jack plug of the charger into the handset and plug the charger into the mains Ensure that the battery is charged for 24 hours before first use in order to reach proper function and prolong the lifetime. -
Page 34: Seat Extension
Optional Accessories Seat Extension The seat extension fits onto the Insert the allen key bolts provided through the washer, the slot underside of the front of the chair, in the seat extension and into the holes in the underside of the shown above seat and tighten with the allen key provided Adjusting the Seat... -
Page 35: Headrests
Junior Headrests Fitting the headrest (Multi Grip, Oval, PU Adaptable) All of the Jenx headrests fit to the Junior chair in the same way, they also adjust for angle, depth and height in the same way. Step 1: Insert the two... -
Page 36: Multigrip Headrest
Optional Accessories Multigrip Headrest Adjusting Multi-Grip Headrest Use these bolts to adjust position of the Multi-Grip links To move Multi Grip links undo the bolts shown above. The links can then be easily moved to desired posi- tion. Once position is achieved tighten the bolts securely. Why? Benefits of the Adjustment: The headrest should be positioned to support the child’s head. -
Page 37: Pu Adjustable Headrest
Junior PU Adjustable Headrest Moulding the PU Adjustable headrest (Size 1 and Size 2) The headrest can be moulded around the users head. This is done by bending the wings and bottom pad using your hands (a reasonable amount of force needs to be applied in... -
Page 38: Shoulder Protractors
Optional Accessories Shoulder Protractors Step 1: Insert the shoul- der protractor into the slot at the top of the back pad Step 2: Insert the allen key bolt through the washer and into the hole in the back of the back pad and tighten using the allen key supplied Step 3:... -
Page 39: Push Handle
Junior Push Handle Fixed Push Handle Folding Push Handle Fitting the Push Handles Slide the Handle into the back post. Tighten the bolts with the Allen key Pull out the locking knob Move the Handle to the desired position & release the knob ensuring... -
Page 40: Thoracics
Optional Accessories Thoracics Fitting the Thoracics (fixed or flip away) Insert the thoracics through the slot in the side of the back pad (as shown). Insert the allen key bolts through the washers supplied, through the slot on the back of the thoracics and into the nut insert in the back of the back pad, as shown above. - Page 41 Junior Thoracics Fixed & Flip Away Thoracics Fixed Thoracics - Short or Long Flip Away Thoracics - Short or Long Adjusting Thoracics...
- Page 42 Optional Accessories Thoracics Adjusting Thoracics Adjusting Angle of Flip Away Thoracics...
-
Page 43: Armrests
Junior Armrests Tray & Tray Arms Height & Angle Adjustment Why? Benefits of the Adjustment: Tray height is adjusted for the following reasons: To allow the child to have support from their arms To allow the child to have support at the height that suits them for active work on the tray... -
Page 44: Tray
Optional Accessories Tray Fitting Tray Fit the Tray Locating Pins, under the Tray, into Push the Turn Buttons under the Tray Arms one of the holes on each Tray Arm to secure the Tray Tray Infill (Grey) Why? Benefits of the Adjustment: Tray infills are used to give a solid tray surface where the tray is pre-cut with a hole to take a bowl for play and tactile activities. - Page 45 Junior Tray Translucent Infill for Tray Tray Pad The Tray Pad is fitted to the Tray us- ing Velro . The user decides where to ® postion the pad and then sticks the self-adhesive Velcro in the desired ® postion.
-
Page 46: Activity Frame & Grab Bar
Optional Accessories Activity Frame & Grab Bar Activity Frame Why? Benefits of the Adjustment: Activity frames are added to the trays of both seating systems and standing systems to do one of two things: Hold toys near to the child to prevent them being lost. Keep toys at a level where the child benefits most from the toy when they raise their head to see and play with them. -
Page 47: Elbow Blocks & Chest Pad For Tray
Junior Elbow Blocks & Chest Pad for Tray Tray Elbow Blocks Why? Benefits of the Adjustment: Elbow blocks may fit to the tray or to the back of the chair and are used for children who pull their elbows back to prevent them doing this. Children’s arms and hands are more functional when they are forward on the tray and elbow blocks help some children to achieve this. -
Page 48: Hip Pad Extension
Optional Accessories Hip Pad Extension Why? Benefits of the Adjustment: Hip extension pads extend the amount of the child’s thigh which is supported in sitting. These are often used for a child who tends to drop their thighs into external rotation in sitting. Used in conjunction with an abduc- tion block these extension pads provide a gutter to support the whole of the child’s thigh. -
Page 49: Kneeblocks
Junior Kneeblocks Knee Blocks Why? Benefits of the Adjustment: Knee cups are used to hold the knees to encourage/maintain an abducted or neutral hip position in sitting. ! Knee cups are NOT used to push a child back into their seat. There should not be a strong force pushing towards the hips from the knee cups. -
Page 50: Abduction Block
Optional Accessories Abduction Block Why? Benefits of the Adjustment: This soft but firm block helps keep the knees apart and prevent adduction. Step 1: Release the velcro of the cover and remove the abduction pad Step 2: Put the cover back in place using the velcro Step 3: Slide the abduction block post into the hole under the seat Step 4:... -
Page 51: Sandals And Bootees
Junior Sandals and Bootees Sandals Why? Benefits of the Adjustment: The sandals can be moved on the footplate to hold the child’s feet. The most common position for the feet is directly below the knees. Sandal positions can be adjusted forward and backwards and from side to side. -
Page 52: Waistcoat Harness
Optional Accessories Waistcoat Harness Fitting & Adjusting Waistcoat Quick release buckles Thread the top straps through the cam locks at the back of the back rest and close the cam locks. Thread the bottom straps through the cam locks at the back of the seat and close the cam locks. - Page 53 Junior Waistcoat Harness Press the centre button to release the quick release buckles on the top and bottom straps Fitting Webbing Clips Thread the webbing through the Webbing Clip as shown above Squeeze the ends of the clips together until they click...
-
Page 54: Chest Strap Shoulder Harness
Optional Accessories Chest Strap Shoulder Harness Thread the top straps through the cam locks Push the levers down to lock the cam locks at the back of the back rest and close the cam locks Fit the thoracic buckles to the buckles on the Fit the thoracic buckles to the buckles on the Chest Shoulder Harness Chest Shoulder Harness... -
Page 55: Box Footplate
Junior Chest Strap Shoulder Harness The buckle of the Chest Strap Shoulder Harness should be in line with the centre of the clients chest There are quick release clips on the top straps. Press the button to open Box Footplate... -
Page 56: Maintenance And Inspection
CHAPTER FIVE Maintenance and Inspection Re-issue and stores... -
Page 57: Maintenance & Inspection
If there is any doubt about the safety of the product, do not hesitate to contact our Customer Support Department for advice Products should be thoroughly decontaminated in line with MHRA and local guidelines prior to inspection, storage and re-issue Jenx Limited can take no responsibility for re-issue of products...
Need help?
Do you have a question about the Junior and is the answer not in the manual?
Questions and answers