Table of Contents
Advertisement
Operating Instructions
Model
Voltage
Serial No.
Your service center ...............................................
...............................................
...............................................
...............................................
...............................................
64419 A 99/03
KR 1203
KR 1403
page 1 - 17
Advertisement
Table of Contents

Related Manuals for DITTING KR 1203


Summary of Contents for DITTING KR 1203
-
Page 1: Operating Instructions
Operating Instructions KR 1203 KR 1403 Model Voltage Serial No. Your service center ................................................64419 A 99/03 page 1 - 17... -
Page 2: Table Of Contents
Trouble shooting / action Action in event of problems 4.1.1 Possible malfunctions Repairs 4.2.1 Unblocking the discharge tube 4.2.2 Unblocking the grinding unit 4.2.3 Circuit breaker (KR 1203) Thermal protector (KR 1403) Customer service 64419 A 99/03 page 2 - 17... -
Page 3: General
General Dear Customer, We congratulate and thank you for purchasing a DITTING quality product. These operating instructions have been prepared to simplify your use of the coffee grinder. They contain information, advice and instructions for the best use of your unit. -
Page 4: Transfer Declaration (For European Countries Only)
Operating Instructions Transfer declaration (for European Countries only) To ensure transfer of the operating instructions to final consumers Note: The following declaration should be completed by the dealer and the purchaser. The purchaser undertakes to return this declaration to the dealer. The purchaser thereby certifies that the dealer has drawn his attention to the contents of operating instructions no. -
Page 5: General Safety Instructions
• Only original grinding discs sharpened by DITTING must be used. • NEVER reach into the hopper opening while the machine is running. • NEVER touch electrical components with conducting objects, such as needles, pins, cutlery, etc. -
Page 6: Information And Safety Symbols
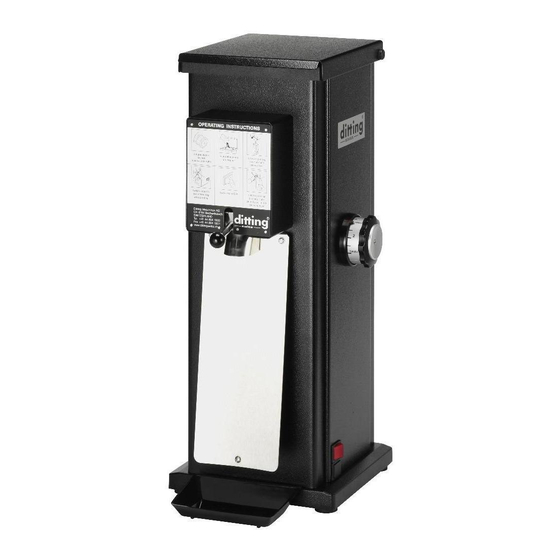
"Turkish fine" to "coarse" with an adjusting knob provided with a scale. The KR 1203/1403 coffee grinders are suitable for use in medium-sized to large food stores, coffee companies and roasting plants. The simple method of operation enables customers to use the grinder themselves in self-service stores. -
Page 7: How To Use The Coffee Grinder
Operating Instructions How to use the coffee grinder Set the required grinding fineness on the scale with adjusting knob (1). Open the cover lid (2) and place coffee beans in hopper (3). Lift lever (4), put empty bag over discharge tube (5) and release lever and paper bag. -
Page 8: Care / Maintenance / Adjustment
Operating Instructions Care / maintenance / adjustment Care and cleaning of coffee grinder The coffee grinder must only be cleaned with a paper towel. If necessary use suitable mild dish washer detergent. Do not use an alkaline cleaning agent. Do not spray coffee grinder with water and/or steam. - Page 9 Operating Instructions The grinding discs and grinding chamber should be cleaned at least once every three months. UNPLUG THE COFFEE GRINDER Loosen the four screws holding the cover lid and hopper and remove them. Use a paper towel and/or a brush to clear the hopper and built-in magnet from any coffee particles.
-
Page 10: Maintenance
Operating Instructions Re-install the adjusting gear/cone in the grinder and turn it clockwise until the rotating plate’s wings clear the grinding housing and the lower plate spins freely. Place the spring over the gear cone, followed by the Aluminum backing plat and screw. -
Page 11: Basic Calibration
Operating Instructions 3.3.1 Basic calibration If the basic calibration is incorrect, friction can occur between the grinding discs, resulting in excessive wear. Switch on motor. Unscrew screw (1) at center of adjusting knob (2) approx. 3 - 5 mm (3/16"), do not remove. -
Page 12: Changing The Scale Setting (Customer Setting)
Operating Instructions 3.3.2 Changing the scale setting (adjustment for customer settings) Switch off motor. Unscrew screw (1) at center of adjusting knob (2) approx. 3 - 5 mm (3/16"), do not remove. Set required number of divisions by pulling out adjusting knob (2), turning in the corresponding direction and re-engaging. -
Page 13: Replacing The Grinding Discs
Operating Instructions Replacing grinding discs Before changing grinding discs switch off motor without fail and pull out power cable ! The grinding discs must only be replaced by persons familiar with operation of the machine according to the following instructions. Switch off motor and pull out power cable. -
Page 14: Trouble Shooting / Action
Action (information text) Grinder cannot be Switch does not light Check power cable, connection and switched on building fuses Circuit breaker (KR 1203) Reset circuit breaker 4.2.3 Thermal protector (KR 1403) Allow the machine to cool down 4.2.3 Grinder jams,... -
Page 15: Repairs
Operating Instructions Repairs Switch off motor and pull out power cable before carrying out any repairs inside the machine, in order to avoid danger of injury and electric shock ! The electrical wiring diagram for this grinder is placed either: - inside of the bottom section of the housing panel or - on the inside of the bottom plate 4.2.1... -
Page 16: Circuit Breaker (Kr 1203)
(3+4) must be dismantled again and then re-fitted. Perform basic calibration according to 3.3.1. 4.2.3 Circuit breaker (KR 1203) Thermal protector (KR 1403) Set ON/OFF switch to OFF position. - Grinder is switched off automatically. Reset overcurrent release by firmly - Allow the machine 10 to 15 min. -
Page 17: Customer Service
Data such as manufacturing number and type of power supply as specified on the nameplate of the coffee grinder should be stated on orders for grinding discs, spare-parts and accessories to ensure rapid and efficient advice and delivery. DITTING MASCHINEN AG Bramenstrasse 11 P.O. Box 241 CH-8184 Bachenbülach...
Need help?
Do you have a question about the KR 1203 and is the answer not in the manual?
Questions and answers