Table of Contents
Advertisement
Quick Links
TABLE OF CONTENTS
Notice on safety driving... ... ... ... ... ... ... ... ... ... ... ... ... ... ... ... 3
Safety driving regulations.... ... ... ... ... ... ... ... ... ... ... ... ... ... .... 3
Protective suits...... ... ... ... ... ... ... ... ... ... ... ... ... ... ... .... ... ... ... ... 3
Modification... ... ... ... ... ... ... ... ... ... ... ... ... ... ... ... ... ... ...... ... 3
Loads and accessory... ... ... ... ... ... ... ... ... ... ... ... ... ... ... ...... ... 3
Front view of TAHITI-150... ... ... ... ... ...... ... ... ... ... ... ... ...... ... 4
Left side view of TAHITI-15... ... ... ... ... .... ... ... ... ... ... ... ...... ... 4
Right side view of TAHITI-15... ... ... ... .... ... ... ... ... ... ... ...... ..... 4
Locations for the Code Numbers... ... .... ... ... ... ... .... ... ...... ..... 5
Using this manual... ... ... ... ... ... ... ... ... .... ... ... ... ... ... ... ...... ..... 6
Ignition switch... ... ... ... ... ... ... ... ... .... ... ... ... ... ... ... .... ...... ..... 6
Key... ... ... ... ... ... ... ... .... ... ... ... ... ... ... .... ... ... ... ... ... .... ..... 6
Meter... .... ... ... ... ... ... ... .... ... ... ... ... ... ... .... ... ... ... ... .... ..... 6
Left handle... ... ... ... ... ... ... .... ... ... ... ... ... ... .... ... ... ... ... .... ..... 6
Right handle... ..... ... ... ... ... ... .... ... ... ... ... ... ... .... ... ... ... .... ..... 7
Cap of fuel tank....... ... ... ... ... .... ... ... ... ... ... ... .... ... ... ... .... ..... 7
Kick start pedal... ........ ... ... ... .... ... ... ... ... ... ... .... ... ... ... .... ..... 7
Rear footrest.... ... ........ ... ... ... .... ... ... ... ... ... ... .... ... ... ... .... ..... 8
Helmet hook..... ... ....... ... ... ... .... ... ... ... ... ... ... .... ... ... ... .... ..... 8
Front luggage carrier.... ... ... ... .... ... ... ... ... ... ... .... ... ... ... .... ..... 8
Luggage cabinet...... ... ... ... ... ... ... ... ... ... ... ... ... ..... ... ... ... ... ... .8
Rear carrier rack..... ... ... ... ... ... ... ... ... ... ... ... ... ..... ... ... ... ... ... .8
Parking the motorcycle... ... .... ... ... ... ... ... ... .... ... ... ... .... ..... 8
Notice on use gasoline and engine oil... ... ... ... ... .... ... ... ... .... ..... 8
Run in period of new motorcycle... .... ..... ... ... ... .... ... ... ... .... ..... 9
Inspection before driving... .... ... ... ... ... ... ... .... ... ... ... .... ..... 10
Driving tips... ... ... ... ... ..... .... ... ... ... ... ... ... .... ... ... ... .... ..... 10
Starting the engine.... ... ..... .... ... ... ... ... ... ... .... ... ... ... .... ..... 10
Starting to drive on..... ... ... ... ... ... ... ... ... ... ... .... ... ... ... .... ..... 11
Driving on a slope....... ... ... ... ... ... ... ... ... ... ... .... ... ... ... .... ..... 11
Braking and Parking.... ..... ... ... ... ... ... ... ... ... .... ... ... ... .... ..... 11
Maintenance Chart..... ... ... .... ... ... ... ... ... ... ... .... ... ... ... .... ..... 12
Engine oil dipstick.... ... ... .... ... ... ... ... ... ... ... .... ... ... ... .... ..... 13
Oil replacement... ...... ... ... .... ... ... ... ... ... ... ... .... ... ... ... .... ..... 13
Gear oil replacement... ... ... ....... ... ... ... ... ... ... .... ... ... ... .... ..... 14
Carburetor... ... ... ...... ... ... .... ... ... ... ... ... ... ... .... ... ... ... .... ..... 14
Throttle cable adjustment... ....... ... ... ... ... ... ... .... ... ... ... .... ..... 14
Idle speed adjustment.... ... .... ... ... ... ... ... ... ... .... ... ... ... .... ..... 14
Spark plug.... ... ... ... ... ..... .... ... ... ... ... ... ... ... .... ... ... ... .... ..... 15
Air cleaner..... ..... ... ... ... ... ... ... ... ... ... ... ... ... ... ... ... ... ... ... ... 15
How to clean the core of air cleaner... .... ... ... ... ... ... .... ... ... .... ..15
Brake system... ... ... ... ... ... ... ... ...... .... ... ... ... ... ... .... ... ... .... ..16
Drain out the air from brake system... ..... ... ... ... ... .. .... ... ... .... ..16
Replace brake pads... ... ... ... ... ... ..... ..... ... ... ... ... .. .... ... ... .... ..17
Tires... ... ..... ... ... ... ... ... ... ... ... ...... .... ... ... ... ... ... .... ... ... .... ..17
Tire pressure.... ... ... ... ... ... ... ... ...... .... ... ... ... ... ... .... ... ... .... ..17
1
Advertisement
Table of Contents

Related Manuals for Roketa 2006 Tahiti-150 YY125T-12


Summary of Contents for Roketa 2006 Tahiti-150 YY125T-12
-
Page 1: Table Of Contents
TABLE OF CONTENTS OPERATIONS SAFETY FIRST Parking the motorcycle… … .… … … … … … … .… … … … .… ..… 8 Notice on safety driving… … … … … … … … … … … … … … … … 3 Notice on use gasoline and engine oil…... - Page 2 TABLE OF CONTENTS Tread..… ..… … … … … … … … .… ...… .… … … … … … .… … … .… ..17 Battery… ..… … … … … … … … … ...… .… … … … … … .… … … .… ...17 Fuse…...
-
Page 3: Safety First Notice On Safety Driving
SAFETY FIRST Notice on safety driving gloves and mask or glasses, and the passenger must wear a helmet too. Safety must be seriously considered when driving a scooter. Do not The clothing should be sheath instead of loose to avoid its being drive until you have fully understood the safety requirements and caught by the handlebars, kick-starter, footrests or the wheels. -
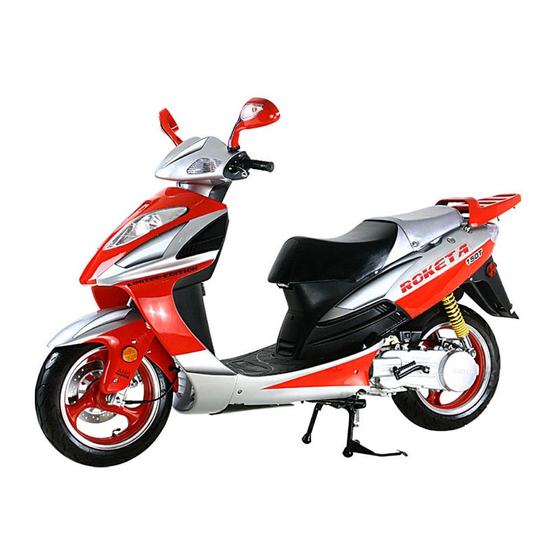
Page 4: Tahiti-150 Front View Of Tahiti-150
SCOOTER TAHITI-15 Front view 10 Headlight 14 Air filter 18 Kick-start pedal 11 Front turning light 15 Seat 19 Main stand 12 Helmet hook 16 Seat lock 20 Side stand 13 Battery 17 Rear carrier rack Right side view 1 Rear view mirror 4 Meter 7 Switch of left handle 2 Rear brake lever... -
Page 5: Locations For The Code Numbers
SCOOTER TAHITI-15 Locations for the Code Numbers Please write down the numbers in the following boxes for future The frame number and engine number are prepared for scooter reference. registration. Also these numbers will help the dealers of our company to give you a better service when your scooter needs repairing or when it Frame number: is entrusted to them for a special service. -
Page 6: Controls And Indicators Using This Manual
CONTROLS AND INDICATORS Turning indicator (4) Using this manual When the turning switch is on, turning indicator and turning light will This document covers the 2006 YY125T-12 scooter. Unless otherwise flash at the same time. Left one is for turning left indicator and right noted, illustrations and descriptions are functionally representative of one is for turning right indicator. -
Page 7: Right Handle
CONTROLS AND INDICATORS Switch of turn signal light “ 3” Throttle controller “ 3” Push the switch to left position, left turn signal light wink; push Throttle controller can control the speed of scooter. Turn the throttle the switch to right position, right turn signal light wink. -
Page 8: Parking The Scooter
CONTROLS AND INDICATORS OPERATIONS Rear footrest Parking the scooter Both feet of passenger must be put on the rear This scooter can be parked with main stand or footrests in the both sides of scooter. side stand. When you use main stand parking the scooter, Helmet hook use your foot step on the pedal of main stand, Turn counterclockwise the hook, and hang... -
Page 9: Run In Period Of New Motorcycle
OPERATIONS Engine oil number: SAE10W-40 or SAE15W-40 is recommended, and Change of rotate speed of engine SAE10W-30 should be used if the temperature is below 5°C. If that The rotate speed of the engine should be changed frequently, and not to kind engine oil is not easy to be found, please choose the substitute remain at one speed. -
Page 10: Inspection Before Driving
OPERATIONS Inspection before driving Driving tips Inspection to the following items must be done before driving. One Warning: If this is your first time to drive this type of scooter, should never neglect these inspections. you are suggested to be practice in a safe and non-crowded field until you are fully familiar with control and operation of this Items to be Purpose of inspection... -
Page 11: Starting To Drive On
OPERATIONS Driving on a slope 2.Start the engine by the kick-start pedal When battery is low or start the engine in the first time, please start the 1. When climbing a steep slope, the scooter may slow down as a result engine by the kick-start pedal. -
Page 12: Maintenance Maintenance Chart
MAINTENANCE Maintenance Chart Interval Item 1500 3000 6000 10000 Months *Battery *Exhaust pipe bolts, cylinder head nuts *Driven belt *Brake system I, T I, T *Brake pads Hydraulic braking liquid hose Replace every four year Steering handle I, T I, T Fuel hose and fuel filter I, R Bolts and nuts in the motorcycle... -
Page 13: Engine Oil Dipstick
MAINTENANCE Engine oil dipstick The above form lists the maintenance to be done after a certain kilometers or months during which the scooter is used. At the end of Check the oil level before driving each period, inspection, testing, lubrication and maintenance should to ensure the oil level is maintained be given following the described procedures. -
Page 14: Gear Oil Replacement
MAINTENANCE Gear oil replacement Throttle cable adjustment Gear oil needs to be replaced every 3,000Km or half a year, 1. Loosen the lock screw “ 1” . whichever comes first. Always use SAE80W90 gear oil. 2. Turn the adjusting nut “ 2”to make (1) Stand the scooter on flat surface the free play of the cable between by using the main stand with... -
Page 15: Spark Plug
MAINTENANCE Spark plug Air cleaner 1. After the initial 1,000 km and every Air cleaner is located under the seat and in the front of luggage 3,000 km after that, clean the carbon cabinet. The core of air cleaner for this scooter is made of filter deposit on the spark plug with a wire paper and sponge. -
Page 16: Brake System
MAINTENANCE 3. Press the sponge to squeeze the When brake fluid is less or no in the disc brake system, that brake detergent out of it by the palms. will be not working any more. Never twist it in case it is broken. Check the brake fluid level of top 4. -
Page 17: Replace Brake Pads
MAINTENANCE Tire pressure the brake lever accordingly. 4. Repeat step 1 to step 3, until the resistance is large enough when Insufficient tire pressure quickens wear to tires and strongly affects squeezing the brake lever. the riding stability. Insufficient pressure causes difficult steering 5. -
Page 18: Fuse
MAINTENANCE Rear view mirror If the scooter will not be ridden for a long time, the battery should be removed and place at a cold, dark and well ventilated space. The Seating on the driving seat of scooter, be sure all back and side battery should be fully charged before returning to the scooter. -
Page 19: Tools Set
MAINTENANCE TROUBLESHOOTING Engine 2. Charge the battery and reinstall it. 3. Discharge the anti-rust oil in the fuel tank and refill the fuel. Starter does not operate or does not turn engine over 4. Conduct pre-driving inspection and check its performance at low 1. -
Page 20: Vibration
TROUBLESHOOTING Starts but runs irregularly or misses 6. CVT wears and tears. See dealer or service. 1. Spark plug in bad condition or partially fouled. Vibration 2. Spark plug cables in bad condition and leaking. 3. Spark plug gap too close or to wide. 1. -
Page 21: Brakes
TROUBLESHOOTING Brakes 1. Brake lever lose resistance. There is no brake fluid in the hydraulic hose and brake fluid tank. See dealer or service. 2. Brakes fade because of air inside brake system. Drain air out from the brake system. See dealer or service. 3. -
Page 22: Technical Specification
TECHNICAL SPECIFICATION Item Specification Item Specification Size (L×W×H) 1970mm× 690mm× 1120mm Lubricate method Pressure & splash Wheelbase 1360mm Starting method Electrical start / kick start Net weight 105kg Spark plugtype A7TC orA7RTC Max. load 175kg Clutch type Dry and automatic ≥80Km/h Max. - Page 23 ELECTRICAL WIRING DIAGRAM - 23 -...
Need help?
Do you have a question about the 2006 Tahiti-150 YY125T-12 and is the answer not in the manual?
Questions and answers