Table of Contents
Advertisement
Quick Links
Advertisement
Table of Contents

Related Manuals for Fulltone tube tape echo

Summary of Contents for Fulltone tube tape echo
- Page 1 Owner’s Manual Version 7 Covers serial #3664 and higher… June 2013 and later...
- Page 2 Echo Footswitch, and instead can use up to 500’ of any 2 conductor, standard instrument cable. Fulltone unveils our Echo Cancel Footswitch (ECF) which requires no external power for its status LED’s (more info or purchase here) Serial# 3664 6/2013: TTE goes to all black metal and black Tolex cabinet &...
-
Page 3: Table Of Contents
Table of Contents Page 1 Product Overview Page 2 Top Panel Diagram Page 3 Additional Diagrams Operating the TTE Page 4 Initial Set-Up Page 5 Let’s Play in Mono! Page 6 Let’s Play in Mono! (Continued) Page 7 All about ((STEREO)) Maintenance and Service Page 8 Service Diagrams... -
Page 4: Product Overview
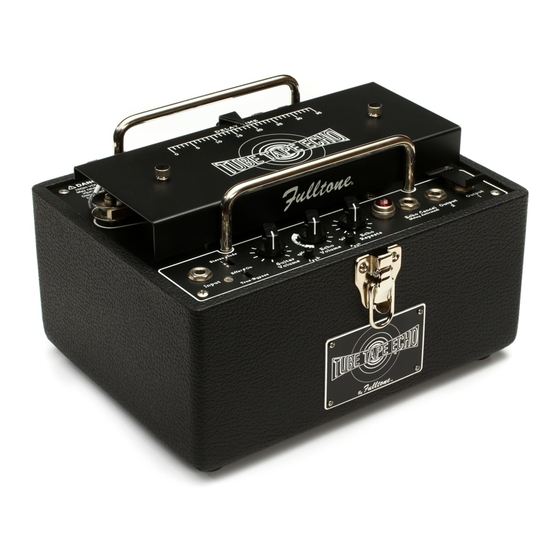
Page 1 Product Overview The Fulltone Tube Tape Echo, although inspired by Market Electronics’ Echoplex of the early to mid-‘60’s, is a far more evolved design which eliminates all of the noise, inconsistencies, and reliability issues associated with the Echoplexes. -
Page 5: Top Panel Diagram
Page 2 Top Panel Diagram... -
Page 6: Additional Diagrams
Page 3 Additional Diagrams... -
Page 7: Initial Set-Up
Page 4 Operating your Tube Tape Echo Warning! Always unplug the guitar cable from the Main Output when not in use! Not doing so for an extended time period may cause the pinch roller to go out-of-round making the tape transport unstable, the repeats out of tune, and may void warranty service claims relating to this issue. -
Page 8: Let's Play In Mono
Page 5 Let’s Play in Mono! Refer to Diagrams on Pages 2 and 3 So you’ve gone through all of the steps in the “Initial Set-Up” Chapter? Now you’re ready to check a few more things and play. Terms: CW= Clockwise CCW= Counter-Clockwise 1) You’re now running in Mono (only one amplifier) so make sure the Stereo Mode Switch (see #2) -
Page 9: Let's Play In Mono! (Continued)
Page 6 Let’s Play in Mono! (Continued) Refer to Diagrams on Pages 2 and 3 6) Another way to alter the available Delay Times is via the Tape Speed Switch. (see #18) With this switch, you are given a choice of High Speed or Low Speed tape movement, and you will see the Tape flow at a slower or faster rate depending on which setting you choose. -
Page 10: All About ((Stereo))
Page 7 All about ((Stereo)) Refer to Diagrams on Pages 2 and 3, and 9 Warning! Running multiple amps can be dangerous or even fatal due to the possibility of a ground loop being created when two or more AC powered devices do not share a common ground reference point. -
Page 11: Service Diagrams
Page 8 Service Diagrams Only use a 250volt / 2 amp Slo-Blow (20mm x 5.2mm) -
Page 12: Service Diagrams (Continued)
Page 9 Service Diagrams (Continued) -
Page 13: Tape, Tape Heads, And Transport
Page 10 Tape, Tape Heads, and Transport Refer to diagrams on Pages 2 and 3 Most of the procedures outlined on this page require the removal of the Top Cover Plate, for an explanation on how to do this, see page 4. Tape Cartridge (ETC-1) is available for direct purchase (only for sale with proof of TTE ownership) at our website Your ETC-1 is a plastic cartridge that houses about 1 minute of Hi Quality Recording Tape. -
Page 14: Tape, Tape Heads, And Transport (Continued)
Page 11 Tape, Tape Heads, and Transport (Continued) Refer to diagrams on Pages 2,3, 8 and 9 With the TTE is turned on, dab some S-721H-4 on a Q-Tip, engage the Transport Clutch and press the swab up against the roller with pressure being careful not to get the swab caught in between the Pinch-Roller and the Capstan (see #16). -
Page 15: Additional Tape Path Maintenance
Page 12 Additional Tape Path Maintenance... -
Page 16: Tubes
Bias Oscillator/Erase function of the TTE. Warning! Changing the Erase tube to anything other than a Fulltone 12AU7 will result in the unit not erasing properly!. Fulltone sells a matched & tested Tube Trio for your TTE direct for $49.95 (shipping included) to US resident only! You get 2 x Fulltone 12AX7 tubes, and 1 x Fulltone 12AU7. - Page 17 Page 14 Converting Transformer to Operate at 220/240 Voltage Warning! This procedure is ONLY to be done by an experienced Technician. Serious injury or death and/or irreparable damage to the unit may occur if done improperly. Note: the only changes are to the White and Brown Wires…all other wires are left alone...
- Page 18 The Tubes carry a 3-month warranty that only covers failure, not breakage. Owner is responsible for all shipping and insurance charges both ways. Fulltone Musical Products Inc. (and its employees) is not liable for any damages or injuries resulting from the misuse of this unit and/or carelessness of the user.
Need help?
Do you have a question about the tube tape echo and is the answer not in the manual?
Questions and answers