
Summary of Contents for Seabear H3
- Page 1 SEABEAR ER M MAN N UAL L V0.12 2 (requires f f irmware V 1.27)
-
Page 2: Table Of Contents
Introduction ................7 Safety Considerations ............8 2.1 Warnings ................. 10 Using the SEABEAR H3 ............. 13 3.1 Activating the SEABEAR H3 ........... 13 3.2 Button Operation ............. 14 3.3 Charging / USB connection ..........16 Settings ................19 4.1 Overview menu structure ..........20 4.2 Main menu .............. - Page 3 4.6.2 Modifying a gas entry ..........28 4.7 MODES sub menu ............30 4.8 Settings sub menu ............31 SEABEAR H3 on the surface ..........33 5.1 Watch mode ..............33 5.2 main surface screen ............35 5.3 Large number dive screen ..........38 5.4 Compass screen .............
- Page 4 Introduction SEABEAR H3 7.5 Decompression diving ............. 53 7.6 Multi gas diving NITROX ..........56 7.7 Gas switches NITROX ............ 58 7.8 Multi gas diving TRIMIX ..........59 7.9 Gas switches TRIMIX ............. 61 7.10 Ascend speed bar graph..........64 7.11 Dive profile ..............
- Page 5 Logbook ................77 Dive data download ............78 9.1 Immediate download with NFC ........78 9.2 PC Mode ................. 79 9.3 Customizing the SEABEAR H3 ........81 10 Outdoor modes ..............82 10.1 Stop watch ..............83 10.2 Altitude logging ............. 83 11 Care and Maintenance ............
- Page 6 Introduction SEABEAR H3 13 Troubleshooting ..............91 14 Firmware update ..............92 15 Limitations of Liability ............93 16 Contact ................95...
-
Page 7: Introduction
The H3 is an active NFC tag, which means that dive data can instantly be transferred to NFC enabled mobile devices for detailed visuaklization and for sharing on soc ial networks. -
Page 8: Safety Considerations
Oxygen toxicity or some other inherent risk of scuba diving. Do not use this SEABEAR H3 if you are not aware of these risks, and you do not accept these remaining risks. - Page 9 Safety Considerations SEABEAR H3 WARNING statements describe potentially hazardous situations, if not avoided, could result in death,or serious injury. Avoid these situations under any circumstances. CAUTION indicates a hazardous situation which, if not avoided, could result in minor or moderate injury.
-
Page 10: Warnings
Safety Considerations SEABEAR H3 2.1 Warnings Before using the SEABEAR H3, read the manual in its entirety and get familiar with all the functions of the device. Divers must have successfully completed a course in scuba diving. They must have knowledge about the potential risks and hazards of scuba diving. - Page 11 SEABEAR H3 for TRIMIX diving. Proper training in TRIMIX diving is required before doing any TRIMIX or HeliOx dives. Do not ignore warning signs and indicators on the SEABEAR H3, as this may result in serious injuries and can be even lethal.
- Page 12 SEABEAR H3. If you do not fully understand how to use the SEABEAR H3, or if you have any questions, contact your instructor or your authorized Seabear Diving...
-
Page 13: Using The Seabear H3
3 Using the SEABEAR H3 3.1 Activating the SEABEAR H3 When the SEABER H3 is not used, it is in standby mode, which means, that the display is switched off to reduce the power consumption to a minimum. Press either the left or the right button shortly to activate the computer. -
Page 14: Button Operation
/Using the SEABEAR H3 SEABEAR H3 3.2 Button Operation 2 push buttons are used to operate the SEABEAR H3. The operation of the device is done with short and long pushes of the buttons. Within the menu, the long push functions are indicated at the bottom of the screens directly above the buttons. - Page 15 /Using the SEABEAR H3 SEABEAR H3 A short push of either button is used to switch between screens, navigate in a menu, increment (right button) or decrement (left button) user settings. The symbol for a short push is a hand with a stretched index finger.
-
Page 16: Charging / Usb Connection
3.3 Charging / USB connection The SEABEAR H3 is charged via USB. To charge the SEABEAR H3 or to download data from the SEABEAR H3, first, connect the USB cable to the SEABEAR H3. Then connect the USB cable to a personal computer USB port or to a USB charger. - Page 17 SEABEAR H3 Do not dive when the SEABEAR H3 battery indicator is red. The dive computer might run out of battery. In such a case, the H3 may give incorrect depth readings, incorrect decompression data or may shut off completely. In case of a red battery indicator, recharge the SEABEAR H3 before the next dive.
- Page 18 /Using the SEABEAR H3 SEABEAR H3 Use only a clean and dry USB cable. Clean and dry the connector surfaces of the cable.
-
Page 19: Settings
Settings SEABEAR H3 4 Settings The SEABEAR H3 has an intuitive menu which allows the user to change settings quickly. To enter the menu, press and hold the left button for more than It is possible to enter the menu on the surface as well as also during the dive. -
Page 20: Overview Menu Structure
Settings SEABEAR H3 4.1 Overview menu structure only available in CCR mode CCR GAS TABLE diluent gas table SET CCR SP1 switch to setpoint 1 SET CCR SP2 switch to setpoint 2 SET OC switch to open circuit EDIT CCR SP1... - Page 21 Settings SEABEAR H3 SETTING DIVE CONSERVATISM conservatism settings DIVE DETECTION automatic dive computer activation DIVE TIMEOUT dive mode timeout after surfacing SAFETY STOP enable/disable 3m safety stop USER GF HIGH Gradient Factor High setting USER GF LOW Gradient Factor Low setting...
- Page 22 Settings SEABEAR H3 LOGBOOK display logbook PC-MODE mass storage/USB mode INFORMATION information STANDBY switch off dive computer At the bottom of the screen is written what function is performed when one button is pressed long: SELECT: a menu item or gas is selected EDIT: edit a value, gas, etc.
-
Page 23: Main Menu
Press and hold the left button to enter a sub menu or to select a menu item in the menu (like STANDBY). Press and hold the right button to exit the main menu. Selecting the menu item STANDBY switches the SEABEAR H3 into standby mode. ↓... -
Page 24: Navigation Sub Menu
Press and hold the right button to edit one heading. 4.4 Editing a heading First aim the H3 at the desired direction. Then long press the left button to store the direction that is displayed on the screen. In the next step you can modify the caption of the heading. Short press the left or the right button to scroll characters. - Page 25 Settings SEABEAR H3 Use a space character at the end of the caption to indicate the end of the caption you want to enter. Press and hold the left button to save the current heading. In the next step it is possible to save a depth. Shortly press the left or the right button to increase or decrease the depth.
-
Page 26: Compass Calibration
The compass calibration takes approximately 2 minutes. Within this 2 minutes rotate the SEABEAR H3 vertically around all its axes. After calibration check the compass heading. If the compass heading is incorrect, redo the calibration process. For further instructions on compass calibration visit the SEABEAR webpage www.seabear- diving.com. -
Page 27: Gas Submenu
Press and hold the left button to select a specific gas. After ↓ ↑ setting one gas, the SEABEAR H3 exits the menu and returns to normal operation. The SEABEAR H3 uses then this gas for calculating compartment on and off gassing. -
Page 28: Modifying A Gas Entry
Settings SEABEAR H3 4.6.2 Modifying a gas entry Press and hold the right button to modify or delete a gas entry. Then the O2 value of the gas entry will start blinking, which means that this value can be edited now. - Page 29 Make sure, that the gas, which is currently set, matches the gas you are breathing. If the gas fractions set in the SEABEAR H3 do not match the frations of the gas you are actually breathing, decompression calculation will be wrong.
-
Page 30: Modes Sub Menu
In the bottom timer mode, no decompression data are shown either. When using the bottom timer mode, the SEABEAR H3 uses the Nitrogen fractions of air to calculate on and off gassing of compartments for the purpose of estimating no flight times. -
Page 31: Settings Sub Menu
4.8 Settings sub menu The sub menu setting allows the user to modify many parameters of the SEABEAR H3. Shortly press left or right button to navigate between menu items. Press and hold left button to select an item. Press and hold right button to exit the menu. - Page 32 There are two sub menus. In COLOR SCHEMES it is possible to set the color schemes of the SEABEAR H3. In COLOR WATCH it is possible to set the color of the watch screen. H2O DENSITY: only available with Science unlock - the water density can be set in order to achieve geometrically accurate depth readings.
-
Page 33: Seabear H3 On The Surface
5.1 Watch mode You can use the SEABEAR H3 as a watch. Shortly press the left or the right button, to switch on the display. The display shows time, date. - Page 34 /SEABEAR H3 on the surface SEABEAR H3 The SEABEAER H3 also features a dual time screen. This is especially interesting when you are on holidays and you would like to know also the time at your home for instance. It is possible to set 2 time.
-
Page 35: Main Surface Screen
In standby mode, shortly press either button to enter watch mode. Afterwards, press either button again, to switch on the SEABEAR H3. The surface main screen of SEABEAR H3 shows a multitude of information: In the top row local time and date are displayed. In the lower fields the ambient pressure is shown. - Page 36 30%, thus the SEABEAR H3 should be charged before the next dive. When the SEABEAR H3 is charged via a USB cable, then the battery symbol shows a bold arrow. This example also shows how the SEABEAR H3 can be customized.
- Page 37 /SEABEAR H3 on the surface SEABEAR H3 If the SEABEAR H3 is fully charged and is still connected to a USB charger or USB port, the battery symbol shows no arrow anymore. Instead a USB symbol is displayed (Example 4).
-
Page 38: Large Number Dive Screen
/SEABEAR H3 on the surface SEABEAR H3 5.3 Large number dive screen Shortly press the left or the right button to navigate to the large number dive screen. The large number dive screen is available on the surface as well as during diving. -
Page 39: Compass Screen
/SEABEAR H3 on the surface SEABEAR H3 5.4 Compass screen Shortly press the left or the right button to navigate to the compass screen. The large compass screen is also available during diving. The compass screen shows the heading. The current depth is shown on top left of the screen. -
Page 40: Navigating With The Compass
/SEABEAR H3 on the surface SEABEAR H3 5.5 Navigating with the compass Up to 3 compass headings can be stored in the SEABEAR H3. Select from the sub menu NAVIGATION one pre programmed heading. Short press either button to navigate between pre-programmed headings. - Page 41 SEABEAR H3 Attend a course in underwater navigation prior to using a compass underwater. Exercise and become familiar with the compass of the SEABEAR H3 on land, before using it underwater. Check before a dive, if the compass works correctly.
-
Page 42: Seabear H3 Automatic Switch On
1.1 bar absolute pressure, which equals to 1m depth at sea level, or if the diver descends more than 1m/min, the SEABEAR H3 is switched on. The automatic switch on feature can be activated or deactivated in menu... - Page 43 SEABEAR H3 automatic switch on SEABEAR H3 It is recommended to switch on the SEABEAR H3 before entering the water. If the automatic turn on feature is activated, the SEABEAR H3 will be automatically switched on at the beginning of the dive.
-
Page 44: Diving With The Seabear H3
Switch on the SEABEAR H3 before you enter the water. If automatic switch on is activated, you do not need to switch on the SEABEAR H3. It will be activated automatically as soon as you dive deeper than 1m, however we still recommend to switch on the H3 before... - Page 45 Verify before each dive, that the SEABEAR H3 settings are correct. If you are using breahting gases other than air, analyze the breathing gas before the dive. Set the SEABEAR H3 to units you are familiar with (imperial or metric units).
-
Page 46: Seabear H3 Decompression Model
The SEABEAR H3 calculates no decompression times and decompression stops, depth and duration with a mathematical decompression model, which estimates the inert gas uptake and release during diving. The decompression model in the SEABEAR H3 uses the Buelhmann ZH-L16C dataset. The model uses 16 hypothetical compartments for Nitrogen to estimate the inert gas loadings of the tissues of the body during a dive. - Page 47 Diving with the SEABEAR H3 SEABEAR H3 The SEABEAR H3 features a very precise pressure sensor, which can be also used as altimeter. This allows the SEABEAR H3 to adapt automatically to the reduced atmospheric pressure in altitude diving. The SEABEAR H3 comes with 4 predefined Gradient factor settings.
- Page 48 Diving with the SEABEAR H3 SEABEAR H3 A smaller GF High allows you shorter No Decompression Times. Diving with a smaller GF High reduces risk of decompression sickness. GF Low is only relevant when doing decompresion dives. A GF Low smaller than GF high results in deeper stops.
-
Page 49: No Decompression Diving
Diving with the SEABEAR H3 SEABEAR H3 7.3 No decompression diving During no decompression diving, the SEABEAR H3 shows all dive relevant information. There are 3 screens available. The standard and default screen shows next to depth, dive-time, decompression information and maximum depth, as well as detailed information about compartment inert gas loadings, ascent and descent speed and battery voltage. - Page 50 Diving with the SEABEAR H3 SEABEAR H3 The depth field as well as the NDT field are color coded. The color coding of the depth field is based on the pO2 of the current breathing gas, thus it is dependent on the O2 fraction of the breathing gas and the depth.
- Page 51 This risk also depends on the individual diver’s physiological condition, which can vary from day to day. The SEABEAR H3 cannot account for these variations.
-
Page 52: Safety Stop Indicator
The SEABEAR H3 includes a Safety Stop feature, which requests a 3 min safety stop between 3 and 6 m depth. The SEABEAR H3 only requests a Safety Stop if the dive was deeper than 10m. The Safety Stop feature can be enabled or disabled in the... -
Page 53: Decompression Diving
In recreational mode, only one gas is available. In decompression diving, the SEABEAR H3 shows a ceiling in m and the estimated time to surface. An additional screen is available, which gives detailed decompression stop information at which depth decompression stops have to be done as well as how long those have to be. - Page 54 Diving with the SEABEAR H3 SEABEAR H3 The same decompression information is also shown on the second screen in large numbers. As soon as the diver has to perform decompression stops, in cases where there is a ceiling indicator and time to surface is displayed, additional screen shows the decompression schedule.
- Page 55 This risk also depends on the individual diver’s physiological condition, which can vary from day to day. The SEABEAR H3 cannot account for these variations.
-
Page 56: Multi Gas Diving Nitrox
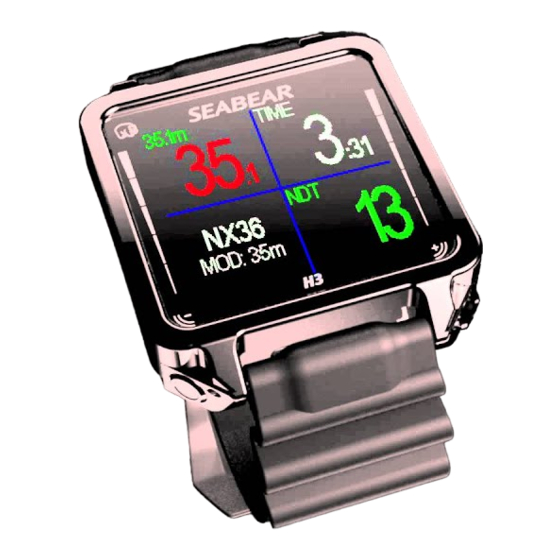
SEABEAR H3. A maximum of 8 different breathing gases can be programmed in menu GAS. The SEABEAR H3 suggests the best breathing gas for you dependent on the depth and the fractions of the programmed breathing gases. It suggests the breathing gas with the highest fO2 fraction that at the current depth has still a pO2 of less than 1.6 bar. - Page 57 Diving with the SEABEAR H3 SEABEAR H3 In this example, the diver is at 22.3 and the dive time is 32min 1 s. The estimated Time to Surface TTS is 7min and the ceiling is 9m. The maximum depth is 22.3m.
-
Page 58: Gas Switches Nitrox
After performing a gas change, after having changed the breathing regulators, the user has to confirm the gas change on the SEABEAR H3. This is a very simple task. A single long press of the right button is sufficient to confirm the gas change and change the selected gas. -
Page 59: Multi Gas Diving Trimix
If multi gas diving is unlocked, it is possible to use more than one breathing gas with your SEABEAR H3. At maximum 8 different breathing gases can be programmed. If TRIMIX is unlocked, then it is also possible to program TRIMIX gases, thus gases containing Oxygen, Helium and Nitrogen. - Page 60 Diving with the SEABEAR H3 SEABEAR H3 The following example shows a diving scenario of 3 breathing gases. TX 15/40, NX 36 and O2 are programmed. In this example, the diver is at 38.1m and the dive time is 18min 45s.
-
Page 61: Gas Switches Trimix
After performing a gas change and having changed the breathing regulators, the user has to confirm the gas change on the SEABEAR H3. This is a very simple task. A single long press of the right button is sufficient to confirm the gas change and change the selected gas. - Page 62 Diving with the SEABEAR H3 SEABEAR H3 The SEABEAR H3 uses the currently selected breathing gas for calculation of the inert gas loadings. The selected gas does NOT automatically change. It is required to select the suggested breathing gas manually with a long press of the right button or selecting the suggested gas from the GAS submenu.
- Page 63 O2 fraction of less than 20%, unless you have been properly trained in using those and unless you have a TRIMIX certification. The SEABEAR H3 suggests a breathing gas solely based on the MODs of the breathing gases and the current depth, but does not account for isobaric...
-
Page 64: Ascend Speed Bar Graph
7.10 Ascend speed bar graph The SEABEAR H3 calculates ascent and descent speed. A bar graph on the right side of the display indicates the ascent and descent speed. A bar in blue color, starting on top, and pointing down, indicates descent speed. The maximum ascend and descent speed that can be indicated is 20m/min. -
Page 65: Dive Profile
Do not descend faster than 20 m/min as this may increase the risk for inert gas narcosis. 7.11 Dive profile The SEABEAR H3 continuously logs the dive profile. The dive profile screen is an alternative screen. Press the left or the right button short to toggle screens until the dive profile is shown. -
Page 66: Inter Gas Loadings
7.12 Inter gas loadings The SEABEAR inert gas loading graph visualizes the compartment gas loadings. There are 16 bar graphs, one for each of the 16 compartments. The compartments are sorted from left to the right, with the fastest gas loading displayed at the left and the slowest at the right. - Page 67 Diving with the SEABEAR H3 SEABEAR H3 In this example the diver is at 5.6 m depth and performs a safety stop. All compartment bar graphs are green, which means, that there is no mandatory decompression stop required anymore. The 8 faster compartments have inert gas loadings higher than the ambient pressure line, which means that they are off- gassing.
- Page 68 The ascend speed is 10m/min. This manual does only describe the functionality of the SEABEAR H3. It is not intended as guidebook for decompression, multigas of trimix diving.It is the divers own responsibility to dive within the limits he is trained and...
-
Page 69: Acoustic Alarms
Diving with the SEABEAR H3 SEABEAR H3 7.13 Acoustic alarms The SEABEAR H3 has an inbuilt piezo-sounder to indicate potentially dangerous situations. The acoustic alarm is triggered in the following situations: - Remaining no decompression time NTD = 1 min - Ceiling violation... -
Page 70: Bottom Timer Mode
SEABEAR H3 7.14 Bottom timer mode SEABEAR H3 has a bottom timer mode. To activate the bottom timer mode, enter the sub menu MODES. Shortly press the left button, navigate to the menu item bottom timer. Press and hold the left button to activate the bottom timer mode. - Page 71 After recreational multi day diving one should wait at least 24h before flying. After technical diving wait at least 48h before flying. Using the H3 in normal dive mode within 48h after using it in bottom timer mode or apnea mode may result in incorrect decompression calculations.
-
Page 72: Apnea Mode
SEABEAR H3 7.15 Apnea mode The SEABEAR H3 is the ideal tool for breath-hold diving. It can be switched into Apnea mode by entering the sub menu MODES. From there navigate to apnea item and long press the left button to activate apnea mode. - Page 73 After recreational multi day diving one should wait at least 24h before flying. After technical diving wait at least 48h before flying. Using the H3 in normal dive mode within 48h after using it in bottom timer mode or apnea mode may result in incorrect decompression calculations.
-
Page 74: Closed Circuit Rebreather Mode
SEABEAR H3 7.16 Closed circuit rebreather mode The SEBAEAR H3 supports closed circuit rebreather diving (CCR unlock required). In the example screens the SEABEAR H3 is set to constant setpoint SP2 1.1bar, Diluent Air. 7.16.1 CCR related settings this mode... -
Page 75: After Diving
7.17 After Diving After each Dive, rinse the SEABEAR H3 in fresh water and let it dry. Be sure, that the SEABEAR H3 is dry and clean before connecting it to a USB cable. After diving, rinse the SEABEAR H3 in fresh water to avoid corrosion. -
Page 76: Flying After Diving
7.18 Flying after Diving The SEABEAR H3 has integrated algorithm to calculate the compartment desaturation time and the no fly time. The No Fly time is shown on the surface screen. Do not fly directly after a dive. Flying after diving may cause decompression sickness. -
Page 77: Logbook
/Logbook SEABEAR H3 8 Logbook The SEABEAR H3 stores all dive data on the internal memory. To access the logbook enter the menu by pressing and holding the left button. Navigate with short presses of the left button to the menu item Logbook. Press and hold the left button to enter the logbook. -
Page 78: Dive Data Download
NFC on your mobile phone. Place the mobile device above the SEABEAR H3, and the dive data of the last dive will be automatically transferred to the mobile device. Pairing of the devices is not required. A dedicated SEABEAR App is available, which allows viewing dive data as well as sharing them in social networks. - Page 79 SEABEAR H3 9.2 PC Mode Firstly, connect the USB cable to the SEABEAR H3. Then connect the cable to a USB port of your PC. Next, activate the PC mode on the SEABEAR H3 by selecting the menu item PC MODE in the main menu.
- Page 80 PC. Therefore click 'Safely Remove Hardware' in the System Tray of Windows before leaving the H3 PC mode. This is necessary to ensure that Windows is not busy reading / writing when you end the PC mode, as this may result in corrupted data on the SEABEAR H3.
-
Page 81: Customizing The Seabear H3
Therefore connect the SEABEAR H3 to a PC and enter PC mode through the menu. Open a file explorer and search for the SEABEAR drive. The SEABEAR H3 appears as a local drive in your file explorer. Create a text tile in the root folder of the SEABEAR H3. Rename the file to user.info The file can contain 3 lines of characters and numbers, but at maximum 14 characters/numbers per line. -
Page 82: Outdoor Modes
Outdoor modes SEABEAR H3 10 Outdoor modes The SEABEAR H3 has an inbuilt compass and a precise pressure sensor which can also be used as an altimeter. In watch mode, the screen can be switched between watch screen, compass screen and altitude profile. -
Page 83: Stop Watch
Outdoor modes SEABEAR H3 10.1 Stop watch The SEABEAR H3 features a stop watch, In watch mode, press the right button shortly to start or stop the watch. Press the right button long to reset the watch. 10.2 Altitude logging The SEABEAR H3 is capable of logging the altitude. - Page 84 (ALT_XXXX.csv), whereas each recording is saved in a separate file. Similar to accessing the dive files, it is possible to access also the altitude files by simply connecting the SEABEAR H3 to a PC and entering USB mode. The altitude is calculated from the atmospheric pressure. If the weather changes, this usually also induces atmospheric pressure changes, thus the altimeter may show incorrect values.
-
Page 85: Care And Maintenance
SEABEAR H3 11 Care and Maintenance The SEABEAR H3 is built from high quality seawater resistant materials and features an ultra scratch resistant sapphire glass. The SEABEAR H3 is designed to withstand diving harsh conditions. However, you should still protect your SEABEAR H3 from shock, excessive temperatures, chemicals and mechanical tampering. - Page 86 Care and Maintenance SEABEAR H3 The SEABEAR H3 should be inspected for mechanical damage and cracks before, and after each dive to ensure it is working properly. Failure to observe the above precautions leads to loss of warranty and any product-related...
-
Page 87: Specifications
Specifications SEABEAR H3 12 Specifications 12.1 General specifications Maximum operational depth: 130m Full color OLED Display: 160 x 128 pixel, RGB, 1.7” Digital Pressure Sensor, 130 m rated Depth resolution: 0.1m Temperature resolution 0.1°C Imperial / metric mode Digital Compass, tilt compensated... -
Page 88: Decompression Algorithm
Specifications SEABEAR H3 12.2 Decompression algorithm Buehlmann ZH-L16 decompression model 16 compartments for Nitrogen, 16 compartments for Helium Unlock code required for multigas diving Unlock code required for TRIMIX diving Gradient factors (4 pre set values) No-fly time indicator Automatic altitude adaption... -
Page 89: Electrical Specifications
Dive data storage interval in dive mode: 5s Dive data storage interval in free-diving mode: 1s Memory accessible via USB (SEABEAR H3 is recognized as Mass Storage Device) NFC Tag capability – instant download of dive data to a mobile phone without pairing... -
Page 90: Special Software Features
12.6 Testing and validation The SEABEAR H3 was tested according to the European Normative EN13319. About 10000 simulated dives were carried out in the laboratory and in the hyperbaric chamber to validate the correct implementation of the decompression model. The code was validated according to Eric C Bakers implementation of the Buehlmann ZH-L16 algorithm with Gradient Factor extension. -
Page 91: Troubleshooting
In this case it is necessary to reset the SEABEAR H3. Simply attach the USB cable to the SEABEAR H3 and plug it in a charger. The SEABEAR H3 will be reset after a few seconds. All decompression information and user settings are lost after a reset. -
Page 92: Firmware Update
Download the latest firmware for your product from the SEABEAR website. Connect the SEABEAR H3 to your PC and enter PC mode in menu/PC MODE. Search in the file explorer for the SEABEAR drive. Unpack the firmware file to the SEABEAR drive. Exit USB mode and activate STANBY mode in menu /STANDBY. -
Page 93: Limitations Of Liability
LIMITATIONS OF SEABEAR’S LIABILITY TO YOU. YOU AGREE AND UNDERSTAND THAT SCUBA DIVING IS A HIGH RISK, POSSIBLY LIFE-THREATENING ACTIVITY AND THE USE OF THE SEABEAR H3 IS IN NO WAY A SUBSTITUTE FOR PROPER SCUBA TRAINING AND CERTIFICATION. BECAUSE OF THE NUMBER OF VARIABLES AND THE VARYING DEGREES TO WHICH THEY MAY AFFECT... - Page 94 INJURY OR DEATH WHILE DIVING, EVEN IF YOUR PERSONAL INJURY OR DEATH IS CAUSED, IN WHOLE OR IN PART AND DIRECTLY OR INDIRECTLY, BY THE SEABEAR H3 OR YOUR USE OF THE SEABEAR H3, OR ARISING FROM BREACH OF THE WARRANTY, BREACH OF CONTRACT, NEGLIGENCE, STRICT TORT, OR...
-
Page 95: Contact
Contact SEABEAR H3 16 Contact SEABEAR GmbH Peter Tunner Strasse 19 A-8700 Austria Homepage: http://www.seabear-diving.com News: https://www.facebook.com/seabear.diving... - Page 96 Contact SEABEAR H3...
Need help?
Do you have a question about the H3 and is the answer not in the manual?
Questions and answers