Table of Contents
Advertisement
Advertisement
Table of Contents

Related Manuals for onga Pantera II Series


Summary of Contents for onga Pantera II Series
- Page 1 Pantera Series Should you the installer or owner be unfamiliar with the correct installation or operation of this type of equipment you should contact the distributor/manufacturer for the correct advice before proceeding with the installation or operation of this product.
- Page 2 Relax - you’ve bought an Congratulations on your decision to purchase an Onga product. Onga is one of the best know brands in its field, with a proud local and international reputation. Onga is a brand for reliability, value for money and technological innovation.
- Page 3 ISO 9001:2000 accreditation. A Fair Price Onga products are neither the cheapest nor the most expensive in their field. Our products do, on the other hand, always represent very good value for money; they always have and they always will.
-
Page 4: Table Of Contents
TABLE OF CONTENTS Model Data Installation Operation Service and Maintenance Troubleshooting Warranty... -
Page 5: Model Data
Manufactured in Australia, the Onga Pantera II sand filter is made from UV stabilised polyethylene. The reputation of durability and performance makes the PanteraII range first choice for quality pool builders. - Page 6 Filter Application - General Information This filter is designed for use in domestic/residential swimming pool installations with correctly sanitised fresh or salt chlorinated water. Suitable for use with sand or Zelbrite filter media. Locate the filter system as close to the pool as practical. Place the filter on a level stable foundation, preferably a concrete pad or paving.
-
Page 7: Installation
Installation Hazardous Pressure Incorrectly installed or tested equipment may fail, causing severe injury or property damage. Read and follow instructions in owner’s manual when installing and operating equipment. Have a trained pool professional perform all pressure tests. All glued fittings and pipe work should be allowed to dry to atmosphere for 24 hours before closing the installation. - Page 8 The filter internals comprise of a collector hub and eight (8) laterals, which are supplied packaged seperately with the collector hub and are stored inside the filter tank prior to shipment. Carefully inspect the laterals and hub prior to assembly for any visible defects.
-
Page 9: Installation Of Filter Internals
Important: Ensure slotted side of laterals face downwards from hub after final assembly, and prior to filling with sand. Steps for Installation of Filter Internals A. Insert first lateral into socket; twist clockwise 1/4 turn to lock lateral into hub. Lateral is correctly installed when slots face down. -
Page 10: Installation Of Multi-Port Valve
Loading Sand Media To keep sand out off collector assembly, place plastic sand shield over top of collector tube before pouring sand into filter (See diagram below). To support laterals and prevent lateral breakage during loadings, fill tank about half full of water before loading sand. - Page 11 Hazardous pressure. Clamp will not hold unless it is seated properly! DO NOT START PUMP until clamp ends are 1/4” (6mm) apart or less. Tighten clamp knob until clamp ends (under bolt) are 1/4” (6mm) apart. Tap around outside of clamp with a mallet to help seat clamp.
- Page 12 If you notice a leak around the clamp area after 15-30 minutes of running, repeat steps 3-4. If there are leaks from beneath valve/clamp area, STOP PUMP, release all pressure by turning valve handle to ‘waste’, remove clamp and valve and clean sealing surfaces.
-
Page 13: Operation
Operation The filter operator or owner must be provided with this owner’s manual. This must be read before operation, and followed during operation. Incorrectly installed or tested equipment may fail, causing severe injury or property damage. Read and follow instructions in owner’s manual when installing and operating equipment. -
Page 14: Startup/Operation
Startup/Operation Open system valve and make sure pump is filled with water. Make sure pool water level is 2” (50mm) above bottom of skimmer opening. With pump OFF, set valve to ‘BACKWASH’ position. Start pump, circulating water through filter to waste. NOTE: To prevent pump running dry, be sure water level never drops below bottom of skimmer inlet. -
Page 15: Service And Maintenance
Service & Maintenance Hazardous pressure. Stop pump and release all pressure from system before working on filter, valve, or clamp. General: Wash outside of filter with a mild detergent and water. Rinse off with hose. DO NOT use solvents to clean filter; solvents may damage components in system. - Page 16 To prevent damage to system components, keep water temperature below 38 C at all times. Vacuum Pool (Refer cleaner operating manual or consult your local pool professional) Fill vacuum hose by submerging in water from one end to the other. To vacuum, insert hose into skimmer suction manifold or into vacuum line in pool wall.
- Page 17 NOTE: If Multi-Port Valve is below pool water level, close suction and discharge valves before disassembly to prevent draining pool. 1. Disconnect piping from pump and pool. 2. Remove clamp. 3. Remove valve from filter top. 4. To re-install valve, follow instructions, BE SURE to follow clamp tightening instructions.
-
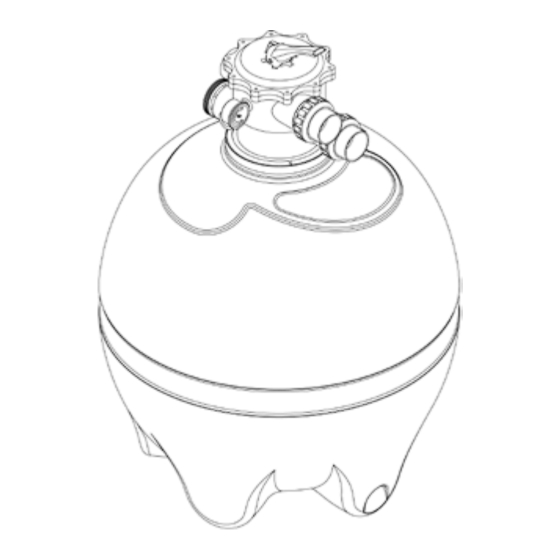
Page 18: Tank Assembly
Tank Assembly P225 P221... - Page 19 P233 P229 Item Description P221 P225 P229 P233 Multiport Valve assembly o-ring - tank flange Handle - vee clamp Vee Clamp Filter Tank assembly Collector hub Lateral assembly Lateral ‘Y’ Piece Locking Pin - lateral End Cap - lateral Washer (Laterals) l Not Shown on diagram...
-
Page 20: Troubleshooting
Troubleshooting Symptom Cause Remedy No Water Pool water level too Fill Pool to correct level. Discharge Air leaks in inlet Check and tighten all connections. fittings to pump. Teflon tape fittings. Short Filter Cycles Filter Dirty Filter not backwashed for long enough period. - Page 21 Leaking From Tank o-ring dirty Call an authorised service agent to Filter Tank Joint service pump. o-ring incorrectly fitted o-ring damaged (pinched) Clamp Band not correctly fitted Should problems persist, contact your nearest Pentair Water Service Agent.
-
Page 22: Warranty
Pentair Water Product Warranty Pentair Water warrants that, when this product is used for the purpose it was designed, is correctly housed and vented against weather, vermin, dust etc., that it will be free of material and manufacturing defects at the time of the original purchase. This warranty is limited to the cost of the product and does not cover third party costs including the costs of electricians, plumbers, etc. - Page 23 Exclusion of damages: PENTAIR WATER’S LIABILITY IS LIMITED TO THE COST OF REPAIR OR REPLACEMENT OF THE PRODUCT. ONGA SHALL NOT BE LIABLE FOR: DAMAGE TO OTHER PROPERTY CAUSED BY ANY DEFECTS IN THE PRODUCT, DAMAGES BASED UPON INCONVENIENCE, LOSS OF USE OF THE PRODUCT,...
- Page 24 IMPORTANT Please attach your sales invoice/docket here as proof of purchase should warranty service be required. Please do not return Warranty - Retain for your records. Purchased From ........................Purchase Date........Serial No......Model No......Pacific Head Office Australia Pentair Water Australia Pty Ltd Notting Hill Victoria, Australia Tel: +61 3 9574 4000 Fax: +61 3 9562 7237...
Need help?
Do you have a question about the Pantera II Series and is the answer not in the manual?
Questions and answers
Is there a step by step guide to changing the sand in the filter please.
To change the sand in the Onga Pantera II Series filter, follow these steps:
1. Prevent Sand from Entering the Collector Assembly: Place a plastic sand shield over the top of the collector tube to keep sand out during the process.
2. Remove Old Sand and Clean: Remove the existing sand from the filter tank and clean out any debris inside the tank.
3. Install Laterals Correctly:
- Insert the first lateral into the hub socket and twist it clockwise 1/4 turn to lock it in place. Ensure the slotted side of the laterals faces downwards.
- Add the remaining laterals to the hub, ensuring they are securely locked and properly positioned.
- Position the assembly in the center at the bottom of the tank.
4. Fill the Tank with Sand Media:
- Gradually add the required amount of sand (use 16/30 grade sand), ensuring it is evenly distributed in the tank.
- Refer to the manual for the specific sand quantity required for your filter model.
After completing these steps, reassemble the filter and check for proper operation.
This answer is automatically generated