Zaxcom Nomad User Manual
Hide thumbs
Also See for Nomad:
- User manual (81 pages) ,
- Preliminary manual (36 pages) ,
- User manual (74 pages)

Related Manuals for Zaxcom Nomad


Summary of Contents for Zaxcom Nomad
- Page 1 USER MANUAL Published October 2014 Software Version Nomad 7.20 Zaxcom Nomad Sound bag audio redefined...
-
Page 2: Table Of Contents
File Resolution Select ..................................27 File Naming Protocol ..................................27 Mirror Options ....................................27 Time Code Offset ..................................... 28 Format Mirror Card ..................................28 Mirror Drive Select - Nomad 12 Only....................... 29 .............................. 30 ADER SSIGN ATRIX Setting a Cross point ............................30 ............................ - Page 3 Meter Peak Hold Set ............................39 Punch-In ................................39 PFL Routing ..............................39 MP3 Support ..............................40 MP3 Mix ................................41 Auto-Mixer – Not available in Nomad Lite ...................... 42 A-Mix Mode ..............................42 Mic On Threshold ............................. 42 Attack ................................42 Decay ................................42 Noise Reduction ...............................
- Page 4 ENG S ................................48 ETUP Headphone 1 Volume ............................48 Headphone 2 Volume ............................48 Set Time and Date ............................48 Compressor Enable ............................48 Input Compressor Parameter Adjust ....................... 49 Output Compressor Parameter Adjust ......................49 Card Compressor Parameters .......................... 49 Monitor Names ..............................
- Page 5 NOMAD INPUT TRIM CALIBRATION ......................57 PRESSING THE TIME CODE KEY ........................59 ..............................59 LATE ............................... 59 ..............................60 NTER Manually entering time code ........................... 60 Manually entering user-bits ..........................60 ............................61 ETUP TC Mode ................................61 TC F ...............................
- Page 6 SING THE EYBOARD ............................79 OCKING THE EYBOARD .............................. 80 EYBOARD HORTCUTS COMPACT FLASH CARDS..........................81 SYNCING NOMAD TO A DENECKE SLATE ....................... 82 NOMAD CONNECTOR ASSIGNMENTS......................83 (XLR-3) ......................83 UDIO NPUT UTPUT ONNECTORS (TA-5) ......................83 UDIO NPUT...
-
Page 7: Know Your Nomad
14 15 1. Primary/Mirror Record LEDs Indicates Nomad is in record mode and which card is being written to (Primary Card, Mirror Card). The mirror LED is intentionally dimmer than the primary LED 2. TC / REC / 1 / A – multi-function key In shifted mode •... - Page 8 When a “D” for user-bits is required, double click it. • 8. PFL / 5 / E – multi-function key Pressing from any home page put nomad into pre-fader listen mode. • When a number is needed in a data entry field, press it for the number/channel 5.
-
Page 9: Left Side
2. AES Input / Output connector (DE-15F) Nomad has four AES input pairs and three AES output pairs. The input has a sample-rate conversion, allowing each input to have a different sampling-rate. Nomad will accept any unlocked AES signal with a sampling-rate of 44.1 to 96 kHz. - Page 10 10. Micro SD Media Slot - For factory use. 11. Compact Flash Card Primary Media Slot 12. Internal Battery Compartment NOTE: Insert the battery carrier correctly. If you insert with the contacts reversed it will do no harm to the unit, Nomad just won’t turn on.
-
Page 11: Right Side
NOMAD LAYOUT Right Side Panel Right Side 1. Outputs 1 – 6 (TA-5M) Outputs 6 channels of audio via output buses 1-6 TA5 out 1/2 carries output bus 1 and 2 TA5 out 3/4 carries output bus 3 and 4 TA5 out 5/6 carries output bus 5 and 6 2. -
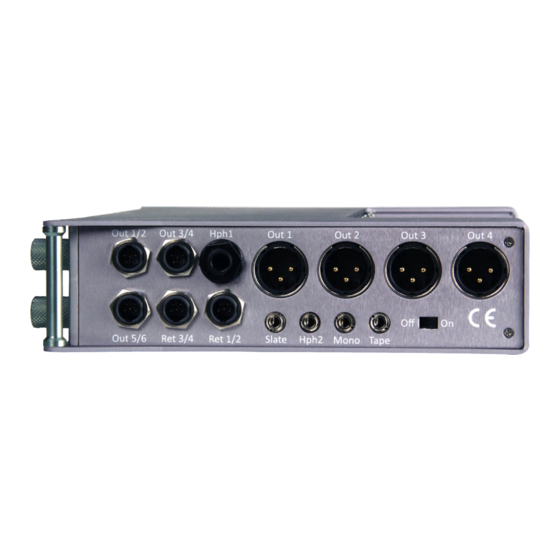
Page 12: Back Side
NOMAD LAYOUT Back Back Side 1. Mic/Line-level Inputs 1 – 6 (XLR-3F) -
Page 13: Home Screen / Meters
NOMAD LAYOUT Meters Screens Home Screen / Meters There are several selectable home meter screens from which to choose. You can toggle through the different screens by pressing the Star key – or by pressing the MENU knob and the SLT or COM key at the same time. - Page 14 NOMAD LAYOUT Meters Screens Yellow ISO Attenuation Enabled Red Record Enabled Indicators - shows which tracks will be recorded Yellow Strike Through – Represents that these tracks will not be recorded Card Track Home Screen Card Tracks with Output Buses 1 and 2...
-
Page 15: Store/Recall A Home Screen Configurations
NOMAD LAYOUT Meters Screens 4 Out / 4 In 6 Output Busses with Input Trim Output Bus 1 (Auto-Mix Output) Auto-Mix Inputs - “A” designates inputs assigned to Auto-Mix. Blue dot shows which inputs are “open” Auto-Mix Meter Screen Store/Recall a Home Screen Configurations You can “park”... -
Page 16: Home Screen Explained
• Press the headphone knob to restore normal headphone monitoring. Battery Indicator Displays the power source (I - Internal / E - External), a numeric display of the current voltage. Nomad will always automatically switch to the higher voltage source first. -
Page 17: Card Information Field
MAIN MENU Meter Screens Card Information Field Top Line - Displays available mirror card space. • Second Line - Mirror file progress displays what percentage of mirroring is done. • Third Line - This line will alternate between: • Time left on the primary card. •... -
Page 18: Main Menu
To adjust the metadata using the MENU Knob select and highlight one of the data fields then press the MENU Knob. Metadata can be edited and changed before Nomad starts recording a file or even while Nomad is recording. If you are in continuous mirror mode and changes are made after stop is pressed the file will need to be re-mirrored for the changes in the metadata to be reflected in the mirror file. -
Page 19: Playback Control Menu
MAIN MENU Playback Control Playback Control Menu This menu allows you to controls playback of recorded files. Segment time code Playback shuttle control Segment currently playing Turn the MENU knob to adjust Press and turn for 10X adjustment Playing segment’s metadata Current folder While in this menu, the STOP key and PLAY key function immediately, even if the transport keys are set to shifted mode. - Page 20 Nomad Lite Only The primary card record routing in Nomad Lite is slightly different from the card routing in Nomad 10 or 12. Nomad Lite doesn’t have a record enable matrix or a card routing matrix. With Nomad Lite, you can route all your inputs and all your record busses to any one of the 10 record tracks.
-
Page 21: Primary Card Record Routing - Nomad 10 And 12
MAIN MENU Nomad 10 / 12 Record Enables Primary Card Record Routing – Nomad 10 and 12 This matrix allows you to select which tracks are enabled and recorded on the primary and mirror compact flash cards. “X” indicates which tracks will be... -
Page 22: My Nomad Menu
The take number will add the letter a letter for each time Nomad creates a new file. So for example if the first take is over 2GB the take numbers would be Take1 and Take 1a. -
Page 23: Primary Compact Flash Card Menu
The audio on the primary card is recorded as a Zaxcom MARF file. The advantage of MARF is that if there is any power loss while recording there will not be any loss of recorded audio, as is common with all other portable recording systems. -
Page 24: Delete Last Primary Segment
MAIN MENU My Nomad / Primary Card Delete Last Primary Segment This menu allows you to delete the last recorded segment by pressing star key Erase Current Primary Folder This menu allows you to delete an entire folder from the compact flash card. -
Page 25: Iso Attenuation
MAIN MENU My Nomad / Primary Card ISO Attenuation The NeverClip™ inputs allow large signals to travel through the digital mixing engine using 32 bit floating point numbers. Once these large signals are recorded into a 24-bit WAV (or MARF) file, the advantage of floating point math is lost and these signals can clip if you don’t use a card limiter. -
Page 26: Mirror Settings Menu
Green checkmark indicates which folder will be mirrored. Start Segment This will set the first segment that Nomad will mirror or re-mirror. As you are recording the start segment will automatically increment with each file on the primary card End Segment... -
Page 27: File Type Select
Even if Nomad is setup to allow mirroring mode to be remembered after a power cycle - if a CF card is not installed in the mirror slot after the unit boots-up - mirror mode will be turned off and must be manually turned on by the user when a mirror card is inserted. -
Page 28: Time Code Offset
This menu is used to create a time code offset for the mirror files. You can create an offset from -500ms to +500ms in 1ms increments Format Mirror Card This menu is used to format the mirror compact flash card. Nomad will format the card as a FAT32 format. -
Page 29: Mirror Drive Select - Nomad 12 Only
Nomad 12 Only This menu selects if Nomad will mirror to a compact flash card or USB drive. If set to mirror to the compact flash card Nomad will mirror to the internal mirror card. If set to mirror to the USB Nomad will mirror to a... -
Page 30: Fader Assign Matrix
STAR key when in this matrix. That will add the “T” to the cycle • Z - Assigns the fader to control the gain of a Zaxcom wireless transmitter. Please note that a Z can only be assigned when ZaxNet is in transmit mode. -
Page 31: Memory Menu
Store / Recall Memory From the store and recall positions, Nomad can save and recall three full recorder setups for different work scenarios. All user set parameters are saved and can be recalled as needed. Note if you do a factory restore, all of the saved memories will be erased. -
Page 32: Factory Reset To Default Settings
Nomad is exhibiting odd behavior. Store / Recall using Mirror Card Nomad has the option to save settings to (and restore settings from) the mirror compact flash card. This allows settings to be exchanged between multiple Nomads. -
Page 33: About Nomad Menu
MAIN MENU About Nomad About Nomad Menu This menu provides information about your Nomad Software Version ZaxNet Software Version Indicates current CPU Usage. Normal operations should be between 55 - 80%... -
Page 34: Mode Menu
Time code transport adjusts the way Nomad will go into record mode. Normal - Nomad will go into record when the record button is pushed. • Auto Load - Nomad will go into to record with it senses record run time code coming from an external • source... -
Page 35: Prerecord
Mode Menu Prerecord Prerecord allows Nomad to buffer the audio in a prerecord buffer. You can choose to buffer up to 10 seconds of audio. From the point the Nomad is powered up, any audio coming from the input is always being processed. -
Page 36: Input Configure Set
AES channels, other input sources or ZaxNet may need to be deactivated. The factory default is set up so that Nomad can handle one pair of AES inputs. If more than one pair of AES inputs are required or you want to use ZaxNet IFB, then the Input configuration must be changed. -
Page 37: Transport Keys
Turning on the remote roll will allow Nomad to use a remote switch to start and stop recording. To operate you will need to connect a toggle switch to the serial port on Nomad - not to the USB port. -
Page 38: Vfader Mode
If the blue trim icon is displayed the MENU knob will control the input trim of that input. • Folder Change Folder change allows Nomad to automatically change the mirror folder to follow the selected primary folder. If AutoChange is selected and you change the primary folder the mirror folder will change to the same folder. -
Page 39: Meter Peak Hold Set
The beep is heard in the main headphones only and is not sent to the record tracks or output busses. Note regardless of this setting Nomad will create a new file when the current file reaches 2GB. -
Page 40: Mp3 Support
Then when you are done, to transfer the MP3 file from the primary card to a USB device or mirror compact flash card. Go to My Nomad > Mirror Settings > File Type and select MP3. Then when you turn mirror mode to on Nomad will start writing the MP3 files to the selected mirror drive. -
Page 41: Mp3 Mix
Select which record tracks you want to mirror as an MP3 Nomad will record up to two card tracks into the MP3 folder. In the MP3 mix menu you will select which record tracks you want Nomad to create MP3 files of. -
Page 42: Auto-Mixer - Not Available In Nomad Lite
MAIN MENU Auto-Mixer Auto-Mixer – Not available in Nomad Lite A-Mix Mode Enables Nomads Auto-Mixer and sets if the Auto-Mixer will work pre-fade or post-fade. Pre-Fade - The Auto-Mixer is inserted before the faders in the audio chain so only the trim control will •... -
Page 43: Auto-Mix Enables
MAIN MENU Auto-Mixer Auto-Mix Enables The Auto-Mix enable matrix sets which inputs are included in the Auto-Mix. When an input is selected to be included in the Auto-Mix an “A” will be displayed to the right of the input meter on the meter screen. This matrix also lets you select which output buses the Auto-Mix will be sent to. -
Page 44: Using The Auto-Mixer
• The Auto-Mixer menu can be accesses from the main menu. After the Auto-Mixer is enabled you can the access the menu by pressing the A-MIX key on Nomad. Unless MP3 support is turned on, in that case the A- Mix key toggles the MP3 recording marker. -
Page 45: Zaxnet Setup Menu
TX - The ZaxNet transceiver is set to transmit mode. You will be able to transmit audio, time code and • wireless transmitter commands right from your Nomad. Please note if you set the IFB mode to TX, be sure to attach a ZaxNet antenna. If you do not, RF can potentially leak into the microphone preamps. -
Page 46: Rx Audio Gain
“group” of transmitters that have the same group code. For example, setting a Group Code to 1 allows Nomad to control all Group 1 transmitters. Setting it to 2 allows you to control all Group 2 transmitters. Group codes can be set from 1 to 99. -
Page 47: Ifb Test Tone
MAIN MENU ZaxNet Menu IFB Test Tone IFB test tone turns ON/OFF a test tone that is transmitted on the IFB audio channel to Zaxcom ERX receivers. Burn ZaxNet Software This menu allows you to install and updates the ZaxNet software. -
Page 48: Eng Setup
Scroll for additional menu items Headphone 1 Volume Nomad allows you add up to 12dB of digital gain to the headphone 1 amplifier. This setting will adjust the amount of digital gain that will be added. The recommended setting is 12dB. -
Page 49: Input Compressor Parameter Adjust
MAIN MENU ENG Setup Menu Input Compressor Parameter Adjust This menu sets the parameters for the input compressor. The Input Compressor settings are global, meaning that the settings adjusted here will be the same for all input Channels. Output Compressor Parameter Adjust This menu sets the parameters for the output compressor settings. -
Page 50: Monitor Names
If you create a headphone name labeled “PLAY” when you go into playback mode Nomad will automatically jump to this preset, when hit press stop Nomad will automatically return to the last preset you were listening Track Names This menu allows for the naming of the record tracks. -
Page 51: Note Presets Edit
MAIN MENU ENG Setup Menu Note Presets Edit This menu allows you to create a preset list of notes. There are 20 note presets available. The existing notes can edited and new notes names can be created. Each note can be up to 22 characters long. Warnings Setup The warning setup menu manages the audible alerts that are sent to the main headphones. -
Page 52: Input Levels Adjust
MAIN MENU ENG Setup Menu Input Levels Adjust This menu manages the audio input levels for the internal slate, external slate, camera returns and digital inputs. Scroll for additional menu items Internal & External Slate Levels This allows you to adjust the internal and external slate microphone levels. The levels are independently adjustable in 1 dB steps from –20dBu to 30dBu. -
Page 53: Output Levels Adjust
This menu is where the brightness of the LCD Screen is adjusted. Nomad allows you to adjust the screen brightness to 11. LED Brightness This menu is where the brightness of Nomad’s LEDs is adjusted. This is a global setting meaning that all LED lights will be set to the same brightness. -
Page 54: Transport Keys
Unshifted Mode If the transport key is set to unshifted mode and you press the REC, PLAY or STOP keys Nomad will go into record, playback or stop. In unshifted mode to display the TC, A-MIX or ZNET menus, it is necessary to press the MENU knob while pressing the TC, A-MIX or ZNET key. -
Page 55: Advanced Setup
Burn Boot loader The boot loader is part of the software that helps boot up Nomad. Generally, you will not need to update the boot loader. If the boot loader needs to be updated there will be a note released with the software to do so. -
Page 56: Usb Status
This page will display if the USB drive is ready for mirroring. Allow Logging Allow logging will turn on the logging feature which will allow Nomad to log warning and error messages which then can be used by the factory to diagnose your Nomad. The logged messages are displayed on the log screen. -
Page 57: Nomad Input Trim Calibration
If this procedure is not followed exactly it could make the input trims not function correctly and you may not be able to recover normal trim operations and your Nomad will need to be sent back to the factory to be re-calibrated which will not be covered under warranty. - Page 58 13. Quickly press BACK (HP) knob to get back to the home screen (the one containing 2 outs and 6 input meters). 14. Let Nomad sit for about 2 to 4 minutes. You should see levels on the input meters creeping up every second as it calibrates the input trim level.
-
Page 59: Pressing The Time Code Key
Nomads internal calendar and clock. NOTE: Nomad contains a battery backed real-time clock. This clock is used to maintain running time code and internal calendar. It is advised to change the battery every 2 to 3 years. The battery that maintains the time code and clock is a CR2320 3V coin cell battery. -
Page 60: Enter Time Code
NOMAD OPERATIONS Time Code Key Enter Time Code Manually entering time code 1. Press the MENU knob to highlight ENTER TC. 2. Rotate the MENU knob to select the desired position. 3. Press the numeric function keys to enter a numeric value. -
Page 61: Time Code Setup Menu
Auto Date Jam If the auto date jam is set to on Nomad will automatically jam the user bits to the internal date upon boot up. If this is set to off the user bits will stay as previously set. -
Page 62: Pressing The A-Mix Key
NOMAD OPERATIONS A-Mix Key Pressing the A-MIX Key When Auto-Mix is enabled pressing A-MIX will display the Auto-Mix menu (providing MP3 is not enabled). • See the Auto-Mixer section of this manual for Auto-Mix operations. When Auto-Mix is off pressing A-MIX will take you to the Metadata menu. -
Page 63: Pressing The Z-Net Key
2. TRX Frequency This is where the frequency of the Zaxcom TRX wireless transmitter can be change from. Rotating the MENU knob will change the frequency. After you stop on a new frequency it will take about 2 seconds for the TRX to change its frequency to match. -
Page 64: Pressing The Bus Key
NOMAD OPERATIONS Bus Key Pressing the Bus Key Output Bus Assign Busses The output bus matrix lets you assign your analog and digital inputs to your output buses. To move between the matrixes, press the BUS Key. The top line of the three pages indicates the following sources: Analog Inputs 1-6 •... -
Page 65: Mono Out Matrix
This Matrix lets you set what audio is routed to the tape out connector. The tape out matrix also routes what audio is sent to the IFB feed. The IFB feed can be received by a Zaxcom ERX receiver. Card Tracks... -
Page 66: Card Tracktone Enable
NOMAD OPERATIONS Bus Key Card TrackTone Enable This matrix lets you assign which card tracks have tone assigned to it. Card Track Slate Enables This matrix lets you assign which card tracks have the slate microphone assigned to it. Card Tracks Com Enables... -
Page 67: Card Routing - Nomad 10 And 12 Only
These matrices allow you to route the analog inputs, digital inputs, returns and output busses to the card tracks on Nomad 10 and 12. The card mix matrices are broken down as 1-4, 5-8 and 9-12 to additional groups of card tracks can be accessed from the bus menu. -
Page 68: Pressing The Pfl Key
Pressing the PFL Key Pressing the PFL Key puts Nomad into Pre Fader Listen mode. Once the PFL key is pressed, the name in the Headphone Monitor field is replaced with PFL alternating with the selected channel number(s) that are being monitored. -
Page 69: Pressing The Setup Key
When using a stereo or surround microphone the input compressors (limiters) should be linked to insure that the spatial integrity of the signal is maintained. Nomad allows you to create three separate compressor groups. For example, a stereo microphone on inputs 1 and 2 may have their limiters set to Group A. So if the signal on... -
Page 70: Main Headphone Setup
To easily monitor your recorded tracks simply set up a matrix and name it PLAY. Then when you press play from Nomad this matrix will automatically be routed to your main headphones so you can monitor your recorded tracks. Then when you press stop Nomad will automatically jump to the matrix that was being monitored. -
Page 71: Setting Up And Engaging Tone
NOMAD OPERATIONS Tone Setup Setting Up and Engaging Tone Assigning Tone to Output Busses To assign tone to an output bus, press the BUS Key and go to the analog assign matrix to select which output bus will receive tone when tone is engaged. Please note that only the busses with tone routed to it will output the slate tone when the visual time code slate tone is activated. -
Page 72: Entering Text
NOMAD OPERATIONS Enter Text Entering Text This menu allows alphanumeric data entry for all parameters that require data input. This screen will appear when you select an item that requires text. To enter a character, turn the MENU knob until the character is highlighted and then press the MENU knob •... -
Page 73: False Start
NOMAD OPERATIONS False Start False Start Pressing and holding the STOP Key for 1 second you press stop will open the false start page. From this page you can mark a take as a false start or just delete the file. -
Page 74: Zaxnet Quick Start Guide
Press the MENU key to enter the remote control unit ID. This number will correspond to the ZaxNet input on Nomad. For example, 001 on the unit code will correspond to input 1 on the Nomad, 002 will correspond to input 2 on the Nomad, etc. -
Page 75: Qrx Ifb Audio Receive
2. From the QRX: a. Go to the IFB extended menu. b. Set the IFB to TX and set the TX frequency to the same frequency that you set Nomad to. 3. From Nomad a. Go to the headphone setup matrix and put a cross point in the corresponding ZNET matrix. To listen to Freq 1 you will select the first box, Freq 2 the second, etc. -
Page 76: Erx Ifb Audio Receive
3. In Nomad go to the BUS routing menu, select Tape/IFB out and select what audio you would like to send to the ERX. You can use any combination of card tracks, outputs or returns. -
Page 77: Eng /Efp Bag Operation
NOMAD OPERATIONS Basic ENG / EFP Bag Operations ENG /EFP Bag Operation ENG mode was created to aid in mixing and recording when you are involved in a “run and gun” situation. In ENG mode you can pan and mix all 10 inputs right from the ENG Home screen. -
Page 78: Autotrim
Virtual Fader Nomad has 6 hardware faders and 10 inputs. To mix inputs 7-10 from the ENG home screen you need to activate the VFader mode in the mode menu. The virtual fader will allow you to mix all 10 channels right from the ENG meter screen using the MENU Knob as the hardware fader for those inputs. -
Page 79: Usb Keyboard Support
With Nomad powered down plug a USB keyboard into the USB port then power up your nomad as normal. Approximately 30 seconds after boot-up Nomad will identify the attached keyboard and “Found Keyboard” will flash once on the meter screen. If the keyboard is not found you may need to power cycle your Nomad. Using the Keyboard After the keyboard is identified you can begin navigation and control. -
Page 80: Keyboard Shortcuts
Then select the input to listen to by pressing the number keys 1 through 8. PFL Nomad faders CTRL+ Pressing CTRL + a number key will toggle through inputs assigned to the Nomad faders. PFL FP8 faders ALT+ Pressing ALT + the number key will toggle through the inputs for the FP8 faders. -
Page 81: Compact Flash Cards
SanDisk and Transcend cards. It is not necessary to use cards with “double write speed” features. Any cards, 4 - 128GB, should be fine. 133X cards are fine - a faster card will not make Nomad write any faster - the only advantage of a faster card is faster downloads. -
Page 82: Syncing Nomad To A Denecke Slate
Syncing Nomad to a Denecke Slate The LTC stream out of the Nomad has a “jitter” in the time code signal at 29.97 fps and 23.976 fps. This can result in the Denecke TS-C or the TS-3 slates identifying the wrong code, if you set the slate to “Auto Set”... -
Page 83: Nomad Connector Assignments
Zaxcom Nomad User’s Manual Connector Pin Assignments Nomad Connector Assignments Audio Input / Output Connectors (XLR-3) Pin 1 – Ground Pin 2 – Signal (+) Pin 3 – Signal (-) Audio Input / Output Connectors (TA-5) Pin 1 - Ground... -
Page 84: Usb To Mix 8 (Usb Type Ato Db9M)
Case - Pin 5 (Shield) AES Digital Input / Output Connectors (DB-15) Nomad uses a mini DB-15 (AKA: DE-15) connector for the AES (digital) input and output connectors. Top row pins: 5, 4, 3, 2, 1 Middle row pins: 10, 9, 8, 7, 6... -
Page 85: Updating Firmware
3. Insure that a set of fully charged batteries are installed or a stable power supply is connected. 4. With Nomad powered down, insert the CF card containing the .bin file into the mirror slot. Make sure only one .bin file is on the card. -
Page 86: Nomad Specifications
Ext Slate Mic Connector 1/8” (3.5mm) stereo jack Input Range –56 dBu to –26 dBu Digital Inputs (not available in Nomad-Lite) Channel Count 8 (4 x AES-3 pair, 1 x AES-42 pair) Connector 1 x mini DB-15 (DE-15) shared w/digital outputs... -
Page 87: Specifications
Zaxcom Nomad User’s Manual Specifications Other Connectors External Storage 1 x USB 2.0 (Nomad-8 & 12 only) External Storage Power 5 watts Serial/RS-422 1 x 4-pin USB style (Zaxcom proprietary) Time code Input 1 x BNC Output 1 x BNC... -
Page 88: Software
Zaxcom Nomad User’s Manual Specifications Software Internal Mixer Mixer Cross-points 16 in / 16 out (pre-fader, post-fader, phase inversion) Internal Processing 32-bit floating point DSP Effects Input Limiter (A x 10, D x 8) Type Soft Knee Attack 1 to 100 ms... -
Page 89: Product Support
Download the latest Firmware from: http://zaxcom.com/support/updates/ Download the latest User Manuals from: http://zaxcom.com/support/updates/ Submit Technical Questions at: http://www.zaxcom.com/submit-a-technical-question Submit information for Repair Services at: http://www.zaxcom.com/support/repairs Join the Zaxcom User Forum at: http://www.zaxcom.com/forum/forum.php Join the Zaxcom Face Book User Group at: https://www.facebook.com/groups/682199065139938/... -
Page 90: Zaxcom Warranty Policy And Limitations
Distributers may sell Product to resellers who then sell Product to end users. Please see below for warranty information or obtaining service. No warranty service is provided unless the Product is returned to Zaxcom Inc. or a Zaxcom dealer in the region where the Product was first shipped by Zaxcom.
Need help?
Do you have a question about the Nomad and is the answer not in the manual?
Questions and answers