Table of Contents
Advertisement
PROFESSIONAL WEATHER STATION
(WIND AND AIR PRESSURE)
Operation Manual
About this manual
Thank you and congratulations on selecting this professional weather station! We are positive
you will enjoy the benefits of accurate weather readings and the precise radio controlled time
information that our instruments offer.
This manual will guide you step-by-step through setting up your device. Use this manual to
become familiar with your professional weather station, and save it for future reference.
Glossary of Common Terms
LCD
"LCD" is an acronym for "Liquid Crystal Display". This is a common type of display screen used
in televisions, computers, watches, and digital clocks.
BAROMETER & BAROMETRIC PRESSURE
A barometer is a device that measures the pressure of the air pushing on it—this measurement is
called the barometric pressure. We don't actually feel the barometric pressure because the air
pressure is pushing equally in every direction.
RELATIVE AIR PRESSURE
Relative air pressure is the same as the barometric pressure. The calculation of relative air
pressure is a combination of the absolute air pressure and the altitude.
ABSOLUTE AIR PRESSURE
Absolute air pressure is the actual air pressure on the barometer without regard to altitude.
INCHES OF MERCURY (inHg)
Inches of Mercury is the common unit of measurement for air pressure in the United States.
HECTOPASCALS (hPa)
Hectopascals are the common units of measurement for air pressure in the International System
(SI) of measurement. The hectopascal holds the same value
Important Note:
Before inserting batteries, please carefully read the operation manual.
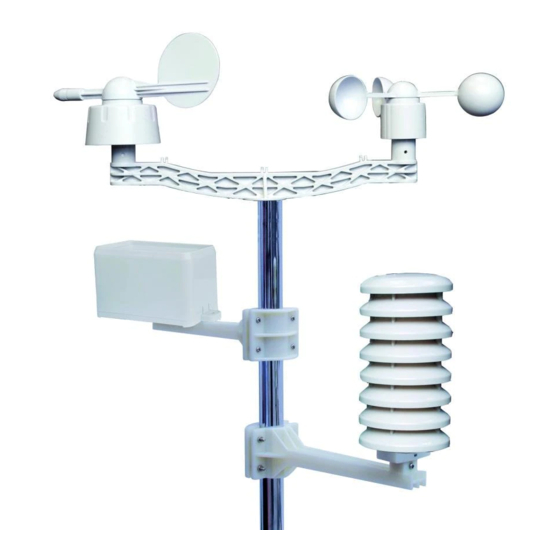
The Professional weather station includes a base station (receiver), a transmitter unit, one wind
direction sensor, one wind speed sensor, one rain gauge, USB cable and a PC software package
on CD-ROM.
An added feature of the Weather Station is the readout of all measured and displayed time
and weather data on a PC.
- 1 -
Advertisement
Table of Contents

Summary of Contents for Mi-Sol WH2081
-
Page 1: About This Manual
PROFESSIONAL WEATHER STATION (WIND AND AIR PRESSURE) Operation Manual About this manual Thank you and congratulations on selecting this professional weather station! We are positive you will enjoy the benefits of accurate weather readings and the precise radio controlled time information that our instruments offer. -
Page 2: Lcd Display
LCD display 1. Time 2. Wind direction 3. Barometric Pressure 4. Barometric trend 5. Indoor Temperature 6. Outdoor Temperature 7. Memory 8. Date 9. Rainfall 10. Weather Forecast 11. Indoor Humidity 12. Outdoor reception signal 13. Outdoor Humidity Note: The presence of the "Alarm-On icon" in the section means that the particular alarm has been enabled. - Page 3 Set up Guide Before placing and installing all components of the weather station at there final destination, please set up the weather station with all parts being nearby for testing the correct function. Setting up the base station and transmitter Insert two pieces of LR6 (AA size) batteries into the transmitter, the LED located in the middle front case of transmitter will be turned on for 4 seconds, then it will be off and start to work normally.
- Page 4 - 4 -...
- Page 5 - 5 -...
-
Page 6: Program Mode
Positioning Once you have verified that all of the components of the weather station are working, they can be positioned in their permanent places. Before permanently mounting, make sure that all components work properly together at their chosen mounting or standing locations. If e.g. there appear to be problems with the 433 MHz radio transmission, they can mostly be overcome by moving the mounting locations. - Page 7 - Press the MENU key to select the TIME section, TIME section digits will start flashing. Enter LCD contrast setting mode (level 1-8, default level 5), press the UP/+ or DOWN/- key to set the value. - Press the ENTER key to select the following modes: Time zone Note: At Europe, 0 for GMT+1 time zone, 1 for GMT+2 time zone, -1 for GMT time zone.
- Page 8 The wind speed high alarm setting. The wind direction alarm setting. Reset the maximum wind speed value. When both the wind speed value and MAX icon are flashing, hold the ENTER key for 3s, the maximum value will be reset to current reading. Note: Press the ON/OFF key to on/off the alarm.
- Page 9 enabled Reset the maximum pressure value. When both the pressure value and MAX icon are flashing, hold the ENTER key for 3s, the maximum pressure value will be reset to current reading. Reset the minimum pressure value. When both the pressure value and MIN icon are flashing, hold the ENTER key for 3s, the minimum pr essure value will be reset to current reading.
- Page 10 - Press the MENU key the eighth time to select the INDOOR TEMPERATURE section, INDOOR TEMPERATURE section digits will start flashing. Enter the temperature unit mode, press the UP/+ or DOWN/- key to select temperature unit between ℃ and ℉ - Press ENTER key to select the following modes: The indoor temperature high alarm setting.
- Page 11 Temperature unit display. Press the UP/+ or DOWN/- key to select the temperature unit between ℃ and ℉ by The outdoor temperature high alarm setting. Press the ON/OFF key to on/off the alarm. If alarm is enabled, an alarm symbol appears in the display indicating the alarm function has been enabled The outdoor temperature low alarm setting.
- Page 12 of a PC. Also the settings of the storing intervals from 5 minutes to 240 minutes for the storage of data sets can only be performed by means of a PC. Connections and Software The wiring between Weather Station and PC takes place by means of an included USB cable. The EasyWeather software package, also included in the shipping contents, must be installed on the PC.
-
Page 13: Specifications
When memory is full, it will take about two minutes to upload all history data into PC and it takes another two minutes to process all history data for graphic display. Further detailed PC software user manual can be found from the help menu. Specifications Outdoor data Transmission distance in open field :... - Page 14 Indoor temperature range 0˚C--50˚C (32℉ to + 122℉) (show --- if outside range) Resolution 0.1˚C Measuring range rel. humidity 10%~99% Resolution Measuring range air pressure 300-1100hPa (8.85-32.5inHg) Accuracy +/-3hpa under 700-1100hPa Resolution 0.1hPa (0.01inHg) Alarm duration 120 sec Power consumption Base station 2XAA 1.5V LR6 Alkaline batteries Remote sensor...
-
Page 15: General Information
EasyWeather PC Software User Manual 1.0 General Information This Weather Station is a high quality, easy to use weather monitoring system that reads, displays and records the weather data from internal as well as external sensors. Besides the internally measured values for indoor temperature, indoor humidity and air pressure the outdoor sensor will take data for temperature and humidity, wind and rainfall. - Page 16 Basic Settings of the “EasyWeather” Software After the “EasyWeather.exe” program has been started, the following main window will appear on the PC screen: All the settings from the base unit is mirrored into the PC software, so once you have done your setting on the base unit, then you don’t need to make any setting changes on the PC software.
- Page 17 This section is used to set up PC software display, base station units, as well as able or disable the corresponding alarm function. Once you made your choice, press Save to make the setting effective. : display and setup system alarm value - 17 -...
- Page 18 This section is used to set the desired time, high or low alarm value for the base unit. Once you made your choice, choose Save to make the setting effective. If you don’t want to make any change, just press Cancel and exit without change. display min and max recorded value - 18 -...
- Page 19 This section is used to display the recorded min and max value recorded with time stamp. Min/Max reset can only be done through key operation on the base station. : display listed history data - 19 -...
- Page 20 This section is used to display recorded history data in a spread sheet. If you wanted to see all history data in a desired time period, choose the time duration and press Search to reload the history data. With the Export button, you can export the selected history data into text format file for other application purpose.
- Page 21 In this section, you can see the history data plotted in graph format for easier observation. If you want to see more details, just use your mouse to select the area you wanted and the display will be automatically updated in more detailed scale: - 21 -...
- Page 22 Also you can see the graph in 3D mode by selecting the 3D check box: You can change the Y axel by scrolling the mouse up and down roller. - 22 -...
- Page 23 What to do if graph function is not working This is the most encountered problem with this software. To make the graph function working properly, please check the following step: 1, find the folder where the “EasyWeahter.exe” file is located 2.
- Page 24 • The EasyWeather software products are protected by copyright laws and international copyright treaties as well as other intellectual property laws and treaties. • You may not copy the printed materials accompanying the products. - 24 -...
Need help?
Do you have a question about the WH2081 and is the answer not in the manual?
Questions and answers