
Summary of Contents for DiscoSmash DSR-X20
- Page 1 DSR-X20 User Manual DISCO Discosmash Vroegeinde 14, 2243 Pulle, Belgium Phone: +32 (0)3 4640909 - Fax: +32 (0)3 4640139 info@discosmash.com - www.discosmash.com...
- Page 2 +32 (0)34640909 internet: http://www.discosmash.com E-mail: info@discosmash.com Address: Discosmash b.v.b.a. Vroegeinde 14 2243 Pulle Belgium Discosmash is not responsible for data loss, or for the copyrights that may protect the sounds that you will record with this device...
-
Page 3: Table Of Contents
CONTENT: 1. Introduction 2. Connections 3. Daily Usage 3.1 Playing samples 3.2 Adjusting volume 3.3 Using the menu 4. Adding new samples 4.1 Recording 4.2 Copying 5. Editing samples 5.1 Cutting 5.2 Deleting 5.3 Copying 5.4 Setting tone offset 5.5 Setting volume offset 5.6 Setting iterruptability 5.7 Bind to preset button 6. -
Page 4: Introduction
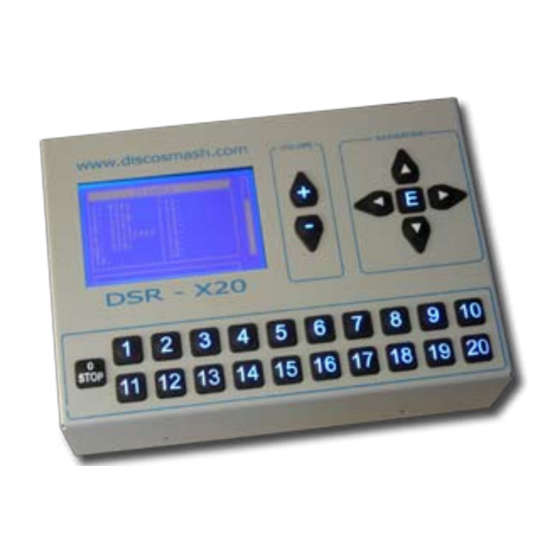
To start first a few thing will be explained which are important to understand the rest of the manual. The DSR-X20 can store an unlimited amount of samples (i.e. soundeffects, text messages, etc.) on it’s internal memory. 20 of these files can be mapped to the 20 preset buttons for quick access. -
Page 5: Connections
Here you can insert an external Secure Digital memory card. Maximum capacity: 1GB. This can be used to copy samples from or to the DSR-X20, or to perform software upgrades. REMOTE: on the left you can connect extra controll panels on the right you can connect a button, relays, etc. -
Page 6: Daily Usage
3. DAILY USAGE 3.1 Playing samples When everything is configured correctly (how to do all this will be explained later) you just need to push 1 of the 20 preset buttons to activate a sound. While this sound is playing, the corresponding button will blink and a progress bar will see how much has been played already. -
Page 7: Adding New Samples
(i.e. from your microphone, cd-player,...) or copy them from the external memory. you can put sounds on this external memorycard using your PC, copy from another DSR-X20, buy cards from Discosmash with spoken texts or sound effects,...). 4.1 Recording To record your own samples, do the following: •... -
Page 8: Copying
4.2 Copying To copy a sample from the externam memory: • Open the main menu by pushing “E”. • Go to “Samples” (1). • Open “New sample” (1). • Choose “Copy from SD-card” (1). • Now a list will be shown with the samples that are on the external card. -
Page 9: Editing Samples
5. EDITING SAMPLES For all the editing functions, you need to go to the edit sample menu: • Open the main menu by pushing “E”. • Go to “Samples” (1). • Choose “Edit sample” (2). • Choose the sound that you want to edit from the list. You can listen by pusing the right arrow button. - Page 10 5.3 Copy to ext. SD-card If you want to copy a sound to the external memory (for editing on a PC, copying to another DSR-X20, making a backup copy, etc.) choose “Copy to ext. SD-Card” (3) from the “Edit sample” menu.
- Page 11 5.5 Volume offset Using the Volume offset function, you can adjust the volume settings of a file. This way you can make all your samples equally loud. Open the “Volume offset” (5) function. Here you will see a volume bar. If you never changed it, it will be in the middle.
-
Page 12: Bind To Preset Button
5.5 Bind to preset To put this sound on 1 of the 20 preset buttons, open the “Bind to preset” (7) option. Now you can choose the preset button that you want this sound to be on. Push “STOP” to go back without changing anything, or push the correct preset button. -
Page 13: Timers
6. TIMERS Timers are sequences of sounds that can be played automatically. After each time a sound will be played there will be pause for a specified time and then the next sound will play. This is often used for commercial messages, security announcements, etc. - Page 14 6.3 Start Timer To start a timer, choose “Start timer” (3). After this you will get a list of all the timers that are available. Select the timer that you wish to start and push “E”. This will give you a confirmation message that the timer has been started, and you can push “E”...
-
Page 15: Options
“E”, or go back without saving with “STOP”. When these settings are saved, also the master volume setting will be saved so that the next time you switch on your DSR-X20, the volume will be at the same level as when you saved these settings. -
Page 16: Remote
To use this feature, connect a NO (normal open) switch to the “Remote” connector (you can contact Discosmash if you need a connector that fits here). When the 2 contacts of this connector are closed, the sound will be activated. - Page 17 Thank you for your confidence! If you have any further problems or questions, do not hesitate to contact us. Discosmash Vroegeinde 14 2243 Pulle Belgium Phone: +32 (0)3 4640909 Website: http://www.discosmash.com E-mail: info discosmash.com...
Need help?
Do you have a question about the DSR-X20 and is the answer not in the manual?
Questions and answers