
Related Manuals for Kodak EasyShare V570


Summary of Contents for Kodak EasyShare V570
- Page 1 Kodak EasyShare V570 dual lens digital camera User’s guide www.kodak.com For interactive tutorials, www.kodak.com/go/howto For help with your camera, www.kodak.com/go/v570support...
- Page 2 Rochester, New York 14650 © Eastman Kodak Company, 2005 All screen images are simulated. Kodak and EasyShare are trademarks of Eastman Kodak Company. Schneider-Kreuznach and Xenar are trademarks of Jos. Schneider Optische Werke GmbH used under license by Eastman Kodak Company.
-
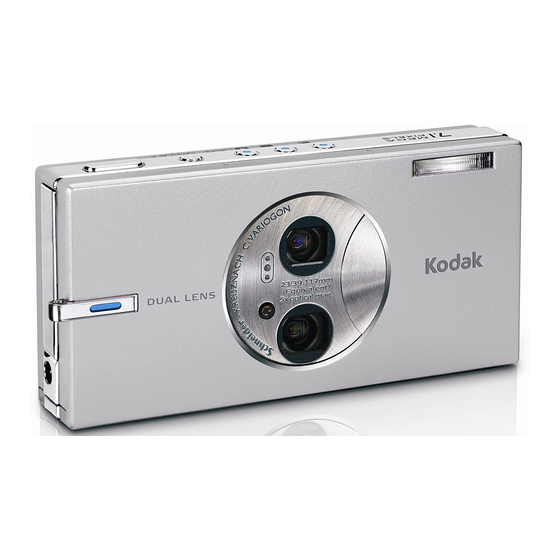
Page 3: Product Features
Front view Shutter button On/Off button Auto/SCN (scene) mode button Video mode button Favorites mode button www.kodak.com/go/support Flash Lens cover Dual lenses (ultra-wide and optical zoom) Video/Self-Timer/AF Assist light Microphone Grip/Strap post Product features... -
Page 4: Back View
Strap post Macro/Landscape mode button DC-In (5V) 10 Battery compartment 11 Tripod socket 12 Dock connector, USB, A/V Out 13 Share button 14 Review button 15 Menu button 16 Delete button 17 Flash button 18 Speaker 19 Ready light www.kodak.com/go/support... -
Page 5: Table Of Contents
Using the framing grid to compose a picture... 23 Taking panoramic pictures... 24 Using exposure compensation to adjust brightness ... 25 Using the histogram to view picture brightness... 25 Changing picture-taking settings ... 26 Customizing your camera ... 30 www.kodak.com/go/support... - Page 6 Camera specifications ... 52 Flash settings in each mode... 55 Storage capacities ... 56 Important safety instructions ... 57 Battery life ... 58 Upgrading your software and firmware... 59 Additional care and maintenance ... 59 Warranty... 60 Regulatory compliance ... 62 www.kodak.com/go/support...
-
Page 7: Setting Up Your Camera
Setting up your camera Attaching the strap Loading the KLIC-7001 battery For information on replacing batteries and extending battery life, see page www.kodak.com/go/support... -
Page 8: Charging The Battery
Setting up your camera Charging the battery Charge until all 3 battery charging lights are lit (approximately 3 hours). Kodak EasyShare photo frame dock 2 (May be sold separately.) 5-volt AC adapter (included with your camera) NOTE: Use this AC adapter to charge the battery and to power the EasyShare photo frame dock 2. -
Page 9: Turning On The Camera
NOTE: You can also press the Auto/SCN, Video, or Favorites button to turn on the camera in that mode. Setting the date/time, first time At the prompt, press OK. to change. for previous/next field. to accept. To set the date/time at a later time, see www.kodak.com/go/support Setting up your camera Date & Time, page... -
Page 10: Storing Pictures On An Sd Or Mmc Card
Your camera has 32 MB of internal memory. You can purchase an SD or MMC card to conveniently store more pictures and videos. NOTE: We recommend Kodak SD or MMC cards. When using the card for the first time, format it in this camera before taking pictures (see CAUTION: A card can only be inserted one way;... -
Page 11: Taking Pictures And Videos
• Framing grid, status icons on • Histogram on, framing grid, status icons on Taking a video Press the Video mode button. Press the Shutter button completely down and release. To stop recording, press and release the Shutter button again. www.kodak.com/go/support for:... -
Page 12: Understanding The Blur Warning Icons
Red—Picture is not sharp enough for an acceptable 4 x 6-inch (10 x 15 cm) print. White—Print sharpness is still being determined. To turn off the blur warning feature, see page is displayed during quickview and review. Blur Warning, page www.kodak.com/go/support Play a video. Adjust volume... -
Page 13: Understanding The Picture-Taking Icons
Zoom: digital telephoto wide ultra-wide Dual lens Histogram Framing grid In capture mode—shutter pressed halfway Album name www.kodak.com/go/support Taking pictures and videos Flash Picture size Pictures/time remaining Image storage location Long time exposure AF mode Focus zone Exposure metering White balance... -
Page 14: Using The Auto-Focus Framing Marks (Pictures)
Landscape, Fireworks), or when in the ultra-wide zoom range. When you use Focus Zone and set Center Zone, the framing marks are fixed at Center Wide. Center focus Center wide focus Side focus Center and side focus Left and right focus www.kodak.com/go/support... -
Page 15: Reviewing Pictures And Videos
Press once to reverse at 2X speed; press again for 4X (during playback). NOTE: To learn how to choose and view your favorite pictures, see accessory Kodak EasyShare photo frame dock 2, EasyShare dock, or Kodak 5-volt AC adapter. (See www.kodak.com/go/v570accessories.) Magnifying a picture during review www.kodak.com/go/support... -
Page 16: Understanding The Review Icons
Scroll arrows Videos Video length Favorite tag Email tag Review mode Video date display Scroll arrows view multi-up thumbnails. highlight a thumbnail. view a single picture. Protected Picture/Video number Image storage location Battery level (1/2) Picture/Video number Image storage location www.kodak.com/go/support... -
Page 17: Deleting Pictures And Videos
Formatting internal memory or an SD or MMC card deletes all (including protected) pictures and videos. (Formatting internal memory also deletes email addresses, album names, and favorites. To restore them, see the EasyShare software Help.) www.kodak.com/go/support Taking pictures and videos appears... -
Page 18: Transferring And Printing Pictures
1 Close all software applications that are open on your computer (including anti-virus software). 2 Place the Kodak EasyShare software CD into the CD-ROM drive. 3 Load the software: if the install window does not appear, choose Run from the Start Windows OS—... -
Page 19: Transferring Pictures With The Photo Frame Dock 2
Transferring pictures with the photo frame dock 2 If you have a Kodak EasyShare photo frame dock 2, use it to transfer pictures. (To purchase accessories, see www.kodak.com/go/v570accessories.) Transferring pictures with the USB cable If you do not have an EasyShare dock, use the USB / A/V connector and USB cable model U-8 (may be sold separately), then turn on the camera. -
Page 20: Also Available For Transferring
Transferring and printing pictures Also available for transferring You can also use these Kodak products to transfer your pictures and videos. Kodak EasyShare camera dock, Kodak EasyShare printer dock (see Kodak multi-card reader, Kodak SD multimedia card reader-writer Purchase these and other accessories at a dealer of Kodak products or www.kodak.com/go/v570accessories. - Page 21 Access internal memory, a card, or Favorites. Image Storage— NOTE: During direct printing, pictures are not permanently transferred or saved to the printer. To transfer pictures to your computer, see www.kodak.com/go/support Transferring and printing pictures www.kodak.com/go/v570accessories to choose a picture. Choose the number of copies.
-
Page 22: Ordering Prints Online
Automatically print tagged pictures when you insert your card into a printer with an SD/MMC card slot. See your printer user’s guide for details. Make prints at an SD/MMC card-capable Kodak picture maker. (Contact a location prior to visiting. See www.kodak.com/go/picturemaker.) Take the card to your local photo retailer for professional printing. -
Page 23: Dock Compatibility For Your Camera
6000 camera dock 6000 Other docks: printer dock 4000 camera dock II LS420, LS443 camera dock Purchase camera docks, printer docks, and other accessories at a dealer of Kodak products or www.kodak.com/go/v570accessories. www.kodak.com/go/support Transferring and printing pictures Docking configuration... -
Page 24: Doing More With Your Camera
3 Take the picture or video. NOTE: Optical zoom is effective when the lens is no closer than: 24 in. (60 cm) 11.8 in. (30 cm) in telephoto close-up/macro mode 2 in. (5 cm) in wide close-up/macro mode 31.5 in. (80 cm) in ultra-wide www.kodak.com/go/support... -
Page 25: Changing The Flash Settings
Red-Eye The camera automatically detects and removes red-eye from the picture. (For Red-Eye Pre-Flash, see IMPORTANT: When the flash is set to Red-Eye, the camera cannot For flash settings in each mode, see www.kodak.com/go/support Doing more with your camera page 32.) take more than 2 pictures in quick succession. -
Page 26: Picture-Taking Modes
Landscape Far-away scenes. The camera uses infinity auto-focus. Auto-focus framing marks are not available in Landscape. page page 21.) page page Press a button to choose a mode. Press until the Macro or Landscape icon appears in the LCD status area. www.kodak.com/go/support 42.) - Page 27 Distant scenery at night. Flash Landscape does not fire. Place the camera on a flat, steady surface or use a tripod. www.kodak.com/go/support Doing more with your camera Camera pre-settings Subject is sharp and the background is indistinct. Position your subject at least 6 ft (2 m) away and fill the frame with a head and shoulder pose.
- Page 28 Shutter speed > 1/180 sec., Multi-Zone Focus, Multi-Pattern Exposure Metering Multi-Pattern Exposure Metering, Multi- Zone Focus, Daylight White Balance Multi-Pattern Exposure Metering, Multi- Zone Focus, Daylight White Balance The camera automatically sets the focus distance depending on the zoom position. www.kodak.com/go/support...
-
Page 29: Using The Framing Grid To Compose A Picture
Using the framing grid to compose a picture The framing grid divides the LCD into thirds — vertically and horizontally. This is helpful if, for example, you want to balance a picture between water, earth, and sky. www.kodak.com/go/support Doing more with your camera Camera pre-settings... -
Page 30: Taking Panoramic Pictures
After you take 3 pictures, the pictures are automatically stitched together. Take 2 or 3 pictures. Get 1 panoramic picture. NOTE: A panoramic picture is 4 x 14 in. (10.2 x 35.6 cm). For printing options, visit the Kodak EasyShare Gallery (www.kodakgallery.com). www.kodak.com/go/support... -
Page 31: Using Exposure Compensation To Adjust Brightness
If the peak is to the right of the graph, the subject is bright; if it’s to the left, the subject is dark. Optimal exposure is achieved when the peak is in the middle of the histogram. www.kodak.com/go/support Doing more with your camera To turn on the histogram in Auto, SCN-Custom, or Review, press the LCD/Info the histogram appears. -
Page 32: Changing Picture-Taking Settings
The camera stops taking pictures when you release the Shutter button, when all pictures are taken, or when there is no more storage space. During Burst, the flash is set to Off. During quickview, you can delete all pictures in a burst series. www.kodak.com/go/support... - Page 33 This setting remains until you change modes or turn off the camera. www.kodak.com/go/support Doing more with your camera Options 5.0 MP (default)—for printing up to 20 x 30 in. (50 x 76 cm); pictures are highest resolution and largest file size.
- Page 34 Single AF (default)—uses Through-The-Lens AF when the Shutter button is pressed halfway down. Continuous AF—because the camera is always focusing, there is no need to press the Shutter button halfway down to focus. www.kodak.com/go/support...
- Page 35 Video Length Choose video record length. This setting remains until you change it. www.kodak.com/go/support Doing more with your camera Options Multi-Zone (default)—evaluates 3 zones to give an even picture focus. Ideal for general picture taking. Center-Zone—evaluates the small area centered in the lens.
-
Page 36: Customizing Your Camera
Options Single AF (default)—uses Through-The-Lens AF when the Shutter button is pressed halfway down. Continuous AF—because the camera is always focusing, there is no need to press the Shutter button halfway down to focus. On (default) Customizing your camera. www.kodak.com/go/support... - Page 37 Date & Time Video Out Choose the regional setting that lets you connect the camera to a television or other external device. www.kodak.com/go/support Doing more with your camera Options Theme—apply the same sound effect set to all functions. Individual—choose a sound effect for each function.
- Page 38 NOTE: The camera automatically corrects red-eye, even if the Red eye Pre flash is set to Off. Choose a date option, or turn off the feature. (Default is off.) On (default)— choose from date formats. None On (default) Choose your language. www.kodak.com/go/support...
-
Page 39: Viewing Pictures/Videos By Date Or By Album
3 Press to highlight Begin Show, then press the OK button. Each picture and video is displayed once. To interrupt the Slide Show, press the OK button. www.kodak.com/go/support Doing more with your camera Options Memory Card—deletes everything on the card;... -
Page 40: Changing The Slide Show Display Interval
1 On the Slide Show menu, press button. 2 Press to select a transition, then press the OK button. to highlight Interval, then press the OK to highlight Loop, then press the OK button. to highlight Transition, then press the OK www.kodak.com/go/support... -
Page 41: Displaying Pictures And Videos On A Television
USB / A/V connector Displaying pictures and videos with the photo frame dock 2 Your package may include an EasyShare photo frame dock 2. See your packaging for details. (To purchase accessories, see www.kodak.com/go/v570accessories.) www.kodak.com/go/support Doing more with your camera page... -
Page 42: Cropping Pictures
The video is split in two. The original video is saved. Press the Menu button to exit the menu. to locate a picture. to move the crop box. Press the OK 26.) to locate a video. to locate a video. www.kodak.com/go/support Changing... -
Page 43: Making A Video Action Print
Manual 9 Frames Manual 4 Frames 4 Follow the screen prompts. A multi-up picture is created. The original video is saved. Press the Menu button to exit the menu. www.kodak.com/go/support Doing more with your camera 16-up to locate a video. Video frames... -
Page 44: Viewing Picture/Video Information
NOTE: Pictures and videos are copied, not moved. To remove pictures and videos from the original location after copying, delete them (see not copied. Protection settings are not copied. for: page 11). Tags that you applied for print, email, and favorites are www.kodak.com/go/support... -
Page 45: Pre-Tagging For Album Names
See the EasyShare software Help for details. Tagging pictures/videos for albums Use the Album feature in Review mode to tag the pictures and videos in your camera with album names. www.kodak.com/go/support Doing more with your camera... -
Page 46: Sharing Your Pictures
Press the Share button to tag pictures/videos: Any time. (The most recent picture/video taken is then displayed.) Just after you take a picture/video, during quickview (see After pressing the Review button (see to scroll through the pictures. page page www.kodak.com/go/support... -
Page 47: Tagging Pictures And Videos For Emailing
Use EasyShare software to create an email address book on your computer. Then, copy up to 32 email addresses to the camera’s internal memory. For details, click the Help button in the EasyShare software. www.kodak.com/go/support Doing more with your camera to locate a picture. -
Page 48: Tagging Pictures As Favorites
Favorite pictures - smaller copies of your originals - are loaded back to your camera, so you can share and enjoy more. to locate a picture/video. section of your camera’s www.kodak.com/go/support to scroll... -
Page 49: Optional Settings
NOTE: Pictures taken at the 4.4 MP (3:2) quality setting are displayed at a 3:2 aspect ratio with a black bar at the top of the screen. www.kodak.com/go/support to highlight Favorite, then press the OK button. appears in the status area. To remove the tag, press page 13) or an EasyShare dock. - Page 50 3 Highlight Print or Email, then press the OK button. NOTE: Favorites that were taken on this camera (not imported from another source) are good for prints up to 4 x 6 in. (10 x 15 cm). button. button. Press to locate a picture. www.kodak.com/go/support...
-
Page 51: Troubleshooting
Flash does not fire Storage location is almost or entirely full www.kodak.com/go/support Make sure the battery is properly installed Insert a charged battery. Transfer all pictures to the computer Take another picture. If the problem continues, change the image storage location to internal memory. - Page 52 This is normal for LCD technology. This does not affect pictures or videos. Panoramic pictures may not be viewable on devices that do not support panoramic capture. (page 58). (page (page (page (page (page 50). www.kodak.com/go/support 12),...
-
Page 53: Computer/Connectivity Problems
Make sure the camera is not in Close-Up/Macro mode if you are more than 21 in. (0.7 m) from your subject. Place the camera on a flat, steady surface or use a tripod (especially in high-zoom settings or in low light). www.kodak.com/go/support Insert a charged battery (page Turn on the camera. - Page 54 Exposure Compensation. (page 19) or change your position so light is not (Electronic Flash, page (page 25). In Auto and SCN-Custom modes, adjust the (page 19). (Electronic Flash, page (page 25). In Auto and SCN-Custom modes, adjust the www.kodak.com/go/support 53). 53).
-
Page 55: Direct Printing (Pictbridge Enabled Printer) Problems
The Direct print menu interface turns off. Cannot print pictures. Camera or printer display an error message. www.kodak.com/go/support Solution Turn on the camera. Make sure the camera is not in Favorites mode. Use the Direct print menu to change the image storage location. -
Page 56: Getting Help
Get help with the Windows operating system and working with digital pictures Other Get support for cameras, software, accessories, more Get information on Kodak EasyShare printer docks Get information on Kodak inkjet products Optimize your printer for truer, more vibrant colors Register your camera www.kodak.com/go/v570support... -
Page 57: Telephone Customer Support
Telephone customer support If you have questions concerning this product, you may speak with Kodak customer support: Australia 1800 147 701 Austria 0179 567 357 Belgium 02 713 14 45 Brazil 0800 150000 Canada 1 800 465 6325 China 800 820 6027... -
Page 58: Appendix
Appendix Camera specifications For more specifications, visit www.kodak.com/go/v570support. CCD—1/2.5 in. CCD, 4:3 aspect ratio Output image size— 5.0 MP: 2576 x 1932 pixels 4.4 MP (3:2): 2576 x 1716 pixels 4.0 MP: 2304 x 1728 pixels 3.1 MP: 2048 x 1536 pixels 1.8 MP: 1552 x 1164 pixels... -
Page 59: Video Capture
Image storage—Optional MMC or SD Card the SD Card Association.) Internal storage capacity—32 MB internal memory. (28 MB available for image storage. 1 MB equals one million bytes.) Quickview—Yes Video output—NTSC or PAL www.kodak.com/go/support Appendix (The SD logo is a trademark of... - Page 60 Appendix Power—Kodak Li-Ion rechargeable digital camera battery KLIC-7001; 5V AC adapter Communication with computer—USB 2.0 (PIMA 15740 protocol), via USB Cable Model U-8, EasyShare camera dock or printer dock PictBridge support—Yes Self-Timer—10 seconds White balance—Auto, Daylight, Tungsten, Fluorescent, Open Shade Color modes—High Color, Natural Color, Low Color, Black &...
-
Page 61: Flash Settings In Each Mode
Self-Portrait Red-Eye* Custom Auto* * When you change to Auto or Red-Eye in these modes, it becomes the default. www.kodak.com/go/support Available settings Auto, Off, Fill Flash, Red-Eye Auto, Off, Fill Flash, Red-Eye Auto, Off, Fill Flash, Red-Eye Auto, Off, Fill Flash, Red-Eye... -
Page 62: Storage Capacities
16 min. 28 sec. 31 min. 57 sec. 4.0 MP 3.1 MP 320 x 240 (QVGA) 2 min. 18 sec. 2 min. 36 sec. 5 min. 13 sec. 10 min. 26 sec. 20 min. 53 sec. 41 min. 46 sec. www.kodak.com/go/support 1.8 MP... -
Page 63: Important Safety Instructions
Kodak customer support. Using this product The use of an accessory attachment that is not recommended by Kodak, such as an AC adapter, may cause fire, electric shock, or injury. Use only a USB-certified computer. Contact your computer manufacturer if you have questions. -
Page 64: Battery Life
Appendix Remove the battery when the product is stored for an extended period of time. In the unlikely event that battery fluid leaks inside the product, contact Kodak customer support. In the unlikely event that battery fluid leaks onto your skin, wash immediately with water and contact your local health provider. -
Page 65: Power-Saving Features
Do not allow chemicals, such as suntan lotion, to contact painted surfaces. Service agreements may be available in your country. Contact a dealer of Kodak products for more information. For digital camera disposal or recycling information, contact your local authorities. -
Page 66: Warranty
Limitations Request for Warranty service will not be accepted without proof of date of purchase, such as a copy of the original dated Kodak EasyShare digital camera or accessory sales receipt. (Always keep the original for your records.) This warranty does not apply to the battery(s) used in digital cameras or accessories. -
Page 67: Outside The United States And Canada
Kodak makes no other express or implied warranty for this product. In the event that the exclusion of any implied warranty is ineffective under the law, the duration of the implied warranty will be one year from the purchase date. -
Page 68: Regulatory Compliance
Regulatory compliance FCC compliance and advisory Kodak EasyShare V570 dual lens digital camera This equipment has been tested and found to comply with the limits for a Class B digital device, pursuant to Part 15 of the FCC Rules. These limits are designed to provide reasonable protection against harmful interference in a residential installation. -
Page 69: Waste Electrical And Electronic Equipment Labeling
Install and use the equipment according to the instruction manual. MPEG-4 Use of this product in any manner that complies with the MPEG-4 visual standard is prohibited, except for use by a consumer engaging in personal and non-commercial activities. www.kodak.com/go/support www.kodak.com/go/recycle for recycling program information. Appendix... - Page 70 35 USB, 13 Canadian compliance, 63 candle light, 22 caring for your camera, 59 children, 22 clock, setting, 3 close-up, 22 color mode, 28 computer connect camera, 13 connect photo frame dock, 13 connector for USB / A/V, 13 www.kodak.com/go/support...
- Page 71 2 printer, 14 downloading pictures, 13 EasyShare software, 12 emailing pictures, videos, 41 exposure compensation, 25 long time, 29 metering, 28 www.kodak.com/go/support favorites button, i removing, 44 settings, 43 tagging, 42 FCC compliance, 62 fireworks, 22 firmware, upgrading, 59...
- Page 72 SD/MMC card, 4 software, 12 internal memory capacity, 56 ISO speed, 27 Kodak EasyShare software installing, 12 upgrading, 59 Kodak Web sites, 50 landscape, 21 landscape mode, 20 language, 32 LCD, ii dimmer, 31 LCD/Info button, 5 reviewing pictures, videos, 9...
- Page 73 EasyShare printer dock, 14 optimizing printer, 50 order online, 16 PictBridge, 14 tagged pictures, 16 protecting pictures, videos, 11 quickview, using, 6 www.kodak.com/go/support ready light, ii recycling, disposal, 59, 63 red-eye pre-flash, 32 regulatory information, 62 removing favorites, 44 repair camera, 50...
- Page 74 46 slide show continuous loop, 34 interval, 34 problems, 47 running, 33 television, 35 transition, 34 snow, 22 software installing, 12 upgrading, 59 sound themes, 31 volume, 31 speaker, ii specifications, camera, 52 split a video, 36 sport, 21 www.kodak.com/go/support...
- Page 75 6 tripod socket, ii turning camera on and off, 3 undo delete, 11 upgrading software, firmware, 59 URLs, Kodak Web sites, 50 transferring pictures, 13 USB / A/V out, ii, 35 VCCI compliance, 63 video action print, 37...
Need help?
Do you have a question about the EasyShare V570 and is the answer not in the manual?
Questions and answers