Table of Contents
Advertisement
Advertisement
Table of Contents

Related Manuals for Targa Visionary XP-210

Summary of Contents for Targa Visionary XP-210
- Page 1 Manual English TARGA Visionary XP 210 i - 1...
- Page 2 Notice The information in this user’s manual is subject to change without notice. THE MANUFACTURER OR RESELLER SHALL NOT BE LIABLE FOR ERRORS OR OMISSIONS CONTAINED IN THIS MANUAL AND SHALL NOT BE LIABLE FOR ANY CONSEQUENTIAL DAMAGES, WHICH MAY RESULT FROM THE PERFORMANCE OR USE OF THIS MANUAL.
-
Page 3: Table Of Contents
TABLE OF CONTENTS PREFACE Symbols and Conventions Protecting Your Computer - Avoid Abusive Handling and Adverse Environment Chapter Summaries GETTING TO KNOW THE BASICS Performance Features (1-2,3) System at a Glance (1-4) Front View (1-4,5,6,7,8) Rear View (1-9,10,11) Bottom View (1-12,13) AC Adapter (1-14) LED Status Indicators (1-15) Keyboard Features (1-16) - Page 4 TROUBLE-SHOOTING First Step (2-2,3) Audio Problems (2-4) Hard Disk Problems (2-5,6) CD-ROM, DVD-ROM, CD-RW, or Combo Drive Problems (2-7) Display Problems (2-8) Keyboard and Mouse Problems (2-9) CMOS Battery Problems (2-10) Memory Problems (2-11) Modem Problems (2-12) Network Adapter / Ethernet Problems (2-13) PC Card / PCMCIA Problems (2-14) Performance Problems (2-15) Printer Problems (2-16)
-
Page 5: Using This Manual
Preface Using This Manual This User’s Manual contains general information about your computer, hardware and software setup information, troubleshooting, and technical specifications. Symbols and Conventions The following conventions and symbols are used in this manual: When keys are to be pressed at the same time, a plus (+) symbol is used. - Page 6 Protecting Your Computer - Avoid Abusive Handling and Adverse Environment Follow the advice below will help ensure that you get the most out of your Investment. Your computer will serve you well if you take good care of it. Do not expose the computer to direct sunlight or place it near sources of heat.
- Page 7 but pull on the plug. Keep the adapter away from children. The total ampere ratings of the equipment plugged in should not exceed the ampere rating of the cord if you are using an extension cord. The total current rating of all equipment plugged into a single wall outlet should not exceed the fuse rating.
-
Page 8: Chapter Summaries
Chapter Summaries The following is a summary of the available chapters and appendices in this manual. Chapter 1: Getting to Know the Basics In this chapter, you will learn the basic operations and features of your computer. It gives you a general understanding of the components of your computer. -
Page 9: Getting To Know The Basics
chapter 1 getting to know the basics GETTING TO KNOW THE BASICS This chapter introduces the features and components of the computer. -
Page 10: Performance Features
chapter 1 getting to know the basics Performance Features High Performance Processor The notebook PC is equipped with a powerful AMD Mobile Athlon XP-M processor of the latest sub-micron process, processor technologies, and high bus bandwidths. Advanced Graphic Engine The system is built with a high performance ATI Radeon 9600 video processor with a dedicated frame buffer (of 64MB.) The advanced graphic engine is DirectX 9 compatible and delivers the fastest-performing 3D graphics... - Page 11 chapter 1 getting to know the basics Communication Features The system provides built-in Ethernet network adapter for local network and 56K modem. Firewire (IEEE1394 / 1394a) and USB2.0 ports In addition to a full array of built-in I/O por s, the computer offers IEEE1394 for ultra high-speed connection to high bandwidth digital video devices and USB2.0 ports to connect to any USB-based peripheral devices.
-
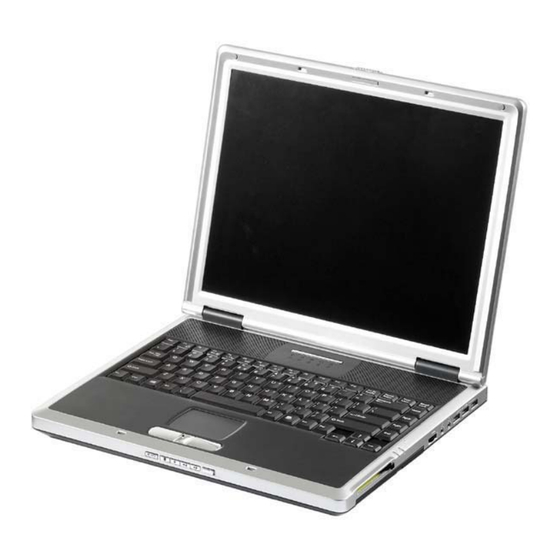
Page 12: System At A Glance
chapter 1 getting to know the basics System At A Glance Front View 1. LCD Latch The LCD latches lock / unlock the LCD panel. 2. LCD Display The panel is where the system content is displayed. 3. Built-in Microphone The built-in microphone records sound. - Page 13 chapter 1 getting to know the basics 4. Suspend Status LED Flashing green light indicates the notebook is in suspend mode. (See the LED Status Indicator Section for details.) 5. Power Status LED The multi-color LED indicates the power status of the notebook. (See the LED Status Indicator Section for details.) 6.
- Page 14 chapter 1 getting to know the basics 11. Playback / Pause Key Press the key once to start playback an audio track. Press again to temporarily stop an audio track during playback. Press again to resume playback. 12. MP3 Player On/Off Button Press the MP3 Player Button to turn on the stand-alone MP3 player without having to boot to Windows.
- Page 15 chapter 1 getting to know the basics 16. Ventilation Grill The fan grill is where air is expelled to dissipate the internal heat. Do not block this airway completely. 17. Keyboard The keyboard is used to enter data. It has an embedded numeric keypad and cursor control keys.
- Page 16 chapter 1 getting to know the basics 21. Power / Suspend Button The power/suspend button turns the notebook on and off and it also acts as a system suspend key. Press momentarily to turn on the system. Press and hold for at least 3~4 seconds to turn off the system.
-
Page 17: Rear View
chapter 1 getting to know the basics Rear View Warning: Do not place any heavy objects on the top of notebook. This may damage the display 1. Ventilation Grill The fan grill is where air is exchanged to dissipate the internal heat. -
Page 18: Modem Port
chapter 1 getting to know the basics 5. Ventilation Grill The fan grill is where air is exchanged to dissipate the internal heat. Do not block this airway completely. 6. TV (S-Video) Port The S-Video port permits you to redirect the screen output to a television set or any analog video playback device. - Page 19 chapter 1 getting to know the basics 12. Microphone Jack The microphone jack (3.5-mm diameter) is where you connect a microphone. 13. Audio Volume Dial Use the volume dial to control the loudness of the speakers. 14. Optical Drive (CD-ROM or DVD-ROM or CD-RW or Combo or DVD R/ RW) and Disk Eject Button and Manual Eject Key Hole If your computer comes with DVD-ROM, you may play DVD...
-
Page 20: Bottom View
chapter 1 getting to know the basics Bottom View 1-12... -
Page 21: Battery Pack
The battery pack is a built-in power source for the notebook. 6. DDR Memory Module This is the system’s DDR memory module. The module can be changed to a module of higher capacity. Use only DDR memory module which are listed under http://www.service.targa.co.uk 1-13... -
Page 22: Ac Adapter
chapter 1 getting to know the basics AC Adapter 1. DC-out Connector The DC-out connector docks to the power jack (DC-in) on the computer. 2. LED Lamp The LED lamp appears green when the unit is plugged into a valid AC source. 3. -
Page 23: Led Status Indicators
chapter 1 getting to know the basics LED Status Indicator The LED Status Indicator displays the operating status of your notebook. When a certain function is enabled, an LED will light up. The following section describes its indication. System Status Indicator LED Graphic Indication Symbol... -
Page 24: Keyboard Features
chapter 1 getting to know the basics Keyboard Features Function Keys (Quick Keys) Graphic Action System Control Symbol Fn + F1 Enters Suspend Mode. Fn + F3 Turns Battery Warning Beep on or off. Fn + F4 Changes Display Mode: LCD-only, CRT-only and LCD&CRT. -
Page 25: Windows Keys
chapter 1 getting to know the basics Windows Keys Your keyboard also has two Windows keys: 1. Start Key This key allows you to pull up the Windows Start Menu at the bottom of the taskbar. 2. Application Menu Key This key brings up the popup menu for the application, similar to a click of the right mouse button. -
Page 26: Touch Pad With Page Up / Page Down Function
chapter 1 getting to know the basics Touch Pad with Page Up / Page Down Function The built-in touch pad, which is a PS/2-compatible pointing device, senses movement on its surface. As you move your fingertip on the surface of the pad, the cursor responds accordingly. The following items teach you how to use the touch pad: 1. -
Page 27: Graphic Subsystem
chapter 1 getting to know the basics Graphic Subsystem Your computer uses a high performance 15-inch active matrix TFT panel with high resolution and multi-million colors for comfortable viewing. The ATI Radeon 9600 graphics accelerator, which is Microsoft DirectX 9 compatible, performs graphic rendering at a lighting-fast speed. -
Page 28: Opening And Closing The Display Panel
chapter 1 getting to know the basics Opening and Closing the Display Panel To open the display, slide the LCD latch to the right and lift up the lid. Then tilt it to a comfortable viewing position. To close the display cover, fold it down gently until the LCD latches click into place. -
Page 29: Audio Subsystem
chapter 1 getting to know the basics Audio Subsystem Your computer’s audio subsystem is Sound Blaster Pro-compatible. Adjusting the Volume Manually To increase the volume, press Fn+ F5. To decrease the volume, press Fn+F6. Adjusting the Audio Volume in Windows 1. - Page 30 chapter 1 getting to know the basics Modem Your computer comes with a 56K V.92 internal fax/modem and a phone jack (RJ-11), which is located on the right rear side of your computer. Use a telephone cable to connect the computer to the telephone wall outlet.
- Page 31 chapter 1 getting to know the basics Ethernet Your computer is equipped with a 10/100Base-TX Fast Ethernet network adapter. Connect the active LAN cable to the RJ-45 LAN port located on the left rear side of the computer. This allows you to access and transmit data in the local area network.
-
Page 32: Trouble-Shooting
chapter 2 trouble shooting TROUBLE SHOOTING In this chapter, you will learn how to solve common hardware and software problems. - Page 33 chapter 2 trouble shooting Your computer has been fully tested and complies with the system specifications before shipping. However, incorrect operations and/or mishandling may cause problems. This chapter provides a reference for identifying and correcting common hardware and software problems that you may encounter. When you encounter a problem, you should first try to go through the recommendations in this chapter.
- Page 34 chapter 2 trouble shooting hardware devices in the BIOS Setup utility. A faulty setting may cause the system to misbehave. If you are not sure of the changes you made, try to restore all the settings to factory defaults. Be sure all the device drivers are installed properly. For example, without the audio driver properly installed, the speakers and microphone will not work.
-
Page 35: Audio Problems
chapter 2 trouble shooting Audio Problems No speaker output - Turn up the volume dial located at the right edge of the computer. See Chapter 1 for its location. Software volume control is turned down in Microsoft Sound System or is muted. Double-click the speaker icon on the lower right corner of the taskbar to see if the speaker has been muted or turned down all the way. -
Page 36: Hard Disk Problems
chapter 2 trouble shooting Hard Disk Problems The hard disk drive does not work or is not recognizable - If you had just performed a hard disk upgrade, make sure the hard drive connector is not loose and the hard disk drive is also correctly seated. - Page 37 chapter 2 trouble shooting Many browsers store files in the hard drive as a cache to speed up the performance. Check the program’s Online Help for instructions on decreasing the cache size or on removing temporary Internet files. Empty the Recycle Bin to create more disk space. When you delete files, Windows saves them to the Recycle Bin.
-
Page 38: Cd-Rom, Dvd-Rom, Cd-Rw, Or Combo Drive Problems
chapter 2 trouble shooting CD-ROM, DVD-ROM, CD-RW, or Combo Drive Problems The CD-ROM, DVD-ROM, or Combo drive does not work - Try rebooting the system. The disk is damaged or files are not readable. After you have inserted a CD-ROM disk, it may take a moment before you can access its content. -
Page 39: Display Problems
chapter 2 trouble shooting Display Problems The display panel is blank when the system is turned on - Make sure the computer is not in the Standby or Hibernate suspend modes. The display is turned off to conserve energy in these modes. The screen is difficult to read - The display resolution should at least be set to at least1024x768 for optimal viewing. -
Page 40: Keyboard And Mouse Problems
chapter 2 trouble shooting Keyboard and Mouse Problems The built-in touch pad performs erratically - Make sure there is no excess perspiration or humidity on your hand when using the touch pad. Keep the surface of the touch pad clean and dry. Do not rest your palm or wrist on the surface of the touch pad while typing or using the touch pad. -
Page 41: Cmos Battery Problem
chapter 2 trouble shooting CMOS Battery Problem A message “CMOS Checksum Failure” displays during the booting process or the time (clock) resets when booting - Try to reboot the system. If the message “CMOS Checksum Failure” appears during the booting procedure even after rebooting, it may indicate failure of the CMOS battery. -
Page 42: Memory Problems
Certain brands of memory module may not be compatible with your system. You should ask your vendor for a list of compatible DIMM http://www.service.targa.co.uk The memory module may not be installed properly. Go back to Chapter 1 Button view to review the details of this operation. -
Page 43: Modem Problems
chapter 2 trouble shooting Modem Problems The built-in modem does not respond - Make sure the modem driver is loaded properly. Go to [Start > Settings > Control Panel > Phone and Modem Options] and go to Modems tab. Make sure SmartLink 56K Voice Modem or Uniwill V.90 Modem is listed. -
Page 44: Network Adapter / Ethernet Problems
chapter 2 trouble shooting Network Adapter / Ethernet Problems The Ethernet adapter does not work - Go to [Start > Settings > Control Panel > System > Hardware > Device Manager]. Double-click on Network Adapters and check if VIA Rhine II Fast Ethernet Adapter appears as one of the adapters. -
Page 45: Pc Card / Pcmcia Problems
chapter 2 trouble shooting PC Card / PCMCIA Problems Note: Some system may not have the PC Card Slot option. PC Cards do not function- Make sure you have properly installed the driver for the card. Consult the card’s manual or contact the vendor for trouble-shooting. -
Page 46: Performance Problems
chapter 2 trouble shooting Performance Problems The computer becomes hot - In a 35 C environment, the certain areas of the computer’s back case are expected to reach 50 degrees. Make sure the air vents are not blocked. If the fan does not seem to be working at high temperature (50 degrees Celsius and up), contact the service center. -
Page 47: Printer Problems
chapter 2 trouble shooting Printer Problems The printer does not print - Make sure the cable connection is secured and the printer is powered up, if the printer is connected via the parallel port. Run the printer self-test to see if it reports any problem. Check if the printer displays any error messages. -
Page 48: Firewire (Ieee1394) And Usb2.0 Problems
chapter 2 trouble shooting Firewire (IEEE1394) and USB2.0 Problems The USB device does not work - Windows NT 4.0 does not support USB protocols Check the settings in the Windows Control Panel. Make sure you have installed the necessary device drivers. -
Page 49: Appendix A Product Specification
appendix A product specification PRODUCT SPECIFICATION... -
Page 50: System Memory
appendix A product specification Processor and Core Logic AMD Mobile (DTR) Athlon XP-M 2000+ (1.67GHz) to Processor 3000+ (2.2GHz), 462 Pins OPGA Type, 266MHz FSB, 256KB or 512KB L2 cache VIA KT400a + VT8235 chipset with audio, modem, Core Logic LAN and USB controllers integrated 133MHz Front Side Bus 266/333/400MHz DDR interface... - Page 51 appendix A product specification Audio Chipset VIA integrated audio controller Audio Codec VT8235 Sound DirectSound 3D accelerator Capabilities SoundBlaster Pro compatible AC97 V2.2 compatible 2 Stereo Speakers (1 Watt each) Modem Chipset VIA integrated Modem Controller integrated with MDC card, AC97 V2.2 Modem support Transmission V.92 / K56flex for download data speed up to 56Kbps.
- Page 52 appendix A product specification...
- Page 53 appendix A product specification Firewire IEEE1394(a) Chipset VIA VT6307 IEEE1394 OHCI Host Controller and Up to 400 Mbps Capabilities Expandable up to 63 devices in chains Storage Hard Drive 2.5-inch format hard disk drive CD-ROM 5.25-inch format (12.7mm height) fixed module with 24X speed DVD-ROM 5.25-inch format (12.7mm height) fixed module...
- Page 54 appendix A product specification Ports & Connectors Audio-In Port One Microphone-in jack Audio-Out / SPDIF One Headphone / SPDIF-out jack Volume Pot One VR Dial for audio volume control Firewire One Firewire (IEEE1394) host connector USB2.0 Port Three USB2.0-compliant connectors Ethernet One standard network Ethernet connector (RJ-45) S-Video...
- Page 55 appendix A product specification BIOS PnP Function AMI PnP BIOS Self Test Power On Self Test Auto DRAM auto-detection, auto-sizing Detection L2 Cache auto-detection Hard disk type auto-detection Power APM 1.2 (Advanced Power Management) & Management ACPI 2.0 (Advanced Configuration Power Interface) Smart Power ®...
-
Page 56: Agency Regulatory Notices
appendix B agency regulatory notices AGENCY REGULATORY NOTICES... - Page 57 appendix B agency regulatory notices Federal Communications Commission Notice This equipment has been tested and found to comply with the limits for a Class B digital device, pursuant to Part 15 of the FCC Rules. These limits are designed to provide reasonable protection against harmful interference in a residential installation.
- Page 58 appendix B agency regulatory notices Compliance with these directives implies conformity to the following European Norms: EN55022 (CISPR 22) Radio Frquency Interference EN50082 (IEC801-2, IEC801-3, IEC801-4) Electro-magnetic Immunity EN 300 328-2 (ETS 300 328) Radio Spectrum Matter. TBR21 (ETS TBR21) Terminal Equipment EN60950 (IEC950) I.T.E.
- Page 59 appendix B agency regulatory notices The minimum specification for the flexible cord are: (1) 0.75 mm2 conductors, (2) Type VCT or VCTF, and (3) 3-conductor. The cord set must have minimum rated current capacity of 7 A. The attachment plug must be a two-pole, grounded type with a Japanese Industrial Standard C8303 (15 A, 125 VAC) configuration.
- Page 60 appendix B agency regulatory notices Telephone lines requirement The appropriate utilization of 26AWG telephone line cord on unit. CAUTION: Always disconnect all telephone lines from the wall outlet before servicing or disassembling this equipment. CAUTION: To reduce the risk of fire, use only No. 26AWG or larger telecommunication line cord.
- Page 61 appendix B agency regulatory notices Laser Safety The optical drive used with this computer is certified as a Class 1 laser device according to the U.S. Department of Health and Human Services (DHHS) Radiation Performance Standard and International Standards IEC 825 / IEC 825-1 (EN60825 / EN60825-1).
- Page 62 appendix B agency regulatory notices Lithium battery warning This computer contains a lithium battery to power the clock and calendar circuitry. CAUTION: Danger of explosion if battery is replaced incorrectly. Replace only with the same or equivalent type recommended by the manufacturer. Discard used batteries according to the manufacturer’s instructions.
Need help?
Do you have a question about the Visionary XP-210 and is the answer not in the manual?
Questions and answers