Advertisement
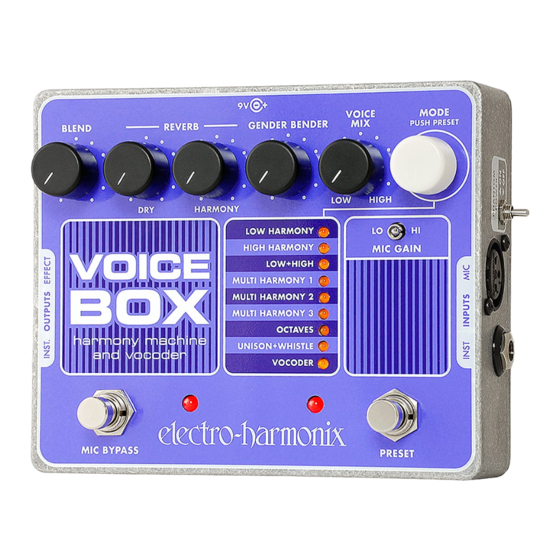
VOICE BOX
Harmony Machine and Vocoder
Congratulations on your purchase of the Electro-Harmonix Voice Box!
The Voice Box is a comprehensive and easy to use vocal harmony
machine and vocoder. Singers can produce 1 to 4 part harmonies from
their solo vocals. The harmonies are determined by the chords played on
your instrument and the notes you sing. The Voice Box has a superb and
easy to use vocoder, allowing you to easily create classic vocoder
sounds. Additionally the Voice Box has an Octave mode, Whistle effect
and a Unison effect.
Special Features of the Voice Box:
3 different dual harmony modes including: Low, High, Low + High.
3 different multi harmony modes.
Vocoder mode turns the Voice Box into a professional sounding
vocoder.
Octave mode produces an octave above and below your vocal.
Whistle mode synthesizes a whistle tone 2 octaves above the note you
sing.
Unison mode allows for a formant shaping effect without pitch shifting.
Save and load up to 9 presets: 1 preset for each mode.
Scroll through the presets using the MODE knob or PRESET Footswitch.
Built-In balanced Mic Pre-Amp with switchable Phantom Power and Gain
adjustment.
Effect output on balanced XLR line output for interfacing with mixers
and stage breakout boxes.
Clean and transparent analog instrument through circuitry.
WARNING: Use only the AC Adapter that the Voice Box comes
supplied with. Do not use any other AC Adapters. Using other AC
adapters, even those made by Electro-Harmonix, could cause harm to
the unit, the adapter or you. The Voice Box does not use batteries.
1
- QUICK START GUIDE -
BASIC CONNECTION SETUP
1. Connect your microphone to the MIC input on the right side of
the Voice Box using a balanced XLR cable.
2. Connect a balanced XLR cable to the EFFECT output jack on the
left side of the Voice Box. Connect the other end of the XLR
cable to the line input of a mixer.
3. Using an unbalanced instrument cable, plug your instrument into
the INST Input Jack on the right side of the Voice Box.
4. Connect your instrument's amp or chain of effects into the INST
output jack on the left side of the Voice Box.
5. Plug the AC Adapter into a wall outlet.
6. Plug the barrel connector of the AC Adapter into the 9V power
jack at the top of the Voice Box. Polarity is center negative.
7. If using a condenser microphone, flip the Phantom Power switch
up to the top position, otherwise leave it off. The Phantom
Power Switch is located on the right side of the Voice Box, next
to the XLR MIC input.
8. Push the MIC BYPASS Footswitch until its associated LED is off.
Sing into the microphone, you will hear your dry vocal at this
point. Adjust mixer settings as well as the MIC GAIN switch on
the Voice Box to obtain optimal mic levels.
USING THE HARMONIES
1. Rotate the white MODE knob clockwise until LOW HARMONY
mode is selected.
2. Rotate the GENDER BENDER, DRY and HARMONY REVERB
knobs fully counter-clockwise.
3. Rotate the BLEND and VOICE MIX knobs so that they are set to
12 o'clock or 50% position.
4. Play your instrument to make sure you can hear it well. Now
tune your instrument, the harmonies in the Voice Box work best
when your instrument is properly tuned with itself. The
instrument does not have to be tuned to A440 or any other
standard.
5. Play some chords and sing, you will hear the Voice Box produce
mostly 3rds and 5ths below your original vocal and in tune with
your instrument.
6. Rotate the MODE knob to load the other harmony modes.
2
Advertisement
Table of Contents

Related Manuals for Electro-Harmonix VOICE BOX


Summary of Contents for Electro-Harmonix VOICE BOX
- Page 1 The harmonies are determined by the chords played on 6. Plug the barrel connector of the AC Adapter into the 9V power your instrument and the notes you sing. The Voice Box has a superb and jack at the top of the Voice Box. Polarity is center negative.
-
Page 2: Using The Vocoder
VOICE MIX Knob Adjustments USING THE VOCODER 7. When the Voice Box is set to one of the 6 harmony modes, the 1. Turn the MODE knob counter-clockwise until VOCODER mode is VOICE MIX knob adjusts the mix between lower and higher selected. -
Page 3: Description Of Modes
- DESCRIPTION OF MODES - USING UNISON + WHISTLE MODE The Voice Box has 9 modes to choose from. Each mode gives the musician a different sonic palette to work with. In addition, each mode may change the functionality of 1. -
Page 4: Harmony Modes
The Voice Box creates two harmony voices one above the note you sing pitch shifter. If no instrument is plugged in and playing, the six harmony and one below. - Page 5 MULTI HARMONY 2: Lower 3rd, Lower 5th, Upper 3rd and Upper Octave OCTAVES Mode The Voice Box creates the same three harmonies as in Multi Harmony 1 OCTAVES mode pitch shifts your vocal up and down exactly one octave. and adds the upper octave. The harmonies consist of the lower 3rd Since the amount of pitch shift is preset to an octave, this mode does harmony, the lower 5th harmony and the upper 3rd harmony.
- Page 6 After loading a preset, if you move a knob, the knob’s new location will The Voice Box can save one preset for each of the 9 modes. Each preset supersede the preset’s stored value for that knob. At this point, the will pertain directly to the mode you have saved it in.
- Page 7 Box. The MODE knob is a rotary encoder enabling the user to scroll In all modes, the VOICE MIX knob mixes between two different voices. through the 9 Modes of the Voice Box. Turn the knob clockwise to In most cases it mixes between a low harmony voice (counter-clockwise progress up through the modes: from VOCODER to LOW HARMONY position) and a high harmony voice (clockwise position).
- Page 8 BLEND KNOB mic pre-amp to the input of the Voice Box or if you have a loud singer with an especially sensitive microphone. The BLEND knob is a wet/dry control for the effect output jack. Turning the BLEND knob to its minimum counter-clockwise position will yield PHANTOM POWER Toggle Switch 100% dry and no wet signal.
-
Page 9: Technical Specifications
Plug the output of the Voice Box’s supplied AC Adapter into the 9V power jack located at the top of the Voice Box. The Voice Box requires 9 - 9.6VDC at 200mA with a center negative plug. The Voice Box accepts Boss style AC Adapters.
Need help?
Do you have a question about the VOICE BOX and is the answer not in the manual?
Questions and answers
I bought used, how do I know if my unit is working correctly?
To test if your used Electro-Harmonix Voice Box is working correctly, follow these steps:
1. Basic Connection Setup
- Connect a microphone to the MIC input using a balanced XLR cable.
- Connect a balanced XLR cable from the EFFECT output to a mixer’s line input.
- (Optional) Connect an instrument to the INST input with an unbalanced instrument cable.
- Plug the AC adapter into a wall outlet and connect it to the 9V power input on the Voice Box.
2. Testing the Audio Output
- Speak or sing into the microphone and check if sound comes through the mixer or speakers.
- Adjust settings such as harmony blend and reverb to see if they affect the vocal output.
3. Testing Harmony Effects
- Set the blend effect to maximum to clearly hear harmonies.
- Play an instrument (if connected) to trigger harmonies based on chord input.
- Cycle through harmony modes (e.g., Multi-Harmony, Low Harmony, High Harmony) and confirm that different harmonies are generated.
4. Testing the Vocoder
- Switch to the Vocoder mode and speak or sing while playing an instrument.
- Ensure that your voice takes on the instrument’s tonal characteristics.
5. Checking Knobs and Settings
- Adjust knobs like Gender Bender and Voice Mix to confirm they change the sound as expected.
If the unit produces sound, responds to settings, and applies effects properly, it is working correctly. If there is no sound or some features do not work, check cables, power, and connections before considering further troubleshooting.
This answer is automatically generated