Lexmark X560n User Manual
Hide thumbs
Also See for X560n:
- User manual (210 pages) ,
- Quick reference (5 pages) ,
- Compatibility manual (179 pages)
Table of Contents
Advertisement
Quick Links
X560n
User's Guide
May 2008
www.lexmark.com
Lexmark and Lexmark with diamond design are trademarks of Lexmark International, Inc., registered in the United States and/or other countries.
All other trademarks are the property of their respective owners.
© 2008 Lexmark International, Inc.
All rights reserved.
740 West New Circle Road
Lexington, Kentucky 40550
Downloaded From ManualsPrinter.com Manuals
Advertisement
Table of Contents

Related Manuals for Lexmark X560n


Summary of Contents for Lexmark X560n
- Page 1 User's Guide May 2008 www.lexmark.com Lexmark and Lexmark with diamond design are trademarks of Lexmark International, Inc., registered in the United States and/or other countries. All other trademarks are the property of their respective owners. © 2008 Lexmark International, Inc.
- Page 2 Downloaded From ManualsPrinter.com Manuals...
-
Page 3: Table Of Contents
Contents Safety information................11 Learning about the printer.............12 Checking the box contents..............................12 Printer configurations................................13 Understanding the printer control panel........................16 Getting the printer ready to fax............................18 Choosing a fax connection................................18 Using an RJ11 adapter .................................. 19 Connecting directly to a telephone wall jack ........................23 Connecting to a telephone ................................. - Page 4 Unacceptable paper ..................................49 Selecting paper....................................49 Selecting preprinted forms and letterhead........................... 49 Using recycled paper..................................50 Using letterhead..................................50 Using transparencies................................50 Using envelopes...................................51 Using labels....................................52 Using card stock...................................53 Storing paper..................................53 Supported paper sizes, types, and weights.......................54 Supported paper sizes .................................. 54 Supported paper types.................................
- Page 5 Adjusting copy quality.................................. 65 Making a copy lighter or darker ..............................65 Adjusting the sharpness of a copy ............................65 Adjusting the color saturation of a copy..........................66 Adjusting the auto exposure of copies........................... 66 Centering an image on a page ..............................67 Copying multiple pages onto a single sheet ........................
- Page 6 Changing the maximum e-mail size of a scanned image ....................83 Changing the scan destination..............................83 Changing the TIFF format for a scanned image ........................83 Selecting the type of document being scanned ......................... 84 Making a scanned image lighter or darker..........................84 Setting the scan color mode...............................
- Page 7 Adjusting the fax resolution ............................... 96 Selecting the type of document being faxed........................96 Making a fax lighter or darker ..............................97 Setting the delayed start time..............................97 Customizing the fax settings for an individual fax job...................97 Clearing jams..................98 Avoiding jams..................................98 Understanding jam messages and locations......................98 Clearing Tray 1 (MPT) jams............................100 Clearing Tray 2 jams.................................104...
- Page 8 Understanding printer messages..........148 List of status and error messages..........................148 Maintaining the printer..............160 Storing supplies.................................160 Cleaning the printer.................................160 Cleaning the exterior of the printer ............................160 Cleaning the scanner glass................................161 Ordering supplies................................161 Ordering print cartridges ................................161 Ordering a fuser.....................................162 Ordering a transfer belt ................................162 Moving the printer................................162 Before moving the printer.................................162 Locking the scanner..................................163...
- Page 9 Solving copy problems..............................175 Copier does not respond ................................175 Scanner unit does not close..............................175 Poor copy quality..................................175 Partial document or photo copies............................177 Solving scan problems..............................177 Scanner does not respond ................................177 Scan was not successful ................................177 Scanning takes too long or freezes the computer......................178 Poor scanned image quality ..............................178 Partial document or photo scans............................179 Cannot scan from a computer ..............................179...
- Page 10 Notices....................193 Edition notice..................................193 Power consumption.................................201 Index....................205 Contents Downloaded From ManualsPrinter.com Manuals...
-
Page 11: Safety Information
This product is designed, tested, and approved to meet strict global safety standards with the use of specific Lexmark components. The safety features of some parts may not always be obvious. Lexmark is not responsible for the use of other replacement parts. -
Page 12: Learning About The Printer
Learning about the printer Checking the box contents The following illustration shows the items included with the printer. Printer Print cartridges Phone cord Power cable Setup sheet Software and Documentation CD Learning about the printer Downloaded From ManualsPrinter.com Manuals... -
Page 13: Printer Configurations
Printer configurations Basic model The following illustrations show the basic printer model. Automatic Document Feeder (ADF) Paper guides Scanner cover Printer control panel Standard 250-sheet tray (Tray 2) Standard exit bin Scanner glass Scanner lock Learning about the printer Downloaded From ManualsPrinter.com Manuals... - Page 14 LINE port Ethernet port EXT port Parallel port USB port Power supply port Power switch Learning about the printer Downloaded From ManualsPrinter.com Manuals...
- Page 15 Fully configured model The following illustration shows the fully configured printer model. The basic model can be fully configured by adding a 550-sheet drawer. Optional 550-sheet drawer (Tray 3) Learning about the printer Downloaded From ManualsPrinter.com Manuals...
-
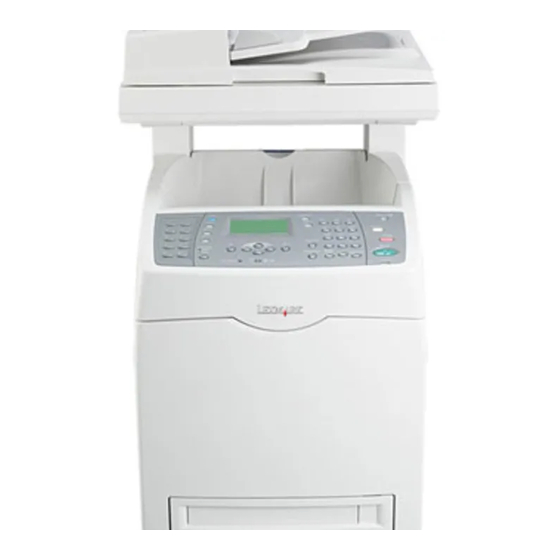
Page 16: Understanding The Printer Control Panel
Understanding the printer control panel Printer control panel item Description Quick access panel The buttons on the quick access panel provide direct access to pre-programmed fax numbers. Up to 10 entries can be stored in the Quick Dial directory for one-touch access to fax numbers. - Page 17 Printer control panel item Description Back Return to the previous menu. Color Mode Switches between Color and B&W (black-and-white) modes for your copy, fax, or scan Control panel item Description Job Status Press to check active job status and Walk-Up printing jobs. System Switches the display to the Setup menu Keypad...
-
Page 18: Getting The Printer Ready To Fax
Control panel item Description Reset the printer when performing an action. Stop Press to start a copy, scan, or fax job. Start Error The red light indicates an error condition. Speed Dial Press to access directories of group or individual fax telephone numbers. Clear button Deletes a single character each time the button is pressed. -
Page 19: Using An Rj11 Adapter
You can connect the printer to other equipment. See the following table to determine the best way to set up the printer. Equipment Benefits Send and receive faxes without using a computer. • The printer • A telephone cord • •... - Page 20 Connect the telephone line of your chosen telecommunications equipment to the left outlet of the adapter. If your telecommunications equipment uses a US-style (RJ11) telephone line, follow these steps to connect the equipment: Remove the plug from the EXT port on the back of the printer.
- Page 21 Country/region • • Saudi Arabia Israel • • United Arab Emirates Hungary • • Egypt Poland • • Bulgaria Romania • • Czech Republic Russia • • Belgium Slovenia • • Australia Spain • • South Africa Turkey • Greece To connect a telephone, an answering machine, or other telecommunications equipment to the printer: Remove the plug from the back of the printer.
- Page 22 Connect your telecommunications equipment directly to the EXT port on the back of the printer. Note: Once this plug is removed, any country- or region-specific equipment that you connect to the printer by the adapter, as shown, will not function properly. Country/region •...
-
Page 23: Connecting Directly To A Telephone Wall Jack
Connecting directly to a telephone wall jack Connect the printer directly to a telephone wall jack to make copies or to send and receive faxes without using a computer. Make sure you have a telephone cord and a telephone wall jack. Connect one end of the telephone cord into the FAX port of the printer. - Page 24 Connect one telephone cord to the FAX port of the printer, and then plug it into an active telephone wall jack. Remove the protective plug from the EXT port of the printer. Connect the other telephone cord to a telephone, and then plug it into the EXT port of the printer.
-
Page 25: Connecting To An Answering Machine
Connecting to an answering machine Connect an answering machine to the printer to receive both incoming voice messages and faxes. Note: Setup steps may vary depending on your country or region. Make sure you have the following: • A telephone •... -
Page 26: Connecting To A Computer With A Modem
Connect a third telephone cord from the answering machine to the EXT port of the printer. Connecting to a computer with a modem Connect the printer to a computer with a modem to send faxes from the software program. Note: Setup steps may vary depending on your country or region. Make sure you have the following: •... -
Page 27: Setting The Outgoing Fax Name And Number
Remove the protective plug from the EXT port of the printer. Connect a second telephone cord from the telephone to the computer modem. Connect a third telephone cord from the computer modem to the EXT port of the printer. Setting the outgoing fax name and number Make sure the printer is on and Select Function appears. -
Page 28: Setting The Country Code
Press repeatedly until Fax Settings appears, and then press OK. Press repeatedly until Your Fax Number appears, and then press OK. Use the keypad to enter the fax number, and then press OK. Press repeatedly until Company Name appears, and then press OK. Use the keypad to type the user name, and then press OK. - Page 29 If you live in Select Finland France Greece France Guam United States Guatemala United States Honduras United States Hungary France Iceland France Israel France Jordan France Kuwait France Latvia France Lebanon France Liechtenstein France Lithuania France Malaysia Brazil Malta United States Morocco France Nicaragua...
-
Page 30: Setting The Date
If you live in Select Slovenia France Sri Lanka France Trinidad and Tobago United States Tunisia France United Arab Emirates France Uruguay United States Venezuela United States Vietnam France Virgin Islands United States Setting the date You can set the date so that the correct date is printed on every fax you send. If there is a power failure, you may have to reset the date. -
Page 31: Understanding The Fax And Scan Software
Use the keypad to enter the time, and then press to move to the next digit. After the time is entered, press OK. Press repeatedly until Select Function appears. Understanding the fax and scan software Understanding Address Book Editor Address Book Editor provides a convenient interface for modifying the address book entries stored in the printer. With it you can create: •... -
Page 32: Installing Options
Installing options Installing a 550-sheet drawer The printer supports one optional drawer which allows an additional 550 sheets of paper to be loaded. CAUTION—SHOCK HAZARD: If you are installing a 550-sheet drawer after setting up the printer, turn the printer off, and unplug the power cord before continuing. -
Page 33: Securing The 550-Sheet Drawer To The Printer
Securing the 550-sheet drawer to the printer Grasp the handle, and pull the standard tray (Tray 2) out. Remove the tray completely. Attach and tighten the two screws provided with the feeder with a coin or similar object. Installing options Downloaded From ManualsPrinter.com Manuals... - Page 34 Align the tray, and insert it. Installing options Downloaded From ManualsPrinter.com Manuals...
-
Page 35: Installing A Multi-Protocol Network Card
Installing a multi-protocol network card The system board has one connection for an optional multi-protocol network card. CAUTION—SHOCK HAZARD: If installing a network card after setting up the printer, turn the printer off, and unplug the power cord from the wall outlet before continuing. Warning—Potential Damage: System board electrical components are easily damaged by static electricity. - Page 36 Push the card firmly into place. Notes: • The entire length of the connector on the network card must touch and be flush against the system board. • Be careful not to damage the connectors. Attach the screws to hold the network card in place. Installing options Downloaded From ManualsPrinter.com Manuals...
-
Page 37: Installing A Memory Card
Close the system board cover. Installing a memory card CAUTION—SHOCK HAZARD: If you are installing a memory card after setting up the printer, turn the printer off, and unplug the power cord from the wall outlet before continuing. Warning—Potential Damage: System board electrical components are easily damaged by static electricity. Touch something metal on the printer before touching any system board electronic components or connectors. - Page 38 An optional memory card can be purchased separately and attached to the system board. To install the memory card: Access the system board. Unpack the memory card. Note: Avoid touching the connection points along the edge of the card. Align the notch on the memory card with the ridge on the connector. Installing options Downloaded From ManualsPrinter.com Manuals...
- Page 39 Insert the memory card into the slot. Push the memory card back until it snaps into place. Installing options Downloaded From ManualsPrinter.com Manuals...
-
Page 40: Attaching Cables
Close the system board cover. Attaching cables Connect the printer to the computer using a USB cable or an Ethernet cable. • A USB port requires a USB cable. Be sure to match the USB symbol on the cable with the USB symbol on the printer. •... - Page 41 Ethernet port USB symbol USB port Installing options Downloaded From ManualsPrinter.com Manuals...
-
Page 42: Loading Paper And Specialty Media
Loading paper and specialty media This section shows how to load the multipurpose feeder (Tray 1), the 250-sheet tray (Tray 2), and the optional 550- sheet tray (Tray 3). Loading Tray 1 (MPT) In addition to plain paper, Tray 1 (MPT) can use various other sizes and types of paper or specialty media, such as envelopes and transparencies. - Page 43 Slide the width guides to the edges of the tray. The width guides should be fully extended. Flex the sheets back and forth to loosen them, and then fan them. Do not fold or crease the paper. Straighten the edges on a level surface. Insert all paper or specialty media facedown and top edge first into Tray 1 (MPT).
-
Page 44: Loading Tray 2 And Tray 3
Slide the width guides until they rest lightly against the edges of the paper stack. Loading Tray 2 and Tray 3 The printer has two trays to select from: the standard tray (Tray 2), also known as the 250-sheet tray, and the optional 550-sheet tray (Tray 3), which is part of the 550-sheet drawer and fits into the support unit. - Page 45 Squeeze the length guide tab as shown. Slide the guide to the correct position for the paper size being loaded. Squeeze the width guide tabs together as shown, and slide the width guide to the correct position for the paper size being loaded.
-
Page 46: Setting The Paper Type
Load the paper stack with the recommended print side faceup. Load the stack toward the back of the tray as shown. When loading preprinted letterhead, place the header toward the front of the tray. Align the tray, and insert it. Setting the Paper Type Make sure the printer is on and Select Function appears. - Page 47 To set up tray linking: • Load both Tray 2 and Tray 3 with the same paper size and type. • From Print Properties, change the Paper source to Auto select. • Set Tray Switching to Nearest Size: From the printer control panel, press System. Press repeatedly until Admin Menu appears, and then press OK.
-
Page 48: Paper And Specialty Media Guide
Paper and specialty media guide Paper guidelines When printing on specialty media, use the printer control panel to set the correct Paper Type. Paper characteristics The following paper characteristics affect print quality and reliability. Consider these characteristics when evaluating new paper stock. Weight The printer can automatically feed paper weights from 60 to 176 g/m (16 to 47 lb bond) grain long. -
Page 49: Unacceptable Paper
Fiber content Most high-quality xerographic paper is made from 100% chemically treated pulped wood. This content provides the paper with a high degree of stability resulting in fewer paper feeding problems and better print quality. Paper containing fibers such as cotton possesses characteristics that can negatively affect paper handling. Unacceptable paper The following paper types are not recommended for use with the printer: •... -
Page 50: Using Recycled Paper
Lexmark consistently tests its printers with recycled paper (20–100% post-consumer waste) and a variety of test paper from around the world, using chamber tests for different temperature and humidity conditions. Lexmark has found no reason to discourage the use of today's recycled office papers, but generally the following property guidelines apply to recycled paper. -
Page 51: Using Envelopes
• Before loading transparencies, fan the stack to prevent sheets from sticking together. • We recommend Lexmark part number 12A8240 for letter-size and Lexmark part number 12A8241 for A4-size transparencies. Using envelopes Print samples on the envelopes being considered for use before buying large quantities. -
Page 52: Using Labels
Print samples on the labels being considered for use before buying large quantities. For detailed information on label printing, characteristics, and design, see the Card Stock & Label Guide available on the Lexmark Web site at www.lexmark.com/publications. When printing on labels: •... -
Page 53: Using Card Stock
• Use full label sheets. Partial sheets may cause labels to peel off during printing, resulting in a jam. Partial sheets also contaminate the printer and the cartridge with adhesive, and could void the printer and cartridge warranties. • Do not print within 1 mm (0.04 in.) of the edge of the label, of the perforations, or between die-cuts of the label. •... -
Page 54: Supported Paper Sizes, Types, And Weights
Supported paper sizes, types, and weights The following tables provide information on standard and optional paper sources and the types of paper they support. Note: For an unlisted paper size, select the closest larger listed size. For information on card stock and labels, see the Card Stock & Label Guide Supported paper sizes Paper size Dimensions... -
Page 55: Supported Paper Types
Paper size Dimensions Multipurpose Standard 250-sheet Optional 550-sheet feeder (Tray 1 MPT) tray (Tray 2) tray (Tray 3) 104.8 x 241.3 mm Com 10 Envelope (4.12 x 9.5 in.) DL Envelope 110 x 220 mm (4.33 x 8.66 in.) C5 Envelope 162 x 229 mm (6.38 x 9.01 in.) B5 Envelope... -
Page 56: Supported Paper Weights
Supported paper weights Paper type Multipurpose feeder Standard 250-sheet tray Optional 550-sheet tray (Tray 1 MPT) (Tray 2) (Tray 3) Plain (xerographic or 60 to 90 g/m grain long 60 to 90 g/m grain long (16 60 to 90 g/m grain long business) paper (16 to 24 lb bond) - Page 57 Paper type Multipurpose feeder (Tray 1 Standard 250-sheet Optional 550-sheet tray MPT) letter-size tray (Tray 2) (Tray 3) 15 mm (0.59 in.) or less in height X Envelopes * Based on 75 g/m Paper and specialty media guide Downloaded From ManualsPrinter.com Manuals...
-
Page 58: Printing
Printing This chapter covers printing, printer reports, and job cancelation. The Selection and handling of paper and specialty media can affect how reliably documents print. Installing printer software A printer driver is software that lets the computer communicate with the printer. The printer software is typically installed during the initial printer setup. -
Page 59: Printing The Demo Page
Printing the demo page Print the demo page to isolate print quality problems. Make sure the printer is on and Select Function appears. From the printer control panel, press System. Press repeatedly until Information Pages appears, and then press OK. Press repeatedly until Demo Page appears, and then press OK. -
Page 60: Using Proof Printing
Using Proof printing Understanding Proof Print Proof Print is a feature that lets you store the print data of multiple copies in the memory, print out only the first set to check the print result, and, if satisfactory, print the remaining copies from the printer control panel. Note: You can select whether to delete proof print data after printing. -
Page 61: Canceling A Print Job From The Windows Taskbar
Canceling a print job from the Windows taskbar When you send a job to print, a small printer icon appears in the right corner of the taskbar. Double-click the printer icon. A list of print jobs appears in the printer window. Select a job to cancel. -
Page 62: Copying
Copying Automatic Document Feeder (ADF) Scanner glass Use the Automatic Document Feeder (ADF) for Use the scanner glass for single pages, small items (such multiple-page A4-, letter-, or legal-size documents. as postcards or photos), transparencies, photo paper, or thin media (such as magazine clippings). Making a copy Load an original document faceup, short edge first into the ADF or facedown on the scanner glass. -
Page 63: Customizing Copy Settings
Customizing copy settings Press to access copy options while in copy mode. Selecting a paper tray for copies To select a paper tray other than the currently selected tray: Load an original document faceup, short edge first into the ADF or facedown on the scanner glass. Note: Do not load postcards, photos, small items, transparencies, photo paper, or thin media (such as magazine clippings) into the ADF. -
Page 64: Reducing Or Enlarging Copies
Reducing or enlarging copies To change the default size ratio for copies: Load an original document faceup, short edge first into the ADF or facedown on the scanner glass. Note: Do not load postcards, photos, small items, transparencies, photo paper, or thin media (such as magazine clippings) into the ADF. -
Page 65: Adjusting Copy Quality
Adjusting copy quality Choose between Enhanced (best quality) or Standard (fastest speed). To change the quality setting: Load an original document faceup, short edge first into the ADF or facedown on the scanner glass. Note: Do not load postcards, photos, small items, transparencies, photo paper, or thin media (such as magazine clippings) into the ADF. -
Page 66: Adjusting The Color Saturation Of A Copy
To change the color mode, press Color Mode until the light comes on next to the selection you want. Choose between B&W (black and white) and Color. Press repeatedly until Sharpness appears, and then press OK. Press repeatedly until Sharper, Normal, or Softer appears, and then press OK. Press Start to begin copying. -
Page 67: Centering An Image On A Page
Centering an image on a page You can automatically center a copied image on a page. The printer automatically reduces or enlarges the copied image to fit the currently loaded paper. Note: The ADF cannot be used for this feature. To center an image: Load an original document facedown on the scanner glass. -
Page 68: Printing A Poster
Printing a poster The Poster option enables you to copy one original image onto several pages that can be assembled into a poster. The current Reduce/Enlarge setting is applied. The following options are available: Poster setting Description Turns off poster printing Copies the image to 4 sheets of paper Copies the image to 9 sheets of paper Copies the image to 16 sheets of paper... -
Page 69: Setting The Copy Margins
Setting the copy margins Note: The ADF cannot be used for this feature. From the printer control panel, press System. Press repeatedly until Default Settings appears, and then press OK. Press repeatedly until Copy Defaults appears, and then press OK. Press repeatedly until Margin Width appears, and then press OK. -
Page 70: Scanning
If you are loading a document into the ADF, adjust the paper guides. Click Start Programs or All Programs Lexmark Applications Presto! PageManager. The Presto! Scan Buttons dialog appears. Note: If the Presto! Scan Buttons dialog does not appear, press F9. -
Page 71: Scanning Documents Directly To Other Applications
If you are loading a document into the ADF, adjust the paper guides. Click Start Programs or All Programs Lexmark Applications Presto! PageManager. From the Presto! Scan Buttons toolbar, click the application to scan to. Note: If the Scan Buttons dialog does not appear, press F9. - Page 72 Click Preview. Wait for the image to appear on the screen. Note: If you are using the ADF, the Preview function is not supported. If you are using the scanner glass, you can preview one page at a time. If you want to scan only a portion of the document, click and drag the dotted line box to select a specific area of the preview image to scan.
-
Page 73: Scanning Clear Images From Magazines Or Newspapers
If you are loading a document into the ADF, adjust the paper guides. Click Start Programs or All Programs Lexmark Applications Presto! PageManager. The Presto! Scan Buttons dialog appears. Note: If the Presto! Scan Buttons dialog does not appear, press F9. -
Page 74: Creating A Computer Address Using Address Book Editor
In Windows Vista, click • In Windows XP and earlier, click Start. Click Programs or All Programs Lexmark Applications Address Book Editor. In the left pane of the Address Book Editor, right-click Server, and then select New. The Server Address dialog appears. -
Page 75: Creating A Computer Address Using The Embedded Web Server
Creating a computer address using the Embedded Web Server Open a Web browser. In the address bar, type the IP address of the printer, and then press Enter. If the Java applet screen appears, click Yes. Click Address Book. Under Server Address Book, click Individual Directory. In the Directory Listing, click Add for any blank address. - Page 76 In Mac OS X version 10.4–10.5 From the Apple menu, choose System Preferences. Click Network. Click Ethernet. Write down the IP Address. Enable file sharing on the computer: In Mac OS X version 10.5 From the Apple menu, choose System Preferences. Click Sharing.
-
Page 77: Scanning To A Computer Over The Network
In Windows Vista, click • In Windows XP and earlier, click Start. Click Programs or All Programs Lexmark Applications Address Book Editor. In the left pane of the Address Book Editor, right-click Server, and then select New. The Server Address dialog appears. -
Page 78: Creating An Ftp Address Using The Embedded Web Server
Fill in the remaining information for the FTP server: In the Server Name/IP Address field, enter the IP address for the FTP Server. In the Path field, enter the path to the folder you want the images placed in. If the FTP server requires you to log in, enter the name and password in the appropriate fields. Click OK. -
Page 79: Scanning To E-Mail
Make sure the printer is connected to a computer with a USB cable, and both the printer and the computer are turned on. Do one of the following: • In Windows Vista, click • In Windows XP and earlier, click Start. Click Programs or All Programs Lexmark Applications Address Book Editor. Scanning Downloaded From ManualsPrinter.com Manuals... -
Page 80: Creating An E-Mail Address Using The Embedded Web Server
In the left pane of the Address Book Editor, right-click E-Mail, and then select New New Entry. The E-Mail Address dialog appears. The Address Book Editor automatically assigns the Address ID to the first empty entry. To manually specify the Address ID, click Specify an Address Number, and then enter a value from 1 to 100 for the desired address number. -
Page 81: Scanning To An E-Mail Address
Click Edit next to the group that was just created. Select the e-mail addresses to be included in the group, and then click Save Changes to add the addresses to the group. Scanning to an e-mail address Make sure the printer is connected to the network through a print server, and the printer, the print server, and the computer receiving the scan are all turned on. -
Page 82: Adjusting The Color Saturation Of A Scanned Image
Press repeatedly until Scan Defaults appears, and then press OK. Press repeatedly until Auto Expo. Level appears, and then press OK. Press repeatedly until Normal, Higher(1), or Higher(2) appears, and then press OK. Press repeatedly until Select Function appears. Adjusting the color saturation of a scanned image From the printer control panel, press System. -
Page 83: Selecting The Size Of The Document Being Scanned
Press repeatedly until Scan Defaults appears, and then press OK. Press repeatedly until Sharpness appears, and then press OK. Press repeatedly to select the sharpness you want, and then press OK. Press repeatedly until Select Function appears. Selecting the size of the document being scanned The Document Size setting defines the size of the original document being scanned. -
Page 84: Selecting The Type Of Document Being Scanned
Press repeatedly until Scan Defaults appears, and then press OK. Press repeatedly until TIFF File Format appears, and then press OK. Press repeatedly to select the TIFF file format you want, and then press OK. Press repeatedly until Select Function appears. Selecting the type of document being scanned The scanner optimizes the appearance of the scanned output based on the contents of the original document. -
Page 85: Setting The Scanned Image File Type
Press repeatedly to select the color mode you want, and then press OK. Press repeatedly until Select Function appears. Setting the scanned image file type From the printer control panel, press System. Press repeatedly until Default Settings appears, and then press OK. Press repeatedly until Scan Defaults appears, and then press OK. -
Page 86: Faxing
Faxing Automatic Document Feeder (ADF) Scanner glass Use the Automatic Document Feeder (ADF) for Use the scanner glass for single pages, small items (such multiple-page A4-, letter-, or legal-size documents. as postcards or photos), transparencies, photo paper, or thin media (such as magazine clippings). Sending a fax Note: New Zealand telecom users: If a charge for local calls is unacceptable, do not use the “Dial”... -
Page 87: Sending A Broadcast Fax
Press Start to start the fax job. After the page is scanned, Another Page? appears. Press repeatedly to select No or Yes, and then press OK. If you want to send a single page, select No, and then press repeatedly until Select Function appears. If you want to send more than one page, select Yes. -
Page 88: Setting Up The Address Book For Faxing
In Windows Vista, click • In Windows XP and earlier, click Start. Click Programs or All Programs Lexmark Applications Address Book Editor. In the left pane of the Address Book Editor, right-click Fax, and then select New. The Speed Dial dialog appears. -
Page 89: Creating A Fax Number Entry Using The Printer Control Panel
In Windows Vista, click • In Windows XP and earlier, click Start. Click Programs or All Programs Lexmark Applications Address Book Editor. In the left pane of the Address Book Editor, right-click Fax, and then select New New Group. The Group Dial dialog appears. -
Page 90: Creating A Fax Group Using The Embedded Web Server
Click OK to create the group. Confirm the group members, and then click OK. From the File menu, select Save All. The Address Book is saved with the new fax group. Creating a fax group using the Embedded Web Server Make sure the printer is on and Select Function appears. -
Page 91: Canceling A Fax Job
Canceling a fax job To cancel a print job, press Stop at any time. Receiving a fax Understanding the fax receive modes Fax receive mode Description TEL Mode Automatic fax reception is turned off. You can receive a fax by picking up the handset of the external phone and then pressing the remote receive code, or by setting On Hook to On (so you can hear voice or fax tones from the remote machine) and then pressing Start. -
Page 92: Enabling Secure Faxes
Enabling secure faxes When the Secure Receive Lock option is enabled, a password is required before faxes can be printed or removed. Make sure the printer is on and Select Function appears. From the printer control panel, press System. Press repeatedly until Admin Menu appears, and then press OK. -
Page 93: Printing Fax Reports
Printing fax reports Several fax reports are available to provide information about faxing activities, directories, and pending jobs. The Speed Dial report and the Address Book report display information about fax numbers and individual or group recipients. The Fax Activity report provides information about completed fax jobs. The Fax Pending report provides a list of faxes waiting to be sent. -
Page 94: Limiting Access To Fax And Scan Operations
Limiting access to fax and scan operations Enabling the Scan/Fax Lock option limits access to fax and scan operations by requiring a password to be entered before faxing or scanning. Make sure the printer is on and Select Function appears. From the printer control panel, press System. -
Page 95: Customizing Dial Settings
Customizing dial settings Setting the dialing mode Depending on the type of phone line being used, the printer can be set to Touch Tone (PB) or Pulse (DP) dialing. The factory default setting is Touch Tone. Make sure the printer is on and Select Function appears. From the printer control panel, press System. -
Page 96: Setting The Time Delay Before Receiving A Fax Automatically
Press repeatedly until PBX appears, and then press OK. The printer must be restarted before the settings take effect. Press OK to continue. Press repeatedly until Select Function appears. Setting the time delay before receiving a fax automatically The Auto Answer receive mode specifies how long the printer waits before answering an incoming call. The time ranges from 0 to 255 seconds. -
Page 97: Making A Fax Lighter Or Darker
• Photo—Used for photograph prints From the printer control panel, press System. Press repeatedly until Default Settings appears, and then press OK. Press repeatedly until Fax Defaults appears, and then press OK. Press repeatedly until Document Type appears, and then press OK. Press repeatedly to select the document type you want, and then press OK. -
Page 98: Clearing Jams
The following hints can help you avoid jams: • Use only recommended paper or specialty media. For more information, see the Card Stock & Label Guide available on the Lexmark Web site at www.lexmark.com/publications. • Do not load too much paper. Make sure the stack height does not exceed the indicated maximum height. - Page 99 Jam message Area name Jam at Exit Fuser top Open Door A Jam at Reg. Roll Fuser bottom Open Door A Optional duplex unit Jam at Duplexer Open Door A Lift Belt Unit Jam at Tray 3 Optional 550-sheet tray (Tray 3) Open Tray 3 Open Door A Jam at Tray 2...
-
Page 100: Clearing Tray 1 (Mpt) Jams
Clearing Tray 1 (MPT) jams If the paper did not feed from the multipurpose feeder correctly, Jam at Tray 1 appears. Pull the jammed paper out of the multipurpose feeder tray, and then remove any remaining paper from the tray. Push the release button, and gently lower the front door. - Page 101 Remove any jammed paper from inside the printer. Close the front door. Clearing jams Downloaded From ManualsPrinter.com Manuals...
- Page 102 Grasp the handle, and pull Tray 1 out. Remove the tray completely. Clearing jams Downloaded From ManualsPrinter.com Manuals...
- Page 103 Remove any jammed paper from inside the tray housing. Align the tray, and insert it. Clearing jams Downloaded From ManualsPrinter.com Manuals...
-
Page 104: Clearing Tray 2 Jams
Clearing Tray 2 jams If the paper did not feed from Tray 2 correctly, the jam is in the tray. Jam at Tray 2 appears. Grasp the handle, and pull Tray 1 out. Remove the tray completely. Clearing jams Downloaded From ManualsPrinter.com Manuals... - Page 105 Remove the jam. The jam could be in the tray or behind the tray area. • Jams in the tray—Locate the single piece of paper lying on top of the stack. Pull it straight out. Clearing jams Downloaded From ManualsPrinter.com Manuals...
- Page 106 • Jams behind the tray area—Locate the jam on the bottom surface of the tray housing. You may have to reach far under the printer to locate the jam, as shown in the following illustration. Pull the jam straight out. Align the tray, and insert it.
- Page 107 Remove any jammed paper from inside the printer. Clearing jams Downloaded From ManualsPrinter.com Manuals...
- Page 108 Close the front door. Clearing jams Downloaded From ManualsPrinter.com Manuals...
-
Page 109: Clearing Tray 3 Jams
Clearing Tray 3 jams If the paper did not feed from Tray 3 correctly, the jam is in the tray. Jam at Tray 3 appears. Grasp the handle, and pull Tray 3 out. Remove the tray completely. Remove the jam. The jam could be in the tray or behind the tray area. •... - Page 110 • Jams behind the tray area—Locate the jam on the bottom surface of the tray housing. You may have to reach far under the printer to locate the jam, as shown in the following illustration. Pull the jam straight out. Align the tray, and insert it.
- Page 111 Remove any jammed paper from inside the printer. Clearing jams Downloaded From ManualsPrinter.com Manuals...
- Page 112 Close the front door. Clearing jams Downloaded From ManualsPrinter.com Manuals...
-
Page 113: Clearing Jams In The Fuser
Clearing jams in the fuser If the paper is jammed in the fuser area, Jam at Exit or Jam at Reg. Roll appears. A Jam at Reg. Roll message indicates the paper is jammed below the fuser. A Jam at Exit message indicates the paper is jammed above the fuser. - Page 114 Lift the fuser cover, and then remove the jammed paper. Close the fuser cover, and then lower the pressure release levers. Clearing jams Downloaded From ManualsPrinter.com Manuals...
- Page 115 Close the front door. Clearing jams Downloaded From ManualsPrinter.com Manuals...
-
Page 116: Clearing Jams In The Duplex Unit
Clearing jams in the duplex unit If the paper did not feed through the duplex unit correctly, the jam is in the duplex paper path. Jam at Duplexer appears. CAUTION—HOT SURFACE: To reduce the risk of injury from a hot component, allow the surface to cool before touching it. - Page 117 Lift the transfer belt unit. Remove any jammed paper from the duplex paper feeder. Clearing jams Downloaded From ManualsPrinter.com Manuals...
- Page 118 Close the transfer belt unit. Close the front door. Clearing jams Downloaded From ManualsPrinter.com Manuals...
-
Page 119: Clearing Jams In The Adf
Clearing jams in the ADF If the paper is jammed in the ADF, Jam at Scanner appears. Remove all jammed paper, and make sure the paper feed tray is not overfull. Remove all paper from the paper feed tray, and then open the ADF cover. If the jam is in the paper feed area, remove the jam by carefully pulling it up. - Page 120 If the jam is at the paper exit area, turn the dial to remove the jam. Close the ADF cover. Clearing jams Downloaded From ManualsPrinter.com Manuals...
- Page 121 Open the scanner cover and remove any jammed paper from the paper feed area. Close the scanner cover. When all the jammed paper is removed, Return the Removed Original and Press Start appears. Place the original document in the ADF, and then press Start to continue with the scan job.
-
Page 122: Understanding Printer Menus
Understanding printer menus Menus list A number of menus are available to make it easy for you to change printer settings: Default Settings Tray Settings Information Pages Billing Meters Copy Defaults Tray 1 (MPT) Menu Map Total Impression Scan Defaults Tray 2 Demo Page Color Impression... -
Page 123: Document Type
Menu item Description Paper Supply Sets the paper source for copies Tray 1 (MPT) Notes: Tray 2 • Tray 2 is the factory default setting. Tray 3 • Tray 3 appears only if Tray 3 is installed. Collated Stacks the pages of a print job in sequence when printing multiple copies Notes: •... -
Page 124: Color Saturation
Menu item Description Color Saturation Darkens or lightens the overall color levels of the copies Higher Note: Normal is the factory default setting. Normal Lower Auto Exposure Turns Auto Exposure on or off during copying. Papers that are off-white or ivory colored, such as newsprint, can cause the printer to put toner on the page so that the printed output has a background that matches the original. -
Page 125: Scan Defaults Menu
Menu item Description Poster Doc. Size Selects the size of the poster Letter - 8.5 x 11” Note: Letter - 8.5 x 11” is the factory default setting. A4 - 210 x 297mm B5 - 182 x 257mm A5 - 148 x 210mm Repeat Image Makes multiple copies of one image onto one side of a sheet of paper... -
Page 126: Document Size
Menu item Description Resolution Sets the scanning resolution 150 x 150 dpi Note: 150 x 150 dpi is the factory default setting. 300 x 300 dpi 400 x 400 dpi 600 x 600 dpi Document Type Specifies the type of document being scanned Text Note: Mixed is the factory default setting. -
Page 127: Fax Defaults Menu
Menu item Description Image Compression Sets the image compression for scanning. A low compression will result in a higher quality image, but the file size will be Higher larger. Normal Note: Normal is the factory default setting. Lower Max Email Size Sets the size limitation for scanned documents 50–16384 KB Note: 2048 KB is the factory default setting. -
Page 128: Tray Settings Menu
Tray Settings menu Tray 1 (MPT) menu Menu item Description Paper Type Specifies the paper type loaded in Tray 1 Plain Paper Note: Thin Card Stock is the factory default setting. Thin Card Stock Thick Card Stock Envelope Labels Transparency Letterhead Glossy Paper Thick Glossy Paper... -
Page 129: Tray 2 Menu
Menu item Description Display Popup Specifies whether or not to display the message that prompts you to set the paper size and type every time you load paper in Tray 1 Note: Off is the factory default setting. Tray 2 menu Menu item Description Paper Type... -
Page 130: Information Pages Menu
Menu item Description Paper Type Specifies the paper type loaded in Tray 3 Plain Paper Note: Plain is the factory default setting. Thin Card Stock Thick Card Stock Labels Letterhead Glossy Paper Thick Glossy Paper Prepunched Colored Paper Special Paper Size Specifies the paper size loaded in Tray 3 Auto Note: Auto is the factory default setting. -
Page 131: Billing Meters Menu
Menu item Description PCL Macro List Prints a list of PCL macros <none> Stored Documents Prints a list of documents stored in the printer when using the secure print and sample print feature <none> Billing Meters menu Menu item Description Total impression Displays the total number of pages printed <none>... -
Page 132: Print Language Menu
Print Language menu Menu item Description Specifies PCL settings Paper Supply Notes: Auto • Paper Supply—Specifies the paper tray to be used for Tray 1 (MPT) printing. The factory default setting is Auto. Tray 2 • Document Size—Specifies the paper size. Tray 3 •... - Page 133 Menu item Description PCL (continued) Specifies PCL settings Symbol Set Notes: <list of available symbol sets> • Symbol Set—Specifies the font for symbols. The factory Font Size default setting is ROMAN-8. 4–50 point • Font Size—Specifies the font size. This setting is available Font Pitch only for typographic fonts.
-
Page 134: Network Settings Menu
Network Settings menu Menu item Description Ethernet Specifies the communication speed and the modes of Ethernet Auto Note: Auto is the factory default setting. 10Base Half 10Base Full 100Base Half 100Base Full TCP/IP Specifies the TCP/IP settings for the network Get IP Address Note: DHCP/Autonet is the factory default setting. - Page 135 Menu item Description Protocol Specifies which network protocol to use Note: Enable is the factory default setting. Disable Enable Port9100 Disable Enable Disable Enable SNMP Disable Enable Email Alerts Disable Enable Web Server Disable Enable Bonjour(mDNS) Disable Enable IP Filter Specifies blocking the reception of data from certain IP addresses.
-
Page 136: Parallel Settings Menu
Parallel Settings menu Menu item Description Specifies if the ECP communication mode of the parallel interface is enabled or disabled Disable Enable Note: Enable is the factory default setting. Adobe Protocol Specifies PostScript communication protocol for the parallel interface. Restart the printer after making changes in the TBCP menu. -
Page 137: Line Monitor
Menu item Description Ans Select Specifies the receiving mode TEL Mode Notes: FAX Mode • TEL Mode—Automatic fax reception is turned off. You can TEL/FAX Mode receive a fax by picking up the handset of the external Ans/FAX Mode phone and then pressing the remote receive code, or by DRPD Mode setting OnHook to On (you can hear voice or fax tones from the remote machine) and then pressing Start. -
Page 138: Duplex Print
Menu item Description Ring Tone Volume Specifies the volume for the incoming faxes None Note: Max is the factory default setting. Middle Line Type Specifies the line type PSTN Note: PSTN is the factory default setting. Dialing Type Specifies the dialing type Note: PB is the factory default setting. -
Page 139: Forward Settings
Menu item Description DRPD Pattern Specifies a distinctive ring pattern for use with DRPD service. DRPD Patterns are specified by your telephone company. Pattern1 Pattern2 Note: Pattern4 is the factory default setting. Pattern3 Pattern4 Pattern5 Forward Settings Specifies when you want the printer to forward all of the outgoing faxes to a specified destination Trans. -
Page 140: System Settings Menu
Menu item Description Extel Hook Thresh Specifies the threshold value for the external telephone Lower Note: Normal is the factory default setting. Normal Higher Country Specifies the country or region where the printer is used <country code list> Note: Country must be set before faxes can be sent. Fwd. - Page 141 Menu item Description Alert Tone Specifies whether to turn on the alarm when an error occurs in the printer Panel Select Tone Soft Notes: Normal • Normal is the factory default setting for Panel Select Tone, Loud Machine Ready Tone, Copy Job Tone, Non-Copy Job Tone, Fault Tone, and Alert Tone.
- Page 142 Menu item Description Alert Tone (continued) Specifies whether to turn on the alarm when an error occurs in the printer Out of Paper Soft Notes: Normal • Normal is the factory default setting for Out of Paper. Loud • Off is the factory default setting for Low Toner, Auto Clear Alert, and Base Tone.
-
Page 143: Clock Settings
Menu item Description Clock Settings Specifies the date and time Set Date Note: Set the time zone based on Coordinated Universal Time <input date> (UTC) for your location. Set Time <input time> Date Format yy/mm/dd mm/dd/yy dd/mm/yy Time Format Time Zone <select time offset>... -
Page 144: Fax Activity
Menu item Description Fax Activity Sets the printer to print a report on faxes sent and received Auto Print Note: No Auto Print is the factory default setting. No Auto Print Fax Transmit Specifies when a fax transmission report is printed Print Always Note: Print at Error is the factory default setting. -
Page 145: Secure Settings Menu
Menu item Description Adjust ColorRegi Adjusts the color registration manually Auto Correct Color Regi Chart <press OK to print> Color Regi Yellow <adjust value> Magenta <adjust value> Cyan <adjust value> Initialize NVM Initializes the settings stored in the NVM except for the network settings. -
Page 146: Admin Reports Menu
Menu item Description Scan/Fax Lock When Scan/Fax Lock is enabled, access to the scanner and fax requires a password. Scan/Fax Lock Set Disable Notes: Enable • Panel Lock must be enabled before enabling Scan/Fax Change Password Lock. <input password> • 0000 is the factory default password. -
Page 147: Panel Language Menu
Panel Language Menu Menu item Description English Sets the language displayed on the printer control panel Français Italiano Deutsch Español Dansk Nederlands Português Svenska Pyccкий Polski Türkçe Understanding printer menus Downloaded From ManualsPrinter.com Manuals... -
Page 148: Understanding Printer Messages
Understanding printer messages List of status and error messages 550 Feeder Error Error 072-215 Restart Printer The 550-sheet drawer is not working or is not installed correctly. Reinstall the 550-sheet drawer. <xxx> Error Error xxx-xxx Restart Printer Turn the printer off. Unplug the power cord from the wall outlet. - Page 149 Restart the printer, and then replace the specified print cartridge. CRUM Error Error 094-330 Reseat Transfer Unit Replace the old transfer belt with a new one. Disabled Func Error 016-758 Press OK The function that you are trying to access has been disabled. Enable the function through the printer control panel menus, or contact your printer administrator.
- Page 150 Email Login Error, POP3 Login Failed Error 016-505 Press OK The printer failed to log in to the POP3 server. Verify that the user name and password settings are correct, and then press OK to continue. Email Login Error, SMTP Login Failed Error 016-507 Press OK The printer failed to log in to the SMTP server.
-
Page 151: Invalid Job
Restart Printer Turn the printer off. Unplug the power cord from the wall outlet. Check all cable connections. Connect the power cord to a properly grounded outlet. Turn the printer back on. If the message appears again, contact Customer Support, and report the message. Hard Drive Full Error 016-982 Press OK... - Page 152 Invalid User Error 016-757 Press OK The last person who sent a job to the printer is not authorized to use the printer. Contact your system support person for authorization. Jam at Duplexer Open Door A Lift Belt Unit Paper is jammed inside the printer. Clear the paper path to resume printing. Jam at Exit, Open Door A Paper is jammed inside the printer.
- Page 153 Load Tray <x> Load the specified tray with the correct paper type and size. Login Error Error 016-782 Press OK The printer failed to log in to the server (SMTP/SMB/FTP). Check that the printer is physically connected to the network, verify that the user name and password settings are correct, and then press OK to continue.
- Page 154 Unable to connect to the SMB/FTP server. Check that the printer is connected to the network, and then press OK to continue. Network Scan Error, Directory Not Found Error 016-787 Press OK The directory specified in the address book entry was not found. Correct the address book entry, and then press OK to continue.
-
Page 155: Out Of Memory
Network Scan Error, SMTP Connection Failed Press OK Unable to connect to the SMTP server. Check that the printer is connected to the network, verify that the e-mail server settings are correct, and then press OK to continue. Non-Genuine Toner Installed Error 093-700 An invalid print cartridge is installed. - Page 156 The internal temperature of the printer is too high. Wait one hour before restarting the printer. Ensure that the printer has adequate cooling space around it, and that the cooling vents are not blocked. RAM Error Error 016-3xx Restart Printer Additional memory is not installed correctly, not working correctly, or not supported.
- Page 157 Replace Transfer Unit Soon The transfer belt is nearly exhausted. Order a new transfer belt. Restart Printer: 116-xxx An unspecified printer error has occurred. Turn the printer off. Unplug the power cord from the wall outlet. Check all cable connections. Connect the power cord to a properly grounded outlet.
- Page 158 Restart Printer The scanner lock switch is set to the locked position. Unlock the scanner: Turn the printer off. Open the scanner cover. Move the scanner lock switch to the unlocked position. Understanding printer messages Downloaded From ManualsPrinter.com Manuals...
- Page 159 Close the scanner cover. Turn the printer back on. Select Function The printer is ready to receive print jobs. SMTP Server Error Error 016-766 Press OK An error occurred on the SMTP server. Press OK to continue, and then attempt the operation again. If the message appears again, contact your system support person.
-
Page 160: Maintaining The Printer
Maintaining the printer Periodically, certain tasks are required to maintain optimum print quality. Storing supplies Choose a cool, clean storage area for the printer supplies. Store supplies right side up in their original packing until you are ready to use them. Do not expose supplies to: •... -
Page 161: Cleaning The Scanner Glass
To order supplies in the U.S., contact Lexmark at 1-800-539-6275 for information about Lexmark authorized supplies dealers in your area. In other countries or regions, visit the Lexmark Web Site at www.lexmark.com or contact the place where you purchased the printer. -
Page 162: Ordering A Fuser
Reinsert the print cartridge and continue printing. Note: Repeat this procedure multiple times until the print remains faded, and then replace the cartridge(s). The recommended toner cartridges specifically designed for your printer are: Part name Part number Cyan High Yield Toner Cartridge X560H2CG Magenta High Yield Toner Cartridge X560H2MG... -
Page 163: Locking The Scanner
Follow these guidelines to avoid personal injury or printer damage: • Use at least three people to lift the printer. • Before moving the printer: – Turn it off using the power switch. – Unplug the power cord from the wall outlet. –... -
Page 164: Removing The Printer From The 550-Sheet Drawer
Move the scanner lock switch to the locked position. Close the scanner cover. Removing the printer from the 550-sheet drawer Turn the printer off, and then unplug the power cord from the wall outlet. Disconnect all cables from the back of the printer. Maintaining the printer Downloaded From ManualsPrinter.com Manuals... - Page 165 Grasp the handle, and pull the standard tray (Tray 2) out. Remove the tray completely. Maintaining the printer Downloaded From ManualsPrinter.com Manuals...
- Page 166 Use a coin or similar object to remove the two screws attaching the 550-sheet drawer, and then store them for later use. Lift the printer off the drawer, and set the printer aside. CAUTION—POTENTIAL INJURY: The printer weighs 41 kg (97 lb), and requires at least three people to lift it safely.
-
Page 167: Moving The Printer To Another Location
Moving the printer to another location The printer and options can be safely moved to another location by following these precautions: • Any cart used to move the printer must have a surface able to support the full footprint of the printer. Any cart used to move the options must have a surface able to support the dimensions of the options. -
Page 168: Adjusting The Color Registration
Adjusting the color registration Adjusting the color registration automatically From the printer control panel, press System. Press repeatedly until Admin appears, and then press OK. Press repeatedly until Maintenance appears, and then press OK. Press repeatedly until Adjust ColorRegi appears, and then press OK. Press repeatedly until Auto Correct appears, and then press OK. - Page 169 Press repeatedly until Color Regi Chart appears, and then press OK. Press OK to print the Color Registration Chart. The Color Registration Chart is printed with the new values and the printer returns to Select Function. Verify that 0 is the value nearest the straightest line. If further adjustments are needed, repeat steps 1–10. Maintaining the printer Downloaded From ManualsPrinter.com Manuals...
-
Page 170: Administrative Support
Administrative support Locking the administrator menus Since many people often use a printer, a support person may choose to lock the Admin Menu, Scan and Fax functions, or incoming faxes for security reasons. The following settings are available: Secure setting Description Panel Lock Access to Admin Menu is disabled. -
Page 171: Setting The Auto Reset
Press repeatedly until Admin Menu appears, and then press OK. Press repeatedly until System Settings appears, and then press OK. Press repeatedly until Power Saver Timer appears, and then press OK. Press OK. Press repeatedly until to select Mode 1 (Printer) or Mode 2 (System), and then press OK. Press repeatedly to adjust the time, or use the keypad to enter a value, and then press OK. -
Page 172: Creating An Administrator Password For The Embedded Web Server
Creating an administrator password for the Embedded Web Server Open a Web browser. In the address bar, type the IP address of the printer, and then press Enter. If the Java applet screen appears, click Yes. Click Properties. Under Security, click Administrator Security Settings. Select the Enable Administrator Mode check box. -
Page 173: Troubleshooting
Troubleshooting Online customer support Customer support is available on the Lexmark Web site at www.lexmark.com Checking an unresponsive printer If your printer is not responding, make sure: • The power cord is plugged into the printer and a properly grounded electrical outlet. -
Page 174: Jobs Do Not Print
Jobs do not print These are possible solutions. Try one or more of the following: AKE SURE THE PRINTER IS READY TO PRINT Make sure Select Function appears on the display or the Wake Up light is on before sending a job to print. Press Wake Up to return the printer to Select Function. -
Page 175: Unexpected Page Breaks Occur
Press repeatedly until Nearest Size appears, and then press OK. Press repeatedly until Select Function appears. Unexpected page breaks occur Make sure the printer is on and Select Function appears. From the printer control panel, press System. Press repeatedly until Admin Menu appears, and then press OK. Press repeatedly until System Settings appears, and then press OK. - Page 176 • Missing characters • Faded print • Dark print • Skewed lines • Smudges • Streaks • Unexpected characters • White lines in print These are possible solutions. Try one or more of the following: RE THERE ANY ERROR MESSAGES ON THE DISPLAY Clear any error messages.
-
Page 177: Partial Document Or Photo Copies
Press repeatedly until Standard or Enhanced appears, and then press OK. Press repeatedly until Select Function appears. HECK THE QUALITY OF THE ORIGINAL DOCUMENT Make sure the quality of the original document is satisfactory. HECK THE DOCUMENT PLACEMENT Make sure the document or photo is loaded facedown on the scanner glass in the upper left corner. Partial document or photo copies These are possible solutions. -
Page 178: Scanning Takes Too Long Or Freezes The Computer
N ERROR MAY HAVE OCCURRED IN THE PROGRAM Turn off and then restart the computer. Scanning takes too long or freezes the computer These are possible solutions. Try one or more of the following: O YOU HAVE ANY OTHER SOFTWARE PROGRAMS RUNNING Close all programs not being used. -
Page 179: Partial Document Or Photo Scans
Partial document or photo scans These are possible solutions. Try one or more of the following: HECK THE DOCUMENT PLACEMENT Make sure the document or photo is loaded facedown on the scanner glass in the upper left corner. HECK THE APER IZE SETTING Make sure the Paper Size setting matches the paper loaded in the tray. - Page 180 HECK THE TELEPHONE WALL JACK Plug a telephone into the wall jack. Listen for a dial tone. If you do not hear a dial tone, plug a different telephone into the wall jack. If you still do not hear a dial tone, plug a telephone into a different wall jack. If you hear a dial tone, connect the printer to that wall jack.
-
Page 181: Can Send But Not Receive Faxes
HECK THE COUNTRY CODE From the printer control panel, press System. Press repeatedly until Admin Menu appears, and then press OK. Press repeatedly until Fax Settings appears, and then press OK. Press repeatedly until Country appears, and then press OK. Press repeatedly until the desired country or region appears, and then press OK. -
Page 182: Received Fax Has Poor Print Quality
AKE SURE PEED IAL IS SET UP PROPERLY • Check to make sure Speed Dial has been programmed for the number that you want to dial. • As an alternative, dial the telephone number manually. Received fax has poor print quality These are possible solutions. -
Page 183: Drawers
AKE SURE THE OPTION IS SELECTED From the program you are using, select the option. Drawers AKE SURE THE PAPER IS LOADED CORRECTLY Open the paper tray. Check for paper jams or misfeeds. Make sure paper guides are aligned against the edges of the paper. Make sure the paper tray closes properly. -
Page 184: Solving Print Quality Problems
Solving print quality problems The information in the following topics may help you solve print quality problems. If these suggestions still do not correct the problem, call Customer Support. You may have a printer part that requires adjustment or replacement. Repeating defects These are possible solutions. -
Page 185: Light Colored Line, White Line, Or Incorrectly Colored Line
Color has shifted outside of the appropriate area or has been superimposed over another color area. • Remove and reinstall the print cartridges. • Adjust the color registration: From the printer control panel, press System. Press repeatedly until Admin appears, and then press OK. Press repeatedly until Maintenance appears, and then press OK. -
Page 186: Streaked Vertical Lines
Streaked vertical lines ABCDE ABCDE ABCDE These are possible solutions. Try one or more of the following: S THE TONER SMEARED Try feeding from another tray. S A PRINT CARTRIDGE DEFECTIVE Replace the print cartridge causing the streaks. S THE TRANSFER BELT DEFECTIVE Replace the transfer belt. -
Page 187: Print Irregularities
Print irregularities These are possible solutions. Try one or more of the following: AS THE PAPER ABSORBED MOISTURE DUE TO HIGH HUMIDITY • Load paper from a fresh package. • Store paper in its original wrapper until you use it. AKE SURE THE APER YPE SETTING MATCHES THE PAPER LOADED IN THE TRAY... -
Page 188: Transparency Print Quality Is Poor
Transparency print quality is poor These are possible solutions. Try one or more of the following: AKE SURE THE TRANSPARENCIES YOU ARE USING MEET THE PRINTER SPECIFICATIONS Use only transparencies recommended by the printer manufacturer. AKE SURE THE EDIA YPE SETTING IS SET TO RANSPARENCY From Print Properties, change the Media Type setting to Transparency. -
Page 189: Blank Pages
Blank pages These are possible solutions. Try one or more of the following: S THE TONER LOW When Replace <color> Print Cartridge Soon appears or when the print becomes faded, you may be able to extend the life of the print cartridge: Remove the specified print cartridge. -
Page 190: Solid Color Pages
Solid color pages These are possible solutions. Try one or more of the following: S A TONER CARTRIDGE DEFECTIVE Replace the toner cartridge. OES THE PRINTER NEED TO BE SERVICED Contact Customer Support. Paper curl These are possible solutions. Try one or more of the following: AKE SURE THE APER YPE SETTING MATCHES THE PAPER LOADED IN THE TRAY... -
Page 191: Toner Rubs Off
S THE FUSER DEFECTIVE OR WORN Replace the fuser. S THERE TONER IN THE PAPER PATH If there is excess toner in the paper path, contact Customer Support. Toner rubs off These are possible solutions. Try one or more of the following: HECK THE APER YPE SETTING... -
Page 192: Contacting Customer Support
You need to know your printer model type and serial number. For more information, see the label on the inside top front cover of the printer. The serial number is also listed on the menu settings page. In the U.S. or Canada, call (1-800-539-6275). For other countries/regions, visit the Lexmark Web site at www.lexmark.com. -
Page 193: Notices
The following paragraph does not apply to any country where such provisions are inconsistent with local law: LEXMARK INTERNATIONAL, INC., PROVIDES THIS PUBLICATION “AS IS” WITHOUT WARRANTY OF ANY KIND, EITHER EXPRESS OR IMPLIED, INCLUDING, BUT NOT LIMITED TO, THE IMPLIED WARRANTIES OF MERCHANTABILITY OR FITNESS FOR A PARTICULAR PURPOSE. -
Page 194: Industry Canada Compliance Statement
Note: To assure compliance with FCC regulations on electromagnetic interference for a Class B computing device, use a properly shielded and grounded cable such as Lexmark part number 1021231 for parallel attach or 1021294 for USB attach. Use of a substitute cable not properly shielded and grounded may result in a violation of FCC regulations. - Page 195 Hereby, Lexmark International, Inc., declares that this type of equipment is in compliance with the essential requirements and other relevant provisions of Directive 1999/5/EC. Español Por medio de la presente, Lexmark International, Inc. declara que este producto cumple con los requisitos esenciales y cualesquiera otras disposiciones aplicables o exigibles de la Directiva 1999/5/CE.
-
Page 196: Noise Emission Levels
Íslenska Hér með lýsir Lexmark International, Inc. yfir því að þessi vara er í samræmi við grunnkröfur og aðrar kröfur, sem gerðar eru í tilskipun 1999/5/EC. Italiano Con la presente Lexmark International, Inc. dichiara che questo questo prodotto è conforme ai requisiti essenziali ed alle altre disposizioni pertinenti stabilite dalla direttiva 1999/5/CE. - Page 197 The WEEE logo signifies specific recycling programs and procedures for electronic products in countries of the European Union. We encourage the recycling of our products. If you have further questions about recycling options, visit the Lexmark Web site at www.lexmark.com for your local sales office phone number. Ozone emissions statement A standard for ozone emissions has been established by IEC 60950-1.
-
Page 198: Notice To Users Of The Canadian Telephone Network
If you experience trouble with this equipment, for repair or warranty information, contact Lexmark International, Inc. at www.lexmark.com or your Lexmark representative. If the equipment is causing harm to the telephone network, the telephone company may request that you disconnect the equipment until the problem is resolved. -
Page 199: Notice To Users Of The New Zealand Telephone Network
Avis réservé aux utilisateurs du réseau téléphonique du Canada Ce produit est conforme aux spécifications techniques d’Industrie Canada. Le numéro REN (ringer equivalence number : numéro d’équivalence de sonnerie) fournit une indication du nombre maximum de terminaux pouvant être connectés à l’interface téléphonique. En bout de ligne, le nombre d’appareils qui peuvent être connectés n’est pas directement limité, mais la somme des REN de ces appareils ne doit pas dépasser cinq. -
Page 200: Energy Star
Using this product in Switzerland This product requires a Swiss billing tone filter (Lexmark part number 14B5109 or 80D1877) to be installed on any line which receives metering pulses in Switzerland. The Lexmark filter must be used, as metering pulses are present on all analog telephone lines in Switzerland. -
Page 201: Laser Notice
The power consumption levels listed in the previous table represent time-averaged measurements. Instantaneous power draws may be substantially higher than the average. Values are subject to change. See www.lexmark.com for current values. Notices Downloaded From ManualsPrinter.com Manuals... -
Page 202: Power Saver
—Is manufactured from new parts, or new and serviceable used parts, which perform like new parts —Is, during normal use, free from defects in material and workmanship If this product does not function as warranted during the warranty period, contact a Remarketer or Lexmark for repair or replacement (at Lexmark's option). -
Page 203: Extent Of Limited Warranty
Remarketer or Lexmark, or ship it prepaid and suitably packaged to a Lexmark designated location. You are responsible for loss of, or damage to, a product in transit to the Remarketer or the Lexmark designated location. -
Page 204: Limitation Of Liability
Lexmark's liability for actual damages from any cause whatsoever will be limited to the amount you paid for the product that caused the damages. This limitation of liability will not apply to claims by you for bodily injury or damage to real property or tangible personal property for which Lexmark is legally liable. -
Page 205: Index
Index Numerics partial document or photo copies 177 550 Feeder Error 148 cables, attaching poor copy quality 175 550-sheet drawer Ethernet 40 poor scanned image quality 178 installing 32 USB 40 scanner unit does not close 175 550-sheet tray calling Customer Support 192 copying loading 44 canceling... - Page 206 documents e-mail group making a fax lighter or darker 97 scanning text for editing 71 creating using the Embedded Web printing fax reports 93 documents, printing Server 80 printing secure faxes 92 from Macintosh 58 selecting the type of document from Windows 58 being faxed 96 Door A Open, Close Door A 149...
- Page 207 Insert Transfer Unit 151 memory card NV RAM Error 155 Insert Tray 2 151 installing 37 installing printer software 58 menus Invalid Job 151 Address Book menu 131 OCR, editing document text 71 Invalid User 152 Admin Reports menu 146 online customer support 173 Billing Meters 131 options...
- Page 208 print job Controller Error 148 Network Scan Error, Invalid Write canceling from Mac OS X 61 CRUM Error 149 Permission 154 canceling from Windows Cyan - CRUM Error 148 Network Scan Error, Server Out of desktop 61 Disabled Func 149 Memory 154 canceling from Windows Door A Open, Close Door A 149...
- Page 209 receiving a fax scan troubleshooting scanning to a computer over a enabling secure faxes 92 cannot scan from a network 77 printing secure faxes 92 computer 179 scanning to an e-mail address 81 setting the fax receive mode 91 partial document or photo scanning to an FTP address 78 recycled paper scans 179...
- Page 210 supplies, ordering troubleshooting, print fuser 162 incorrect margins 188 volume settings 95 toner cartridges 161 job takes longer than transfer belt 162 expected 174 supply information, printing 58 jobs do not print 174 Wrong Paper Type 159 System Settings menu 140 multiple-language PDFs do not print 173 paper curl 190...
Need help?
Do you have a question about the X560n and is the answer not in the manual?
Questions and answers