Table of Contents
Advertisement
Advertisement
Table of Contents

Related Manuals for Tunstall ConnectMe Tunstall Vi+


Summary of Contents for Tunstall ConnectMe Tunstall Vi+
- Page 1 ConnectMe Tunstall Vi+ Installation and Programming Guide...
-
Page 2: Table Of Contents
Telephone numbers & IDs ....................35 Call sequences ....................... 35 Away button options ......................35 Radio triggers ........................35 Periodic calls ........................35 Backup battery monitoring ....................36 Intruder monitoring ......................37 Event configuration ......................37 ConnectMe Tunstall Vi+ Installation and Programming Manual... - Page 3 Radio interference monitor ....................45 Voice announcer function ....................46 Alarm control by time ..................... 47 Times when voice announcer messages are played (Tunstall Vi+ only) ......47 Critical visits ........................48 Auto Answer ........................48 Keyless entry ........................48 Virtual Sensors .......................
-
Page 4: Installation Guide
Telephone Telephone Mains lead (3 adaptor adaptor (3 lead (3 adaptor adaptor (3 metre metre metre metre cable) cable) cable) cable) If any of the above items are missing, please contact your supplier. ConnectMe Tunstall Vi+ Installation and Programming Manual... -
Page 5: Bottom View
Your home unit Top View Bottom View Rear View ConnectMe Tunstall Vi+ Installation and Programming Manual... -
Page 6: For Your Safety - Installation Advice
Safe Socket™ Alternatively a Safe Socket (part number TSSAUS01)can be installed on all extensions used by other equipment, except the Tunstall, to ensure that alarm calls are raised even when the line is being used by another extension. Contact your supplier for more information. -
Page 7: Quick Start Guide
NOTE: Only use with the power adaptor supplied with the home unit (part numberT0910TUN). (The DL1 will have a new 12v adaptor. Not sure if this P/N is correct) ConnectMe Tunstall Vi+ Installation and Programming Manual... - Page 8 Then hold the Tunstall Vi+ in a horizontal position and use the two wall mount markers (see diagram below) to accurately mark the wall. Drill 2 holes 40 mm apart, firmly attach screws (not supplied) leaving the screw heads protruding from the surface and then locate the wall mounting points on the back of home unit with the screws.
-
Page 9: Fitting The Table Stand (D5102132)
Table stand / Wall bracket (optional) An optional table stand and wall bracket are available for the Tunstall Vi+,see part numbers below. Fitting the Table Stand (D5102132) This allows the buttons and speaker to be angled towards the user. This also covers where the cables connect to the unit, this can help prevent accidental unplugging of cables. -
Page 10: Fitting The Wall Bracket (D5102130)
Fitting the wall bracket (D5102130) The Tunstall Vi+ can be wall mounted using the optional bracket, this conceals the cables where they connect to the unit. UK/EU/USA/AU ConnectMe Tunstall Vi+ Installation and Programming Manual... -
Page 11: Using The Home Unit
To end a handsfree call, press the red button on the personal radio trigger again or press the cancel button. Calls can also be answered in handsfree mode at the home unit by pressing the cancel button. ConnectMe Tunstall Vi+ Installation and Programming Manual... -
Page 12: Status Warnings
If the power failure lasts for more than 1 hour, during the next hour the unit will automatically call the monitoring centre. A call will be raised every 4 hours to the monitoring centre until the power is restored. The battery provides 40 hours back-up. ConnectMe Tunstall Vi+ Installation and Programming Manual... -
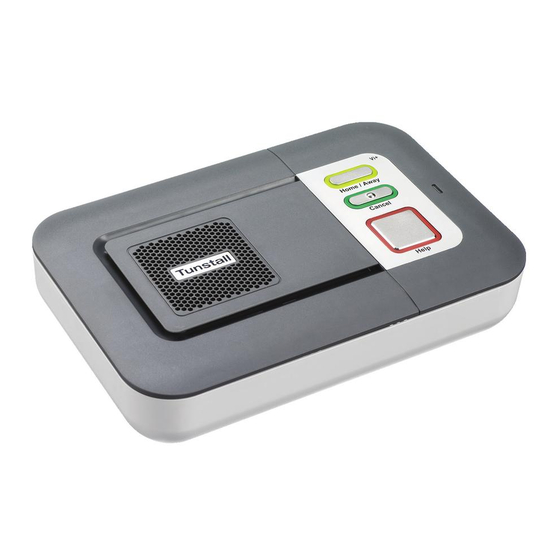
Page 13: The Lights On The Home Unit Indicate
When the personal radio trigger is pressed, the red LED will light up. This is to indicate that the button has been pressed. If the LED flashes when pressed this indicates that the personal radio trigger battery is low and should be replaced. You ConnectMe Tunstall Vi+ Installation and Programming Manual... -
Page 14: Programming A Telecare Sensor To The Home Unit
(press and hold down the green cancel button until it bleeps). When in programming mode, press the required personal trigger if it is within range the home unit will bleep and announce the trigger or telecare sensor type. ConnectMe Tunstall Vi+ Installation and Programming Manual... -
Page 15: Cleaning The Home Unit
NOTE: Do not touch the speaker when the speaker cover has been removed. Maintenance The unit contains no user serviceable parts. The Tunstall home unit battery should be replaced immediately upon receipt of a battery failure alarm or after 5 years. - Page 16 The following table provides an overview of which features can be configured using the above programming tools. For a full list of which features each Tunstall home unit can support, please see the ‘Features at a glance’ section.
- Page 17 None Configuration Time Windows Full None None None None * Auto Presence is not supported in the UK ** Programming home units using manual entry should only be done when advised by Tunstall. ConnectMe Tunstall Vi+ Installation and Programming Manual...
-
Page 18: How To Program Via Pc Connect Programming Software
Manual entry of parameters can also be completed via this method, however this should only be used when advised by Tunstall. How to program using the Installer Keypad Step 1 – Connect the installer keypad to the AUX socket on the Tunstall ConnectMe Tunstall Vi+ Installation and Programming Manual... -
Page 19: Frequently Used Series Telephone Codes
3020. The unit will then announce the date and time. During the first 30 minutes of installation the Tunstall Vi+ will also announce the date and time when an incoming telephone call is received (requires CLI on the telephone line). - Page 20 A CC call expects a particular handshake from the control centre, a PR call requires a recipient with a touch tone telephone and a POTS call is a normal telephone call (i.e. fast dial button). ConnectMe Tunstall Vi+ Installation and Programming Manual...
- Page 21 NOTE: If no unit ID is linked to a telephone number, the first valid code will be used. The actual number of digits sent to the alarm receiver depends upon the type of monitoring centre being used. Please contact your monitoring centre for more information. ConnectMe Tunstall Vi+ Installation and Programming Manual...
- Page 22 STMF for subsequent alarm dial attempts and will then continue to use STMF in preference to DTMF for all future alarm calls. Using the following quick codes, Tunstall Vi+ home units can easily be set to use DTMF or STMF or automatically choose.
- Page 23 Disable Line Disconnect Audio Warning? Mains Fail Audio Warning? 61 60 45 44 01 00 ConnectMe Tunstall Vi+ Installation and Programming Manual...
-
Page 24: Quick Codes
Quick Codes The Tunstall Vi+ home unit has a number of quick codes that can be entered into the series telephone when the home unit is in programming mode or remotely via PNC4 (v2.5.1) and PNC5/6. Quick Purpose Comments Code... - Page 25 Make all event calls silent and visual Alarm button will flash 9108 Make all event calls silent and non visual Alarm button does not flash 9103 Restore all event calls to default states ConnectMe Tunstall Vi+ Installation and Programming Manual...
-
Page 26: Installer Keypad (51900/10)
This will displays current value of the specified parameter e.g. might show *2*995EEEEEEEEEEEEE Note that “E” denotes an “empty” digit. This is shown when reading a parameter but will be added automatically when programming new values. ConnectMe Tunstall Vi+ Installation and Programming Manual... -
Page 27: Quickcodes
It is possible to program the first 4 telephone numbers using the following sequence, to program the remaining telephone numbers use the manual entry method. Monitoring centre numbers Monitoring centre numbers are programmed by pressing To add: Tel. No. (max 16 digits) ConnectMe Tunstall Vi+ Installation and Programming Manual... - Page 28 A prefix number can be inserted before all dialed numbers from the keypad e.g. dialing 9 when using a PBX. This can be achieved by pressing: Enable 0 1 2 prefix (max 8 digits) Disable 0 1 2 ConnectMe Tunstall Vi+ Installation and Programming Manual...
-
Page 29: Call Sequences
10 therefore the call sequence used is as follows: Only personal recipient numbers 1-3 programmed The following call sequence is used: Both monitoring centre and personal recipient numbers 1-3 programmed The following call sequence is used: ConnectMe Tunstall Vi+ Installation and Programming Manual... -
Page 30: Unit Id Number
Some features can also be configured in the required way, for more information see the section ‘Features explained and configuring settings’ on page 23. To turn a feature ON, press: X X X ConnectMe Tunstall Vi+ Installation and Programming Manual... -
Page 31: Features List
Temporarily puts the unit in range Range test test mode. Press cancel key to exit. All features are set to the original Reset unit factory settings. ConnectMe Tunstall Vi+ Installation and Programming Manual... -
Page 32: Inactivity Monitoring
NOTE: To avoid false calls to the monitoring centre, inactivity monitoring should be de-activated when the user leaves their home. Activate (home mode) - press the away button De-activate (away mode) - press the blue away button ConnectMe Tunstall Vi+ Installation and Programming Manual... -
Page 33: Reminder Functionality
(IVR) system. Listening to a reminder message When a message is due to be played, the Tunstall home unit will bleep and announce ‘Reminder’ every 30 seconds. The user must press the cancel button to hear the message. If the user does not acknowledge the message then a ‘reminder- no acknowledge’... -
Page 34: Saving Unit Templates
Delete Template from Keypad To delete a template press followed by the source template ( key, which must be held for 3 seconds, then press the key. ConnectMe Tunstall Vi+ Installation and Programming Manual... -
Page 35: Features Explained
Radio triggers The Tunstall Vi+ supports up to 35 telecare sensors/radio triggers. Using PC Connect the radio triggers can be set up with the correct trigger type, location code and usage e.g. whether it is used as part of a virtual sensor. -
Page 36: Backup Battery Monitoring
Alerts received when no mains failure alerts have been received relate to a battery fault or failure. Such alerts should be dealt with promptly by replacing the unit’s back up battery. These can be ordered from Tunstall using part number D3316093A. This supports battery management procedures and in particular avoids the need to carry out the 6 monthly unit battery tests as previously recommended and will also raise alerts to any battery failures at the earliest opportunity. -
Page 37: Intruder Monitoring
The events are split into the following categories: Buttons Virtual sensors (Tunstall Vi+ only) Faults Telephony Misc. ConnectMe Tunstall Vi+ Installation and Programming Manual... -
Page 38: Hardwired Input
Where xx is TT21 location code, see table 2 Hardwired output The hardwired output in the Tunstall Vi+ home unit provides common (COM), normally closed (NC) and normally open (NO) contacts. Its operation can be controlled via a series telephone using the quick codes below, or by setting the correct boxes in the Remote Output Control of PC Connect or remotely by a PNC5/6 monitoring centre. -
Page 39: Fault Monitoring
Inactivity monitoring has three different modes, Tunstall Vi+ supports all three modes. Mode 1 - Simple – generates an alarm if the user is inactive for a configurable 12 or 24 hour period (continuous period). -
Page 40: Personal Recipient Messages
‘This is an alarm call from’ followed by either the Unit ID or a recorded message e.g. Mrs Smith (Tunstall Vi+ only – see next section). The recipient can then handle the call using their keypad as follows:... -
Page 41: Reminder Functionality (Tunstall Vi+ Only)
No guarantee of actual compliance should be relied upon when using this feature. Tunstall Vi+ is not a medical device and Tunstall is not responsible for any outcome associated with the programming or use of the reminder facility. - Page 42 Recording reminder messages via a series telephone keypad To record a reminder message: Firstly enter programming mode on the Tunstall home unit by holding the cancel button down until it beeps, then press the following on the connected telephone keypad.
-
Page 43: Pendant Test Reminders
The quick code will not result in any calls being transmitted to the monitoring centre. NOTE: Pendant test reminders are handled in the background of PNC5/6 if all the steps are completed by the user. ConnectMe Tunstall Vi+ Installation and Programming Manual... -
Page 44: Ambient Temperature Sensor
This can be enabled using PC Connect. When enabled it is important to position the Tunstall Vi+ in a place that is likely to provide a representative temperature of the home environment. Locations that are likely to be in direct sunlight, draughty, close to windows/doors or close to heating/cooling appliances (radiators, ovens, air conditioning etc.) should be avoided. -
Page 45: Radio Interference Monitor
The operator should also check the calls history for the user to ascertain if the interference is a one off or constantly repeating. Presuming no obvious cause can be ConnectMe Tunstall Vi+ Installation and Programming Manual... -
Page 46: Voice Announcer Function
‘radio trigger & events’ sections within PC Connect. To record a voice announcer message: Firstly enter programming mode on the Tunstall home unit by holding the cancel button down until it beeps, then press the following on the connected telephone keypad. -
Page 47: Alarm Control By Time
Alarm control by time This feature allows specific events to be inhibited by the Tunstall home unit outside a specific time period. This is only relevant to a small number of events, for example, when monitoring room temperatures you may wish to ignore temperatures below the threshold during the night when the resident is likely to be in bed. -
Page 48: Critical Visits
Access Trigger after an alarm call has been raised on the unit. An electronic door lock must have been fitted to the door for this function to work correctly. For more advice contact the Telecare Helpdesk 1800 196 149 (AU) or 0800 488 678 (NZ). ConnectMe Tunstall Vi+ Installation and Programming Manual... -
Page 49: Virtual Sensors
Virtual PES which can be used to monitor multiple doors. It is also possible to monitor weekdays, weekends or both. NOTE: The home unit’s clock must be set to operate virtual sensors. ConnectMe Tunstall Vi+ Installation and Programming Manual... -
Page 50: Adlife
How to set up ADLife 1. Obtain an ADLife ID number from Tunstall – this will be supplied when you take out a 12 month ADLife licence with Tunstall 2. - Page 51 PC Connect is used to configure ADLife. The following steps are required: - 1. Setting the PNC5/6 number - If the Tunstall Vi+ is required to send ADLife data to a different PNC5/6 (than normal alarm calls), it is necessary to set up the alarm numbers and call sequence for ADLife calls.
- Page 52 PNC5/6 numbers required to receive ADLife data calls. Click OK to exit the screen. 2. Configuring the ADLife Data Event - The next step is to configure the Tunstall Vi+ home unit’s response to the ADLife Data event. Click on the Events Configuration icon (on the main PC Connect screen), the Event Configuration screen will open.
- Page 53 ADLife Configuration screen. b. Tick the Enable ADLife box c. Enter the ADLife ID (supplied by Tunstall) d. Enter the time at which the ADLife data will be sent to the PNC5/6 monitoring centre. This is recommended to be between 03:00 and 04:00 (24 hour format) e.
-
Page 54: Table 1 – Tt92 Codes
Gas detector auto low bat ROM 3 event 2 Door left open ROM 3 event 3 Property exit ROM 3 event 4 Property exit auto low bat ROM 3 auto low bat Living room area not spec ConnectMe Tunstall Vi+ Installation and Programming Manual... -
Page 55: Table 2 - Tt21/Bs8521 Location Codes
Living area (other) Living area Living area (other) Living area Living area (other) Hall/stairs Landing Hall Hallway (upstairs) Landing Landing Stairs Stairs (main) Hall/stairs Stairs (other) Hall/stairs Stairs (other) Hall/stairs Stairs (other) Hall/stairs Stairs (other) ConnectMe Tunstall Vi+ Installation and Programming Manual... -
Page 56: Table 3 - Trigger Type Codes
Fault status (alarm not active) Personal Trigger AP Restore Personal Trigger 1 In service (fault rectified) TES High Temp High Temperature Normal default TES High Temp (LB) High Temperature Low battery status set ConnectMe Tunstall Vi+ Installation and Programming Manual... - Page 57 Bed/Chair Not in Bed Occupancy Normal default Bed/Chair Not in (LB) Bed Occupancy Low battery status set Bed/Chair Not up Bed Occupancy Normal default Bed/Chair Not up (LB) Bed Occupancy Low battery status set ConnectMe Tunstall Vi+ Installation and Programming Manual...
- Page 58 ROM # 2 Event #1 Fixed trigger 1 Normal default ROM # 2 Event #1 (LB) Fixed trigger 1 Low battery status set ROM # 2 Event #2 Fixed trigger 1 Normal default ConnectMe Tunstall Vi+ Installation and Programming Manual...
- Page 59 Electrical Usage Sensor ON (LB) Fixed trigger 2 Low battery status set Electrical Usage Sensor OFF Fixed trigger 3 Normal default Electrical Usage Sensor OFF (LB) Fixed trigger 4 Low battery status set ConnectMe Tunstall Vi+ Installation and Programming Manual...
- Page 60 Low battery status set Keypad Event 3 Activation Fixed trigger 1 Normal default Keypad Event 3 Activation (LB) Fixed trigger 1 Low battery status set Keypad Event 4 Activation Fixed trigger 1 Normal default ConnectMe Tunstall Vi+ Installation and Programming Manual...
- Page 61 System status Fault status (alarm not active) Battery Charged Battery Normal default Fault #10 System status Fault status (alarm not active) Door Call System status Normal default Ringing start System status Normal default ConnectMe Tunstall Vi+ Installation and Programming Manual...
- Page 62 Fixed trigger 1 Normal default Test Alarm Not Confirmed (Red Button) Fixed trigger 1 Normal default Test Alarm Not Confirmed (Pendant) Fixed trigger 1 Normal default Radio Blocking Radio receiver Fault status (alarm not active) ConnectMe Tunstall Vi+ Installation and Programming Manual...
-
Page 63: Technical Details
Our policy of continual development means that product specification and appearance may change without notice. Tunstall does not accept any responsibility for any errors or omissions contained in this document. © 2012 Tunstall Healthcare Group Ltd. ® TUNSTALL and TUNSTALL are registered trademarks.
Need help?
Do you have a question about the ConnectMe Tunstall Vi+ and is the answer not in the manual?
Questions and answers