Table of Contents
Advertisement
Advertisement
Table of Contents

Related Manuals for Spy Tec G1W-C

Summary of Contents for Spy Tec G1W-C
- Page 1 G1W-C Dash Camera User Manual Spy Tec www.spytecinc.com...
-
Page 2: Table Of Contents
Accessing, Adding and Deleting Files Specifications Precautions Frequently Asked Questions (FAQs) How do I unfreeze the device? Why is there unexpected interference? Why is the file length inconsistent? Why won’t the camera auto-start? What is the battery life? Spy Tec Spy Tec www.spytecinc.com www.spytecinc.com... -
Page 3: Getting Started
• 2.7" screen • Lightweight • Tilting suction mount • Loop Recording • Functions as a regular camera or dash camera • Works only with continual power supply • Capacitor Model for Improved Operating Temperature Spy Tec Spy Tec www.spytecinc.com www.spytecinc.com... -
Page 4: Powering Up The Device
Plug the USB cable into the back of the dash cam device via the small USB port and attach the cord to the external power supply via the larger USB port (computer or adapter) or use the car charger. Spy Tec Spy Tec www.spytecinc.com... -
Page 5: Micro Sd Memory Card For Data Storage
(not included). Place the Micro SD memory card (up to 64 GB), text facing upwards, into the slot and push in until it clicks into place. To remove or replace the Micro SD memory card, simply push in until it clicks in/out of place. Spy Tec Spy Tec www.spytecinc.com www.spytecinc.com... -
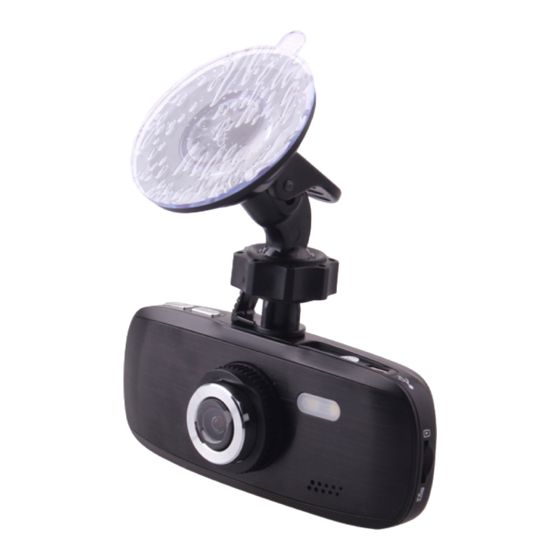
Page 6: Attaching The Device To Tilting Suction Mount
Now you may remove the clear film on the suction and attach to the glass surface. To remove the suction mount, pull the tag on the right-facing side of the suction and gently pull off the glass surface to detach. 1. G1W-C with Mount Spy Tec Spy Tec www.spytecinc.com... -
Page 7: Menu Options
Buttons are also located on each side of the viewing screen: Up Arrow Navigates the selection options upward Down Arrow Navigates the selection options downward Makes a selection, begins recording or captures an image MODE Changes mode Spy Tec Spy Tec www.spytecinc.com www.spytecinc.com... -
Page 8: Video Menu
To enable or disable motion detection, select the Motion Detection option from the Menu and navigate using the Up and Down buttons to the left of the screen to select On or Off and follow by pressing the REC button. Spy Tec Spy Tec www.spytecinc.com... -
Page 9: Record Audio
By selecting Auto Power Off in the menu, the camera is able to set off automatically after 3 Minutes, 5 Minutes or 10 Minutes. This may be disabled by selecting Off in the menu. After highlighting the selection, press the REC button to update settings. Spy Tec Spy Tec www.spytecinc.com... -
Page 10: Beep Sound
Otherwise, this setting allows all other previous changes to default back to factory settings. To go back to default settings, choose Default Settings from the menu and press the REC button. A prompt will ask you to confirm your selection. Spy Tec Spy Tec www.spytecinc.com... -
Page 11: Version
(compressing the image for clarity). Select the Sharpness option from the Menu and navigate using the Up and Down buttons to the left of the screen to select Strong, Normal or Soft and press the REC button. Spy Tec Spy Tec www.spytecinc.com... -
Page 12: White Balance
This setting is not accessible. Date Stamp The date stamp may be enabled or disabled by selecting Date Stamp from the menu. Select either On or Off and press the REC button to save changes. Spy Tec Spy Tec www.spytecinc.com www.spytecinc.com... -
Page 13: Still Capture Settings
Video Recording When the G1W-C is powered on, it automatically goes to the Video screen. To start recording, press the REC button. To end recording, press the REC button again. To have automatic recording take place upon powering the device, adjust settings as explained in the previous section (Video Settings, 9). - Page 14 Removable Disk with Music, Picture and Video folders. Each folder contains files as stored on the device’s Micro SD card. These files may be moved, deleted, dragged/dropped or copied/pasted as needed. Spy Tec Spy Tec www.spytecinc.com www.spytecinc.com...
-
Page 15: Specifications
Built-in Microphone/Speaker (AAC) Codec MPEG4 G-Sensor Support Memory External media: SDHC Supports 64 GB Max, microSD card (NOT Included) Interface USB/HDMI/AV/Micro SD card slot Motion Detection Support Shutter Electronic shutter Battery 3.7V 300mAh Poly Spy Tec Spy Tec www.spytecinc.com www.spytecinc.com... -
Page 16: Precautions
Any previously stored data will be lost after reformatting the card. • The security and integrity of the internal files on the G1W-C are not covered under warranty. • Do not adjust settings or placement while driving. -
Page 17: Frequently Asked Questions (Faqs)
On. Why is the file length inconsistent? Go to the Loop recording settings and select a set time frame for recording. Why won’t the camera auto-start? The camera may be set to motion detection. Spy Tec Spy Tec www.spytecinc.com www.spytecinc.com...
Need help?
Do you have a question about the G1W-C and is the answer not in the manual?
Questions and answers